
Popular categories
Looking for a yarn?


Comments / Questions (23)
![]() Anna wrote:
Anna wrote:
Ska man efter de första 21 raglanökningarna i storlek xl räkna med de 16 maskorna för knappslån? Jag har 353 maskor efter 21 ökningar men ska enligt mönster ha 369.
17.10.2024 - 19:16DROPS Design answered:
Hej Anna. Ja du ska räkna med de 16 framkantsmaskorna. Mvh DROPS Design
18.10.2024 - 14:20
![]() Nathalie wrote:
Nathalie wrote:
Hallo, ich würde die Jacke gerne mit einem anderen, weniger "kratzigen" Garn, z.B. dem Baby Merino stricken. Würde das klappen? Danke!
15.10.2024 - 12:54DROPS Design answered:
Liebe Nathalie, sicher, benutzen Sie den Garnumrechner um die verschiedene Garnalternative (einschl. Baby Merino) sowie die neue passende Garnmenbe zu finden. Viel Spaß beim Stricken!
15.10.2024 - 16:50
![]() Carmen Carvajal wrote:
Carmen Carvajal wrote:
Buenas noches. Por mí medida de cadera, he calculado que necesito la talla XL. A mí, me da la impresión que los 153 puntos para empezar el escote es una cantidad muy grande. No veo posible que me pueda quedar recogido alrededor del cuello. Podrían hacerme alguna sugerencia para afrontar esta situación? Gracias. Espero su respuesta, un saludo
12.10.2024 - 02:13DROPS Design answered:
Hola Carmen, después de montar trabajarás el elástico, por lo que el cuello quedará recogido. Puedes ver esto en las fotos. La cantidad de puntos es correcta. La forma del escote es bastante amplia. Ten en cuenta que no hay aumentos entre el cuello y el canesú, por eso hay más puntos. Si lo prefieres, puedes trabajar un cuello más cerrado y después aumentar al número de puntos necesario para seguir con el canesú.
13.10.2024 - 22:47
![]() Petra Ruchay wrote:
Petra Ruchay wrote:
Warum nimmt man zu Beginn der Blende mit einer kleineren Nadelstärke Maschen zu? Wenn man die ursprüngliche Nadelstärke beibehält und keine Maschen zunimmt ist das Bündchen doch genauso breit .(?) Was ist denn der Grund für diese Art das Bündchen zu stricken?
11.10.2024 - 20:22DROPS Design answered:
Liebe Frau Ruchay, mit derselben Nadelgrösse braucht man mehr Maschen für Bündchen als für Glattrechts, mit kleineren Nadeln braucht man dann eben mehr Maschen; deshalb wird man hier zunehmen (das untere Bündchen muss die Arbeit hier nicht zusammenziehen). Viel Spaß beim Stricken!
14.10.2024 - 07:46
![]() Lefebvre Catherine wrote:
Lefebvre Catherine wrote:
Bonjour;voilà ,je suis au niveau du raglan ,en partie 2:tous les 2 rangs pour le devant et le dos et tous les 4rangs pour les manches ,cela fait 1fois sur 2 ;4et8 mailles pourquoi 8fois pour le dos et les devants et seulement 4 fois pour les manches ? la ça m'interroge.sans doute il y a une explication ,quelque chose qui m'échappe.Merci d'avance pour votre réponse.
08.10.2024 - 16:49DROPS Design answered:
Bonjour Mme Lefebvre, on augmente plus souvent sur le dos et les devants pour éviter que les manches ne soient trop large, donc en taille S, on va augmenter 8 fois tous les 2 tours pour le dos/les devants et 4 fois tous les 4 tours pour les manches, vous allez donc tricoter ainsi (1 tour avec 4 augmentations (dos/devants), 1 tour sans, 1 tour avec 8 augmentations (comme avant, dos, devants et manches), 1 tour sans), répétez de (à) 8 fois au total = vous augmentez encore 8 fois pour le dos/les devants et 4 fois seulement pour les manches. Bon tricot!
09.10.2024 - 07:49
![]() Christine wrote:
Christine wrote:
Bonjour. A la fin de mon ouvrage , j\'ai le côté droit est plus long que le gauche, comment les avoir de même longueur. Merci de votre réponse. Cordialement, Christine C.
08.10.2024 - 12:46DROPS Design answered:
Bonjour Christine, pourriez-vous nous en dire plus? Comme on tricote tout l'empiècement en une seule pièce, puis le dos et les devants en une seule pièce, le devant droit doit avoir la même longueur que le devant gauche. Bon tricot!
09.10.2024 - 08:53
![]() Mies Vanderheyden wrote:
Mies Vanderheyden wrote:
Er staat een fout in het patroon. voor een XL moet je maar 10 x meerderen in de ranglan en voor maat L 12x Kan je de juiste hoeveelheid zeggen?
28.09.2024 - 12:07DROPS Design answered:
Dag Mies,
Volgens mij klopt het patroon wel omdat je op een eerder punt 27 keer meerdert, dus in totaal meer dan in maat L.
29.09.2024 - 20:33
![]() Marie wrote:
Marie wrote:
Hallo ich habe leider Probleme bei der raglanzunahme. Wird der Umschlag in der Rückreihe gefertigt und dann in der Hinreihe gestrickt ? Liebe Grüße Marie
18.09.2024 - 09:27DROPS Design answered:
Liebe Marie, die Umschläge werden immer bei einer Hinreihe gemacht bzw gearbeitet, dann bei der Rückreihe wie unter RAGLANZUNAHMEN gestrickt. Viel Spaß beim Stricken!
18.09.2024 - 15:26
![]() Andea wrote:
Andea wrote:
Alpenzauber
09.08.2024 - 08:56
![]() Martha wrote:
Martha wrote:
Nordlicht
09.08.2024 - 01:41
|
|
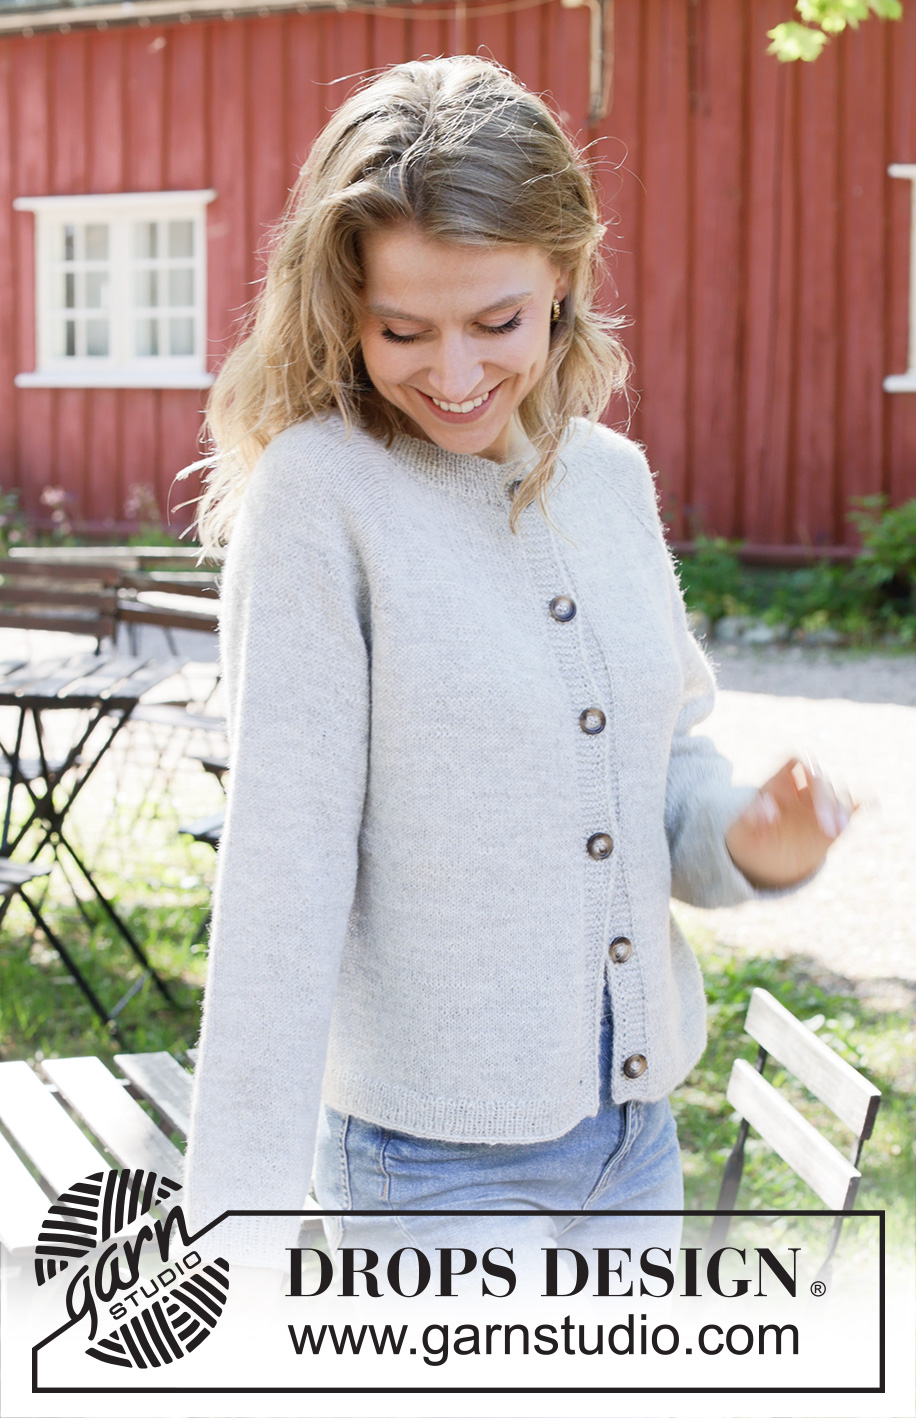
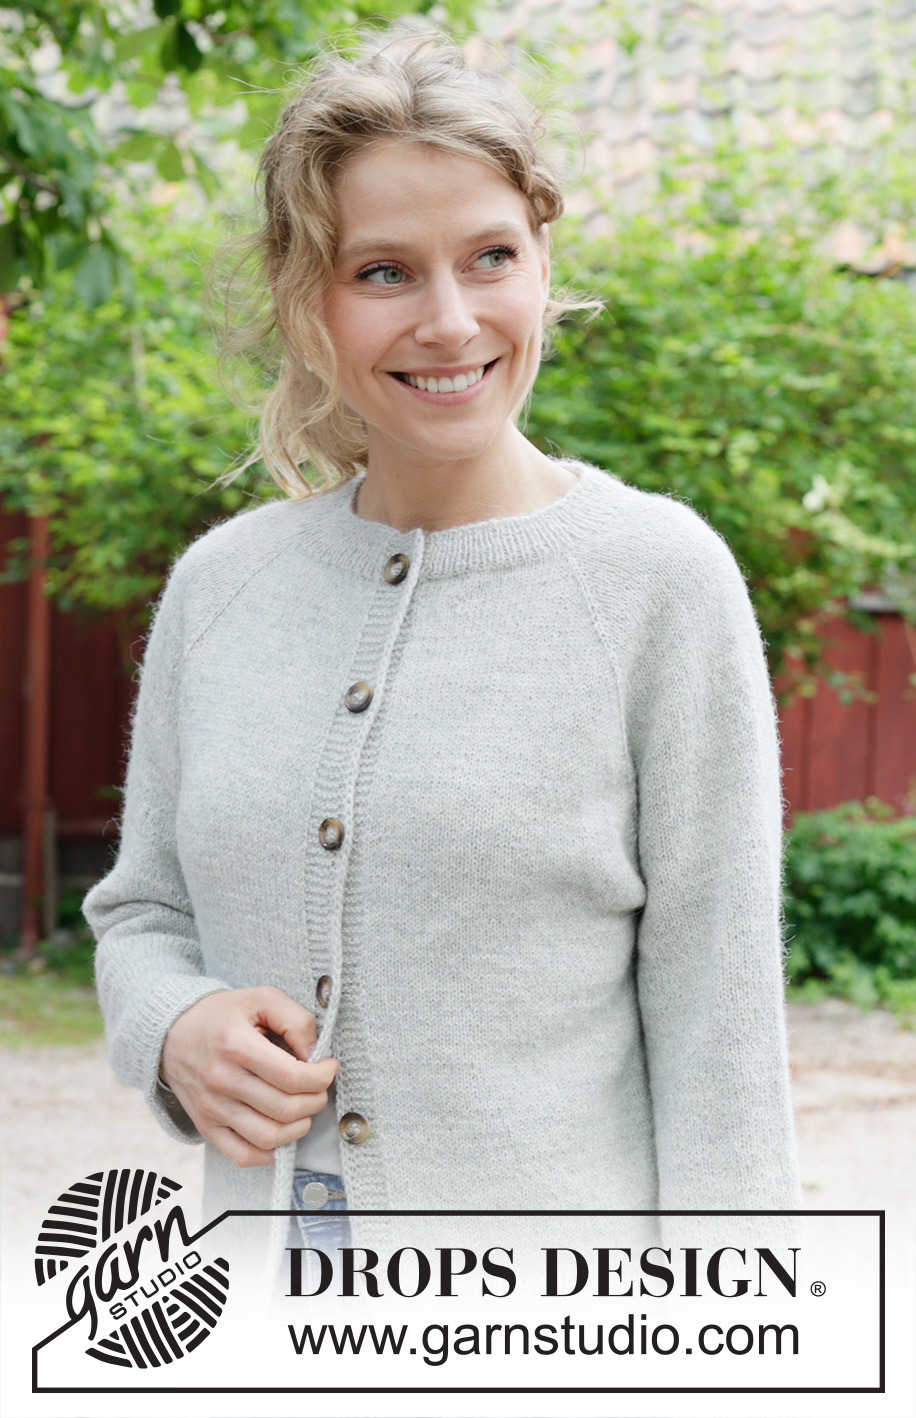
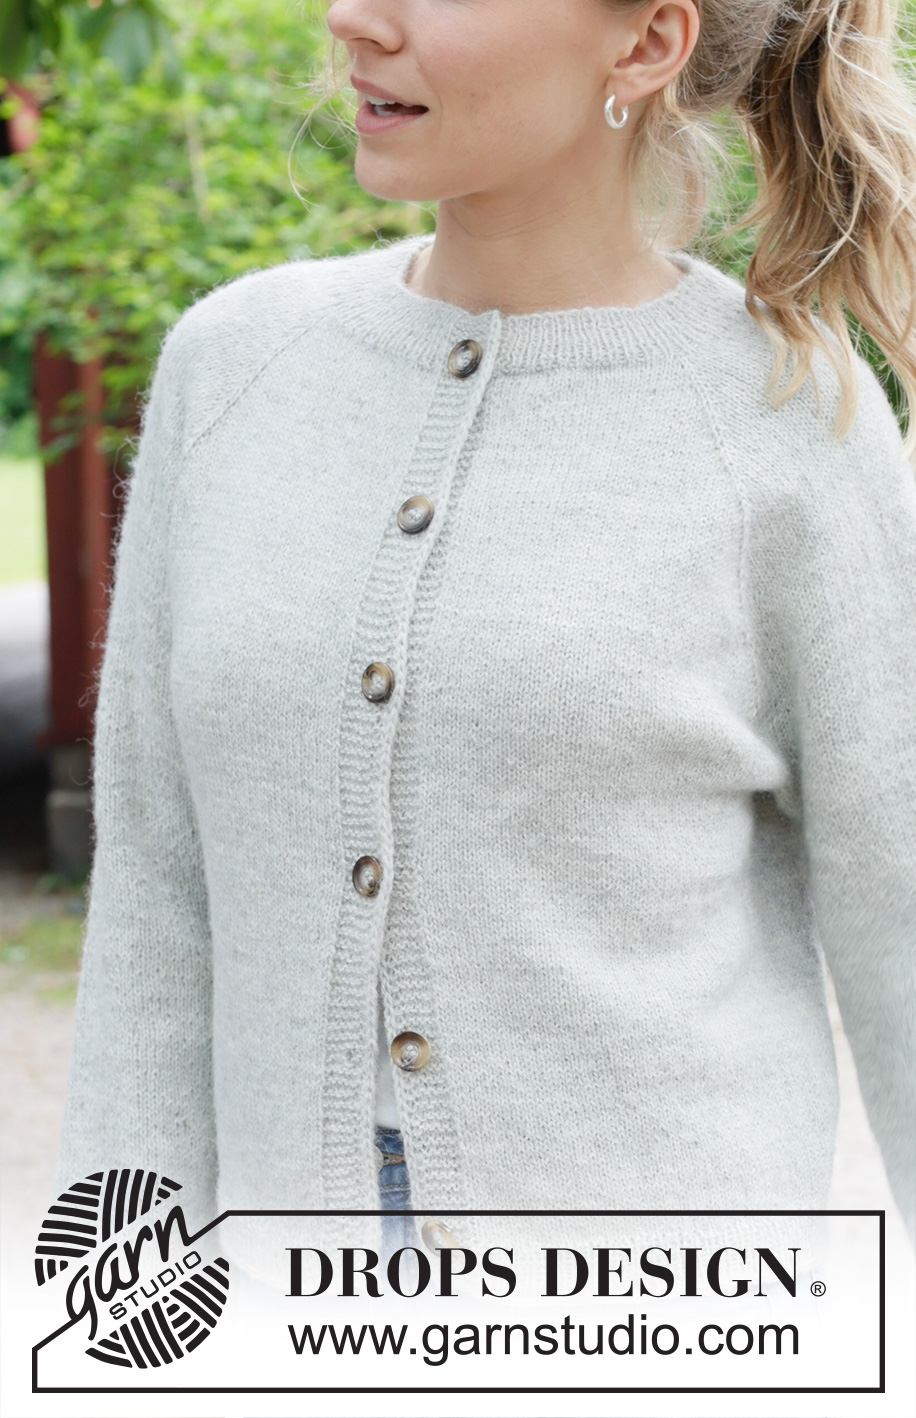
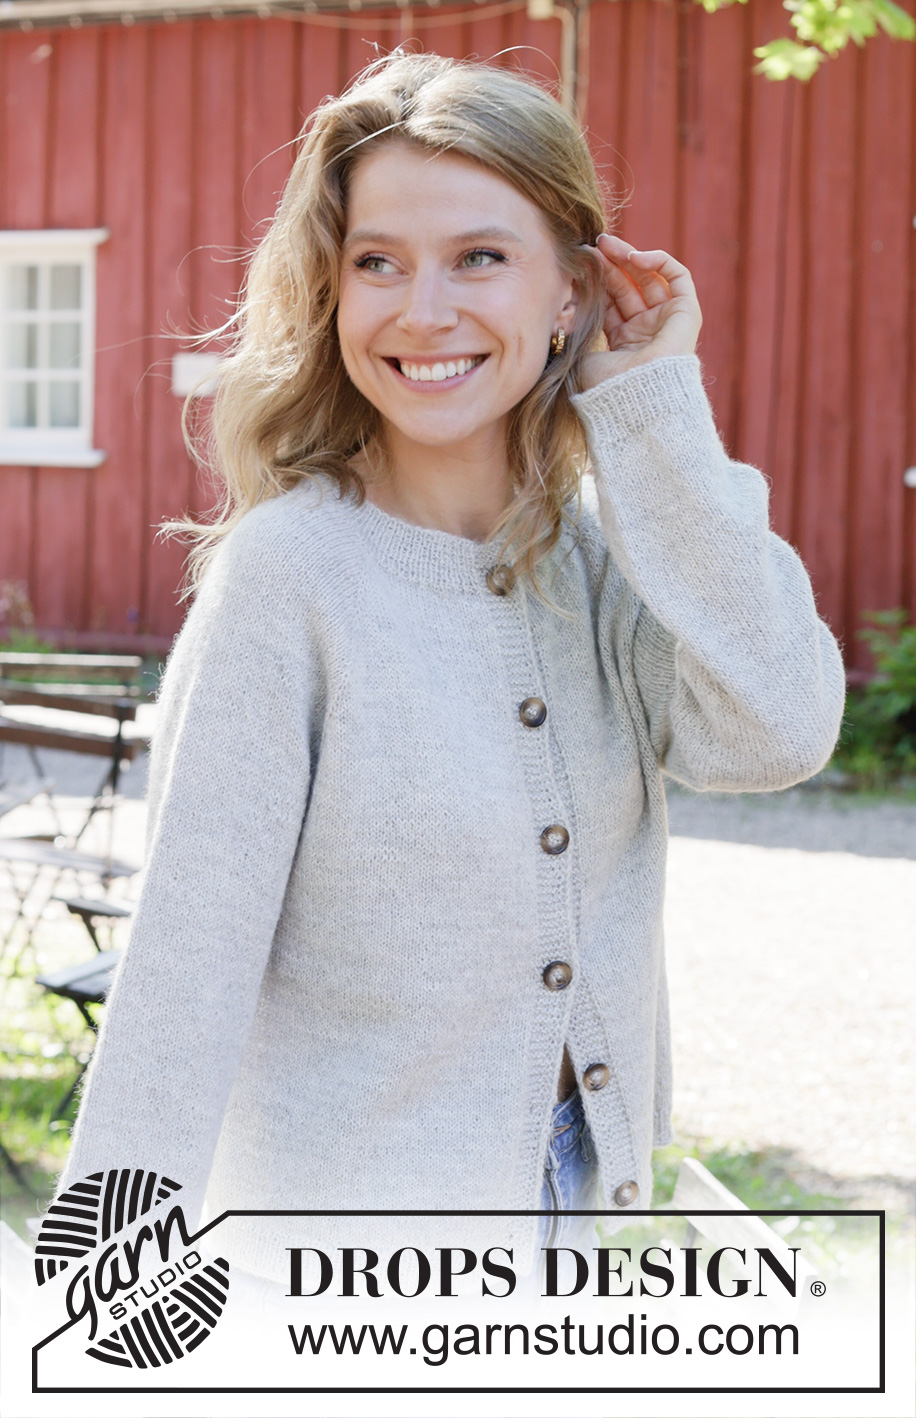
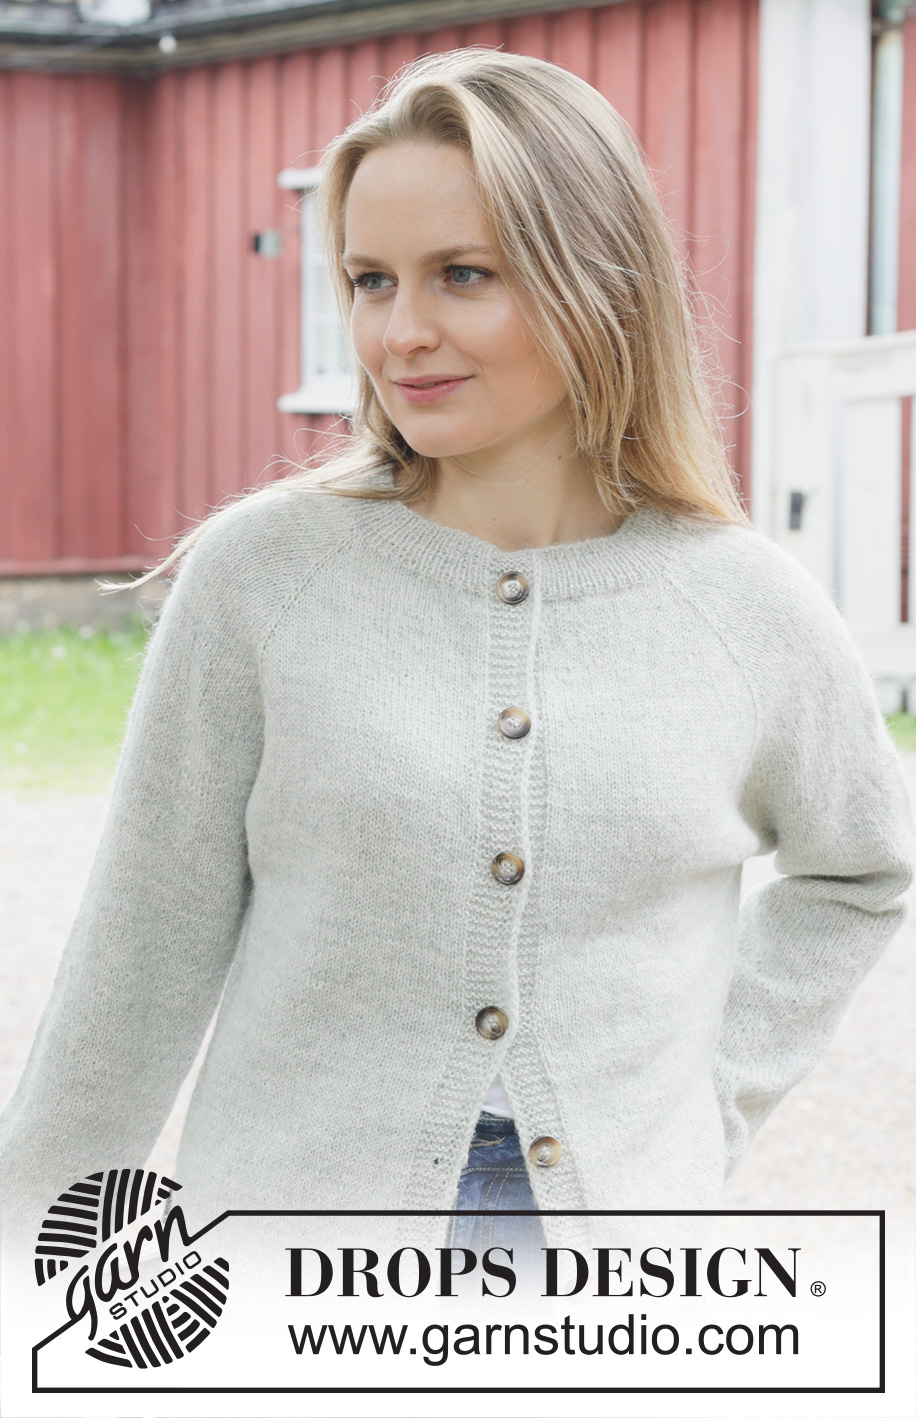
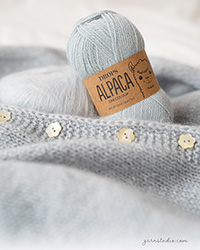
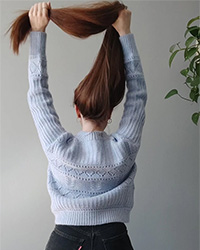
Soft Soul Cardigan#softsoulcardigan |
|
 |
 |
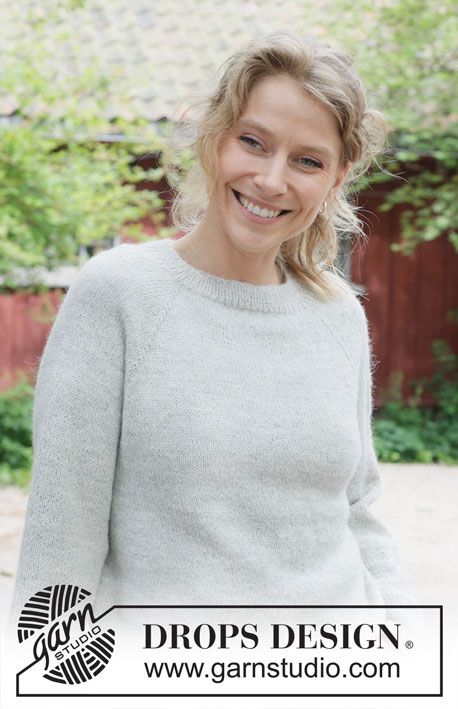
Knitted jacket in DROPS Alpaca. The piece is worked top down with raglan and I-cord. Sizes S - XXXL.
DROPS 252-9 |
|
|
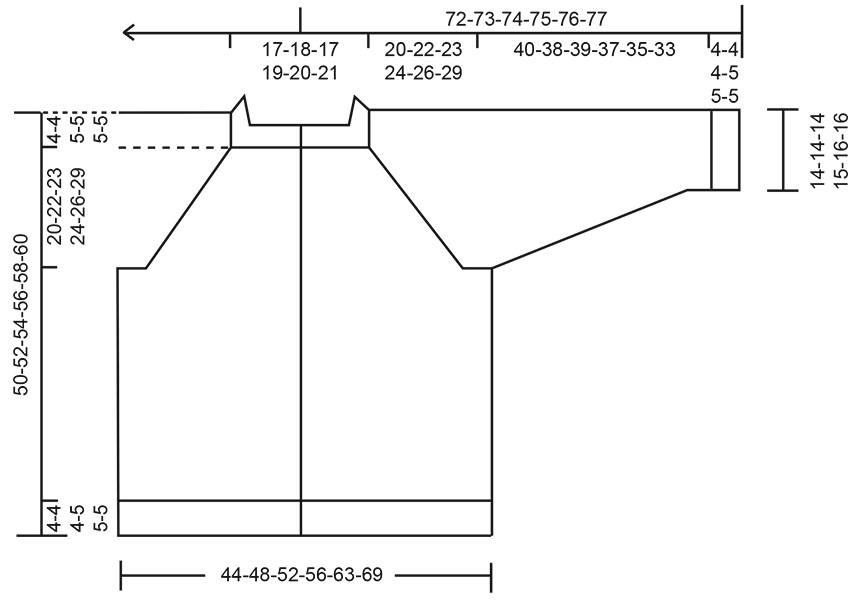
------------------------------------------------------- EXPLANATIONS FOR THE PATTERN: ------------------------------------------------------- BANDS WITH I-CORD BEGINNING OF ROW: Slip 1 stitch purl-wise with strand in front, knit 1, work 6 garter stitches. END OF ROW: Work until there are 8 stitches left on the row, work 6 garter stitches, slip 1 stitch purl-wise with strand in front, knit 1. Work in the same way from both the right and wrong side. GARTER STITCH (worked back and forth): Knit all rows, from both the right and wrong side. 1 ridge in height = knit 2 rows. BUTTONHOLES: Work the buttonholes on the right front band (when garment is worn), from the right side, when there are 5 stitches left on the row. ROW 1 (right side): Make 1 yarn over, knit 2 together, knit 1, slip 1 purl-wise with strand in front, knit 1. ROW 2 (wrong side): Work the band as before, knit the yarn over to leave a hole. The first buttonhole is worked on the first row from the right side after the neck is finished. Then work the other 5-5-5-5-6-6 buttonholes with 8½-9-9-9-8-8½ cm = 3¼"-3½"-3½"-3½"-3⅛"-3¼" between each one. The bottom buttonhole is worked in the transition between the stockinette stitch and rib. RAGLAN: All increases are worked from the right side! Increase 1 stitch by making 1 yarn over, which is worked as follows on the next row: BEFORE MARKER: Purl through the back loop to avoid a hole. Then work the new stitches in stockinette stitch. AFTER MARKER: Slip the yarn over off the left needle and replace it twisted (insert the left needle through the back when replacing it). Purl the front loop to avoid a hole. Then work the new stitches in stockinette stitch. DECREASE TIP (for sleeves): Decrease 1 stitch on each side of the marker-thread as follows: Work until there are 3 stitches left before the marker-thread, knit 2 together, knit 2 (marker-thread sits between these 2 stitches), slip 1 stitch knit-wise, knit 1 and pass the slipped stitch over the knitted stitch (2 stitches decreased). I-CORD BIND OFF: Cast on 2 stitches on right needle. Slip these 2 stitches onto the left needle, with the strand 2 stitches in on the needle (the strand tightens when working to form a small tube). ROW 1 (right side): Knit 1, knit 2 twisted together. ROW 2 (right side): Slip the 2 stitches on the right needle onto the left needle, knit 1, knit 2 twisted together. AFTER ROW 2: Repeat ROW 2 until there are 2 stitches left on the right needle. Slip these 2 stitches onto the left needle. Bind off. Sew a small stitch, joining the beginning and the end of the I-cord. ------------------------------------------------------- START THE PIECE HERE: ------------------------------------------------------- JACKET – SHORT OVERVIEW OF THE PIECE. The pattern uses both long and short needles; start with the length which fits the number of stitches and change when necessary. The neck and yoke are worked back and forth with circular needle, from mid front and top down. When the yoke is finished, it is divided for body and sleeves and the body continued back and forth with circular needle, while the sleeves wait. The sleeves are worked in the round, top down. NECK: Cast on 135-141-147-153-159-165 stitches with circular needle size 2.5 MM = US 1.5 and DROPS Alpaca. Work the first row as follows from the wrong side: 8 stitches according to BANDS WITH I-CORD – read description above, work rib (purl 1, knit 1) until there are 9 stitches left, purl 1 and work 8 stitches according to bands with I-cord. Continue this rib for 4-4-4-5-5-5 cm = 1½"-1½"-1½"-2"-2"-2". Insert 1 marker inside one band, mid-front; the piece is now measured from here. YOKE: Change to circular needle size 3.5 MM = US 4. Insert 4 markers from the right side, without working the stitches, inserting them in stitches which are now called raglan-stitches and which are continued in stockinette stitch. Count 27-29-29-31-31-33 stitches (= left front piece), insert 1 marker in the next stitch, count 19-19-21-21-23-23 stitches (= sleeve), insert 1 marker in the next stitch, count 39-41-43-45-47-49 stitches (= back piece), insert 1 marker in the next stitch, count 19-19-21-21-23-23 stitches (= sleeve), insert 1 marker in the next stitch, there are 27-29-29-31-31-33 stitches left after the last marker (= right front piece). Remember to work the first BUTTONHOLE - read description above, on the first row from the right side. Work stockinette stitch, with the bands as before, and increase for RAGLAN on each side of all 4 raglan-stitches - read description above. Increase every 2nd row a total of 20-22-22-27-22-19 times = 295-317-323-369-335-317 stitches (= 8 increased stitches on each increase-row). Remember to maintain the knitting gauge. Now continue increasing as follows: Increase for raglan every 2nd row on the front and back pieces and every 4th row on the sleeves (= alternately 4 and 8 increased stitches). Increase like this 8-10-12-10-20-28 times on the front and back pieces (4-5-6-5-10-14 times on the sleeves). After the last increase there are 343-377-395-429-455-485 stitches and the piece measures approx. 18-20-21-23-26-29 cm = 7"-8"-8¼"-9"-10¼"-11⅜" from the marker on the neck. Continue working without further increases until the piece measures 20-22-23-24-26-29 cm = 8"-8¾"-9"-9½"-10¼"-11⅜" from the marker. Now divide for the body and sleeves. DIVIDE FOR BODY AND SLEEVES: AT THE SAME TIME as working the next row, divide yoke as follows: Work 55-61-63-68-73-80 stitches as before (= front piece), place the next 69-75-79-87-89-91 stitches on a thread for the sleeve, cast on 10-10-14-16-20-22 stitches (in side mid-under sleeve), work 95-105-111-119-131-143 stitches (= back piece), place the next 69-75-79-87-89-91 stitches on a thread for the sleeve, cast on 10-10-14-16-20-22 stitches (in side mid-under sleeve), work the last 55-61-63-68-73-80 stitches as before (= front piece). The body and sleeves are finished separately. BODY: = 225-247-265-287-317-347 stitches. Work stockinette stitch, with the bands as before, until the piece measures 42-44-45-46-48-50 cm = 16½"-17¼"-17¾"-18"-19"-19¾" from the marker mid-front. On the next row from the right side, begin working rib, AT THE SAME TIME as increasing 74-78-84-88-104-112 stitches evenly on the row = 299-325-349-375-421-459 stitches. Work as follows: Change to circular needle size 2.5 MM = US 1.5. Work the band as before, rib (knit 1, purl 1 – remember to increase) until there are 9 stitches left, knit 1 and work the band as before. When the rib measures 4-4-4-5-5-5 cm = 1½"-1½"-1½"-2"-2"-2" and the last row was from the wrong side, bind off a little loosely from the right side with I-CORD – read description above. The jacket measures approx. 46-48-49-51-53-55 cm = 18"-19"-19¼"-20"-21"-21⅝" from the marker mid-front and 50-52-54-56-58-60 cm = 19¾"-20½"-21¼"-22"-22¾"-23⅝" from top of shoulder. SLEEVES: Place the 69-75-79-87-89-91 sleeve-stitches from the thread on one side of the piece on circular needle size 3.5 MM = US 4 and knit up 1 stitch in each of the 10-10-14-16-20-22 stitches cast on under the sleeve = 79-85-93-103-109-113 stitches. Insert a marker-thread in the middle of the 10-10-14-16-20-22 stitches under the sleeve. Start at the marker-thread and work stockinette stitch in the round. When the sleeve measures 1 cm = ⅜", decrease 2 stitches under the sleeve – read DECREASE TIP. Decrease like this every 2nd round a total of 2-2-3-5-5-6 times = 75-81-87-93-99-101 stitches. Then decrease 2 stitches every 5-4-3-2½-2-1½ cm = 2"-1½"-1⅛"-1"-¾"-½" 5-7-9-10-12-12 times = 65-67-69-73-75-77 stitches. Continue working until the sleeve measures 40-39-38-37-35-33 cm = 15¾"-15¼"-15"-14½"-13¾"-13" from the division. Change to double pointed needles size 2.5 MM = US 1.5. Work rib (knit 1, purl 1), AT THE SAME TIME increase 21-23-23-25-25-27 stitches evenly on the first round = 86-90-92-98-100-104 stitches. When the rib measures 4-4-4-5-5-5 cm = 1½"-1½"-1½"-2"-2"-2", bind off with I-CORD. The sleeve measures approx. 44-43-42-42-40-38 cm = 17¼"-17"-16½"-16½"-15¾"-15" from the division. ASSEMBLY: Sew the buttons onto the left band. |
|
 |
|
Have you finished this pattern?Tag your pictures with #dropspattern #softsoulcardigan or submit them to the #dropsfan gallery. Do you need help with this pattern?You'll find 28 tutorial videos, a Comments/Questions area and more by visiting the pattern on garnstudio.com. © 1982-2026 DROPS Design A/S. We reserve all rights. This document, including all its sub-sections, has copyrights. Read more about what you can do with our patterns at the bottom of each pattern on our site. |
|


With over 40 years in knitting and crochet design, DROPS Design offers one of the most extensive collections of free patterns on the internet - translated to 17 languages. As of today we count 324 catalogs and 12177 patterns - 12167 of which are translated into English (US/in).
We work hard to bring you the best knitting and crochet have to offer, inspiration and advice as well as great quality yarns at incredible prices! Would you like to use our patterns for other than personal use? You can read what you are allowed to do in the Copyright text at the bottom of all our patterns. Happy crafting!
Post a comment to pattern DROPS 252-9
We would love to hear what you have to say about this pattern!
If you want to leave a question, please make sure you select the correct category in the form below, to speed up the answering process. Required fields are marked *.