
Popular categories
Looking for a yarn?


Comments / Questions (10)
![]() Shirley Low wrote:
Shirley Low wrote:
This pattern knit up fast. Easy pattern to knit. I love it
23.06.2025 - 05:21
![]() Smids wrote:
Smids wrote:
Kon de opmerkingen over het patroon niet zien. Maar zag net dat een voorganger het ook had opgemerkt. Denk ook dat zij de juiste oplossing heeft.
20.05.2024 - 10:19
![]() Smids wrote:
Smids wrote:
Bij de tekens van het telpatroon staat waarschijnlijk een foute verklaring. Bij de verklaring van de driehoek staat 1 steek afhalen 1 breien en dan de afgehaalde steek erover afhalen. Ik denk dat het 2 stekken afhalen 1 steek breien en dan 2 steken overhalen moet zijn. Dan kloppen de omslagen van die rij ook.
20.05.2024 - 10:15
![]() Nicole wrote:
Nicole wrote:
De vertaling van het zwartje driehoekje klopt niet. Het zou 'haal 1 steek recht af, 2 recht samen en haal de afgehaalde steek over de samengebreide steken' moeten zijn.
14.05.2024 - 18:31
![]() Marlene Magareth Arentsen Otey wrote:
Marlene Magareth Arentsen Otey wrote:
Me encantó este modelo...me encantaría tejerlo
10.05.2024 - 02:34
![]() Ursula Banzhaf wrote:
Ursula Banzhaf wrote:
In der Anleitung steht vor dem unteren Bündchen Mädchen zunehmen,bevor man auf die dünneren Nadeln wechselt.meine Frage:sollte man nicht die Maschenzahl wie angegeben,abnehmen bevor man das Bündchen strickt?
03.05.2024 - 10:13DROPS Design answered:
Liebe Frau Banzhaf, ja so viele Maschen muss man vor dem Bündchen zunehmen, damit das untere Rand nicht der Pullover zusammenzieht, da man mehr Maschen für Rippenmuster mit kleineren Nadeln als für glattrechts mit grösseren Nadeln für dieselbe Breite braucht. Viel Spaß beim Stricken!
03.05.2024 - 13:08
![]() Concetta La Scala wrote:
Concetta La Scala wrote:
Io ho 24 maglie. Posso farlo lo stesso. Grazie
02.05.2024 - 21:12DROPS Design answered:
Buonasera Concetta, deve lavorare con il numero di ferri che le permette di ottenere il campione indicato. Buon lavoro!
03.05.2024 - 16:33
![]() Concetta La Scala wrote:
Concetta La Scala wrote:
Io ho 24 maglie. Posso farlo lo stesso. Grazie
02.05.2024 - 19:53DROPS Design answered:
Buonasera Concetta, deve lavorare con il numero di ferri che le permette di ottenere il campione indicato. Buon lavoro!
03.05.2024 - 16:34
![]() Nonne wrote:
Nonne wrote:
Heather
21.01.2024 - 13:34
![]() Heike wrote:
Heike wrote:
Brombeertupfer
18.01.2024 - 17:42
|
|||||||||||||||||||
Plum Love#plumlovetop |
|||||||||||||||||||
 |
 |
||||||||||||||||||
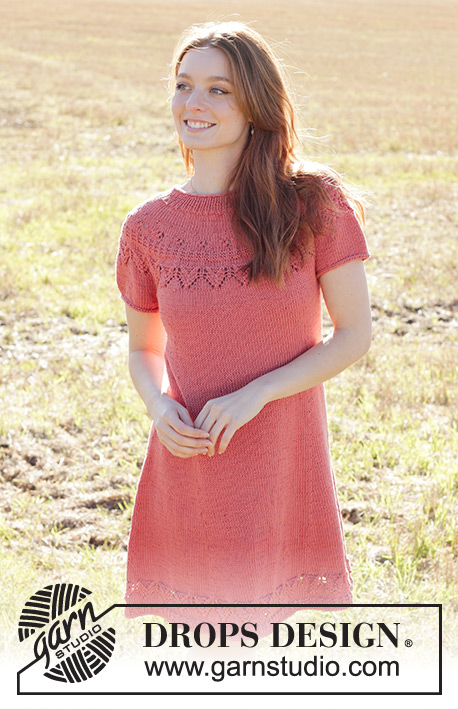
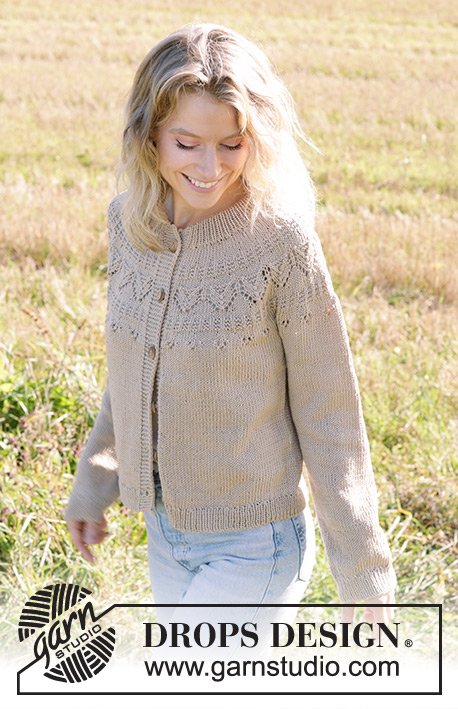
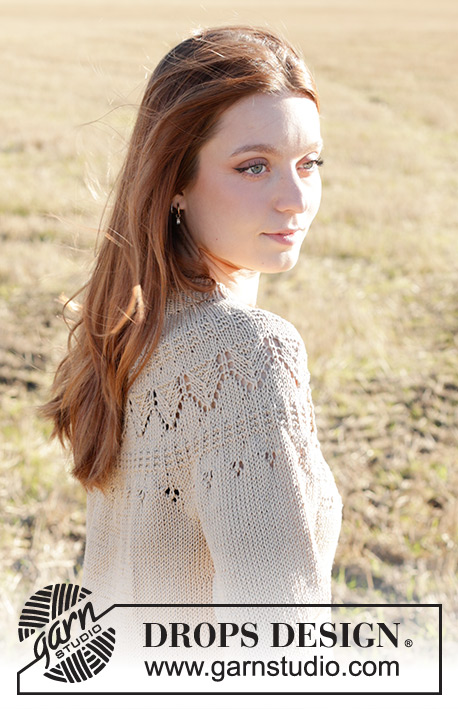
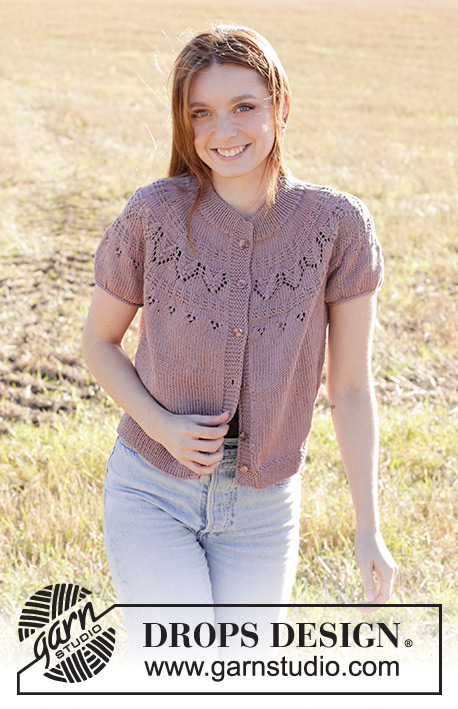
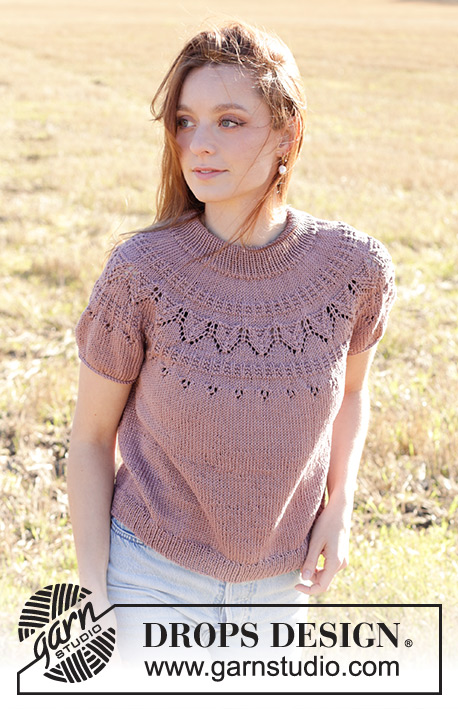
Knitted short-sleeved sweater in DROPS Muskat. The piece is worked top down with double neck, round yoke and lace pattern. Sizes S - XXXL.
DROPS 248-29 |
|||||||||||||||||||
|
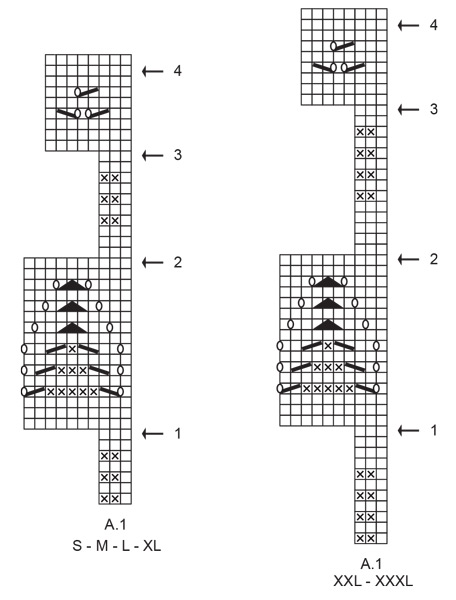
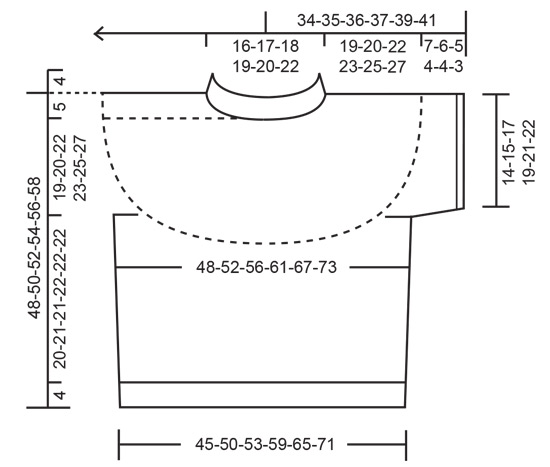
------------------------------------------------------- EXPLANATIONS FOR THE PATTERN: ------------------------------------------------------- PATTERN: See diagram A.1. Choose diagram for your size. INCREASE TIP (applies to round yoke): To work out how to increase evenly, count the total number of stitches on the needle (e.g., 110 stitches) and divide by the number of increases to be made (e.g., 30) = 3.6. In this example, increase by making 1 yarn over after alternately each 3rd and 4th stitch. On the next round work the yarn overs twisted to avoid holes. DECREASE TIP (for sides of body): Start 4 stitches before the marker-thread, slip 1 stitch knit-wise, knit 1, pass slipped stitch over knitted stitch, knit 4 (marker-thread in middle of these 4 stitches), knit 2 together (2 stitches decreased). I-CORD BIND-OFF: After the last stitch on the round has been worked: Cast on 3 stitches on the right needle, from the right side. Place the 3 stitches on the left needle, with the working yarn between these 3 stitches and the other stitches (tighten the strand when working to make a small tube). ROW 1 (right side): Knit 2, knit the next 2 stitches twisted together. ROW 2 (right side): Place the 3 stitches from the right needle back on the left needle, knit 2, knit the next 2 stitches twisted together. Repeat ROW 2 until there are 3 stitches left on the right needle. Place these 3 stitches back on the left needle. Bind off. Sew a small stitch to join the beginning and end of the I-cord. ------------------------------------------------------- START THE PIECE HERE: ------------------------------------------------------- SWEATER – SHORT OVERVIEW OF THE PIECE: The pattern uses both short and long circular needles; start with the length which fits the number of stitches and change when necessary. The neck and yoke are worked in the round with circular needle, from mid back and top down. When the yoke is finished, divide the stitches into body and sleeves. Finish the body in the round with circular needle, top down, while the sleeves wait. The sleeves are then worked top down in the round. The neck is folded double and sewn down. NECK: Cast on 110-114-118-122-126-134 stitches with circular needle size 4 MM = US 6 and DROPS Muskat. Change to circular needle size 3 MM = US 2.5 (casting on with a larger needle makes the cast-on edge elastic). Knit 1 round, then work rib in the round (knit 1, purl 1) for 9 cm = 3½". The neck is later folded double to approx. 4 cm = 1½". YOKE: Change back to circular needle size 4 MM = US 6. Insert 1 marker; the yoke is measured from here. Knit 1 round and increase 30-32-36-40-42-44 stitches evenly spaced – read INCREASE TIP = 140-146-154-162-168-178 stitches. Continue with stockinette stitch. REMEMBER THE KNITTING GAUGE! When the yoke measures 3-3-4-4-5-6 cm = 1⅛"-1⅛"-1½"-1½"-2"-2⅜" from the marker, increase 31-34-38-42-45-50 stitches evenly spaced – remember INCREASE TIP = 171-180-192-204-213-228 stitches. Continue with stockinette stitch until the yoke measures 4-4-5-5-6-7 cm = 1½"-1½"-2"-2"-2⅜"-2¾" from the marker. Now work PATTERN – read description above, i.e., working A.1 57-60-64-68-71-76 times in width around the yoke. AT THE SAME TIME on each round marked with an arrow in A.1, increase as follows: Arrow-1: Increase 39-40-48-56-57-62 stitches evenly spaced = 210-220-240-260-270-290 stitches. Arrow-2: Increase 42-47-51-55-66-70 stitches evenly spaced = 252-267-291-315-336-360 stitches. Arrow-3: Increase 44-53-53-61-64-72 stitches evenly spaced = 296-320-344-376-400-432 stitches. Arrow-4: Increase 4-8-8-12-12-16 stitches evenly spaced = 300-328-352-388-412-448 stitches. When A.1 is finished, the yoke measures approx. 18-18-19-19-22-23 cm = 7"-7"-7½"-7½"-8¾"-9" from the marker. Continue with stockinette stitch until the yoke measures 19-20-22-23-25-27 cm = 7½"-8"-8¾"-9"-9¾"-10⅝" from the marker. Now divide for the body and sleeves: Knit 46-51-54-59-64-71 (half back piece), place the next 58-62-68-76-78-82 stitches on a thread for the sleeve, cast on 8-8-10-10-12-12 (in side under sleeve), knit 92-102-108-118-128-142 (front piece), place the next 58-62-68-76-78-82 stitches on a thread for the sleeve, cast on 8-8-10-10-12-12 (in side under sleeve), knit the last 46-51-54-59-64-71 stitches (half back piece). The body and sleeves are finished separately. The piece is now measured from here! BODY: = 200-220-236-256-280-308 stitches. Insert 1 marker in both sides, in the middle of the 8-8-10-10-12-12 cast on under both sleeves, with 100-110-118-128-140-154 stitches between the marker-threads. Allow the marker-threads to follow your work onwards; they are used when decreasing in the sides. Work stockinette stitch in the round for a further 5-5-5-7-7-7 cm = 2"-2"-2"-2¾"-2¾"-2¾". Now decrease 1 stitch on each side of both marker-threads – read DECREASE TIP. Decrease like this every 5-5-5-7-7-7 cm = 2"-2"-2"-2¾"-2¾"-2¾" a total of 3-3-3-2-2-2 times = 188-208-224-248-272-300 stitches. Continue working until the body measures 20-21-21-22-22-22 cm = 8"-8¼"-8¼"-8¾"-8¾"-8¾" from the division. Knit 1 round and increase 39-44-44-50-56-60 stitches evenly spaced = 228-252-268-298-328-360 stitches. Change to circular needle size 3 MM = US 2.5. Work rib (knit 1, purl 1) for 4 cm = 1½". Bind off. The sweater measures approx. 48-50-52-54-56-58 cm = 19"-19¾"-20½"-21¼"-22"-22¾" from the shoulder. SLEEVES: Place the 58-62-68-76-78-82 stitches from the thread on the one side of the piece on short circular needle/double pointed needles size 4 MM = US 6 and knit up 1 stitch in each of the 8-8-10-10-12-12 stitches cast on under the sleeve = 66-70-78-86-90-94 stitches. Insert a marker-thread in the middle of the new stitches under the sleeve. Start at the marker-thread and work stockinette stitch in the round for 6-5-4-3-3-2 cm = 2⅜"-2"-1½"-1⅛"-1⅛"-¾". Knit 1 round and decrease 8-8-6-6-2-0 stitches evenly spaced = 58-62-72-80-88-94 stitches. Bind off with I-CORD – read description above. ASSEMBLY: Fold the neck double to the inside and sew down. To avoid the neck being tight, and rolling outwards, it is important that the seam is elastic. |
|||||||||||||||||||
Diagram explanations |
|||||||||||||||||||
|
|||||||||||||||||||
 |
|||||||||||||||||||
 |
|||||||||||||||||||
Have you finished this pattern?Tag your pictures with #dropspattern #plumlovetop or submit them to the #dropsfan gallery. Do you need help with this pattern?You'll find 30 tutorial videos, a Comments/Questions area and more by visiting the pattern on garnstudio.com. © 1982-2026 DROPS Design A/S. We reserve all rights. This document, including all its sub-sections, has copyrights. Read more about what you can do with our patterns at the bottom of each pattern on our site. |
|||||||||||||||||||


With over 40 years in knitting and crochet design, DROPS Design offers one of the most extensive collections of free patterns on the internet - translated to 17 languages. As of today we count 325 catalogs and 12298 patterns - 12288 of which are translated into English (US/in).
We work hard to bring you the best knitting and crochet have to offer, inspiration and advice as well as great quality yarns at incredible prices! Would you like to use our patterns for other than personal use? You can read what you are allowed to do in the Copyright text at the bottom of all our patterns. Happy crafting!
Post a comment to pattern DROPS 248-29
We would love to hear what you have to say about this pattern!
If you want to leave a question, please make sure you select the correct category in the form below, to speed up the answering process. Required fields are marked *.