
Popular categories
Looking for a yarn?


Comments / Questions (19)
![]() Jette Østerberg Jensen wrote:
Jette Østerberg Jensen wrote:
Dejlig nem og overskuelig opskrift. Lækkert garn og flot resultat.
25.10.2024 - 16:06
![]() Truus wrote:
Truus wrote:
Armsgaten: brei 26 steken en kant dan 8 steken af; houd ik dan 25 st op de naald? Of brei ik eerst nog een steek die de basis vormt vh afkanten (=26 st op de naald houden)
23.10.2024 - 12:40DROPS Design answered:
Dag Truus,
Je breit inderdaad eerst nog een steek welke de basis vormt voor het afkanten, zodat je ook echt 26 steken op de naald houdt.
30.10.2024 - 19:38
![]() Kristin G wrote:
Kristin G wrote:
Hei, det står at vrangborden på bena skal være 10 cm, men på diagrammet nedenfor står det 5cm, og på bildet ser det mer ut som det er 5cm.
29.09.2024 - 19:45
![]() Stephanie wrote:
Stephanie wrote:
Goedendag, Klopt de beschrijving van de mouwen wel? Met deze beschrijving worden de mouwen breder dan de broekspijpen toch (muv de boord)? Groet, Stephanie
08.08.2024 - 15:10
![]() Jannicke Røseng wrote:
Jannicke Røseng wrote:
På vrangborden til ermet (str 1/3mnd, 50 masker) er det forklart slik: 1 maske i RILLE – les forklaring over, * 2 rett, 2 vrang *, strikk fra *-* til det gjenstår 3 masker, strikk 2 rett og 1 kantmaske i rille. Når jeg følger dette ender jeg med 2 rett som siste masker når 3 gjenstår, og får dermed 4 rett og en kantmaske (r) som siste 5 masker. Dette ser ikke helt rett ut, vrangborden flyter ut i riller på begge ender (3 første og siste masker blir riller). Hva gjør jeg feil?
23.03.2024 - 13:03DROPS Design answered:
Hej Jannicke, det stemmer, det skal kun være 1 kantmaske tilbage, vi skal få det lagt ud i opskriften, tak for info :)
03.04.2024 - 14:33
![]() Karina Rejnhold Sørensen wrote:
Karina Rejnhold Sørensen wrote:
Kan det passe at ærmet er bredere end buksebenet?
28.02.2024 - 19:47DROPS Design answered:
Hei Karina. Vrangborden på beina er større / flere masker enn vrangborden på ermene (i nesten alle str). Men når det strikkes riller er det flere masker på ermet enn beina. mvh DROPS Design
04.03.2024 - 14:27
![]() Vigdis wrote:
Vigdis wrote:
Hei! Skal det strikkes rundt på rundpinne, eller er der frem og tilbake hele tiden?
30.01.2024 - 11:34DROPS Design answered:
Hei Vigdis, Alle delene er strikket fram og tilbake, først beina som er deretter sydd sammen, og overdelen fram og tilbake. Ermene er strikket fram og tilbake og sydd inn til slutt. God fornøyelse!
31.01.2024 - 06:35
![]() Marlies Van Dijk wrote:
Marlies Van Dijk wrote:
Dan is de beschrijving niet helemaal goed : Dit staat er beschreven ; Brei 1 ribbelsteek, * 2 recht, 2 averecht *, brei van *-* tot er 3 steken over zijn, 2 recht en 1 ribbelsteek.
18.01.2024 - 23:03
![]() Marlies Van Dijk wrote:
Marlies Van Dijk wrote:
Klopt de beschrijving van de boordjes mouwen wel? Ik eindig met 2 averecht en 1 kantsteek, en niet met 2 rechte steken en 1 kantsteek. Ik maak de maat 1/3 maanden.
17.01.2024 - 18:43DROPS Design answered:
Dag Marlies,
Dat klopt, als je met 1 kantsteek en daarna 2 recht begint, dan eindig je met 2 averecht en daarna nog 1 kantsteek. Wanneer je de mouwnaden dicht naait, dan loopt de boordsteek mooi door met steeds 2 recht, 2 averecht.
18.01.2024 - 19:44
|
||||
Winter Ready#winterreadyoverall |
||||
 |
 |
|||
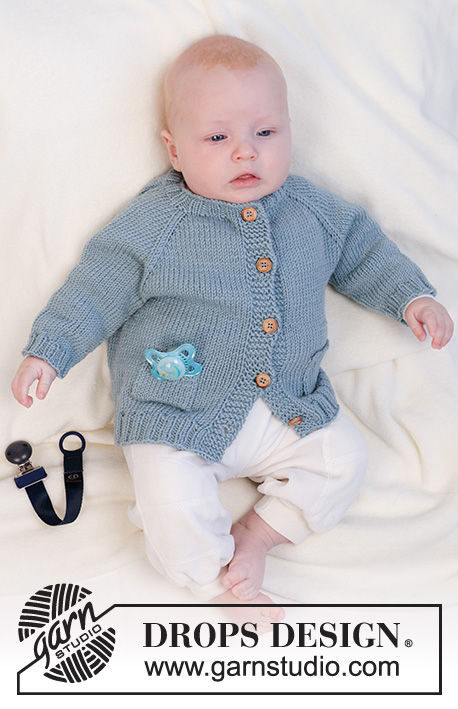
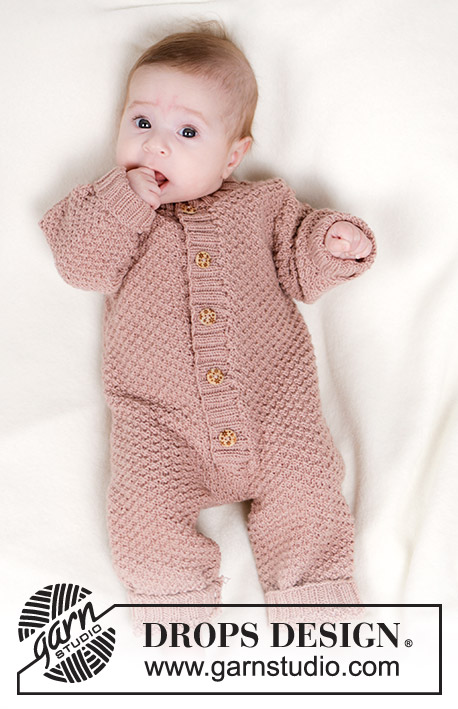
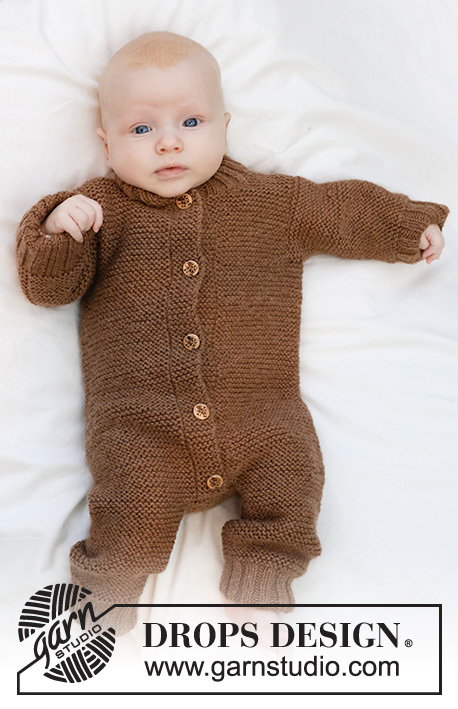
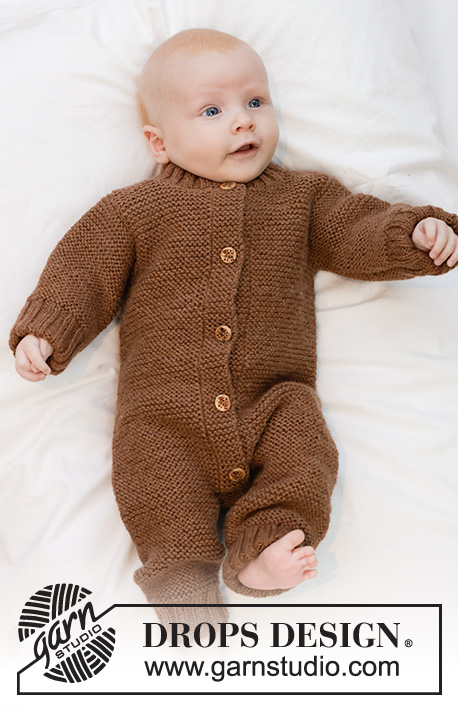
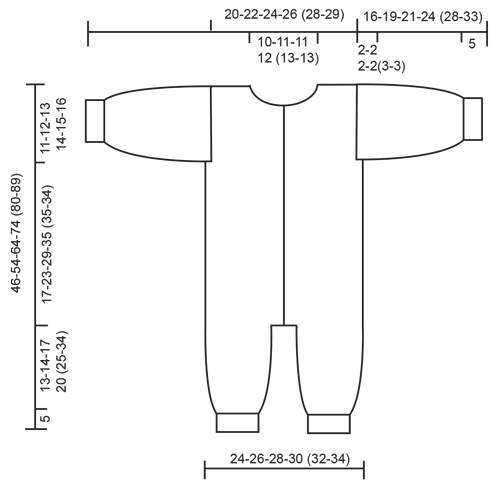
Knitted jumpsuit for babies and children in DROPS Lima or DROPS Fiesta. The piece is worked bottom up with garter stitch. Sizes 0 – 4 years.
DROPS Baby 45-9 |
||||
|
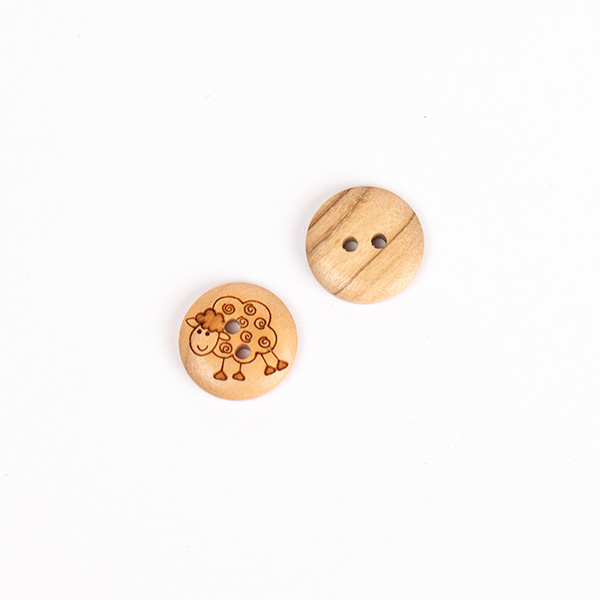
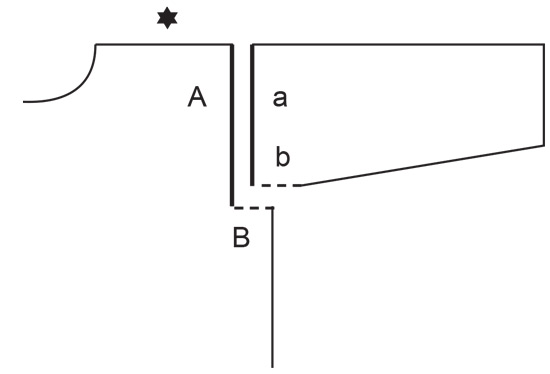
------------------------------------------------------- EXPLANATIONS FOR THE PATTERN: ------------------------------------------------------- GARTER STITCH (worked back and forth): Knit all rows. BUTTONHOLES: Work buttonholes on the right band. 1 BUTTONHOLE = purl together the 3rd and 4th stitch from the edge, make 1 yarn over. On the next row purl the yarn over to leave a hole. Work the buttonholes when the front band measures: 0/1 month: 3, 8, 13, 18 and 23 cm = 1⅛", 3⅛", 5⅛", 7" and 9" 1/3 months: 3, 9, 16, 23 and 30 cm = 1⅛", 3½", 6¼", 9" and 11¾" 6/9 months: 3, 9, 16, 23, 30 and 37 cm = 1⅛", 3½", 6¼", 9", 11¾" and 14½" 12/18 months: 3, 11, 19, 27, 35 and 43 cm = 1⅛", 4⅜", 7½", 10⅝", 13¾" and 17" 2 years: 3, 11, 19, 27, 35 and 44 cm = 1⅛", 4⅜", 7½", 10⅝", 13¾" and 17¼" 3/4 years: 3, 11, 19, 27, 35 and 44 cm = 1⅛", 4⅜", 7½", 10⅝", 13¾" and 17¼" ------------------------------------------------------- START THE PIECE HERE: ------------------------------------------------------- JUMPSUIT – SHORT OVERVIEW OF THE PIECE: The piece is worked bottom up. Each leg is worked back and forth, then joined together. Stitches are cast on between the legs and the piece continued back and forth with circular needle to the shoulders. The sleeves are worked back and forth, then sewn in. The neck is worked to finish. The cuffs on the sleeves and legs are folded double to the inside. LEG: Cast on 50-54-58-62 (66-70) stitches with circular needle size 3.5 MM = US 4 and DROPS Lima or DROPS Fiesta. Purl 1 row from the wrong side. Then work rib as follows from the right side: 1 GARTER STITCH – read description above, * knit 2, purl 2 *, work from *-* until there is 1 stitch left, 1 garter stitch. Continue this rib back and forth for 10 cm = 4". Change to circular needle size 4 MM = US 6. The piece is now measured from here! Work garter stitch over all stitches, AT THE SAME TIME on the first row (right side), decrease 8-8-10-10 (10-10) stitches evenly spaced = 42-46-48-52 (56-60) stitches. REMEMBER THE KNITTING GAUGE! Work until the piece measures 13-14-17-20 (25-34) cm = 5⅛"-5½"-6¾"-8" (9¾"-13⅜"), from the rib. Cut the strand. Work the other leg in the same way. JUMPSUIT: Now join the legs and continue working back and forth with circular needle size 4 MM = US 6 as follows: Cast on 7-7-8-9 (9-9) stitches, work the first leg, cast on 8-8-10-12 (12-12) stitches, work the second leg, cast on 7-7-8-9 (9-9) stitches = 106-114-122-134 (142-150) stitches. Continue with garter stitch but the outermost 6 stitches on each side are purled from both the right and wrong side (bands). Remember the BUTTONHOLES on the right band – read description above. Work until the piece measures 17-23-29-35 (35-34) cm = 6¾"-9"-11⅜"-13¾" (13¾"-13⅜") from where the legs were joined. Now bind off from the right side as follows for the armholes: Work the first 24-26-28-30-31-33 stitches, bind off 8-8-8-10 (12-12) stitches, work the next 42-46-50-54 (56-60) stitches, bind off 8-8-8-10 (12-12) stitches, work the last 24-26-28-30 (31-33) stitches. Finish each section separately. Place the first and last 24-26-28-30 (31-33) stitches on stitch holders and work the 42-46-50-54 (56-60) stitches on the back piece. BACK PIECE: Continue with garter stitch until the piece measures 26-33-40-47-48-48 cm = 10¼"-13"-15¾"-18½"-19"-19" from where the legs were joined. Bind off the middle 18-20-20-22 (22-24) stitches for the neckline and finish each shoulder separately. Bind off 1 stitch on the next row towards the neck = 11-12-14-15 (16-17) shoulder stitches. Work until the piece measures 28-35-42-49 (50-50) cm = 11"-13¾"-16½"-19¼" (19¾"-19¾") from the join (11-12-13-14 (15-16) cm = (4⅜"-4¾"-5⅛"-5½" (6"-6¼") from the bottom of the armhole), bind off. Work the other shoulder in the same way. RIGHT FRONT PIECE: Place the first 24-26-28-30 (31-33) stitches back on circular needle size 4 MM = US 6. Continue with garter stitch and purl the band stitches as before. When the piece measures 24-31-38-44 (45-45) cm = 9½"-12¼"-15"-17¼" (17¾"-17¾") from the join, place the outermost 9-10-10-11 (11-12) stitches on a stitch holder for the neckline. Then bind off on each row from the neck as follows: 2 stitches 1 time and 1 stitch 2 times = 11-12-14-15 (16-17) shoulder stitches. Continue with garter stitch until the piece measures 28-35-42-49 (50-50) cm = 11"-13¾"-16½"-19¼" (19¾"-19¾") from the join (11-12-13-14 (15-16) cm = (4⅜"-4¾"-5⅛"-5½" (6"-6¼") from the bottom of the armhole), bind off. LEFT FRONT PIECE: Place the last 24-26-28-30 (31-33) stitches back on circular needle size 4 MM = US 6. Continue with garter stitch and purl the band stitches as before. When the piece measures 24-31-38-44 (45-45) cm = 9½"-12¼"-15"-17¼" (17¾"-17¾") from the join, place the outermost 9-10-10-11 (11-12) stitches on a stitch holder for the neckline. Then bind off on each row from the neck as follows: 2 stitches 1 time and 1 stitch 2 times = 11-12-14-15 (16-17) shoulder stitches. Continue with garter stitch until the piece measures 28-35-42-49 (50-50) cm = 11"-13¾"-16½"-19¼" (19¾"-19¾") from the join (11-12-13-14 (15-16) cm = (4⅜"-4¾"-5⅛"-5½" (6"-6¼") from the bottom of the armhole), bind off. SLEEVES: Cast on 46-50-54-58 (66-70) stitches with circular needle size 3.5 MM = US 4 and DROPS Lima or DROPS Fiesta. Purl 1 row from the wrong side. Then work rib as follows from the right side: Work 1 garter stitch, * knit 2, purl 2 *, work from *-* until there are 1 stitch left and work 1 garter stitch. Continue this rib back and forth for 10 cm = 4". Change to circular needle size 4 MM = US 6. The piece is now measured from here! Work garter stitch over all stitches, until the sleeve measures 11-14-16-19 (23-28) cm = 4⅜"-5½"-6¼"-7½" (9"-11") from the rib. Bind off. Insert 1 marker-thread in each side, 2-2-2-2 (3-3) cm = ¾"-¾"-¾"-¾" (1⅛"-1⅛") below the bind-off edge, which will be used when assembling. Work the other sleeve in the same way. ASSEMBLY: Sew the shoulder seams. Sew the sleeve-cap to the armhole, then the top 2-2-2-2 (3-3) cm = ¾"-¾"-¾"-¾" (1⅛"-1⅛") on the sleeve to the bottom of the armhole – see sketch. Sew the sleeves seams, sewing in the outermost loop of the outermost stitch so the seam is flat. Sew the opening between the legs (bands laid double so you sew through 3 layers here). Sew the inner-leg seam in the outermost loop of the outermost stitch so the seam is flat. Fold the ribbing on the sleeves and legs double to the inside and fasten with a stitch on each side. Sew the buttons onto the left band. NECK: Start mid-front from the right side and knit up 62 to 78 stitches (including the stitches on the stitch holders and with the stitch count divisible by 4 +2) around the neck, using circular needle size 3.5 MM = US 4. Work rib as follows from the wrong side: Purl the 6 band stitches, purl 2, * knit 2, purl 2 *, work from *-* until there are 6 stitches left, purl the 6 band stitches. Continue this rib for 3 cm = 1⅛". Bind off the outermost 5 stitches on each side, continue the rib with 1 purled stitch on each side. Work until the neck measures a total of 6 cm = 2⅜". Loosely bind off. Fold the neck double to the inside and sew down. To avoid the neck being tight and rolling outwards. It is important that the seam is elastic. Sew the openings on the bands with small stitches. |
||||
Diagram explanations |
||||
|
||||
 |
||||
 |
||||
Have you finished this pattern?Tag your pictures with #dropspattern #winterreadyoverall or submit them to the #dropsfan gallery. Do you need help with this pattern?You'll find 27 tutorial videos, a Comments/Questions area and more by visiting the pattern on garnstudio.com. © 1982-2026 DROPS Design A/S. We reserve all rights. This document, including all its sub-sections, has copyrights. Read more about what you can do with our patterns at the bottom of each pattern on our site. |
||||


With over 40 years in knitting and crochet design, DROPS Design offers one of the most extensive collections of free patterns on the internet - translated to 17 languages. As of today we count 324 catalogs and 12290 patterns - 12280 of which are translated into English (US/in).
We work hard to bring you the best knitting and crochet have to offer, inspiration and advice as well as great quality yarns at incredible prices! Would you like to use our patterns for other than personal use? You can read what you are allowed to do in the Copyright text at the bottom of all our patterns. Happy crafting!
Post a comment to pattern DROPS Baby 45-9
We would love to hear what you have to say about this pattern!
If you want to leave a question, please make sure you select the correct category in the form below, to speed up the answering process. Required fields are marked *.