
Popular categories
Looking for a yarn?


Comments / Questions (27)
![]() Rosy wrote:
Rosy wrote:
Buongiorno xfavore non capisco come lavorare il rovescio di questo diagramma grazie
15.04.2021 - 13:38DROPS Design answered:
Buonasera Rosy, i diagrammi si leggono dal basso verso l'alto, da destra verso sinistra nei ferri di andata e da sinistra verso destra nei ferri di ritorno. Quindi sul rovescio deve leggere il diagramma da sinistra verso destra e lavorare come indicato. Buon lavoro!
15.04.2021 - 19:22
![]() Rosy wrote:
Rosy wrote:
Buongiorno xfavore non capisco come lavorare il rovescio di questo diagramma grazie
15.04.2021 - 13:37DROPS Design answered:
Buonasera Rosy, i diagrammi si leggono dal basso verso l'alto, da destra verso sinistra nei ferri di andata e da sinistra verso destra nei ferri di ritorno. Quindi sul rovescio deve leggere il diagramma da sinistra verso destra e lavorare come indicato. Buon lavoro!
15.04.2021 - 19:22
![]() Linda LYNN wrote:
Linda LYNN wrote:
Please can I knit this garment on straight needles even if I have to knit back and front separately hopefully you can help
19.08.2020 - 17:38DROPS Design answered:
Dear Mrs Lynn, sure you can, you will read more about how to adapt a pattern into straight needles here. Happy knitting!
20.08.2020 - 09:54
![]() Angela Barnes wrote:
Angela Barnes wrote:
Hello I cannot work the sizes out please? Please can you tell me the three sizes? I am about a 40 inch chest Thank you
04.02.2020 - 12:19DROPS Design answered:
Dear Mrs Barnes, measure a similar garment you have and like the shape and compare to the measurements in chart to find out the matching size. read more about sizing here. Happy knitting!
04.02.2020 - 12:39
![]() Judith Foley wrote:
Judith Foley wrote:
You have indicated that patter for 1 and 2 are below the measurment section. I do not see any information for pattern 1 or 2 on the printed pattern. Do you have an updated version?
22.07.2019 - 15:56DROPS Design answered:
Dear Judith, if you have in your printed version drawing/ chart of the sweater with measures, you will find pattern diagram chart on the right - see M.1, M.2. If you have no chart, there is probably one whole page missing in you printed version, so check all then pages for print. Happy knitting!
22.07.2019 - 16:07
![]() Judith Foley wrote:
Judith Foley wrote:
I just downloaded this pattern. In the QA section Elaine Singer asked for the patterns 1 & 2. You indicated they were below the measurement chart. I cannot find them when I print the pattern. Do you have an updated version?
22.07.2019 - 15:54
![]() Vicky Williams wrote:
Vicky Williams wrote:
I assume that when you do the M1 and M2 pattern that the even rows are worked from the left and are the wrong side of the top so need to be purl stitch instead of knit etc??
10.02.2019 - 20:39DROPS Design answered:
Hello Vicky. Yes, the even rows are worked on the wrong side of the work, from the left to the right. You will knit the black squares, and purl the white squares. Happy knitting!
10.02.2019 - 23:00
![]() Gunnel wrote:
Gunnel wrote:
Ytterligare en fråga till förra, från avigsidan, ska man inte sticka avig på räta och räta på avig? I diagrammets förklaring står det att tom ruta är rm och prick i ruta är avigruta. Och då blir det ju på de tre maskorna rätstickning i stället för slätstickning? Enligt diagrammet så stickar man på varv 2, 4 etc 7 aviga och 3 räta! Rätt eller fel? Dessutom ser inte hålmönstret likadant ut på mönstret och bilden!
28.03.2018 - 17:42DROPS Design answered:
Hej, diagrammet visar mönstret sett från rätsidan, så du har helt rätt i att det ska vara 3 maskor i slätstickning i början på diagrammet.
05.04.2018 - 16:45
![]() Gunnel wrote:
Gunnel wrote:
I M1 och M2 visar skissen att de tre första maskorna ska stickas räta på varje varv men de de tre första och de tre sista på varje varv ska stickas i slätstickning. På bilden ser det ut som om även de tre maskorna i M1 och M2 är stickat som slätstickning. Ska alla dessa tre maskor stickas som rätstickning eller slätstickning?
28.03.2018 - 16:52
![]() Dia wrote:
Dia wrote:
Thank you for the clarification, I clearly missed that part. :)
12.10.2017 - 13:41
|
|||||||||||||
South Bay#southbaycardi |
|||||||||||||
|
|
|||||||||||||
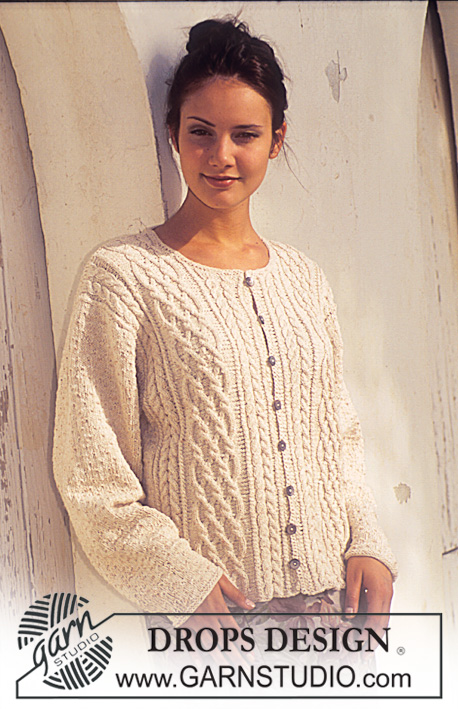
DROPS Cardigan in Safran with lace pattern and short sleeves
DROPS 51-8 |
|||||||||||||
|
Gauge: 23 sts x 30 rows in stockinette st = 10 x 10 cm (4" x 4") Pattern: See chart (1 chart = 1 repeat). The pattern is seen from the right side. Garter st, when knitting flat: Knit all sts, all rows. BODY Cast on 235 (245-255) sts (including 1 edge st at each edge which is knit in garter st) and knit Pattern 1 as follows: 1 edge st, Pattern 1 repeat 23 (24-25) times, 3 sts stockinette st, 1 edge st. When the work measures 29 (29-29) cm [11⅜"] knit Pattern 2 to finished dimensions as follows: 1 edge st, Pattern 2 repeat 23 (24-25) times, 3 sts stockinette st, 1 edge st. At the same time, when the work measures 33 cm (13"), work the next row as follows: 58 (61-63) sts for the front, bind off 4 sts for armhole, 111 (115-121) sts for the back, bind off 4 sts for armhole, 58 (61-63) sts for the front. Knit the rest of each part separately. Front: = 58 (61-63) sts. Bind off at armhole edge every other row: 2 sts 2 (2-2) times, then dec 1 st 3 (4-5) times = 51 (53-54) sts. When the work measures 45 (46-47) cm (17.75" (18⅛"-18.5"), bind off at the neck edge every other row: 6 (8-7) sts 1 time, 3 sts 1 time, 2 sts 3 times, then dec 1 st 2 times; then dec 1 st every 4th row 2 times. Bind off all sts when the work measures 55 (56-57) cm (21⅝" (22"-22.5"). Back: = 111 (115-121) sts. Shape armholes as for the fronts = 97 (99-103) sts. When the work measures 53 (54-55) cm (20⅞" (21.25"-21⅝"), bind off the center 29 (31-31) sts for the neck. Then bind off 2 sts on each neck edge on the next row. Bind off all sts when the work measures 55 (56-57) cm (21⅝" (22"-22.5"). Sleeves: Cast on 78 (78-82) sts on double pointed needles; join and place a marker at the join. Knit Pattern 2. At the same time, inc 1 st each side of marker every other row 12 (14-14) times = 102 (106-110) sts (the increased sts should be worked in pattern stitch). When the work measures 5 (5.5-6) cm (2" (2.25"-2⅜"), bind off 2 sts each side of marker and knit the rest back and forth on the needle. Then shape the sleeve caps on each side every other row: bind off 3 sts 8 (9-9) times, 4 sts 2 times, bind off all remaining sts. The work measures 12 (13-14) cm (4.75" (5⅛"-5.5"). Assembly: Sew shoulder seams. Pick up 120 sts around the neck and knit 4 rows garter st. Bind off. Front band: Crochet along the left front as follows: 2 rows of 75 sc. Repeat along the right front, but after the 1st row (which you should begin at the bottom), make buttonholes on the 2nd row as follows: 2 sc, *ch 2, skip 2 sc, 8-9 sc*. Repeat * - * (there should be 7-8 buttonholes). Sew on sleeves and buttons. |
|||||||||||||
Diagram explanations |
|||||||||||||
|
|||||||||||||
 |
|||||||||||||
Have you finished this pattern?Tag your pictures with #dropspattern #southbaycardi or submit them to the #dropsfan gallery. Do you need help with this pattern?You'll find 23 tutorial videos, a Comments/Questions area and more by visiting the pattern on garnstudio.com. © 1982-2026 DROPS Design A/S. We reserve all rights. This document, including all its sub-sections, has copyrights. Read more about what you can do with our patterns at the bottom of each pattern on our site. |
|||||||||||||


With over 40 years in knitting and crochet design, DROPS Design offers one of the most extensive collections of free patterns on the internet - translated to 17 languages. As of today we count 324 catalogs and 12290 patterns - 12280 of which are translated into English (US/in).
We work hard to bring you the best knitting and crochet have to offer, inspiration and advice as well as great quality yarns at incredible prices! Would you like to use our patterns for other than personal use? You can read what you are allowed to do in the Copyright text at the bottom of all our patterns. Happy crafting!
Post a comment to pattern DROPS 51-8
We would love to hear what you have to say about this pattern!
If you want to leave a question, please make sure you select the correct category in the form below, to speed up the answering process. Required fields are marked *.