
Popular categories
Looking for a yarn?


Comments / Questions (189)
![]() Lavazais Anne-Sophie wrote:
Lavazais Anne-Sophie wrote:
Bonjour, La largeur totale de la manche en haut pour la taille S fait 37 cm (=37 mailles). Or la hauteur de l'emmanchure jusqu'à l'épaule fait 20 cm, donc au total devant + dos = 40 cm. Comment dois-je faire pour coudre les 37 cm de la manche sur les 40 cm de l'emmanchure et que le résultat soit bien plat ? D'avance merci pour votre réponse
05.02.2024 - 21:47
![]() Aki wrote:
Aki wrote:
I'm a beginner knitter so this is a pretty ambitious project for me but I'm very determined to survive this pattern. At the start of the instructions for the back piece it says to purl on the wrong side, but if the cast on is on the left needle, wouldn’t this mean I just need to knit on the right side?
29.01.2024 - 00:42DROPS Design answered:
Dear Aki, what you do is, after casting on, you will purl 1 row. From now on, the side which is towards you when you purled the row will be the wrong side of the piece. This is done so that the cast-on edge looks more neat. Happy knitting!
29.01.2024 - 00:52
![]() Ingrid Høyer wrote:
Ingrid Høyer wrote:
Beskrivelsen af hvordan man laver ærmekuplen er ikke ok. Jeg formoder at man skal lukke ialt 6 m af under ærmet inden der strikkes frem og tilbage.
20.01.2024 - 12:14DROPS Design answered:
Hei Ingrid. Nei, det er riktig slik det står i oppskriften. Se på målskissen og evnt ta en titt på den generelle videoen: Hvordan sys ærmekuplen i ærmegabet. mvh DROPS Design
29.01.2024 - 10:42
![]() Antje wrote:
Antje wrote:
Moin. Wenn ich Rücken- und Vorderteil was die Muster anbetrifft gleich stricke bis zu einer Höhe von 35 cm und gleichzeitig das Rückenteil länger als das Vorderteil ist, dann bedeutet das, dass die Muster nicht auf gleicher Höhe beginnen, oder? Das heißt, das Patent fängt vorne weiter nach oben versetzt an als hinten?
15.01.2024 - 22:05DROPS Design answered:
Liebe Anja, ja genau, Das Muster wird nicht an beiden Seiten anpassen, wenn man die Seiten zusammen näht, siehe 1. Foto; Viel Spaß beim stricken!
16.01.2024 - 08:35
![]() Laetitia E wrote:
Laetitia E wrote:
Bonjour, je ne comprends pas les dimensions des manches. Je réalise la taille S et les manches sont plus longues que les autres tailles. Est-ce normal ? Merci
31.12.2023 - 10:24DROPS Design answered:
Bonjour Laetitia, tout à fait, car les épaules sont plus larges dans les grandes tailles, donc les manches seront plus courtes. Quoi qu'il en soit, vous pouvez ajuster la longueur des manches en vous basant sur un pull similaire dont vous aimez la forme (pensez à bien prendre en compte la largeur du dos/devant dans vos mesures). Bon tricot!
02.01.2024 - 10:56
![]() Jill Christley wrote:
Jill Christley wrote:
There is still a problem with the sleeve instructions. CO 27 sts. @10cm dec 3 sts = 24sts. INC 2 STS EVERY 9 CM. @12cm inc 2 sts = 26 sts. @21cm inc 2 sts = 28 sts. @ 30cm inc 2 sts = 30 sts. @ 39cm inc 2 sts = 32 sts. Sleeve will never have 37 sts, as there is an even number on the needle. Should I increase until there are 32 sts? Thank you.
31.12.2023 - 08:09
![]() Margarita Rafecas wrote:
Margarita Rafecas wrote:
Hola, en la confeccion de el FRENTE, donde dice como hacer el escote de cuello, no entiendo lo siguiente: 2puntos una vez, un punto una vez. Los puntos se rematan de uno en uno, no?? Y entiendo que en cada vuelta del derecho. Si me podeis ayudar? Muchas gracias
12.12.2023 - 19:40DROPS Design answered:
Hola Margarita, cierras en filas que comienzan desde el escote; en un hombro esta será una fila por el lado derecho y en el otro una fila por el lado revés. En la primera fila cierras los primeros 2 puntos, trabajas 1 fila normal y en la siguiente fila cierras sólo 1 punto. Los puntos se rematan de uno en uno.
17.12.2023 - 23:49
![]() Katrin wrote:
Katrin wrote:
Hallo, wenn ich den Pulli mit Drops Air stricken möchte, benötige ich dann insgesamt 900g Wolle, da der Faden ja doppelt genommen wird.
11.12.2023 - 19:07DROPS Design answered:
Liebe Katrin, in diese Lektion wird es erklärt, wie man die neue Garnmenge kalkuliert, gerne können Sie auch unseren Garnumrechner benutzen, so finden Sie die gleiche Ergebnis, da beide Wolle eine verschiedene Lauflänge haben. Viel Spaß beim stricken!
12.12.2023 - 08:50
![]() Valerie wrote:
Valerie wrote:
Bonjour Sur votre schéma A2 le jeté n est fait que sur l envers du travail mais lorsque l’on regarde la vidéo des côtes anglaises, le jeté est fait à l’envers mais aussi à l’endroit Pouvez vous me confirmer que pour ce modèle nous ne devons faire les jetés que à l.envers svp Merci par avance Bien cordialement Valérie
29.11.2023 - 06:57DROPS Design answered:
Bonjour Valérie, dans la vidéo, on tricote entièrement en côtes anglaises, dans A.2 ici, on tricote alternativement 1 maille en côtes anglaise, 1 maile jersey envers; autrement dit, le 1er rang de A.2 se tricote sur l'envers (= 1 jeté, on glisse 1 m à l'envers, puis 1 maille endroit) et, au 2ème rang, on tricote (le jeté et la m glissée ensemble à l'endroit + 1 maille envers). Bon tricot!
29.11.2023 - 08:28
|
||||||||||||||||
Rain Chain#rainchainsweater |
||||||||||||||||
 |
 |
|||||||||||||||
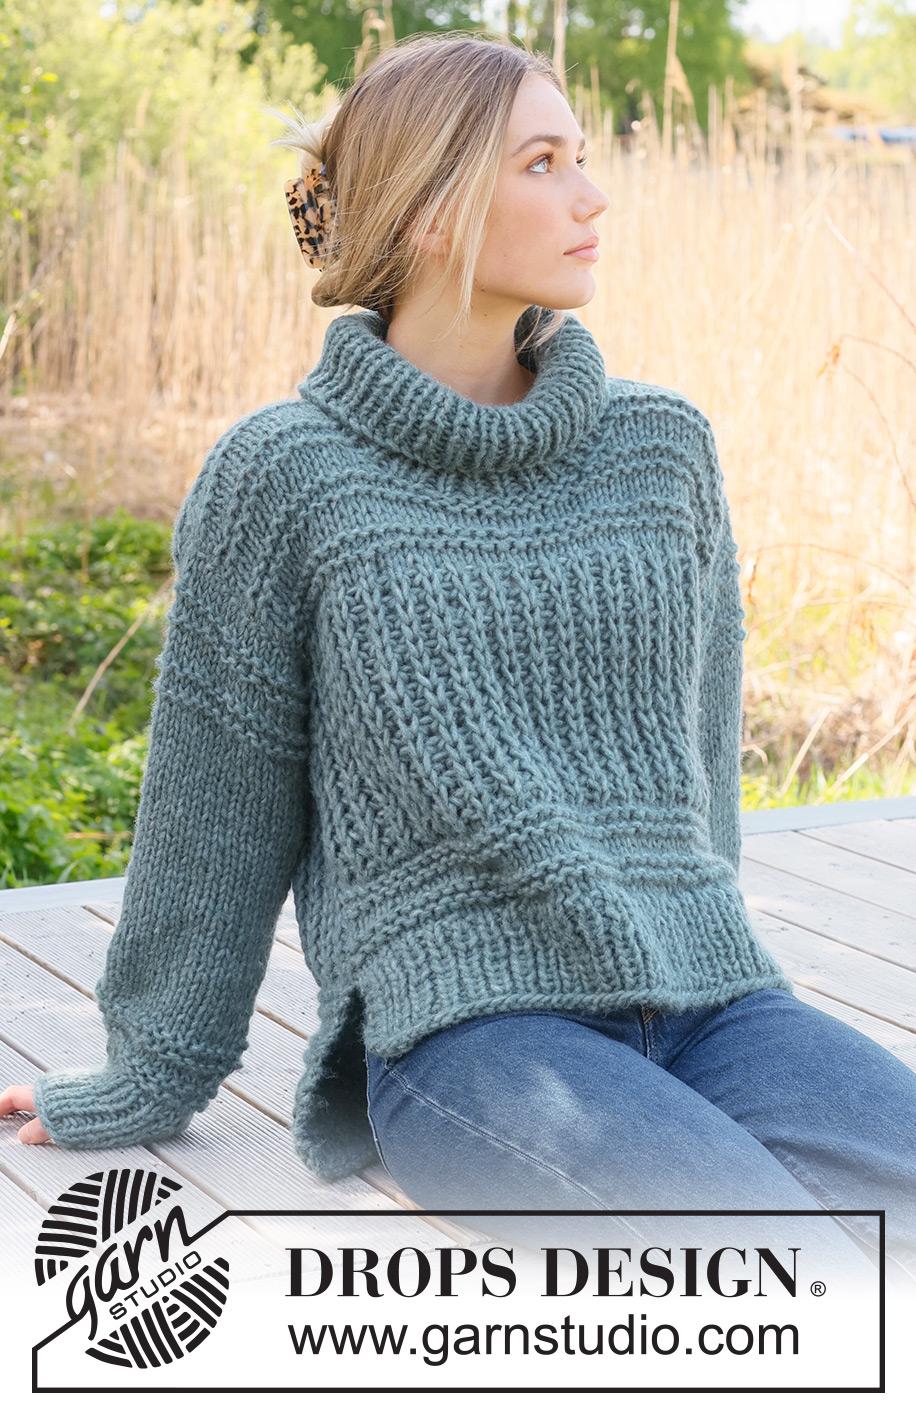
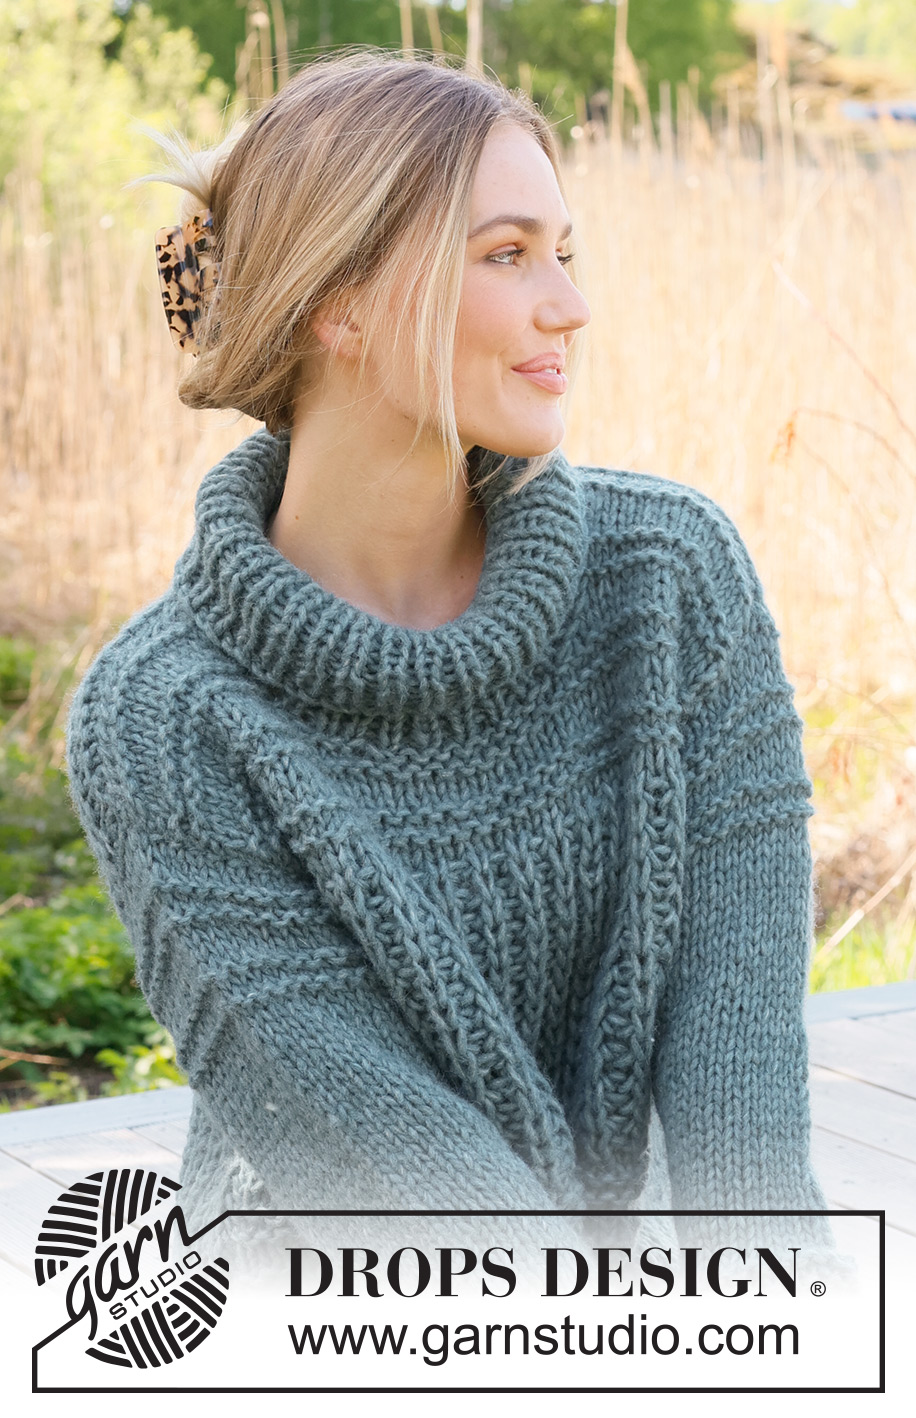
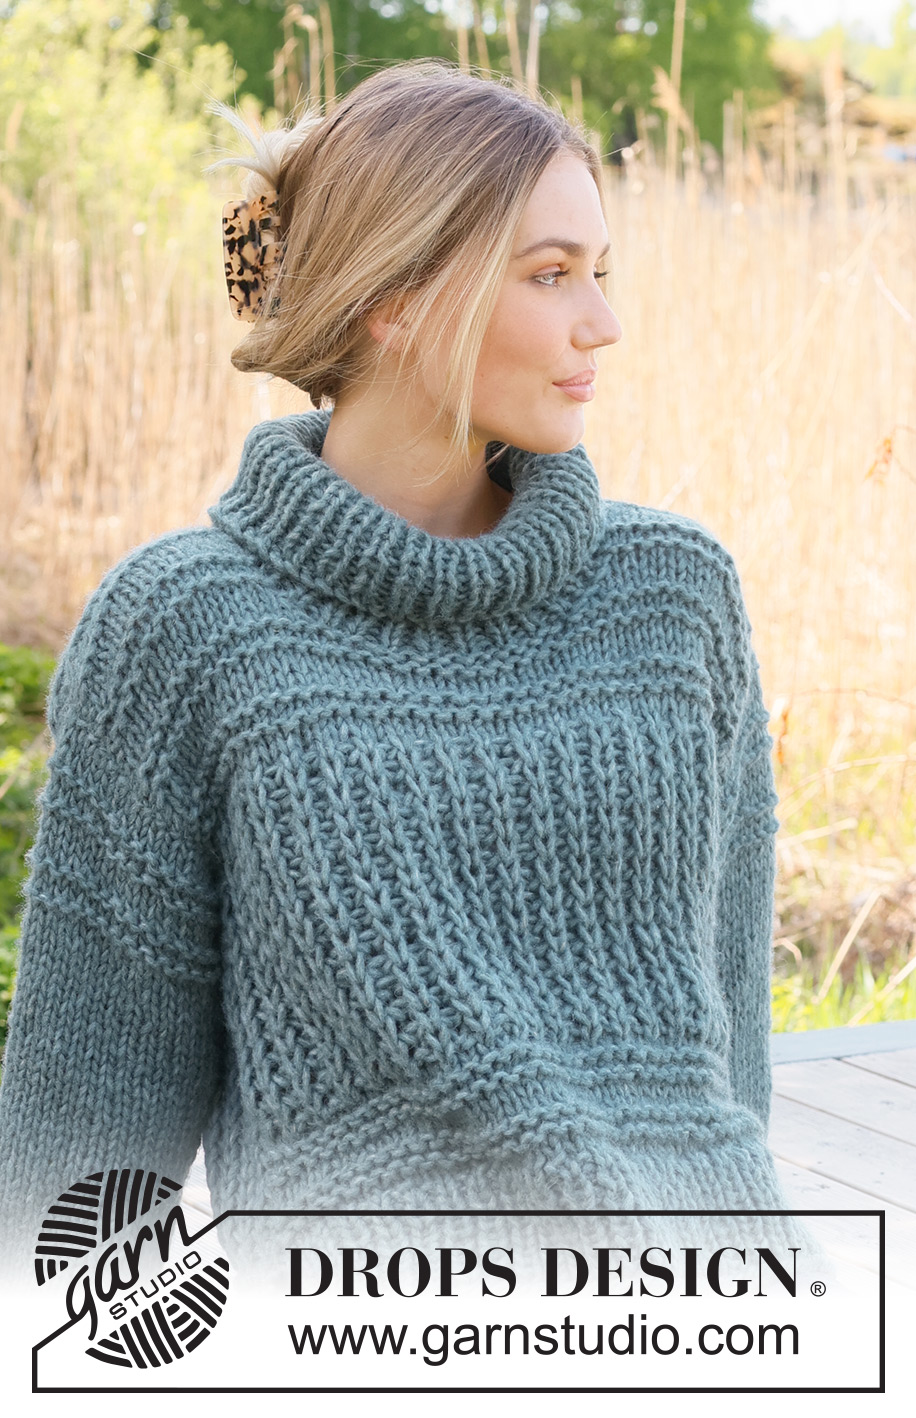
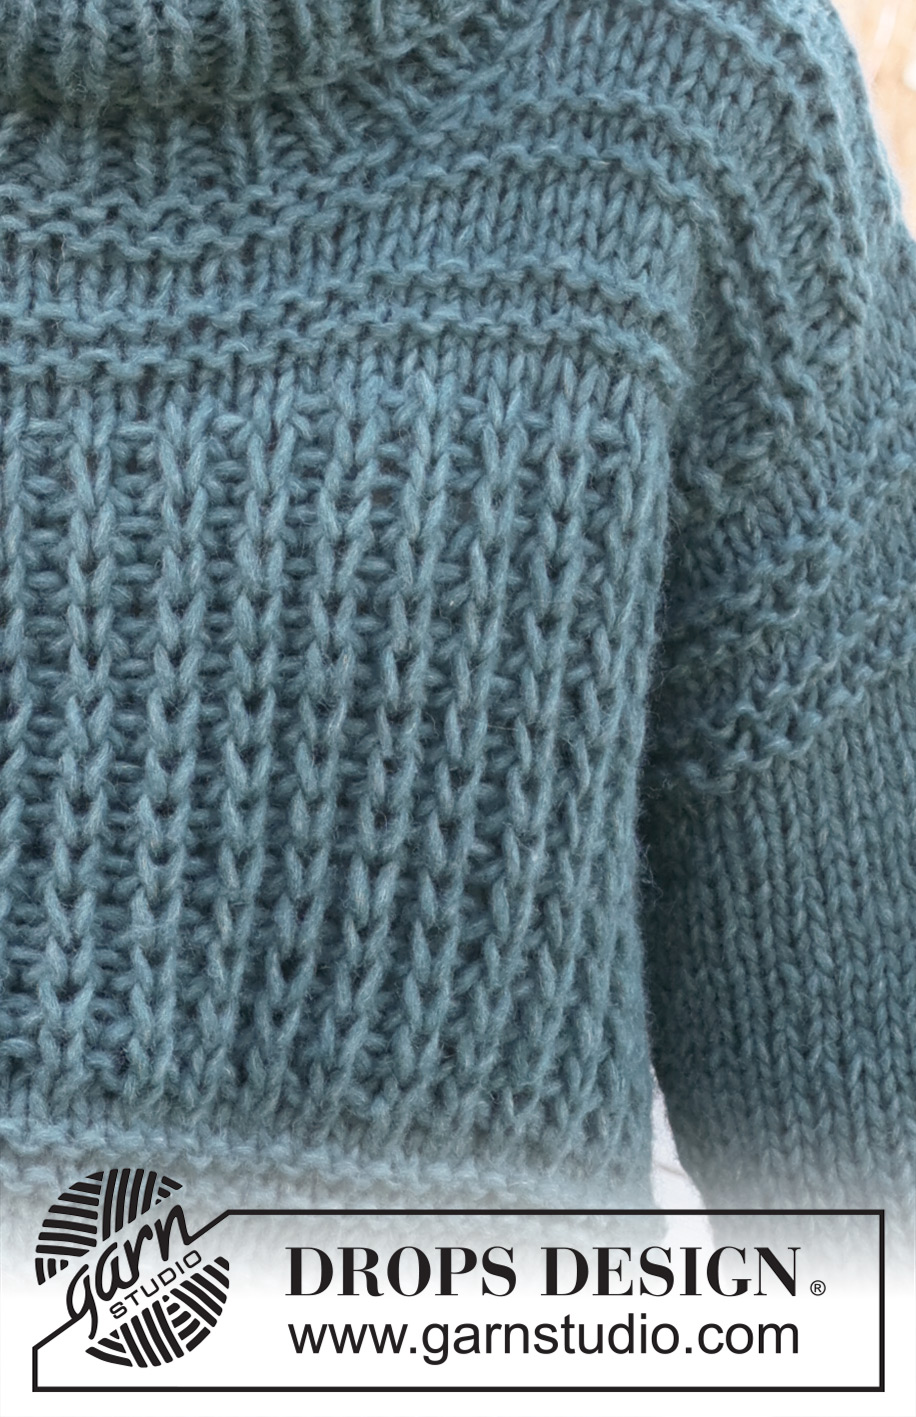
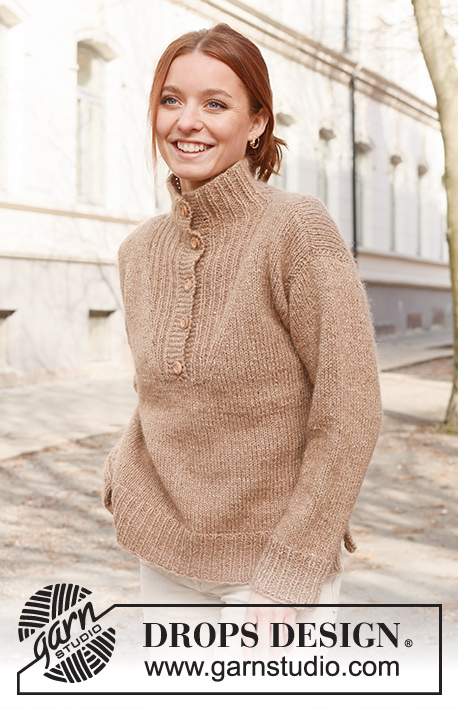
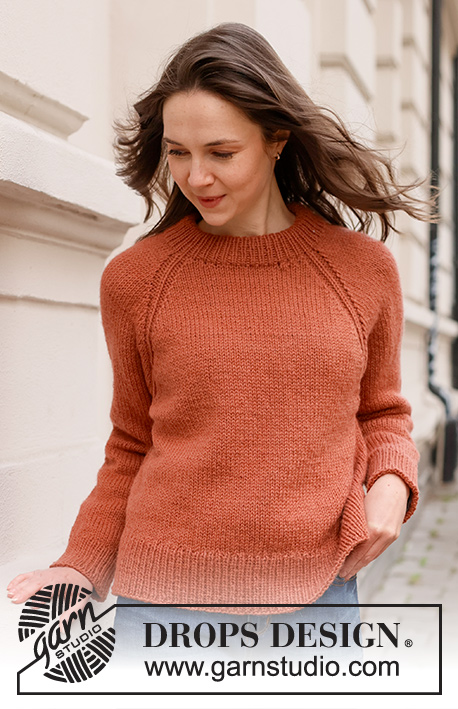
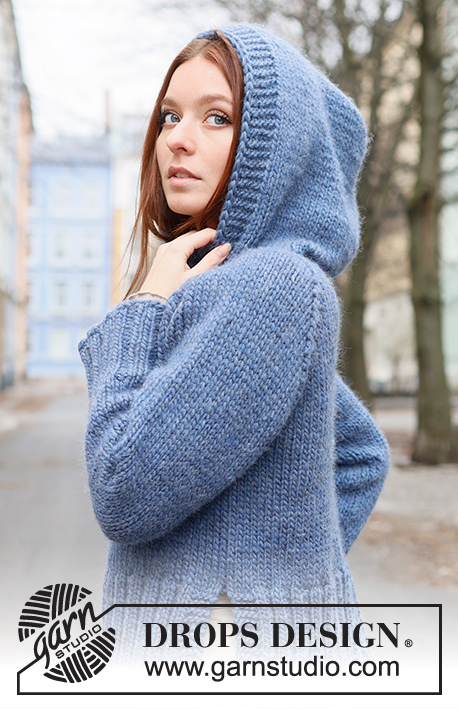
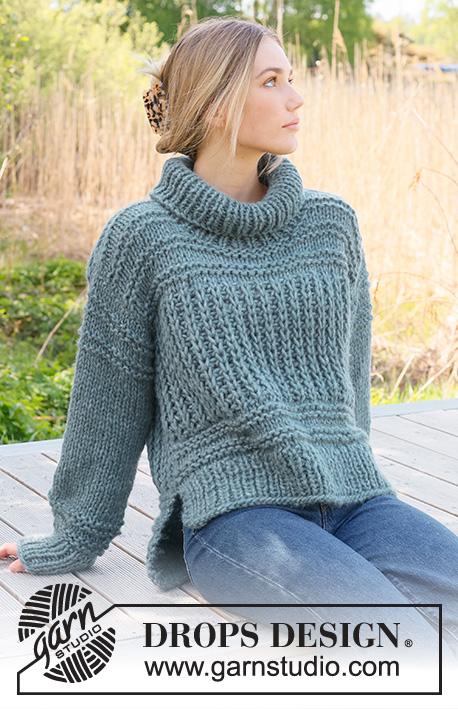
Knitted sweater in 1 strand DROPS Wish or 2 strands DROPS Air. The piece is worked bottom up with English rib, open garter stitch and split in the sides. Sizes S - XXXL.
DROPS 236-9 |
||||||||||||||||
|
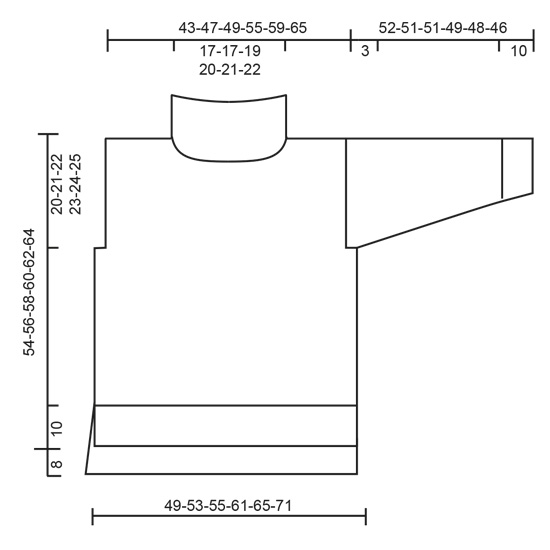
------------------------------------------------------- EXPLANATIONS FOR THE PATTERN: ------------------------------------------------------- PATTERN: See diagrams A.1 and A.2. The diagrams show all rows in the pattern from the right side. RIDGE/GARTER STITCH (worked back and forth): Knit all rows. 1 ridge = knit 2 rows. INCREASE TIP (for sleeves): Work until there is 1 stitch left before the marker thread, 1 yarn over, knit 2 (marker thread sits between these stitches), 1 yarn over. On the next round knit the yarn overs twisted to avoid holes. Then work the new stitches in stockinette stitch. ------------------------------------------------------- SWEATER – SHORT OVERVIEW OF THE PIECE: The piece is worked in sections, back and forth and bottom up, then sewn together. The sleeves are worked in the round with double pointed needles/short circular needle bottom up. The back piece is 8 cm = 3⅛" longer than the front. BACK PIECE: Cast on 59-63-67-73-79-85 stitches with circular needle size 8 MM = US 11 1 strand DROPS Wish or 2 strands DROPS Air. Purl 1 row from the wrong side then work rib as follows from the right side: 2 edge stitches in GARTER STITCH – read description above, * knit 1, purl 1 *, work from *-* until there are 3 stitches left, knit 1 and 2 edge stitches in garter stitch. Continue this rib for 10 cm = 4". Purl 1 row from the wrong side and decrease 10-10-12-12-14-14 stitches evenly spaced = 49-53-55-61-65-71 stitches. Change to circular needle size 9 MM = US 13. REMEMBER THE KNITTING GAUGE! Work A.1, 2-2-2-3-3-3 times in height. Now work 1 row as follows from the right side: 1 edge stitch in garter stitch, * knit 1, purl 1 *, work from *-* until there are 2 stitches left, knit 1 and 1 edge stitch in garter stitch. Work A.2 (first row from the wrong side, reading the diagram from left to right and the pattern beginning and ending with 1 knitted stitch in English rib inside 1 edge stitch in garter stitch, seen from the right side). Continue A.2 onwards. When the piece measures 42-43-44-45-46-47 cm = 16½"-17"-17¼"-17¾"-18"-18½", bind off 3 stitches at the beginning of the next 2 rows for the armholes = 43-47-49-55-59-65 stitches. Continue A.2. When the piece measures 44-46-48-50-52-54 cm = 17¼"-18"-19"-19¾"-20½"-21¼", purl the next row from the wrong side. Then work according to A.1. When the piece measures 60-62-64-66-68-70 cm = 23⅝"-24⅜"-25¼"-26"-26¾"-27½", bind off the middle 13-13-15-15-17-17 stitches for the neck and finish each shoulder separately. Bind off 1 stitch on the next row from the neck = 14-16-16-19-20-23 stitches on the shoulder. Bind off when the piece measures 62-64-66-68-70-72 cm = 24⅜"-25¼"-26"-26¾"-27½"-28⅜". Work the other shoulder in the same way. FRONT PIECE: Cast on and work in the same way as the back piece until the front measures 34-35-36-37-38-39 cm = 13⅜"-13¾"-14¼"-14½"-15"-15¼". Bind off 3 stitches at the beginning of the next 2 rows for the armholes = 43-47-49-55-59-65 stitches. Continue A.2. When the piece measures 36-38-40-42-44-46 cm = 14¼"-15"-15¾"-16½"-17¼"-18", purl the next row from the wrong side. Then work according to A.1. When the piece measures 47-49-51-53-55-57 cm = 18½"-19¼"-20"-21"-21⅝"-22½", work the neck as follows: Place the middle 9-9-11-11-13-13 stitches on a thread and finish each shoulder separately. Bind off for the neck every 2nd row as follows: 2 stitches 1 time, 1 stitch 1 time = 14-16-16-19-20-23 stitches on the shoulder. Bind off when the piece measures 54-56-58-60-62-64 cm = 21¼"-22"-22¾"-23⅝"-24⅜"-25¼". Work the other shoulder in the same way. SLEEVES: Cast on 30-32-32-34-34-36 stitches with double pointed needles size 8 MM = US 11 and 1 strand DROPS Wish or 2 strands DROPS Air. Insert 1 marker-thread at the beginning of the round (mid-under sleeve). Knit 1 round, then work rib in the round (knit 1, purl 1) for 10 cm = 4". Knit 1 round and decrease 3-3-3-3-3-3 stitches evenly spaced = 27-29-29-31-31-33 stitches.Change to double pointed needles size 9 mm = US 13. Work A.1, 2 times in height then continue with stockinette stitch. AT THE SAME TIME when the sleeve measures 12 cm = 4¾", increase 1 stitch on each side of the marker-thread – read INCREASE TIP. Increase like this every 5½-5½-5-4-3½-3½ cm = 2⅛"-2⅛"-2"-1½"-1¼"-1¼" a total of 7-7-7-8-9-9 times = 41-43-43-47-49-51 stitches. When the sleeve measures 43-42-42-40-39-37 cm = 17"-16½"-16½"-15¾"-15¼"-14½", continue with A.1. When the sleeve measures 49-48-48-46-45-43 cm = 19¼"-19"-19"-18"-17¾"-17", work the sleeve cap back and forth (from mid-under sleeve) to finished length. Bind off when the sleeve measures 52-51-51-49-48-46 cm = 20½"-20"-20"-19¼"-19"-18". Work the other sleeve in the same way. ASSEMBLY: Sew the shoulder seams. Sew in the sleeves, inside the 1 edge stitch and sew the bottom of the armholes – see sketch. Sew the side seams as far as the rib (= 10 cm = 4" split on the front piece, 18 cm = 7" on the back), sew in the outermost loop of the outermost stitch so the seam is flat. NECK: Start at the top of the right shoulder and knit up (including the stitches on the thread) 60 to 72 stitches with short circular needle size 8 MM = US 11 and 1 strand DROPS Wish or 2 strands DROPS Air. The number of stitches should be divisible by 2. Work rib in the round (knit 1, purl 1) for 20-20-20-22-22-22 cm = 8"-8"-8"-8¾"-8¾"-8¾". Bind off. |
||||||||||||||||
Diagram explanations |
||||||||||||||||
|
||||||||||||||||
 |
||||||||||||||||
 |
||||||||||||||||
 |
||||||||||||||||
Have you finished this pattern?Tag your pictures with #dropspattern #rainchainsweater or submit them to the #dropsfan gallery. Do you need help with this pattern?You'll find 34 tutorial videos, a Comments/Questions area and more by visiting the pattern on garnstudio.com. © 1982-2026 DROPS Design A/S. We reserve all rights. This document, including all its sub-sections, has copyrights. Read more about what you can do with our patterns at the bottom of each pattern on our site. |
||||||||||||||||


With over 40 years in knitting and crochet design, DROPS Design offers one of the most extensive collections of free patterns on the internet - translated to 17 languages. As of today we count 325 catalogs and 12298 patterns - 12288 of which are translated into English (US/in).
We work hard to bring you the best knitting and crochet have to offer, inspiration and advice as well as great quality yarns at incredible prices! Would you like to use our patterns for other than personal use? You can read what you are allowed to do in the Copyright text at the bottom of all our patterns. Happy crafting!
Post a comment to pattern DROPS 236-9
We would love to hear what you have to say about this pattern!
If you want to leave a question, please make sure you select the correct category in the form below, to speed up the answering process. Required fields are marked *.