
Popular categories
Looking for a yarn?


Comments / Questions (98)
![]() Ulla Salling wrote:
Ulla Salling wrote:
Kan ikke finde ud af at læse A1 og A2 Jeg har nu 94 masker og skal tage ud til 137 masker på første pind Vil i beskrive hvordan jeg skal gøre på denne første pind. På forhånd tak for hjælpen Mvh Ulla
04.01.2026 - 02:38DROPS Design answered:
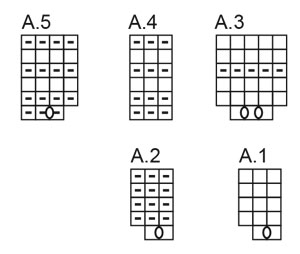
Hei Ulla. Om det er str. 6/9 mnd du strikkes, så strikkes det 4 stolpemasker + A.1 (=2 masker + 1 kast) + A.2 (=2 masker + 1 kast). Så strikker du A.1+A.2 + A.1 + A.2 osv. Du strikker A.1 21 ganger og A.2 21 ganger og du skal nå ha 6 masker igjen på pinnen. Strikk A.1 (2 masker og 1 kast). Det er nå 4 masker igjen = Stolpemasker. Du har nå 137 masker og kast på pinnen. Når man har strikket 1. pinne av diagrammene har man 4 stolpemasker + A.1 (3x22= 66 masker) + A.2 (3 x 21 = 63) + 4 kantmasker = 4+66+63+4= 137 masker. mvh DROPS Design
12.01.2026 - 14:18
![]() Elisabeth wrote:
Elisabeth wrote:
Bonjour Je n'arrive pas à comprendre vos diagrammes (quel que soit le modèle d'ailleurs) : dans ce modèle vous dites de tricoter A1et A2 jusqu'aux 6 dernières mailles mais vous ne précisez pas quand est ce que c'est A1 et qd c'est A2 ! Ni sur combien de rangs ? Pouvez vous m'éclairer car vous avez de très jolis modèles mais je coince à chaque fois à cause des diagrammes ! Merci d'avance Elisabeth
17.12.2025 - 14:35DROPS Design answered:
Bonjour Élisabeth, quand on doit tricoter A.1 et A.2 on doit les tricoter ainsi, je cite: *A.1, A.2*, et on répète de *à* autrement dit, au 1er rang, *vous tricotez les 2 m de A.1 (= 1 m end, 1 jeté, 1 m end), puis les 2 m de A.2 (1 m end, 1 jeté, 1 m end)* et vous répétez de * à * tout le rang jusqu'à ce qu'il ne reste que 6 mailles, vous terminez par A.1 (= 1 m end, 1 jeté, 1 m end) et les 4 m au point mousse. Tricotez les 5 rangs suivants de A.1/A.2 en suivant la légende des symboles. Retrouvez plus d'infos ici . Bon tricot!
17.12.2025 - 18:02
![]() Michelle wrote:
Michelle wrote:
How do you knit 3 pearl 3 when you have increased a stitch between 2 stitches making 4 in the A1 and A2 diagram
12.12.2025 - 02:21DROPS Design answered:
Dear Michelle, you first increase in A.1 and A.2, then after you have worked A.1/A.2 with K3, P3 finishing with K3, you will work A.3 over A1 and A.5 over A.2 increasing 2 sts in A.3 and 1 st in A.5 so that you will have K5, P4 finishing with K5. Happy knitting!
12.12.2025 - 08:21
![]() Ulla Boesen wrote:
Ulla Boesen wrote:
Hvad betyder: Sæt 1 mærke efter forkanten i begyndelsen af pinden midt foran? Er det efter de fire kantmasker?
06.12.2025 - 21:39DROPS Design answered:
Hei Ulla. Ja, etter de 4 kantmaskene. Dette er et merke det senere skal måles fra (lengden). mvh DROPS Design
08.12.2025 - 14:26
![]() Sylvia wrote:
Sylvia wrote:
Can I knit the neck and yoke on this pattern with straight needles or must it be done with circular needles please? Thank you. Sylvia
16.11.2025 - 18:07DROPS Design answered:
Hi Sylvia, We recommend circular needles due to the number of stitches. Using straight needles it is easy to lose stitches off the end. But this is of course just a recommendation and you can use straight needles if you wish. Regards, Drops Team.
17.11.2025 - 06:47
![]() Defferrard Monique wrote:
Defferrard Monique wrote:
Bonsoir, je souhaiterais savoir comment faire les augmentations .Si je fais 1end+1aug +1env+1end+1env+1 end+1aug+1env c'est bien ou pas . Merci Cordialement
08.11.2025 - 22:09DROPS Design answered:
Bonjour Mme Defferrard, parlez-vous des augmentations dans les côtes à la fin du col? Vous tricotez en côtes (1 m end, 1 m env), vous allez augmenter dans 1 section en mailles envers sur 2 autrement dit ainsi: (1 m end, 1 m env, 1 m end, 1 m env + 1 augmentation), vous continuerez ensuite en côtes (1 m end, 1 m env, 1 m end, 2 m env). Bon tricot!
10.11.2025 - 07:30
![]() Barbara wrote:
Barbara wrote:
Chodziło mi o ściągacz francuski po sekcji: Kończyć schematy A.1 i A.2, dalej przerabiać ściągaczem 3 oczka prawe/3 oczka lewe, aż długość karczku od markera na wykończeniu dekoltu wynosi (4) 5-5-5-6 (6) cm. Przerabiać kolejny rząd na prawej stronie robótki następująco: ROZMIAR (
07.11.2025 - 10:03DROPS Design answered:
Witaj ponownie Basiu, ten ściągacz francuskim powstanie po przerobieniu rzędów 3 i 4 schematów A.3/A.5 (ROZMIARY 0/1 – 1/3 – 6/9 – 12/18 miesięcy (2 lata)) lub A.3/A4 (ROZMIAR (<0)).
07.11.2025 - 11:20
![]() Barbara wrote:
Barbara wrote:
Czy po przerobieniu 6 cm ściągaczem 3 oczka prawe, 3 oczka lewe nie powinien być dodany 1 ściągacz francuski, jak widać na zdjęciu?
07.11.2025 - 02:39DROPS Design answered:
Witaj Basiu, dokładnie, patrz część KARCZEK: "Dalej przerabiać na drutach z żyłką nr 4 i przerobić 1 ściągacz francuski ponad wszystkimi oczkami". Pozdrawiamy!
07.11.2025 - 08:23
![]() Torunn Tverborgvik wrote:
Torunn Tverborgvik wrote:
Ønsker oppskrift der eg begynner nede på jakken
03.10.2025 - 14:20
![]() Margaux wrote:
Margaux wrote:
Bonjour, Je ne comprends pas bien l'alternance des diagrammes A3/A5. J'ai bien tricoté sur l'endroit le rang 1 avec des augmentations, et ai obtenu 184 mailles. Le rang 2 se tricote sur l'envers donc 4 m end / 5 m env, rang 3, 4, 5 au point mousse et rang 6 sur l'envers 4 m end/5 m envers ? Puis reprendre les côtes sur ce modèle. Je me retrouve avec des côtes décalées/inversées et une large ligne de point mousse qui n'apparaît pas sur le modèle ?
01.10.2025 - 22:23DROPS Design answered:
Bonjour Margaux, au 2ème rang de A.3 et A.5, vous tricotez A.3 (= 5 m env sur l'envers), puis vous répétez (A.5 = 4 m end, A.3 = 5 m env) jusqu'à la fin du rang. Au 3ème rang, tricotez (A.3 = 5 m end, A.5 = 4 m end), et A.3 = 5 m end; au 4ème rang: tricotez toutes les mailles de A.3 et A.5 à l'endroit sur l'envers pour toutes les mailles, au 5ème rang: tricotez toutes les mailles de A.3 et A.5 à l'endroit sur l'endroit et au 6ème rang tricotez A.3 (5 m env), puis (A.5 = 4 m end, A.3 = 5 m env). Bon tricot!
02.10.2025 - 08:50
|
||||||||||
Sweet Gleam Cardigan#sweetgleamcardigan |
||||||||||
 |
 |
|||||||||
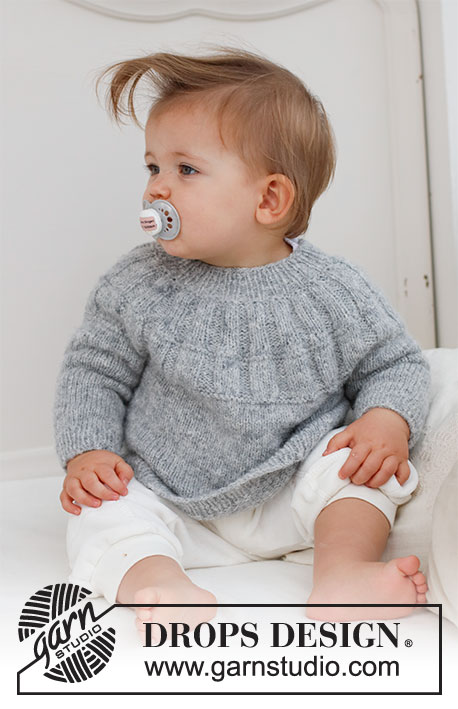
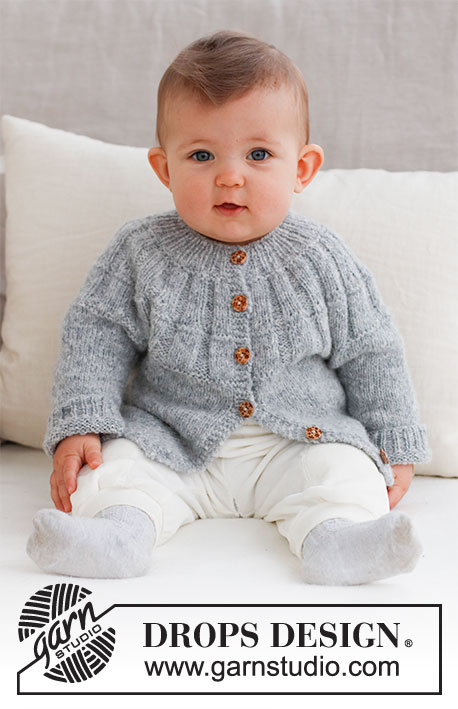
Knitted jacket for baby in DROPS Sky. The piece is worked top down, with round yoke and ribbing on the yoke. Sizes: Premature to 2 years.
DROPS Baby 43-6 |
||||||||||
|
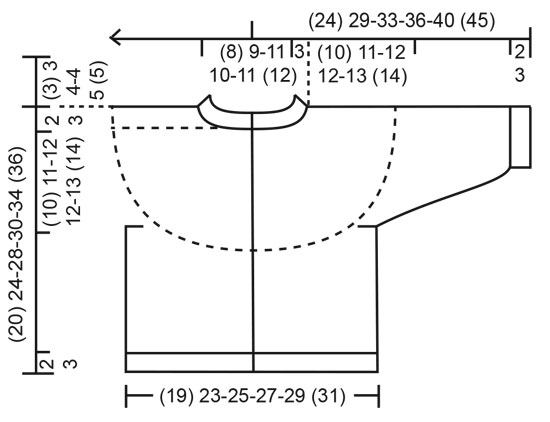
------------------------------------------------------- EXPLANATIONS FOR THE PATTERN: ------------------------------------------------------- RIDGE/GARTER STITCH (worked back and forth): Knit all rows. 1 ridge = knit 2 rows. PATTERN: See diagrams A.1 to A.5. The diagrams show all rows in the pattern from the right side. DECREASE TIP (for sleeves): Start 3 stitches left before the marker, knit 2 together, knit 2 (marker sits between these 2 stitches), slip 1 stitch as if to knit, knit 1 and pass the slipped stitch over the knitted stitch. BUTTONHOLES: Work the buttonholes on the right band (when the garment is worn). Work from the right side when there are 3 stitches left: Make 1 yarn over, knit 2 together and knit 1. On the next row (wrong side) knit the yarn over to leave a hole. The first buttonhole is worked when the neck measures 1½-2 cm = ½"-¾", the other (3) 4-5-5-5 (5) buttonholes are worked with (5) 5-5-5-5½ (6) cm = (2") 2"-2"-2"-2⅛" (2⅜") between each one. ------------------------------------------------------- START THE PIECE HERE: ------------------------------------------------------- JACKET – SHORT OVERVIEW OF THE PIECE. The neck and yoke are worked back and forth with circular needle, from mid front and top down. The yoke is divided for body and sleeves and the body continued back and forth. The sleeves are worked in the round with double pointed needles. NECK: Cast on (59) 63-71-75-79 (83) stitches with circular needle size 3 MM = US 2.5 and DROPS Sky. Purl 1 row from the wrong side, then work the next row as follows: 4 band stitches in GARTER STITCH – read description above, * knit 1, purl 1 *, work from *-* until there are 5 stitches left, knit 1 and 4 band stitches in garter stitch. Work this rib for (2) 2-3-3-4 (4) cm = (3/4") ¾"-1⅛"-1⅛"-1½" (1½") – remember the BUTTONHOLES on the right band – read description above. On the next row from the right side increase every other purl-1 to purl-2 by making 1 yarn over – start to increase in the 2nd purled stitch after the band (knit the yarn overs twisted on the next row to avoid holes) = (12) 13-15-16-17 (18) increased stitches and (71) 76-86-91-96 (101) stitches. Continue the new rib until the neck measures (3) 3-4-4-5 (5) cm = (1⅛") 1⅛"-1½"-1½"-2" (2"). Insert 1 marker after the band; the yoke is measured from this marker! YOKE: Change to circular needle size 4 MM = US 6 and work 1 ridge over all stitches – AT THE SAME TIME on the first row increase (3) 2-0-3-2 (1) stitches evenly spaced = (74) 78-86-94-98 (102) stitches. After the ridge work as follows from the right side: 4 band stitches in garter stitch, * A.1, A.2 *, work from *-* until there are 6 stitches left, A.1 and 4 band stitches in garter stitch. After the first row there are (107) 113-125-137-143 (149) stitches. Complete A.1 and A.2, then continue with knit 3 /purl 3 until the yoke measures (4) 5-5-5-6 (6) cm = (1½") 2"-2"-2"-2⅜" (2⅜") from the marker on the neck. Work the next row from the right side as follows: SIZE (<0): 4 band stitches in garter stitch, * A.3, A.4 *, work from *-* until there are 7 stitches left, A.3 and 4 band stitches in garter stitch. SIZES 0/1 – 1/3 – 6/9 – 12/18 months (2 years): 4 band stitches in garter stitch, * A.3, A.5 *, work from *-* until there are 7 stitches left, A.3 and 4 band stitches in garter stitch. After the first row there are (141) 166-184-202-211 (220) stitches. Complete A.3 and A.4/A.5, then continue with knit 5 / purl 3 in size (<0) and knit 5 / purl 4 in the other sizes until the yoke measures (8) 10-10-10-12 (12) cm = (3⅛") 4"-4"-4"-4¾" (4¾") from the marker. Knit 1 row from the right side where you adjust the number of stitches to (139) 163-175-191-195 (207) stitches. Knit 1 row from the wrong side. Continue with stockinette stitch and 4 band stitches in garter stitch on each side until the yoke measures (10) 11-12-12-13 (14) cm = (4") 4⅜"-4¾"-4¾"-5⅛" (5½") from the marker. On the next row divide for the body and sleeves as follows: Work the first (22) 26-28-30-31 (33) stitches as before, place the next (30) 34-36-40-40 (42) stitches on a thread for the sleeve, cast on (4) 4-6-6-8 (8) stitches (in side under sleeve), work (35) 43-47-51-53 (57) stitches, place the next (30) 34-36-40-40 (42) stitches on a thread for the sleeve, cast on (4) 4-6-6-8 (8) stitches (in side under sleeve), work the last (22) 26-28-30-31 (33) stitches. The body and sleeves are finished separately. The piece is now measured from here! BODY: = (87) 103-115-123-131 (139) stitches. Continue with stockinette stitch and 4 band stitches in garter stitch on each side for a further (6) 9-12-12-15 (16) cm = (2⅜") 3½"-4¾"-4¾"-6" (6¼"). Knit 1 row from the right side where you increase (12) 14-16-18-18 (20) stitches evenly spaced = (99) 117-131-141-149 (159) stitches. Change to circular needle size 3 MM = US 2.5 and work as follows from the wrong side: 4 band stitches in garter stitch, * purl 1, knit 1 *, work from *-* until there are 5 stitches left, purl 1 and 4 band stitches in garter stitch. Continue this rib for (2) 2-2-3-3 (3) cm = (3/4") ¾"-¾"-1⅛"-1⅛" (1⅛"). Bind off a little loosely. The jacket measures approx. (20) 24-28-30-34 (36) cm = (8") 9½"-11"-11¾"-13⅜" (14¼") from the shoulder down. SLEEVES: Place the (30) 34-36-40-40 (42) stitches from the thread on the one side of the piece on double pointed needles size 4 MM = US 6 and knit up 1 stitch in each of the (4) 4-6-6-8 (8) stitches cast on under the sleeve = (34) 38-42-46-48 (50) stitches. Insert a marker in the middle of the (4) 4-6-6-8 (8) stitches under the sleeve. Start at the marker and work stockinette stitch in the round for 1 cm = ⅜". Now decrease 2 stitches under the sleeve (does not apply to sizes <0 and 0/1 month) – read DECREASE TIP. Decrease like this every 4th round a total of (0) 0-1-1-1 (2) times = (34) 38-40-44-46 (46) stitches. Continue working until the sleeve measures (5) 8-10-13-15 (19) cm = (2") 3⅛"-4"-5⅛"-6" (7½") from the division. There is approx. (2) 2-2-3-3 (3) cm = (3/4") ¾"-¾"-1⅛"-1⅛" (1⅛") to finished length; try the jacket on and work to desired length. Knit 1 round where you decrease (0) 0-0-4-4 (2) stitches evenly spaced = (34) 38-40-40-42 (44) stitches. Change to double pointed needles size 3 MM = US 2.5 and work rib (knit 1, purl 1) for (2) 2-2-3-3 (3) cm = (3/4") ¾"-¾"-1⅛"-1⅛" (1⅛"). Bind off a little loosely The sleeve measures approx. (7) 10-12-16-18 (22) cm = (2¾") 4"-4¾"-6¼"-7" (8¾") from the division. Work the other sleeve in the same way. ASSEMBLY: Sew the buttons onto the left band. |
||||||||||
Diagram explanations |
||||||||||
|
||||||||||
 |
||||||||||
 |
||||||||||
Have you finished this pattern?Tag your pictures with #dropspattern #sweetgleamcardigan or submit them to the #dropsfan gallery. Do you need help with this pattern?You'll find 29 tutorial videos, a Comments/Questions area and more by visiting the pattern on garnstudio.com. © 1982-2026 DROPS Design A/S. We reserve all rights. This document, including all its sub-sections, has copyrights. Read more about what you can do with our patterns at the bottom of each pattern on our site. |
||||||||||


With over 40 years in knitting and crochet design, DROPS Design offers one of the most extensive collections of free patterns on the internet - translated to 17 languages. As of today we count 325 catalogs and 12298 patterns - 12288 of which are translated into English (US/in).
We work hard to bring you the best knitting and crochet have to offer, inspiration and advice as well as great quality yarns at incredible prices! Would you like to use our patterns for other than personal use? You can read what you are allowed to do in the Copyright text at the bottom of all our patterns. Happy crafting!
Post a comment to pattern DROPS Baby 43-6
We would love to hear what you have to say about this pattern!
If you want to leave a question, please make sure you select the correct category in the form below, to speed up the answering process. Required fields are marked *.