
Popular categories
Looking for a yarn?


Comments / Questions (28)
![]() Gullbritt wrote:
Gullbritt wrote:
Okökningen När man sätter markören i maskan där det ökas på var sida skall maskan stickas där markören sitter i .
09.12.2025 - 10:10DROPS Design answered:
Hej Gullbritt, ja masken med markøren skal også strikkes :)
10.12.2025 - 07:34
![]() Hanne wrote:
Hanne wrote:
Jeg er ikke sikker på, at jeg laver knuderne rigtigt. Der står, at jeg skal strikke frem og tilbage på 4 pinde. Men når jeg skal starte og slutte med en vrangpind (som jeg læser det), så må det vel være 3 eller 5 pinde.
27.06.2025 - 23:42DROPS Design answered:
Hej Hanne, den første af de 4 glatstrikkede pinde er den du tager ud med omslag :)
01.07.2025 - 08:41
![]() Pujowati wrote:
Pujowati wrote:
Hi, I am trying to make this cardigan, but I have a difficulties in making stitches before marker and stitches after marker. Could you please teach me how to do it? Thank you very much.
19.06.2025 - 10:57DROPS Design answered:
Dear Mrs Pujowati, do you mean how to work the increase tip? In this video we show how to pick up the strand from the front or from behind and how to it. Could this help you? Happy knitting!
20.06.2025 - 07:54
![]() Annick wrote:
Annick wrote:
Bonjour , je suis au niveau de l'empiécement et si je veux que ça tombe juste , je dois dans les 29 premières maille je dois comprendre les 6 mailles de bordure. Vous dîtes qu'il faut partir après après les mailles de bordure....
17.06.2025 - 11:59DROPS Design answered:
Bonjour Annick, vous tricotez la taille M? Alors le devant gauche se compose de 29 mailles au tout début de l'empiècement: 6 m de bordure devant. + 23 mailles qui seront ensuite tricotées en suivant le diagramme A.1. Bon tricot!
18.06.2025 - 07:07
![]() Anita wrote:
Anita wrote:
Hej, I mönstret till denna damkofta står det i Stickfasthet att man ska ta en tjockare sticka ifall man har för många maskor och tunnare sticka ifall man har för få maskor. Ska det inte vara tvärtom?
10.03.2025 - 18:21DROPS Design answered:
Hej Anita. Nej det är riktigt som det står. En tjockare sticka ger större maskor och därmed färre maskor på 10 cm. Mvh DROPS Design
13.03.2025 - 14:08
![]() Shweta Jha wrote:
Shweta Jha wrote:
I am increasing before or after marker as instructed in yoke. But when I see the diagram number of stitches is the same. The diagram does not explain the increased stitch. In all the rows number of stitches is the same . How come ?
29.01.2025 - 16:52
![]() Diane wrote:
Diane wrote:
I am having difficulty following graph as I am used to written instructions not graphs, so can’t get past row one. The problem is the middle of the diamond. After k5, is it k2tog, k1, yon, 1 bobble, yon, k1, s1 k1, past slip st over, k4. Over 7 sts?. For this middle part This makes 8 sts. I don’t understand it sorry. Diane
25.09.2024 - 09:30DROPS Design answered:
Dear Diane, after the last decrease (slip 1, k1, psso), you knit 4, then purl 2 etc... but depending on the size you might have not enough stitches yet to work all stitches in diagram, so just work the 24 sts (in L and XXL, you end with K4 on first row) - (and start with K4 in A.2); and incorporate the stitches increased for saddle shoulders into the pattern, so that on every increase row you will have 1 stitch more worked into the pattern. Happy knitting!
26.09.2024 - 07:45
![]() Chantale wrote:
Chantale wrote:
Bonjour ,je suis un peut confuse je fais la grandeur L ,ce que je comprend c est que sur le côté endroit je fait l augmentation avant le 1 er marqueur et après le 2 iem avant le 3 iem et après le 4iem et sur l envers avant le marqueur 1 et après le 2 iem avant le 3 ien et après le 4iem ,c est ca? Merci pour votre réponse et pour votre patron gratuit bonne journee
23.05.2024 - 14:24DROPS Design answered:
Bonjour Chantale, sur l'endroit, c'est juste mais sur l'envers considérez le numéro des marqueurs dans l'ordre ajouté et non pas dans l'ordre tricoté, autrement dit vous devez augmenter avant le 4ème marqueur (vu sur l'endroit = le 1er vu sur l'envers), après le 3ème marqueur (le 2ème, vu sur l'envers), avant le 2ème marqueur (le 3ème, vu sur l'envers) et après le 1er marqueur (le 4ème, vu sur l'envers). Bon tricot!
31.05.2024 - 08:04
![]() Anne-Christine wrote:
Anne-Christine wrote:
Bonjour! Je suis arrivée à l'augmentation des manches. Vous dites de continuer les augmentations 1 et 2, mais vous écrivez aussi "on augmente maintenant le nombre de mailles des manches seulement; celui du dos et des devant reste le même". Je suis un peu perdue....
02.05.2024 - 20:59DROPS Design answered:
Bonjour Anne-Christine, les AUGMENTATIONS-1 et -2 indiquent seulement comment augmenter, quand on augmente pour les manches, on n'augmente uniquement au début/à la fin de chacune des manches = 4 augmentations à chaque fois, soit 2 par manche, autrement dit, le nombre de mailles des deux devants et du dos ne va pas augmenter lui. Bon tricot!
03.05.2024 - 08:02
![]() Catherine Rigane wrote:
Catherine Rigane wrote:
Bonjour Je ne comprends pas les augmentations empiècement. En taille L, j'ai bien 304 mailles : 58+46+96+46+58 Je dois avoir 44m pour les manches entre chaque m avec marqueur (44+2) Je dois obtenir 70+82+120+82+70 = 424 après les augmentations. Comment obtenir 82 en ajoutant 30 (15 ×2m)...de même pour le dos ... Merci beaucoup de votre réponse. Cordialement
04.03.2024 - 19:50DROPS Design answered:
Bonjour Mme Rigane, nvous augmentez 15 fois 8 mailles pour le raglan, puis vous divisez l'ouvrage comme indiqué, certaines mailles des devants et du dos vont être attribuées aux manches lors de la division. Tant que votre nombre de mailles total est juste et que la répartition est bonne avant les augmentations du raglan, tout est correct. Bon tricot!
05.03.2024 - 09:05
|
|||||||||||||||||||||||||||||||||||||
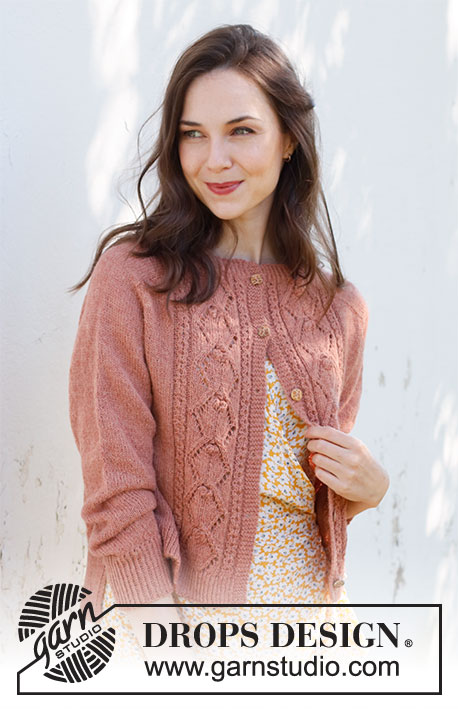
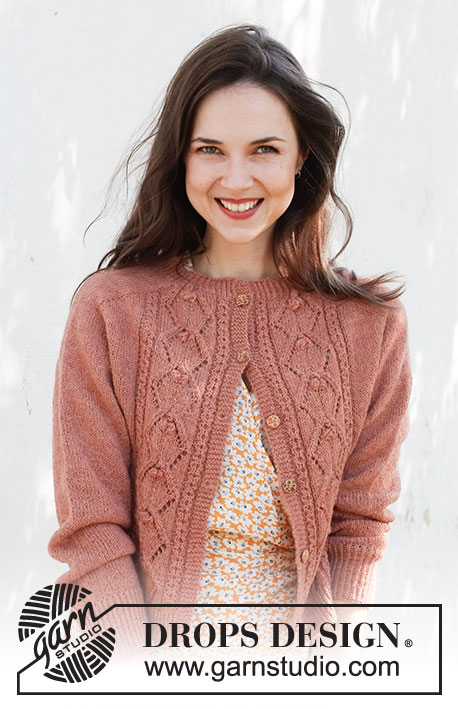
Crystal Lattice#crystallatticecardigan |
|||||||||||||||||||||||||||||||||||||
 |
 |
||||||||||||||||||||||||||||||||||||
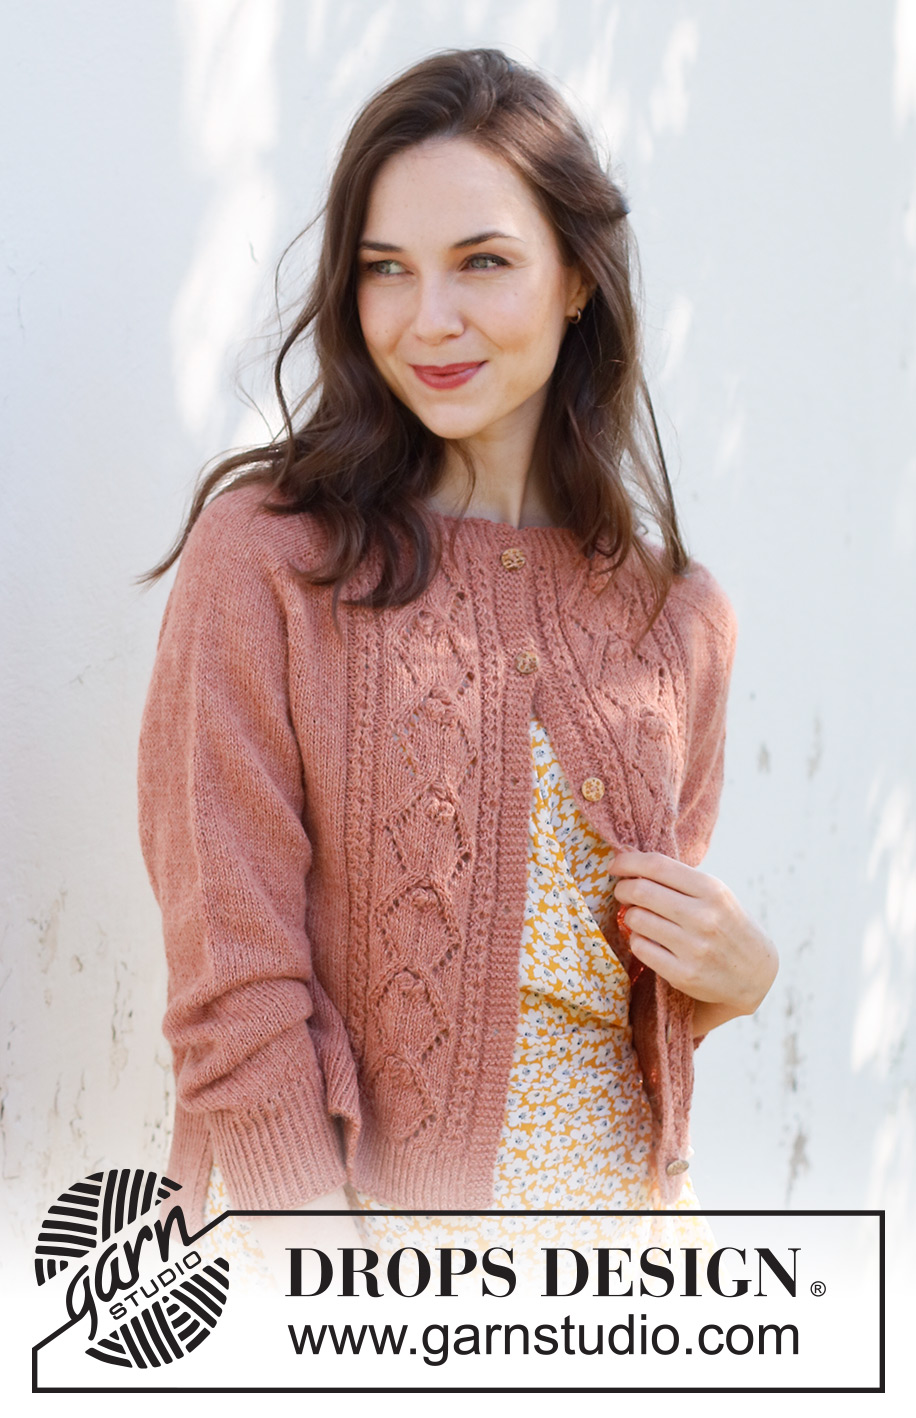
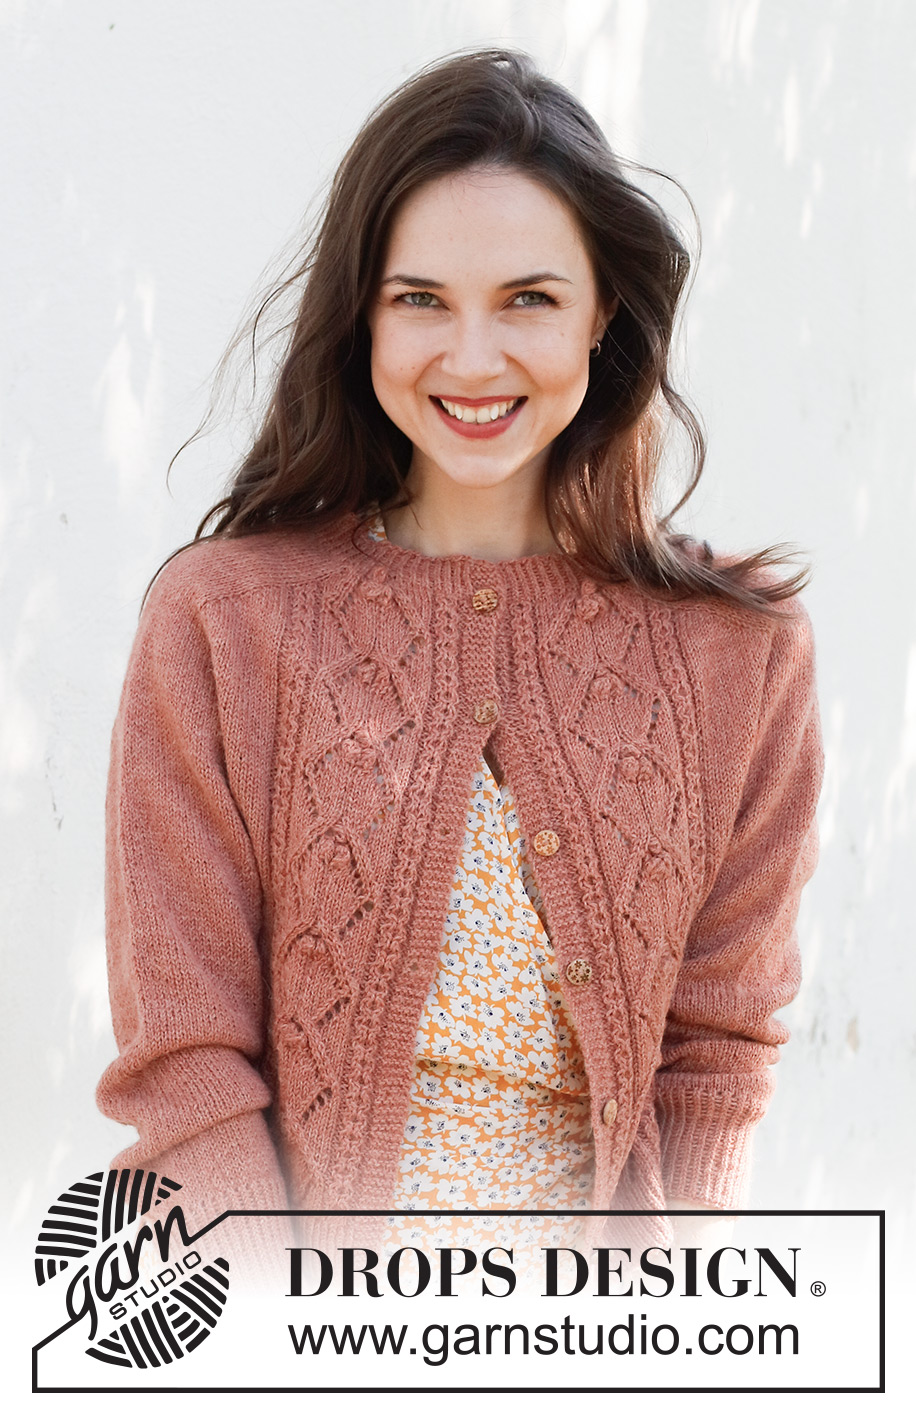
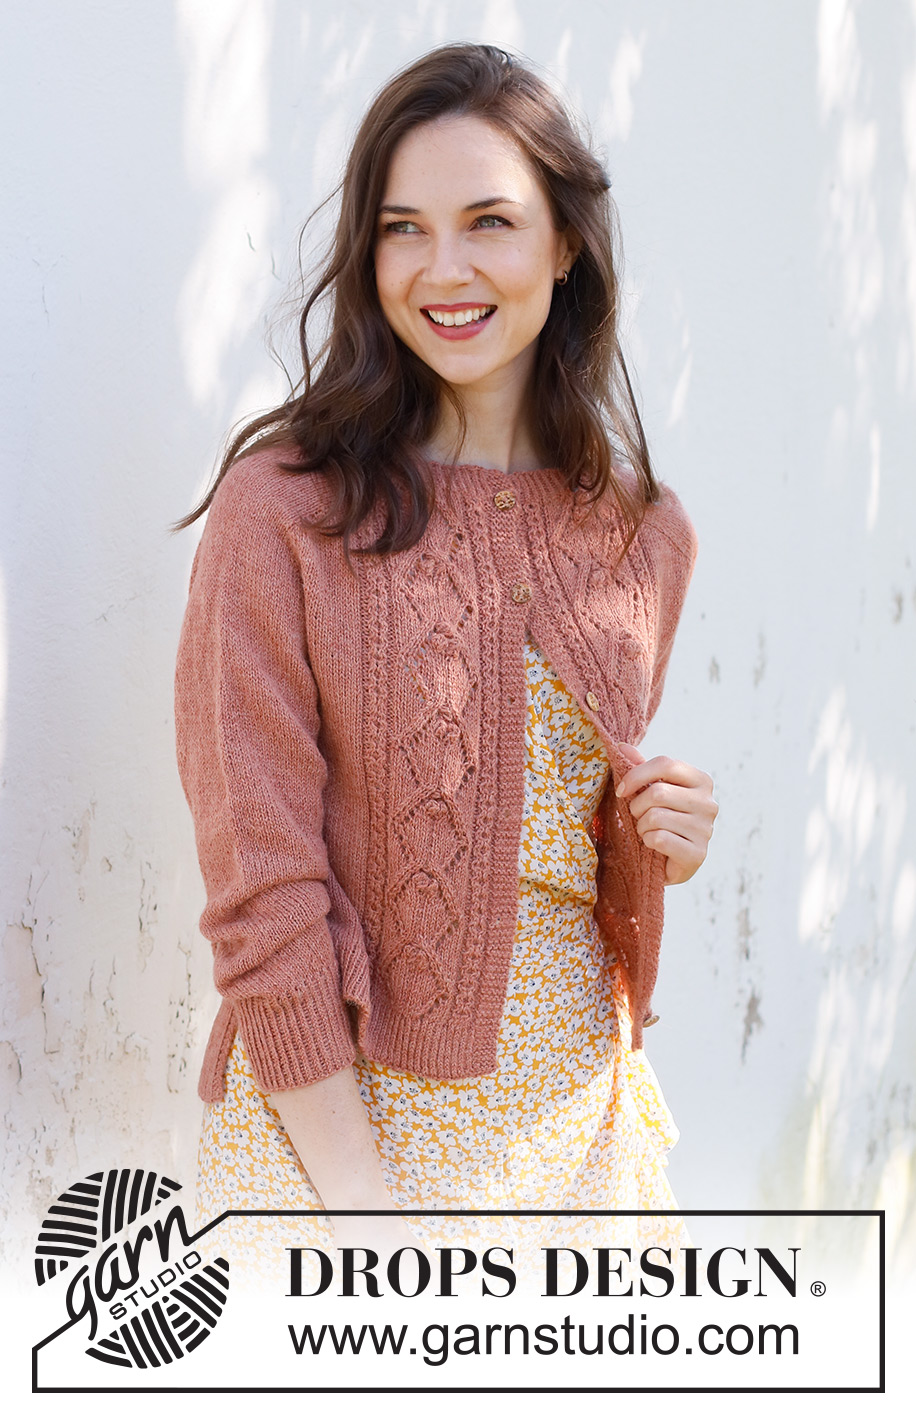
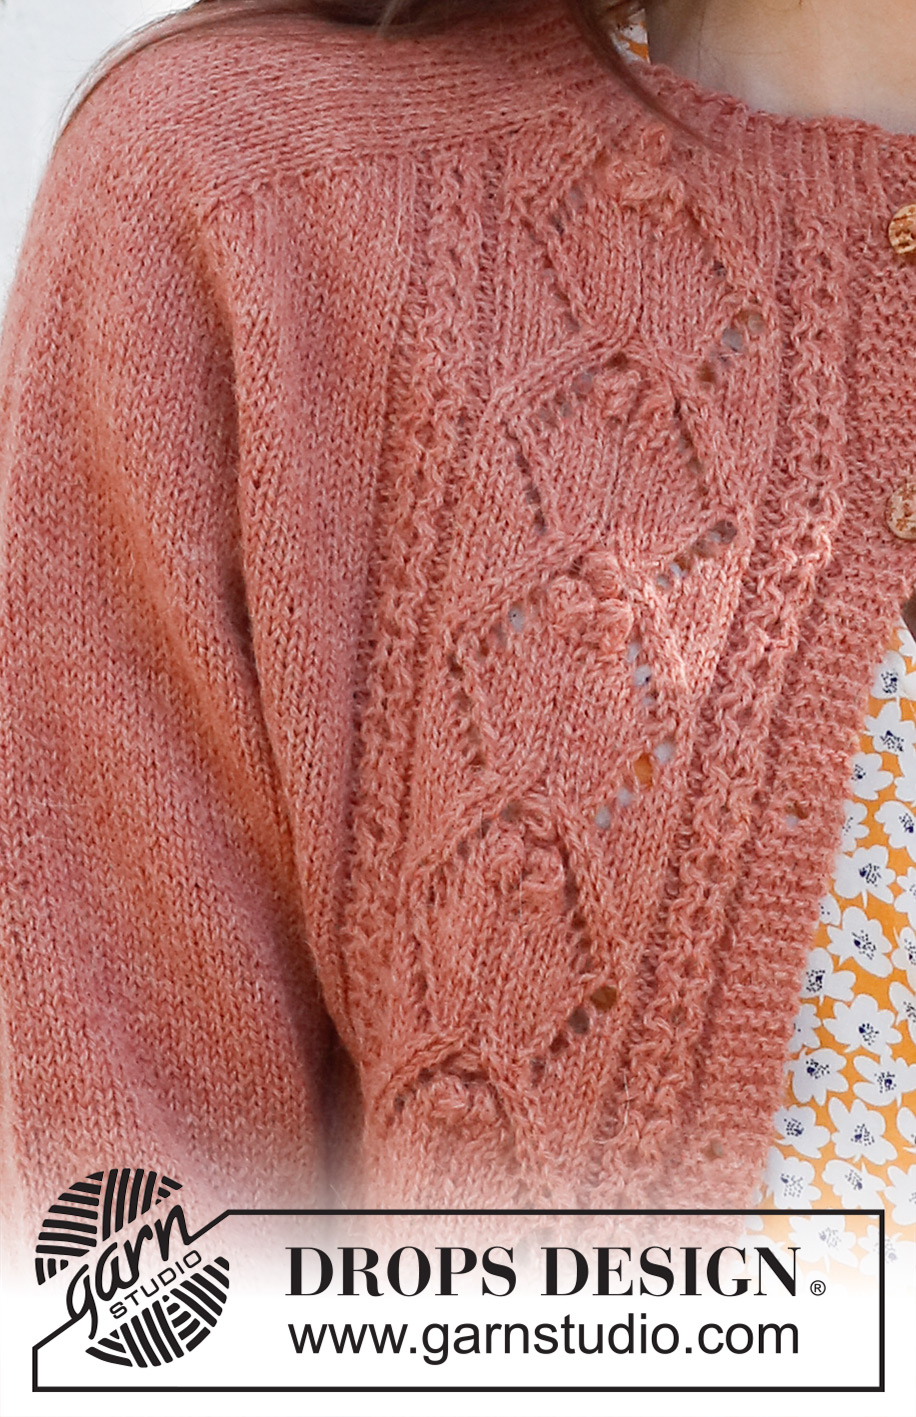
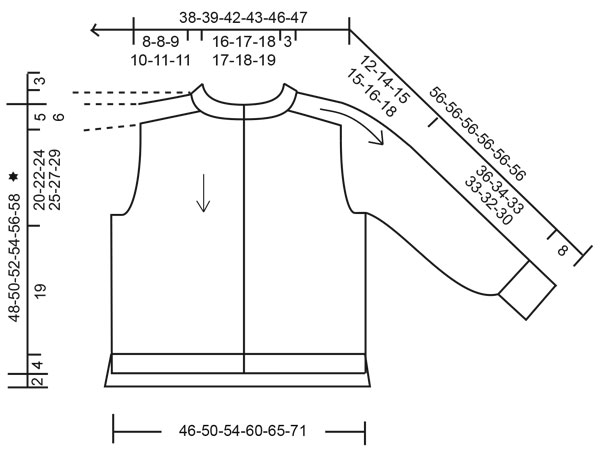
Knitted jacket in DROPS Alpaca or DROPS BabyMerino. The piece is worked top down, with saddle-shoulders, lace pattern, bobbles and split in the sides. Sizes S - XXXL.
DROPS 231-24 |
|||||||||||||||||||||||||||||||||||||
|
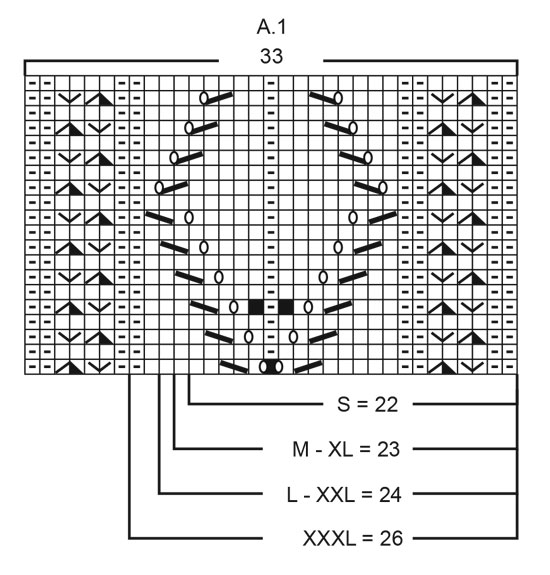
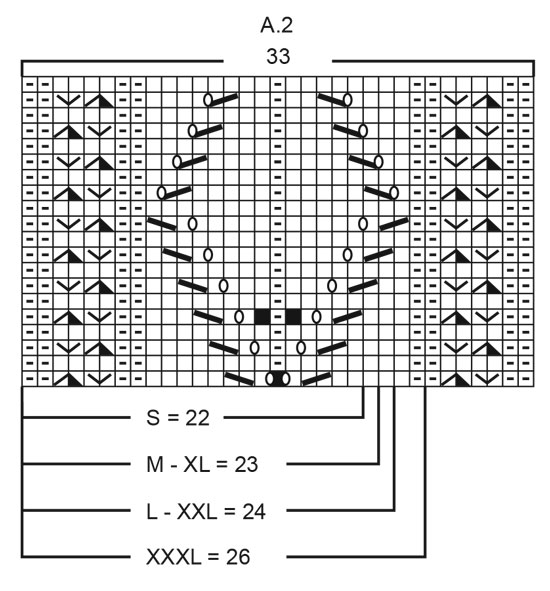
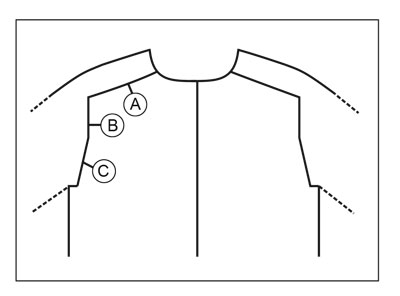
------------------------------------------------------- EXPLANATIONS FOR THE PATTERN: ------------------------------------------------------- RIDGE/GARTER STITCH (worked back and forth): Knit all rows. 1 ridge = knit 2 rows. PATTERN: See diagrams A.1 and A.2. The diagrams show all rows in the pattern from the right side. INCREASE TIP-1 (from the right side): BEFORE MARKER: The new stitch will twist to the right. Use left needle to pick up yarn between 2 stitches from the row below, pick up yarn from the back and knit stitch in front loop. AFTER MARKER: The new stitch will twist to the left. Use left needle to pick up yarn between 2 stitches from the row below, pick up yarn from the front and knit stitch in back loop. INCREASE TIP-2 (from the wrong side): BEFORE MARKER: The new stitch will twist to the right. Use left needle to pick up thread between 2 stitches from the row below, pick up thread from from front and purl stitch in back loop. AFTER MARKER: The new stitch will twist to the left. Use left needle to pick up thread between 2 stitches from the row below, pick up thread from behind and purl stitch in front loop. DECREASE TIP (for sleeves): Decrease 1 stitch on either side of the marker thread as follows: Work until there are 3 stitches left before the marker thread, knit 2 together, knit 2 (marker sits between these 2 stitches), slip 1 stitch as if to knit, knit 1 and pass the slipped stitch over the knitted stitch (2 stitches decreased). BUTTONHOLES: Work buttonholes on the right band (when the garment is worn). Work from the right side when there are 4 stitches left on the row as follows: Make 1 yarn over, knit 2 together and knit 2. On the next row (wrong side), knit the yarn over to leave a hole. The first buttonhole is worked when the neck is finished. Then work the other 5-5-5-5-6-6 buttonholes with approx. 8-8-8½-9-7½-8 cm = 3⅛"-3⅛"-3¼"-3½"-2⅞"-3⅛" between each one. ------------------------------------------------------- START THE PIECE HERE: ------------------------------------------------------- JACKET – SHORT OVERVIEW OF THE PIECE. The neck and yoke are worked back and forth with circular needle, from mid front and top down. The yoke is divided for body and sleeves and the body continued back and forth with circular needle. Before the rib, the body is divided for the split in each side and the pieces are finished separately, with the back piece slightly longer than the front pieces. The sleeves are worked in the round with short circular needle/double pointed needles. NECK: Cast on 139-143-147-153-157-163 stitches with circular needle size 3 MM = US 2.5 and DROPS Alpaca or DROPS Baby Merino. Change to circular needle size 2.5 MM = US 1.5 and purl 1 row from the wrong side. Then work rib as follows: ROW 1 (right side): 6 band stitches in GARTER STITCH – read description above, * knit 1 twisted, purl 1 *, work from *-* until there are 7 stitches left, knit 1 twisted and 6 band stitches in garter stitch. ROW 2 (wrong side): 6 band stitches in garter stitch, * purl 1 twisted, knit 1*, work from *-* until there are 7 stitches left, purl 1 twisted and 6 band stitches in garter stitch. Repeat rows 1 and 2 until the rib measures 3 cm = 1⅛". Knit 1 row from the right side where you increase 5-5-5-3-3-5 stitches evenly spaced (do not increase over the bands) = 144-148-152-156-160-168 stitches. Remember the BUTTONHOLES on the right band – read description above. Purl 1 row from the wrong side with 6 band stitches in garter stitch on each side. YOKE: Change to circular needle size 3 MM = US 2.5. Insert 1 marker-thread after the band at the beginning of the row – THE PIECE IS NOW MEASURED FROM THIS MARKER-THREAD! In addition insert 4 markers, without working the stitches and inserting the markers between 2 stitches as follows. The markers are used when increasing for the shoulders. Count 28-29-30-29-30-32 stitches (front piece), insert marker 1 before the next stitch. Count 26-26-26-30-30-30 (shoulder), insert marker 2 before the next stitch. Count 36-38-40-38-40-44 stitches (back piece), insert marker 3 before the next stitch. Count 26-26-26-30-30-30 stitches (shoulder), insert marker 4 before the next stitch. There are 28-29-30-29-30-32 stitches left after marker 4. Allow the markers to follow your work onwards; you will increase at each marker. INCREASES TO SADDLE-SHOULDERS: You now work pattern and increase at the same time for the shoulders. Read the next section before continuing! FIRST ROW FROM THE RIGHT SIDE: 6 band stitches in garter stitch, work A.1 (= 22-23-24-23-24-26 stitches), increase BEFORE marker 1 – read INCREASE TIP-1, work stockinette stitch over shoulder stitches to marker 2, increase AFTER marker 2, work stockinette stitch over back piece stitches to marker 3 increase BEFORE marker 3, work stockinette stitch over shoulder stitches to marker 4, increase AFTER marker 4, work A.2 (= 22-23-24-23-24-26 stitches) and 6 band stitches in garter stitch . You have increased 4 stitches for the saddle shoulders – the number of stitches on the front and back pieces increases and the number of stitches on the shoulders remains the same. NEXT ROW FROM THE WRONG SIDE: Work the pattern back from the wrong side and increase BEFORE markers 4 and 2 and AFTER markers 3 and 1 – read INCREASE TIP-2. Continue this pattern back and forth and increase on all rows as above; differently from the right and wrong side so the stitches lie neatly. The increased stitches are worked into A.1 and A.2 until the pattern covers 33 stitches (if there is not room for the decrease and the yarn over in the pattern while increasing for the saddle shoulders, do not work the yarn over until there is room to both decrease and work the yarn over). When you have a enough stitches for 1 width of A.1/A.2 continue the increased stitches in stockinette stitch. Repeat A.1 and A.2 in height. Increase a total of 24-26-28-32-34-36 times = 240-252-264-284-296-312 stitches. REMEMBER THE KNITTING GAUGE! After the last increase the yoke measures approx. 8-8-9-10-11-11 cm = 3⅛"-3⅛"-3½"-4"-4⅜"-4⅜" from the marker-thread on the neck. INCREASES TO SLEEVES: Continue the pattern back and forth as before. AT THE SAME TIME increase 4 stitches for the sleeves as follows: RIGHT SIDE: Increase AFTER markers 1 and 3 and BEFORE markers 2 and 4 – remember INCREASE TIP-1. WRONG SIDE: Increase AFTER markers 4 and 2 and BEFORE markers 3 and 1 – remember INCREASE TIP-2. You now are increasing on the sleeves, the number of stitches on the front and back pieces remains the same. Work the increased stitches in stockinette stitch. Increase EACH row a total of 8-9-10-5-10-3 times = 272-288-304-304-336-324 stitches. The yoke measures approx. 10-11-12-12-14-12 cm = 4"-4⅜"-4¾"-4¾"-5½"-4¾" from the marker-thread. INCREASES TO YOKE: Move the 4 markers so each marker sits in the outermost stitch on each side of the sleeves, with 40-42-44-38-48-34 stitches between the markers on each sleeve. On the next row from the right side increase 8 stitches, increasing both before and after each marker-stitch – remember INCREASE TIP-1. You are now increasing on the front/back pieces and on the sleeves and the increased stitches are worked in stockinette stitch. Increase like this every 2nd row (each row from the right side) a total of 11-13-15-20-20-26 times = 360-392-424-464-496-532 stitches. When all the increases are finished the yoke measures approx. 17-19-21-24-26-28 cm = 6¾"-7½"-8¼"-9½"-10¼"-11" from the marker-thread. Continue working without further increases until the yoke measures 20-22-24-25-27-29 cm = 8"-8¾"-9½"-9¾"-10⅝"-11⅜" from the marker-thread. On the next row, divide for the body and sleeves as follows: Work the first 61-66-70-76-82-89 stitches (front piece), place the next 68-74-82-90-94-98 stitches on a thread for the sleeve, cast on 8-8-10-10-12-12 stitches (in side under sleeve), work 102-112-120-132-144-158 stitches (back piece), place the next 68-74-82-90-94-98 stitches on a thread for the sleeve, cast on 8-8-10-10-12-12 stitches (in side under sleeve), work the last 61-66-70-76-82-89 stitches (front piece). The body and sleeves are finished separately. THE PIECE IS NOW MEASURED FROM HERE! BODY: = 240-260-280-304-332-360 stitches. Work the first row from the right side as follows: 6 band stitches in garter stitch, continue A.1 over the next 33 stitches, stockinette stitch until there are 39 stitches left, continue A.2 over the next 33 stitches and 6 band stitches in garter stitch. Continue this pattern back and forth for 19 cm = 7½" – finish after a half or whole repeat of the pattern in height. There is approx. 4 cm = 1½" left on the front pieces (6 cm = 2⅜" on the back piece). Divide the body for the split in each side. Keep the first 65-70-75-81-88-95 stitches from the right side on the needle (left front piece). Place the other stitches on a thread/extra needle. LEFT FRONT PIECE: Knit 1 row from the right side where you increase 19-20-23-25-26-29 stitches evenly spaced (do not increase over the band) = 84-90-98-106-114-124 stitches. Change to circular needle size 2.5 MM = US 1.5. Work rib as follows: ROW 1 (wrong side): 3 stitches in garter stitch, * purl 1 twisted, knit 1*, work from *-* until there are 7 stitches left, purl 1 twisted and 6 band stitches in garter stitch. ROW 2 (right side): 6 band stitches in garter stitch, * knit 1 twisted, purl 1*, work from *-* until there are 4 stitches left, knit 1 twisted and 3 stitches in garter stitch. Repeat rows 1 and 2 until the rib measures 4 cm = 1½". The front piece measures approx. 48-50-52-54-56-58 cm = 19"-19¾"-20½"-21¼"-22"-22¾" from the shoulder down. Bind off a little loosely. RIGHT FRONT PIECE: Place the 65-70-75-81-88-95 stitches on the other side on circular needle size 3 MM = US 2.5 and knit 1 row from the right side where you increase 19-20-23-25-26-29 stitches evenly spaced (do not increase over the band) = 84-90-98-106-114-124 stitches. Change to circular needle size 2.5 MM = US 1.5. Work rib as follows: ROW 1 (wrong side): 6 band stitches in garter stitch, * purl 1 twisted, knit 1*, work from *-* until there are 4 stitches left, purl 1 twisted and 3 stitches in garter stitch. ROW 2 (right side): 3 stitches in garter stitch, * knit 1 twisted, purl 1*, work from *-* until there are 7 stitches left, knit 1 twisted and 6 band stitches in garter stitch. Repeat rows 1 and 2 until the rib measures 4 cm = 1½". The front piece measures approx. 48-50-52-54-56-58 cm = 19"-19¾"-20½"-21¼"-22"-22¾" from the shoulder down. Bind off a little loosely. BACK PIECE: Place the remaining 110-120-130-142-156-170 stitches on circular needle size 3 MM = US 2.5 and knit 1 row from the right side where you increase 33-35-39-43-47-51 stitches evenly spaced = 143-155-169-185-203-221 stitches. Change to circular needle size 2.5 MM = US 1.5 and work rib as follows: ROW 1 (wrong side): 3 stitches in garter stitch, * purl 1 twisted, knit 1*, work from *-* until there are 4 stitches left, purl 1 twisted and 3 stitches in garter stitch. ROW 2 (right side): 3 stitches in garter stitch, * knit 1 twisted, purl 1*, work from *-* until there are 4 stitches left, knit 1 twisted and 3 stitches in garter stitch. Repeat rows 1 and 2 until the rib measures 6 cm = 2⅜" (2 cm = ¾" more than the front pieces). The back piece measures approx. 50-52-54-56-58-60 cm = 19¾"-20½"-21¼"-22"-22¾"-23⅝" from the shoulder down. Bind off a little loosely. SLEEVES: Place the 68-74-82-90-94-98 stitches from the thread on the one side of the piece on short circular needle/double pointed needles size 3 MM = US 2.5 and knit up 1 stitch in each of the 8-8-10-10-12-12 stitches cast on under the sleeve = 76-82-92-100-106-110 stitches. Insert a marker thread in the middle of the 6-6-8-8-10-12 stitches under the sleeve. Allow the thread to follow your work onwards; it will be used when decreasing under the sleeve. Start at the marker thread and work stockinette stitch in the round 2 cm = ¾". Now decrease 2 stitches under the sleeve – read DECREASE TIP. Decrease like this every 1½ cm = ½" a total of 3-5-8-12-15-18 times, then every 4th round 4-4-4-3-2-0 times = 62-64-68-70-72-74 stitches. Continue working until the sleeve measures 36-34-33-33-32-30 cm = 14¼"-13⅜"-13"-13"-12½"-11¾" from the division. There is approx. 8 cm = 3⅛" left; try the jacket on and work to desired length. Change to double pointed needles size 2.5 MM = US 1.5 and work rib (knit 1 twisted, purl 1) for 8 cm = 3⅛". Bind off a little loosely. The sleeve measures approx. 44-42-41-41-40-38 cm = 17¼"-16½"-16⅛"-16⅛"-15¾"-15" from the division. Work the other sleeve in the same way. ASSEMBLY: Sew the buttons onto the left band. |
|||||||||||||||||||||||||||||||||||||
Diagram explanations |
|||||||||||||||||||||||||||||||||||||
|
|||||||||||||||||||||||||||||||||||||
 |
|||||||||||||||||||||||||||||||||||||
 |
|||||||||||||||||||||||||||||||||||||
 |
|||||||||||||||||||||||||||||||||||||
 |
|||||||||||||||||||||||||||||||||||||
Have you finished this pattern?Tag your pictures with #dropspattern #crystallatticecardigan or submit them to the #dropsfan gallery. Do you need help with this pattern?You'll find 36 tutorial videos, a Comments/Questions area and more by visiting the pattern on garnstudio.com. © 1982-2026 DROPS Design A/S. We reserve all rights. This document, including all its sub-sections, has copyrights. Read more about what you can do with our patterns at the bottom of each pattern on our site. |
|||||||||||||||||||||||||||||||||||||


With over 40 years in knitting and crochet design, DROPS Design offers one of the most extensive collections of free patterns on the internet - translated to 17 languages. As of today we count 324 catalogs and 12290 patterns - 12280 of which are translated into English (US/in).
We work hard to bring you the best knitting and crochet have to offer, inspiration and advice as well as great quality yarns at incredible prices! Would you like to use our patterns for other than personal use? You can read what you are allowed to do in the Copyright text at the bottom of all our patterns. Happy crafting!
Post a comment to pattern DROPS 231-24
We would love to hear what you have to say about this pattern!
If you want to leave a question, please make sure you select the correct category in the form below, to speed up the answering process. Required fields are marked *.