
Popular categories
Looking for a yarn?


Comments / Questions (10)
![]() Rita wrote:
Rita wrote:
Buona sera, volendo eseguire la maglia lavorata solo sul davanti e volendo fare una taglia M, inizio la prima metà del dietro a maglia dritta 19 maglie, la spalla altre 19 maglia a dritto, il davanti di 38 maglia lavorate con lo schema di A1, quindi 2 motivi, la spalla di 19 maglie a dritto e infine la seconda metà del dietro di 19 maglie a dritto, tutto già aumentato di 8 maglie per il raglan, è corretto? Grazie mille per la risposta!
19.10.2025 - 22:24DROPS Design answered:
Buonasera Rita, è sicura di far riferimento a questo modello? Il diagramma A.1 è formato da 9 maglie. Buon lavoro!
23.10.2025 - 00:37
![]() Rita wrote:
Rita wrote:
Come posso leggere le domande nella mia lingua, l’italiano?
16.10.2025 - 21:36DROPS Design answered:
Buonasera Rita, può usare un traduttore online. Buon lavoro!
17.10.2025 - 20:04
![]() Tine Brønnum wrote:
Tine Brønnum wrote:
Hej, Jeg strikker række 3 i A1, hvor jeg skal slå om før sidste maske før maskemarkøren (overgang fra bagstykke til ærme), men samtidig skal jeg strikke 5 masker i en. I samme maske. Skal jeg slå om først eller strikke de 5 masker i masken og derefter slå om. Mvh Tine
15.04.2024 - 19:38DROPS Design answered:
Hej Tine, omslaget skal være nærmest de 3 raglanmasker i ret :)
16.04.2024 - 11:13
![]() Tine Brønnum wrote:
Tine Brønnum wrote:
Hej, Jeg strikker række 3 i A1, hvor jeg skal slå om før sidste maske før maskemarkøren (overgang fra bagstykke til ærme), men samtidig skal jeg strikke 5 masker i en. I samme maske. Skal jeg slå om først eller strikke de 5 masker i masken og derefter slå om. Mvh Tine
15.04.2024 - 19:37
![]() Martha Herrygers wrote:
Martha Herrygers wrote:
Ik vind de patronen en steken supper maar ik versta geen engels of een andere taal. Kan ik de uitleg op de een of andere manier i´ de Nederlandse taa bemachtign A U B
29.02.2024 - 22:12DROPS Design answered:
Dag Martha,
Bij ieder patroon kun je onder de afbeeldingen voor een andere taal kiezen, Nederlands staat er ook bij. Als je op Nederlands klikt, kun je daarna het patroon ook in het Nederlands afdrukken via de printbutton onderaan de materialenlijst.
01.03.2024 - 07:23
![]() July Elizabeth Zuleta Bastidas wrote:
July Elizabeth Zuleta Bastidas wrote:
Me puede explicar el punto nudo? muchas gracias
13.03.2023 - 16:25DROPS Design answered:
Hola July, puedes ver el siguiente vídeo sobre cómo tejer una mota/ un nudo: https://www.garnstudio.com/video.php?id=1320&lang=es.
19.03.2023 - 22:26
![]() Andreea wrote:
Andreea wrote:
"Increase 1 stitch on each side of the 3 knitted stitches in the transitions between front/back pieces and the sleeves = 8 stitches increased on the round " Hi, shouldn't be "Increase 1 stitch on each side of the 4 knitted stitches in the transitions "? Thx,
06.08.2022 - 10:27DROPS Design answered:
Dear Andreea, you increase 1 stitch on each side of a group of 3 knitted stitches (not on each side of each). These groups are located in each transition between the front/back and the sleeves. These stitches are forming each raglan line, with two stitches from the body pieces and 1 stitch from the sleeve. So these lines are not symmetrical, as in other patterns. Happy knitting!
07.08.2022 - 22:28
![]() Louise wrote:
Louise wrote:
Bonjour, ma question ne concerne pas seulement ce modèle mais de nombreux autres également. Comment ce fait-il que très peu de vos modèles (en pull en tout cas), ont les explications pour la taille XS alors que vous proposez jusqu'au XXXL ? Beaucoup de gens pourtant porte du XS, c'est donc dommage de devoir renoncer à beaucoup de modèles à cause de ce problème de taille.
28.06.2021 - 19:05DROPS Design answered:
Bonjour Louise, dans les dernières collections, nous avons davantage de modèles en XS, et nous travaillons sur une possibilité de recherches par taille. Bon tricot!
29.06.2021 - 09:18
![]() Karolina wrote:
Karolina wrote:
Czym innym można zastąpić supełek?
17.05.2021 - 17:16DROPS Design answered:
Witaj Karolino, jak nie chcesz mieć supełka, na jego miejscu wykonaj 1 oczko prawe. Pozdrawiamy!
17.05.2021 - 18:12
![]() Ulla wrote:
Ulla wrote:
Er det muligt at lave en forhøjning i nakken.
06.05.2021 - 11:24
|
||||||||||||||||
Rosebud Parade#rosebudparadesweater |
||||||||||||||||
 |
 |
|||||||||||||||
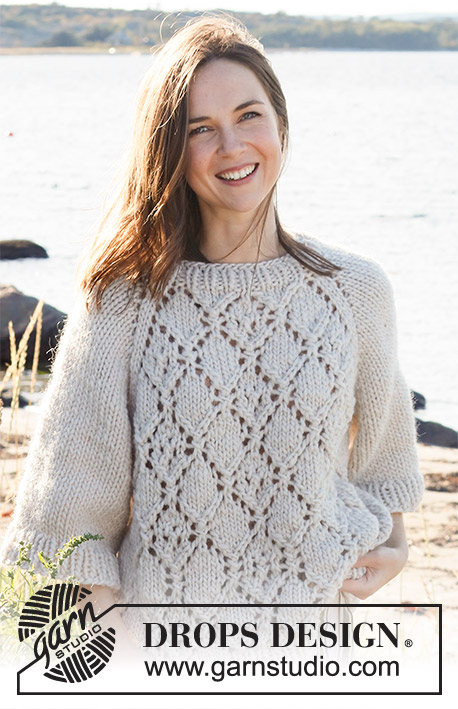
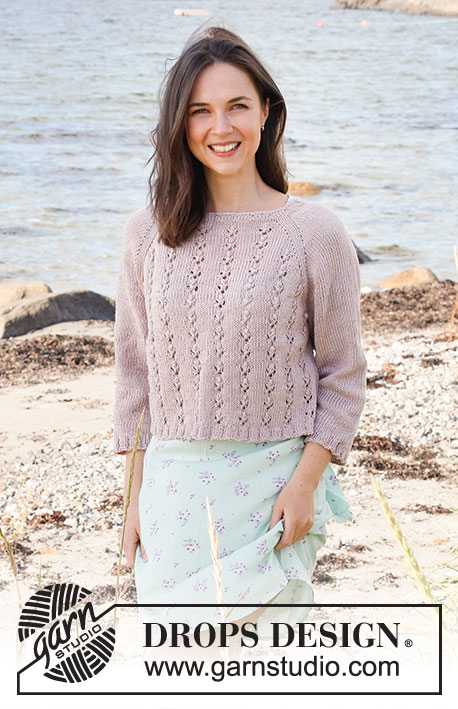
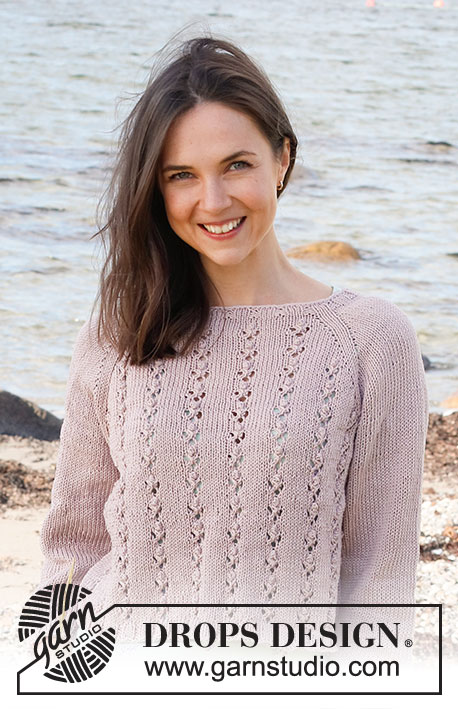
Knitted sweater in DROPS Muskat or DROPS Sky. The piece is worked top down with raglan, lace pattern, knots and ¾-length sleeves. Sizes S - XXXL.
DROPS 221-34 |
||||||||||||||||
|
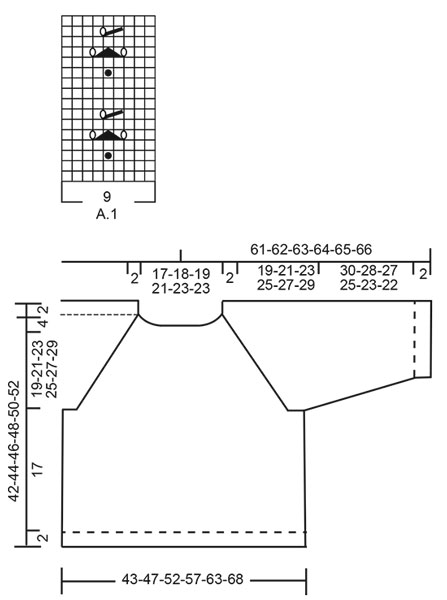
------------------------------------------------------- EXPLANATIONS FOR THE PATTERN: ------------------------------------------------------- PATTERN: See diagram A.1. DECREASE/INCREASE TIP (evenly spaced): To work out how to decrease/increase evenly, count the total number of stitches on needle (e.g. 110 stitches) and divide by the number of decreases/increases to be made (e.g. 4) = 27.5. In this example, decrease by knitting together alternately each 26th and 27th and then each 27th and 28th stitch. When increasing, make 1 yarn over after alternately each 27th and 28th stitch. On the next row work the yarn overs twisted to avoid holes. RAGLAN: Increase 1 stitch on each side of the 3 knitted stitches in the transitions between front/back pieces and the sleeves = 8 stitches increased on the round (there are 2 stitches between the increases on the front/back pieces and the marker and 1 stitch between the increases on the sleeves and the marker). Increase 1 stitch by making 1 yarn over. On the next round work the yarn over twisted to avoid a hole. Then on the sleeves knit the new stitches. On the front/back pieces, the new stitches are worked into the pattern A.1 (i.e. knitted until there are enough stitches to start a new repeat of lace pattern/knots = A.1). You can insert a marker thread before/after each repeat of A.1 to make it easier to see where a new repeat starts. DECREASE TIP (for sleeves): Decrease 1 stitch on either side of the marker-stitch as follows: Work until there are 3 stitches left before the marker-stitch, knit 2 together, knit 3 (marker-stitch is the middle stitch), slip 1 stitch as if to knit, knit 1 and pass the slipped stitch over the knitted stitch (2 stitches decreased). BINDING-OFF TIP: To avoid the bind-off edge being tight you can bind off with a larger size needle. If the edge is still tight, make 1 yarn over after approx. each 5th stitch at the same time as binding off; the yarn overs are bind off as normal stitches. ------------------------------------------------------- START THE PIECE HERE: ------------------------------------------------------- SWEATER – SHORT OVERVIEW OF THE PIECE: The neck and yoke are worked in the round with circular needle, top down from mid back. The yoke is divided for body and sleeves and the body continued in the round with circular needle. The sleeves are worked in the round with short circular needle/double pointed needles, top down. NECK: Cast on 105-110-115-120-130-130 stitches with circular needle size 3 MM = US 2.5 and Muskat or Sky. Knit 1 round, then work rib (knit 3, purl 2) in the round for 2 cm = ¾". Knit 1 round where you adjust the number of stitches to 106-106-114-114-134-134 by decreasing/increasing evenly – read DECREASE/INCREASE TIP. Change to circular needle size 4 MM = US 6. Insert a marker at the beginning of the round (= mid-back); the yoke is measured from this marker! YOKE: Now work pattern and insert 4 markers in the piece as follows: Work A.1 over the first 9-9-18-18-18-18 stitches (= 1-1-2-2-2-2 repeats of 9 stitches), work the first 7-7-0-0-5-5 stitches in A.1, make 1 yarn over, knit 2, insert 1 marker here (= transition between half back piece and right sleeve), knit 1, 1 yarn over, knit 15, 1 yarn over, knit 1, insert 1 marker here (= transition between right sleeve and front piece), knit 2, 1 yarn over, work the last 7-7-0-0-5-5 stitches in A.1, work A.1 over the next 18-18-36-36-36-36 stitches (= 2-2-4-4-4-4 repeats of 9 stitches), work the first 7-7-0-0-5-5 stitches in A.1, 1 yarn over, knit 2, insert 1 marker here (= transition between front piece and left sleeve), knit 1, 1 yarn over, knit 15, 1 yarn over, knit 1, insert 1 marker here (= transition between left sleeve and half back piece), knit 2, 1 yarn over, work the last 7-7-0-0-5-5 stitches in A.1, work A.1 over the last 9-9-18-18-18-18 stitches (= 1-1-2-2-2-2 repeats of 9 stitches). You have now increased 8 stitches to RAGLAN – read description above. Continue like this and increase to raglan every 2nd round a total of 24-26-29-32-35-38 times = 298-314-346-370-414-438 stitches. REMEMBER THE KNITTING GAUGE. When all the increases to raglan are finished, the piece measures approx. 17-19-21-23-25-27 cm = 6¾"-7½"-8¼"-9"-9¾"-10⅝" from the marker. Continue with pattern and stockinette stitch until the yoke measures 19-21-23-25-27-29 cm = 7½"-8¼"-9"-9¾"-10⅝"-11⅜" from the marker. Now divide the piece for body and sleeves on the next round as follows: Work the first 42-45-49-54-61-66 stitches (= half back piece), place the next 65-67-75-77-85-87 stitches on 1 thread for the sleeve, cast on 7-9-11-11-11-11 new stitches (= in side under sleeve), work 84-90-98-108-122-132 stitches (= front piece), place the next 65-67-75-77-85-87 stitches on 1 thread for the sleeve, cast on 7-9-11-11-11-11 new stitches (= in side under sleeve), work the last 42-45-49-54-61-66 stitches. Body and sleeves are finished separately. THE PIECE IS NOW MEASURED FROM HERE. BODY: = 182-198-218-238-266-286 stitches. Continue in the round with as many repeats of A.1 as you have room for. The remaining stitches are knitted. Continue like this until the piece measures 17 cm = 6¾" from the division – finish after round 8 or 16 in the pattern; if necessary, work further rounds of stockinette stitch to reach the correct length. Now increase 23-27-32-37-39-44 stitches evenly spaced = 205-225-250-275-305-330 stitches. Change to circular needle size 3 MM = US 2.5 and work rib (knit 3, purl 2) for 2 cm = ¾". Bind off with knit over knit and purl over purl – read BINDING-OFF TIP. The sweater measures approx. 42-44-46-48-50-52 cm = 16½"-17¼"-18"-19"-19¾"-20½" from the shoulder down. SLEEVE: Place the 65-67-75-77-85-87 stitches from the thread on the one side of the piece on double pointed needles/short circular needle size 4 MM = US 6 and knit up 1 stitch in each of the 7-9-11-11-11-11 stitches cast on under the sleeve = 72-76-86-88-96-98 stitches. Insert a marker in the middle stitch under the sleeve. Allow the thread to follow your work onwards; it will be used when decreasing under the sleeve. Continue in the round with stockinette stitch. When the piece measures 4-4-3-3-3-2 cm = 1½"-1½"-1⅛"-1⅛"-1⅛"-¾" from the division, decrease 2 stitches under the sleeve – read DECREASE TIP. Decrease like this every 2½-2-1½-1½-1-1 cm = 2⅛"-¾"-1⅛"-1⅛"-⅜"-⅜" a total of 11-12-16-15-19-19 times = 50-52-54-58-58-60 stitches. Continue working until the sleeve measures 30-28-27-25-23-22 cm = 11¾"-11"-10⅝"-9¾"-9"-8¾". Now increase 5-8-6-7-7-10 stitches evenly spaced = 55-60-60-65-65-70 stitches. Change to double pointed needles size 3 MM = US 2.5 and work rib (knit 3, purl 2) for 2 cm = ¾". Bind off with knit over knit and purl over purl – remember BINDING-OFF TIP. The sleeve measures approx. 32-30-29-27-25-24 cm = 12½"-11¾"-11⅜"-10⅝"-9¾"-9½". Work the other sleeve in the same way. |
||||||||||||||||
Diagram explanations |
||||||||||||||||
|
||||||||||||||||
 |
||||||||||||||||
Have you finished this pattern?Tag your pictures with #dropspattern #rosebudparadesweater or submit them to the #dropsfan gallery. Do you need help with this pattern?You'll find 24 tutorial videos, a Comments/Questions area and more by visiting the pattern on garnstudio.com. © 1982-2026 DROPS Design A/S. We reserve all rights. This document, including all its sub-sections, has copyrights. Read more about what you can do with our patterns at the bottom of each pattern on our site. |
||||||||||||||||


With over 40 years in knitting and crochet design, DROPS Design offers one of the most extensive collections of free patterns on the internet - translated to 17 languages. As of today we count 324 catalogs and 12290 patterns - 12280 of which are translated into English (US/in).
We work hard to bring you the best knitting and crochet have to offer, inspiration and advice as well as great quality yarns at incredible prices! Would you like to use our patterns for other than personal use? You can read what you are allowed to do in the Copyright text at the bottom of all our patterns. Happy crafting!
Post a comment to pattern DROPS 221-34
We would love to hear what you have to say about this pattern!
If you want to leave a question, please make sure you select the correct category in the form below, to speed up the answering process. Required fields are marked *.