
Popular categories
Looking for a yarn?


Comments / Questions (42)
![]() Margreet Verschuure wrote:
Margreet Verschuure wrote:
Ik snap het structuurpatroon niet goed: Ik ben net begonnen met de pas, maar snap niet hoe ik verder moet Moet je in een naald dan 1 recht, 1 averecht en 2 recht, 1 averecht, 2 recht enz. breien? Of moet je echt 1 naald 1 r, 1 avr breien en dan 1 naald recht en 1 naald averecht?
13.02.2021 - 20:06DROPS Design answered:
Dag Margreet,
Het structuurpatroon staat bovenaan bij de instructies beschreven en is steeds een herhaling van 1 recht en 1 ribbelsteek. (De ribbelsteek brei je op de ene naald recht en de andere naald averecht). Dus naald 1: 1 recht, 1 averecht. Naald 2: 1 recht, 1 recht.
15.02.2021 - 10:43
![]() Linda wrote:
Linda wrote:
I slutet på halskragen : ”..stickas det slätstickning..” , är det då ett avigt varv? (Har svårt att förstå åt vilket håll kravgen viks). Angående strukturmönstrer, ”1 rätmask, 1 maska rätstickning (1 varv rätt o 1 varv avigt)”, betyder det - en rät maska, resten av varvet räta maskor + 1 varv aviga maskor? Om jag gör så tror jag det blir lodräta ränder (ej som på bilden) - tänker jag fel eller tolkar jag strukturmönstrets beskrivning fel?
10.01.2021 - 21:04
![]() Hanne Schreiber wrote:
Hanne Schreiber wrote:
Har strikket abstract rose. iflg. opskriften 400 g str. S. Har overholdt strikkefastheden, men fandt så ud af at jeg havde for lidt garn, kunne bestille 1 nøgle mere med samme indfarvning + fragtkosten. Næsten færdig kunne jeg se at jeg manglede endnu et nøgle mere, men garnet var udsolgt. En alt for kort trøje. Ikke mere drops-design for mig og ikke mere Indkøb over nettet. Ærgeligt
13.12.2020 - 14:15
![]() Susan Jakobsen wrote:
Susan Jakobsen wrote:
Hej. Jeg har snart strikket mange af jeres modeller og jeres opskrifter er nemme og gode, MEN her på det sidste har jeg haft problemer med at have købt garn nok, denne model strikker jeg i large. Og skulle bruge 500 g, altså 10 nøgler af det garn i anbefaler i opskriften, min strikke fasthed er overholdt( går en halv pind op) og er ikke færdig med de 4 udtagninger endnu og har 3 nøgler tilbage! Hvad gør jeg forkert ? Hilsen susan
22.11.2020 - 10:46DROPS Design answered:
Hej Susan, vi har ikke hørt at der skulle være for lidt garn til denne opskrift. Hvis du oplever at du har for lidt garn til en opskrift, så informere os gerne. Vi skal vide størrelse, strikkefasthed og mål og så hvor mange nøgler du har brugt. Så vil vi få mulighed for at rette opskriften. Tak for info :)
24.11.2020 - 15:44
![]() Caroline Quidoz wrote:
Caroline Quidoz wrote:
Dans les instructions pour les augmentations de l’empiècement, il est écrit: Tricoter les augmentations en point texturé, c'est-à-dire tricoter la 1ère augmentation au point mousse, la 2ème en jersey, etc. Quand le point texturé est terminé, tricoter les augmentations en jersey. Est-ce que ça signifie qu’uniquement le 1 tour d’augmentation est fait au point mousse? Donc à partir du 2e tour ou il y a des augmentations et tous les autres, ils sont fait en jersey ?
21.11.2020 - 05:51DROPS Design answered:
Bonjour Mme Quidoz, cette information a été supprimée car elle n'est pas utile. Les augmentations se tricotent comme le montre cette vidéo. Bon tricot!
27.11.2020 - 16:13
![]() Caroline Quidoz wrote:
Caroline Quidoz wrote:
Je ne suis pas certaine de comprendre le motif / le point texturé pour l’empiècement. (Je comprends quand et comment faire les augmentations.) Est-ce que j’applique le point texturé sur toutes les mailles ... donc rang 1 toutes à l’endroit et rang 2 : 1 m. Endroit, 1 m. Envers. Ou seulement sur les augmentations: rang 1 toute à l’endroit, rang 2 augmentation 1 envers ( pour faire un point mousse), augmentation 2 endroit, augmentation 3 env., ...
18.11.2020 - 02:01DROPS Design answered:
Bonjour Mme Quidoz, cette vidéo montre comment tricoter le début d'un pull similaire, avec le même point et les mêmes augmentations et devrait ainsi vous permettre de comprendre comment tricoter le point texturé en fonction des tours et des mailles/augmentations. Si vous avez une autre question, n'hésitez pas, bon tricot!
18.11.2020 - 08:11
![]() Noe wrote:
Noe wrote:
Das ist mein erster Pullover und alles läuft tiptop, klare Anleitung! Allerdings habe ich bei den Ärmeln 8 M wie beschrieben aufgefasst, dennoch gibt es Löcher. Habe ich etwas falsch gemscht? Könnte man vlt 10 M aufnehmen (an den "Ecken" also je eine mehr) und diese später abnehmen? Danke!
15.11.2020 - 18:47DROPS Design answered:
Liebe Noe, Sie können gerne 2 extra Maschen (1 je an der "Ecke") auffassen, und bei der 1. Runde sofort diese Maschen abnehmen damit die Maschenanzahl stimmt. Oder dann beim fertigstellen, diese kleine Löcher annähen. Viel Spaß beim stricken!
16.11.2020 - 09:19
![]() Loes Vonk wrote:
Loes Vonk wrote:
Moet ik bij het begin vd trui een pen van 40 of 80 gebruiken?
31.10.2020 - 17:46DROPS Design answered:
Dag Loes,
Je kan met 40 beginnen en als het niet meer past overschakelen naar 80 cm
03.11.2020 - 13:40
![]() JoeJ5 wrote:
JoeJ5 wrote:
Merci pour votre rapide réponse. Les photos portent effectivement les références des modèles. Je vais les reprendre et reposter les liens. Cordialement
23.10.2020 - 15:43DROPS Design answered:
Merci pour votre compréhension JoeJ5 - pensez bien à ne pas les éditer/modifier de trop, vous pouvez vous inspirer des autres photos publiées dans la galerie. Merci encore!
23.10.2020 - 15:58
![]() JoeJ5 wrote:
JoeJ5 wrote:
Modèle tricoté, j'ai envoyé le lien Ravelry sur Galerie #dropsfan France ainsi que 7 autres modèles drops mais ils n'ont pas été pris en compte. Pouvez-vous me dire pourquoi ? Merci
23.10.2020 - 14:28DROPS Design answered:
Bonjour JoeJ5, félicitations pour vos réalisations et merci pour liens, toutefois, elles ont été trop fortement modifiées pour être prises en compte (cf. conditions) - merci pour votre compréhension. N'hésitez pas à nous adresser d'autres liens, merci encore. Bon tricot!
23.10.2020 - 14:50
|
|
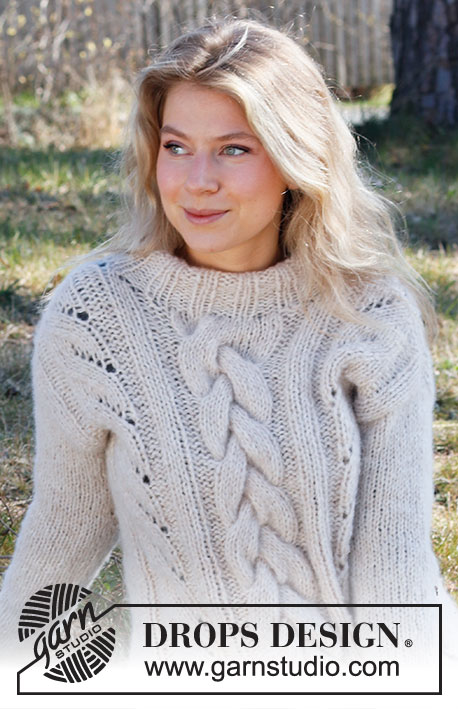
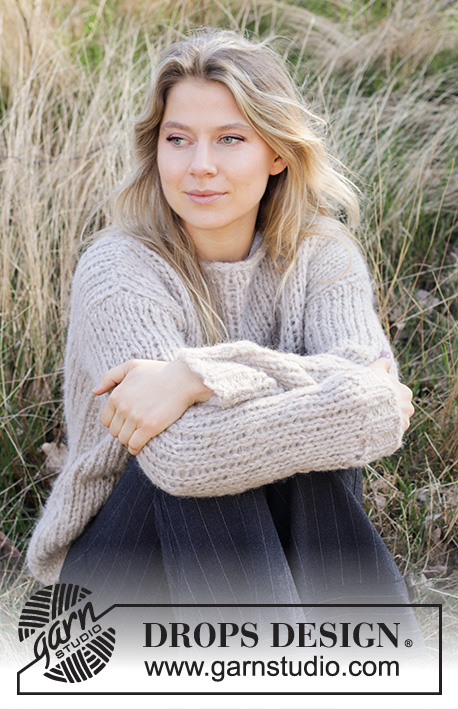
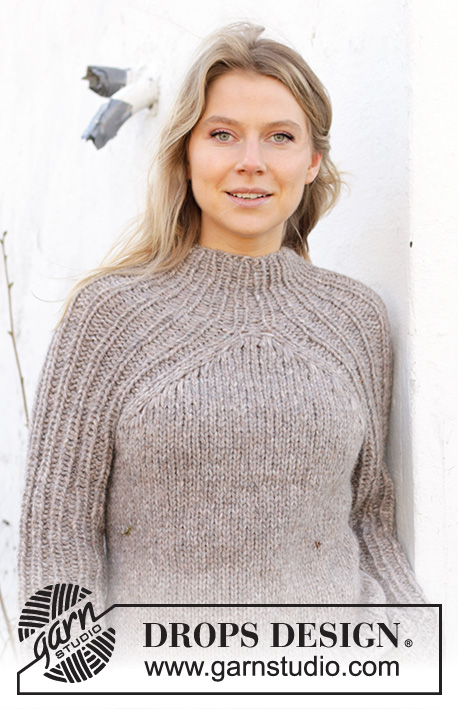
Abstract Rose#abstractrosesweater |
|
 |
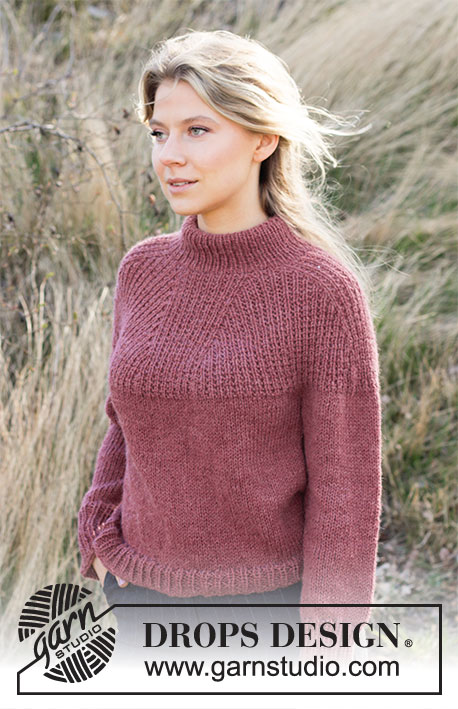 |
Knitted sweater with round yoke in DROPS Nepal. Piece is knitted top down with textured pattern and double neck edge. Size: S - XXXL
DROPS 218-27 |
|
|
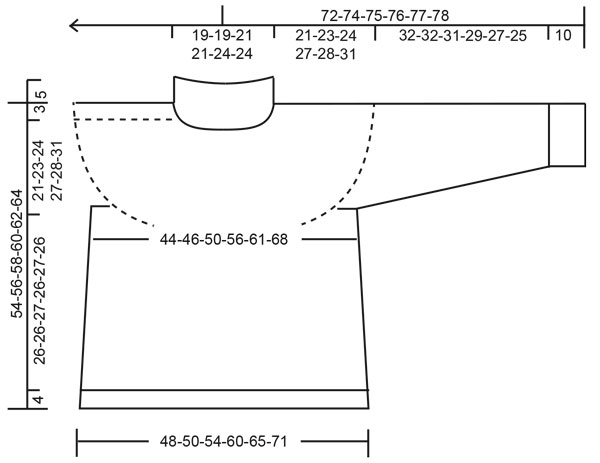
------------------------------------------------------- EXPLANATION FOR THE PATTERN: ------------------------------------------------------- INCREASE TIP-1 (applies to yoke): Increase with 1 yarn over after 1st, 3rd, 5th and 7th marker. Increase with 1 yarn over before 2nd, 4th, 6th and 8th marker. Work yarn overs twisted on next round to avoid holes. Work the increased stitches in textured pattern, i.e. work 1st increase in garter stitch, work 2nd increase in stockinette stitch etc. INCREASE TIP-2 (applies to sides of body): Work until 2 stitches remain before marker thread, 1 yarn over, knit 4 (marker thread is in the middle of these stitches), 1 yarn over. On next round work yarn overs twisted to avoid holes. Then work the new stitches in stockinette stitch. GARTER STITCH (worked in the round): 1 ridge vertically = 2 rounds, i.e. knit 1 round and purl 1 round. TEXTURED PATTERN: * Knit 1, 1 stitch in GARTER STITCH - read explanation above *, work from *-* over all stitches. DECREASE TIP (applies to sleeves): Decrease 1 stitch on each side of marker thread as follows: Work until 3 stitches remain before marker thread and knit 2 together, knit 2 (marker thread is between these stitches), slip 1 stitch knitwise, knit 1, pass slipped stitch over stitch worked. BIND-OFF TIP: To avoid a tight bind-off edge you may use a larger needle size. If this also is too tight – make 1 yarn over after approx. every 4th stitch and bind off these as regular stitches. ------------------------------------------------------- START THE PIECE HERE: ------------------------------------------------------- SWEATER - SHORT OVERVIEW OF THE PIECE: Work neck edge and yoke in the round on circular needle from mid back, top down. Now divide yoke for body and sleeves. Then work body in the round on circular needle, and work sleeves in the round on a double pointed needles. DOUBLE NECK EDGE: Cast on 88-88-96-96-104-104 stitches with 1 strand Nepal on circular needle size 4 mm = US 6. Work rib (knit 1/purl 1) until piece measures approx. 11 cm = 4⅜" (fold the neck edge double later, the finish neck will measure approx. 5 cm = 2"). On next round work stockinette stitch while AT THE SAME TIME decreasing 8 stitches evenly on round = 80-80-88-88-96-96 stitches. Insert 1 marker thread at the beginning of round (= approx. mid back), measure yoke from this marker thread! YOKE: Switch to circular needle size 5.5 mm = US 9. Work TEXTURED PATTERN - see explanation above. When 2 rounds have been worked, insert 8 markers on round without working (insert all markers in a knit stitch) as follows: Insert 1st marker in 7th-7th-9th-9th-9th-9th stitch. Insert 2nd marker in 13th-13th-15th-15th-15th-15th stitch. Insert 3rd marker in 27th-27th-31st-31st-33rd-33rd stitch. Insert 4th marker in 33rd-33rd-37th-37th-39th-39th stitch. Insert 5th marker in 47th-47th-53rd-53rd-57th-57th stitch. Insert 6th marker in 53rd-53rd-59th-59th-63rd-63rd stitch. Insert 7th marker in 67th-67th-75th-75th-81st-81st stitch. Insert 8th marker in 73rd-73rd-81st-81st-87th-87th stitch. On next round, increase 1 stitch at every marker – read INCREASE TIP-1 (= 8 stitches increased). I.e. Number of stitch before 1st marker, between 2nd and 3rd marker, between 4th and 5th marker, between 6th and 7th marker, and after 8th marker stays the same. Work stitches increased between 1st and 2nd marker, 3rd and 4th marker, and 5th and 6 marker and 7th and 8th marker. REMEMBER THE KNITTING GAUGE! Increase like this every other round 15-17-19-23-24-27 times in total, every 4th round 1 time in total and every 6th round 1 time in total = 216-232-256-288-304-328 stitches. Piece now measures approx. 19-21-23-27-28-31 cm = 7½"-8¼"-9"-10⅝"-11"-12¼" from marker thread. Then work in stockinette stitch (size S-M-L), until piece measures 21-23-24-27-28-31 cm = 8¼"-9"-9½"-10⅝"-11"-12¼" from marker thread. Now divide piece for body and sleeves as follows: Work the first 31-33-36-41-44-49 stitches (= half back piece), slip the next 46-50-56-62-64-66 stitches on a stitch holder for sleeve and cast on 8-8-8-8-10-10 new stitches under sleeve, work 62-66-72-82-88-98 as before (= front piece), slip the next 46-50-56-62-64-66 stitches on a stitch holder for sleeve and cast on 8-8-8-8-10-10 new stitches under sleeve, work 31-33-36-41-44-49 stitches as before (= half back piece). BODY: = 140-148-160-180-196-216 stitches. Insert 1 marker thread in the middle of the 8-8-8-8-10-10 stitches under sleeve in each side (= in the sides of body). There are 70-74-80-90-98-108 stitches between marker threads. Move the marker threads upwards when working; they should be used for increase later in the sides. When piece measures 4 cm = 1½" from division, increase 1 stitch on each side of every marker thread - read INCREASE TIP-2 (= 4 stitches increased). Increase like this every 4 cm = 1½" 3 times in total = 152-160-172-192-208-228 stitches. When piece measures 26-26-27-26-27-26 cm = 10¼"-10¼"-10⅝"-10¼"-10⅝"-10¼" from division, increase 10-11-11-12-11-12 stitches evenly on next round= 162-171-183-204-219-240 stitches. Switch to circular needle size 4 mm = US 6 and work rib = knit 1/purl 2. Bind off by knitting when rib measures 4 cm = 1½" - read BIND-OFF TIP! SLEEVES: Slip the 46-50-56-62-64-66 stitches from stitch holder in one side of piece on double pointed needles size 5.5 mm = US 9, and pick up 1 stitch in each of the 8-8-8-8-10-10 stitches cast on under sleeve = 54-58-64-70-74-76 stitches. Insert 1 marker thread in the middle of the 8-8-8-8-10-10 stitches under sleeve. Move the marker thread upwards, decrease on each side of this later. Continue in the round in stockinette stitch. When sleeve measures 3 cm = 1⅛" from division, decrease 1 stitch on each side of marker thread - read DECREASE TIP (= 2 stitches decreased). Decrease like this every 3-2½-2-1½-1-1 cm = 1⅛"-⅞"-¾"-½"-⅜"-⅜" 6-7-9-11-12-12 times in total = 42-44-46-48-50-52 stitches. When sleeve measures 32-32-31-29-27-25 cm = 12½"-12½"-12¼"-11⅜"-10⅝"-9¾" from division, increase 0-1-2-0-1-2 stitches evenly = 42-45-48-48-51-54 stitches. Switch to double pointed needles size 4 mm = US 6 and work rib (= knit 1/purl 2) in the round until rib measures 10 cm = 4". Bind off by knitting. Work the other sleeve the same way. ASSEMBLY: Fold rib at the top of neck down on the inside of garment. Fasten rib to form a folding edge. To avoid a tight neck edge and avoiding the edge to tip outwards, it is important to make the seam elastic. |
|
 |
|
Have you finished this pattern?Tag your pictures with #dropspattern #abstractrosesweater or submit them to the #dropsfan gallery. Do you need help with this pattern?You'll find 26 tutorial videos, a Comments/Questions area and more by visiting the pattern on garnstudio.com. © 1982-2026 DROPS Design A/S. We reserve all rights. This document, including all its sub-sections, has copyrights. Read more about what you can do with our patterns at the bottom of each pattern on our site. |
|


With over 40 years in knitting and crochet design, DROPS Design offers one of the most extensive collections of free patterns on the internet - translated to 17 languages. As of today we count 324 catalogs and 12290 patterns - 12280 of which are translated into English (US/in).
We work hard to bring you the best knitting and crochet have to offer, inspiration and advice as well as great quality yarns at incredible prices! Would you like to use our patterns for other than personal use? You can read what you are allowed to do in the Copyright text at the bottom of all our patterns. Happy crafting!
Post a comment to pattern DROPS 218-27
We would love to hear what you have to say about this pattern!
If you want to leave a question, please make sure you select the correct category in the form below, to speed up the answering process. Required fields are marked *.