
Popular categories
Looking for a yarn?


Comments / Questions (27)
![]() Emilia Gustafsson wrote:
Emilia Gustafsson wrote:
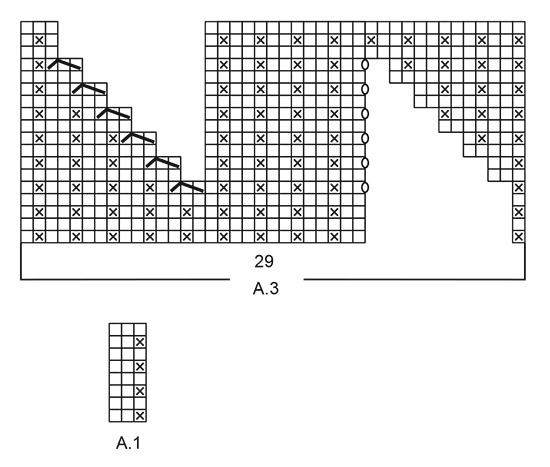
Hej! Jag ska börja sticka förkortade varv, men undrar hur man följer diagrammet (A.1). Är det meningen att fortsätta med första raden, även när man vänt? Eller går man till ny rad vid varje vändning?
28.11.2021 - 12:52DROPS Design answered:
Hei Emilia. Strikk etter diagram A.1, slik at det blir et mønster (1.maske i diagrammet i høyden strikkes enten vrang fra retten (kryss ikon) eller vrang fra vrangen (hvit firkant), de to andre maskene strikkes rett fra retten og vrang fra vrangen (hvit firkant)). mvh DROPS Design
30.11.2021 - 13:02
![]() Tess wrote:
Tess wrote:
Hi, I am working on the first segment for the body where A1 is worked back and forth. I am following the numbers on the guide but by doing this the 2 knitted stitches in A.1 do not sit over the 2 knitted sts in the rib once I get to the 3rd line of A1 (the increase in sts is not a multiple of 3). Is this correct? I am also wondering if I am supposed to work the stitches past the marker or just work the number of sts specified. "Turn, tighten the strand and work A.1 over 35 sts".
07.10.2021 - 13:56DROPS Design answered:
Dear Tess, the knitted stitches should fall above each other as continiuing the stitches of the ribbing. There is no increase while you are doing the short row (back and forth) part, when you turn the piece you should knit the stitches according to the previous pattern. For your last question, you should always knit the number of stitches specified. Happy Stitching!
08.10.2021 - 01:29
![]() TARDIEU FRANCOISE wrote:
TARDIEU FRANCOISE wrote:
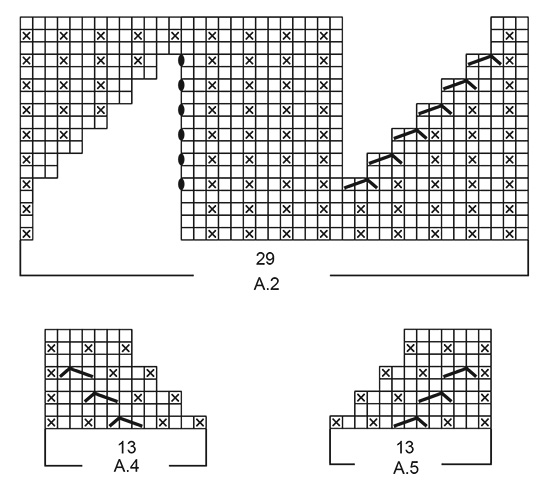
Bonjour, je ne comprends pas comment tricoter pour le devant les épaules et l'encolure en même temps. Dois-je tricoter le diagramme A4 sur l'ensemble des mailles épaules et seulement 13 sur 23 des mailles de l'encolure ? Pour la partie gauche il me restera 10 mailles sur 23 des mailles de l'encolure. Où vaine trouver les 3 mailles manquantes ?
16.01.2021 - 22:59DROPS Design answered:
Bonjour Mme Tardieu, A.4 ne se tricote sur les mailles côté encolure: le diagramme montre comment diminuer les mailles de l'encolure quand on tricote l'épaule droite (quand on porte le pull) - vous tricoterez l'épaule gauche en suivant le diagramme A.5. Dans chacun de ces diagrammes vous diminuez 6 mailles (= cf avant-dernier + dernier symbole de la légende). Bon tricot!
18.01.2021 - 09:10
![]() Marleen Schoubben wrote:
Marleen Schoubben wrote:
Beste, ik ben begonnen met het breien van deze trui maar als ik letterlijk doe wat er geschreven staat heb ik enkel de boord op het rondbreinaald en de voor en achterkant zijn 2 losse flappen we hebben al met 3 pers geprobeerd en niemand geraakt er uit wilt u het eens bekijken en mij verder helpen aub ? dank u wel
12.11.2020 - 17:33DROPS Design answered:
Dag Marleen,
Nadat je de boordsteek hebt gebreid, brei je een aantal verkorte toeren over het achterpand, zodat het achterpand langer wordt dan het voorpand (dit is ook te zien op de foto). Na de verkorte toeren brei je weer over alle steken in de rondte. Wat tussen de *-* staat herhaal je nog een een keer.
14.11.2020 - 10:23
![]() Liz wrote:
Liz wrote:
(Sorry for the re-post, I accidentally clicked comment instead of question!) Hello, what type of bind-off would you recommend for this pattern? Thank you
05.08.2020 - 00:13DROPS Design answered:
Dear Liz, you can use your usual technique of bind off - just making sure bind off edge is not too tight (as for any garment worked top down). Use then larger needle or bind off with yarn overs evenly if necessary. Happy knitting!
05.08.2020 - 08:04
![]() Liz wrote:
Liz wrote:
Hello, what type of bind-off would you recommend for this pattern? Thank you
04.08.2020 - 23:48
![]() Carita wrote:
Carita wrote:
Hei Kuvioiden ohje löytyy vain norjaksi. Saisiko sen suomeksi? Tai ainakin selitteet kuvioille?
07.05.2020 - 22:14DROPS Design answered:
Nyt piirrokset ja niiden merkkien selitykset aukeavat.
13.05.2020 - 17:46
![]() Carla wrote:
Carla wrote:
Hola, no encuentro el diagrama.
21.04.2020 - 16:51DROPS Design answered:
Hola Carla. Había unas correcciones en el diagrama y ahora ya está disponible en la web.
22.04.2020 - 19:46
![]() Miriam wrote:
Miriam wrote:
Non riesco a interpretare gli schemi dove non ci sono simboli e vorrei sapere e e' possibile lavorarlo tutto in piano. grazie
07.04.2020 - 11:29DROPS Design answered:
Buongiorno Miriam. Deve leggere i diagrammi come se non ci fossero gli spazi vuoti. P.es: A2 è lavorato su 29 maglie. Lavora le prime 28, poi passa all’ultima maglia, quella con il simbolo “x” senza nessuna interruzione. Analogamente sulle altre righe. A questo link, trova indicazioni utili per lavorare in ferri di andata e ritorno un capo presentato per essere lavorato in tondo. Buon lavoro!
07.04.2020 - 16:50
![]() Elin Larsen wrote:
Elin Larsen wrote:
Kan jeg strikke forkortede pinner både framme og bak for å unngå bue?
31.03.2020 - 15:14DROPS Design answered:
Hej Elin, ja det skal gå bra, men husk at du da også bruger mere garn. God fornøjelse!
01.04.2020 - 09:32
|
|||||||||||||||||||
Wake the Wind#wakethewindsweater |
|||||||||||||||||||
 |
 |
||||||||||||||||||
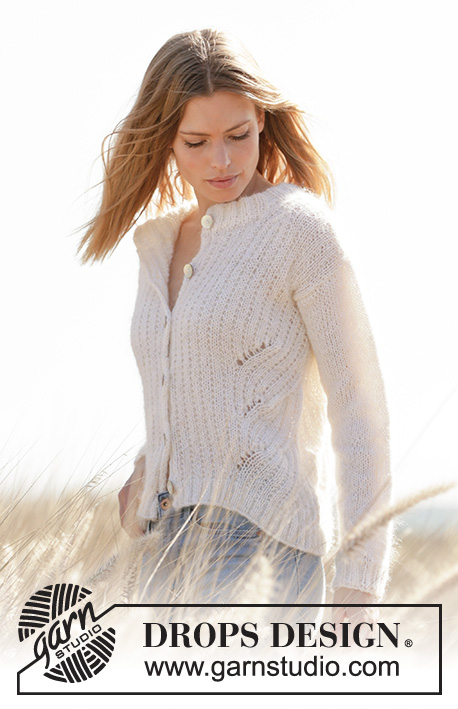
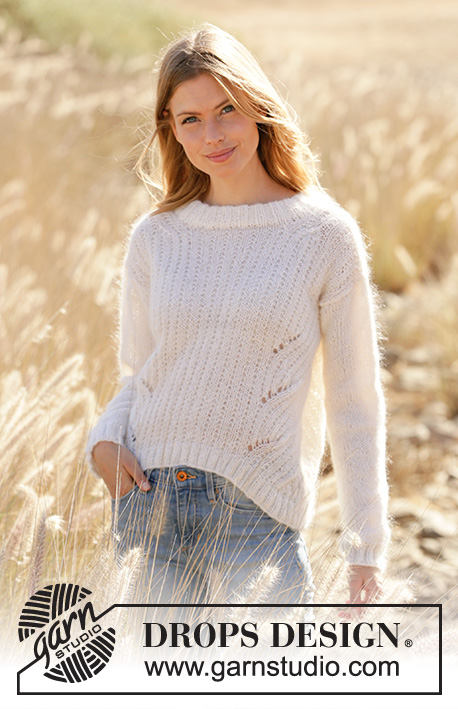
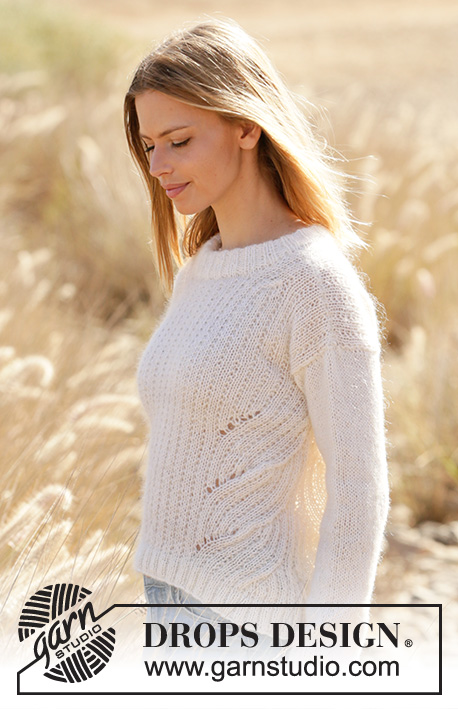
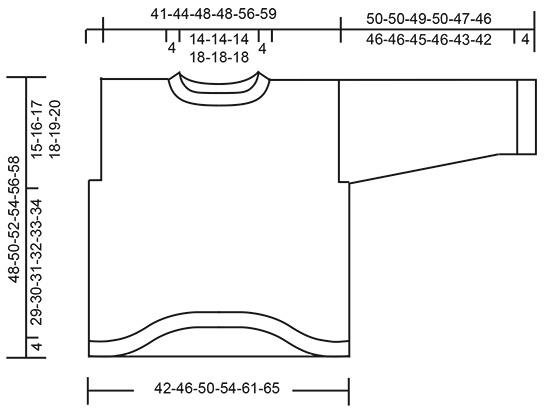
Knitted sweater in DROPS Alpaca and DROPS Kid-Silk. The piece is worked with textured pattern and displacements. Sizes XS - XXL.
DROPS 212-8 |
|||||||||||||||||||
|
------------------------------------------------------- EXPLANATIONS FOR THE PATTERN: ------------------------------------------------------- PATTERN: See diagrams A.1 to A.5. The diagrams show the pattern from the right side. DECREASE TIP-1 (for sides of body): Decrease 1 stitch on each side of the marker thread as follows: Work until there are 5 stitches left before the marker thread, knit 2 together, work 6 stitches (marker thread sits in the middle of these 6 stitches), slip 1 stitch as if to knit, knit 1 and pass the slipped stitch over the knitted stitch (= 2 stitches decreased). DECREASE TIP-2 (evenly spaced): To work out how to decrease evenly, count the total number of stitches on the round (e.g. 44 stitches) and divide by the number of decreases to be made (e.g. 4) = 11. In this example decrease by knitting together each 10th and 11th stitch. INCREASE TIP (for sleeves): Work until there are 2 stitches left before the marker thread, 1 yarn over, knit 4 (marker thread sits between these 4 stitches), 1 yarn over. On the next round knit the yarn overs twisted to avoid holes (2 stitches increased). Then work the new stitches in stockinette stitch. ------------------------------------------------------- START THE PIECE HERE: ------------------------------------------------------- SWEATER – SHORT OVERVIEW OF THE PIECE: The body is worked in the round with circular needle as far as the armholes. Stiches are then bind off for the armhole on each side, dividing the front and back pieces, which are finished separately. The sleeves are worked in the round with double pointed needles/short circular needle, bottom up. The neck is worked in the round with short circular needle to finish. BODY: Cast on 216-232-248-264-296-312 stitches with circular needle size 4.5 mm = US 7 and 1 strand Alpaca + 1 strand Kid-Silk (= 2 strands). Knit 1 round, then work rib as follows: Knit 1, * purl 2, knit 2 *, work from *-* until there are 3 stitches left on the round, purl 2 and knit 1. Continue this rib for 4 cm = 1½". When the rib is finished, work 1 row from the right side where all purl-2 sections are purled together to purl-1 = 162-174-186-198-222-234 stitches. Change to circular needle size 5.5 mm = US 9. You will later work textured pattern with displacements in the sides. The displacements will cause the piece to arch downwards in the sides and upwards mid front and back. To avoid the piece arching upwards mid-back you can now work short rows as follows: Insert a marker thread at the beginning of the round (= in the side between 2 knitted stitches). Insert a marker after the first 40-43-46-49-55-58 stitches, the next stitch is a purled stitch (= mid-stitch on the back piece). Work A.1 (= 3 stitches) to the marker, continue with A.1 until you have worked 9-12-15-18-24-27 stitches past the marker (the 2 knitted stitches in A.1 should sit over the 2 knitted stitches in the rib), turn, tighten the strand and work A.1 over 17-23-29-35-47-53 stitches, turn, tighten the strand and work A.1 over 20-26-32-38-50-56 stitches, turn, tighten the strand and work A.1 over 23-29-35-41-53-59 stitches. Continue back and forth like this, working 3 more stitches each time you turn and until you have worked 19 short rows. The last row is worked from the right side. Then continue A.1 to the beginning of the round. Now work pattern in the round as follows: * A.2 (= 29 stitches), knit 2, A.1 over the next 21-27-33-39-51-57 stitches (= 7-9-11-13-17-19 repeats of 3 stitches), A.3 (= 29 stitches) *, insert a marker thread here (= side), work from *-* 1 more time. Allow the marker threads to follow your work onwards; they will be used later. REMEMBER THE KNITTING GAUGE! When A.2 and A.3 have been completed in height, repeat the diagrams 2 more times (= a total of 3 times). Then continue with knit over knit and garter stitch over garter stitch over the 29 stitches on each side of both marker threads. The other stitches are continued as before. On the next round begin to decrease on each side of both marker threads – read DECREASE TIP-1. Decrease like this every 2nd round a total of 3 times = 150-162-174-186-210-222 stitches. When the piece measures 33-34-35-36-37-38 cm = 13"-13⅜"-13¾"-14¼"-14½"-15", measured from the cast-on edge and along the marker thread in the side (i.e. longest part), bind off 8-8-8-14-14-14 stitches on each side for the armholes (= 4-4-4-7-7-7 stitches on each side of both marker threads). There are 67-73-79-79-91-97 stitches for the front piece and 67-73-79-79-91-97 stitches for the back piece. Each piece is finished separately. BACK PIECE: = 67-73-79-79-91-97 stitches. Continue back and forth with textured pattern (= A.1) as before. Towards the armholes knit 2 inside the 1 edge stitch in garter stitch. When the piece measures 11-12-13-14-15-16 cm = 4⅜"-4¾"-5⅛"-5½"-6"-6¼" from where stitches were bind off for the armholes, bind off the middle 33-33-33-39-39-39 stitches for the neck and each shoulder is finished separately. On the next row from the neck bind off 1 stitch = 16-19-22-19-25-28 stitches on the shoulder. Continue until the piece measures 15-16-17-18-19-20 cm = 6"-6¼"-6¾"-7"-7½"-8" from where stitches were bind off for the armholes. Bind off with knit. Work the other shoulder in the same way. The sweater measures approx. 48-50-52-54-56-58 cm = 19"-19¾"-20½"-21¼"-22"-22¾" from the shoulder down (measured at its longest). FRONT PIECE: = 67-73-79-79-91-97 stitches. Continue back and forth with textured pattern (= A.1) as before. Towards the armhole, knit 2 stitches inside the 1 edge stitch in garter stitch. When the piece measures 8-9-10-10-11-12 cm = 3⅛"-3½"-4"-4"-4⅜"-4¾" – adjust so the next row is worked from the right side, work as follows; Work pattern as before over the first 22-25-28-25-31-34 stitches (= left shoulder), work the next 23-23-23-29-29-29 stitches before placing them on 1 thread for the neck and work the remaining 22-25-28-25-31-34 stitches (= right shoulder). Work 1 row back over the right shoulder. Now work pattern as before but the 13 stitches towards the neck are worked as shown in A.4. When A.4 has been completed in height there are 16-19-22-19-25-28 stitches left on the shoulder. Continue working until the piece measures 15-16-17-18-19-20 cm = 6"-6¼"-6¾"-7"-7½"-8" from where stitches were bind off for the armholes, bind off with knit. Work the other shoulder in the same way but A.5 is worked over the 13 stitches towards the neck. The sweater measures approx. 48-50-52-54-56-58 cm = 19"-19¾"-20½"-21¼"-22"-22¾" from the shoulder down (measured where it is longest). SLEEVE: Cast on 44-44-48-48-48-52 stitches with double pointed needles size 4.5 mm = US 7 and 1 strand Alpaca + 1 strand Kid-Silk (= 2 strands). Knit 1 round, then work rib (= knit 2 / purl 2) in the round for 4 cm = 1½". Knit 1 round where you decrease 8-8-10-8-6-8 stitches evenly spaced – read DECREASE TIP-2 = 36-36-38-40-42-44 stitches. Change to double pointed needles size 5.5 mm = US 9 and insert a marker thread at the beginning of the round (= mid under the sleeve). Work stockinette stitch in the round. When the sleeve measures 8-8-8-9-8-8 cm = 3⅛"-3⅛"-3⅛"-3½"-3⅛"-3⅛", increase 1 stitch on each side of the marker thread – read INCREASE TIP. Increase like this every 7-5-5-4-3½-3½ cm = 2¾"-2"-2"-1½"-1¼"-1¼" a total of 6-8-8-9-10-10 times = 48-52-54-58-62-64 stitches. When the sleeve measures 47-47-46-46-43-42 cm = 18½"-18½"-18"-18"-17"-16½" (shorter sleeves in larger sizes due to longer yoke), finish the sleeve back and forth from the beginning of the round, with 1 edge stitch in garter stitch on each side. This gives you a split which is sewn to the bottom of the armhole. When the sleeve measures 50-50-49-50-47-46 cm = 19¾"-19¾"-19¼"-19¾"-18½"-18", bind off with knit. Work the other sleeve in the same way. ASSEMBLY: Sew the shoulder seams with grafting stitches inside the bind-off edge. Sew the sleeves to the body inside the 1 edge stitch on the body and the bind-off edge on the sleeves. Sew the split to the 4-4-4-7-7-7 stitches bind off for the armhole. NECK: Start from the right side on the top of one shoulder and using 1 strand of each quality (= 2 strands) and circular needle size 4.5 mm = US 7, knit up 88 to 100 stitches around the neck, including the stitches from the threads (number of stitches should be divisible by 4). Work rib in the round (= knit 2 / purl 2). When the neck measures 8 cm = 3⅛", change to circular needle size 5.5 mm = US 9 and bind off with knit over knit and purl over purl – make sure the bind-off edge is not tight. Fold the neck double to the wrong side and sew down. Make sure the seam is not tight. |
|||||||||||||||||||
Diagram explanations |
|||||||||||||||||||
|
|||||||||||||||||||
 |
|||||||||||||||||||
 |
|||||||||||||||||||
 |
|||||||||||||||||||
Have you finished this pattern?Tag your pictures with #dropspattern #wakethewindsweater or submit them to the #dropsfan gallery. Do you need help with this pattern?You'll find 33 tutorial videos, a Comments/Questions area and more by visiting the pattern on garnstudio.com. © 1982-2026 DROPS Design A/S. We reserve all rights. This document, including all its sub-sections, has copyrights. Read more about what you can do with our patterns at the bottom of each pattern on our site. |
|||||||||||||||||||


With over 40 years in knitting and crochet design, DROPS Design offers one of the most extensive collections of free patterns on the internet - translated to 17 languages. As of today we count 324 catalogs and 12290 patterns - 12280 of which are translated into English (US/in).
We work hard to bring you the best knitting and crochet have to offer, inspiration and advice as well as great quality yarns at incredible prices! Would you like to use our patterns for other than personal use? You can read what you are allowed to do in the Copyright text at the bottom of all our patterns. Happy crafting!
Post a comment to pattern DROPS 212-8
We would love to hear what you have to say about this pattern!
If you want to leave a question, please make sure you select the correct category in the form below, to speed up the answering process. Required fields are marked *.