
Popular categories
Looking for a yarn?


Comments / Questions (25)
![]() Katleen wrote:
Katleen wrote:
Hallo, Daar Melody zo veel pluist heb ik via de garenvervanger voor 2 draden brushed alpaca silk gekozen. Samen met Drops Air ( categorie c) kom ik aan c + c + c. Toch kom is deze combinatie niet geschikt voor breinaalden 15. Heb ik een fout gemaakt bij de selectie van de garens ?
20.08.2022 - 15:43DROPS Design answered:
Dag Katleen,
In het patroon wordt garengroep C+D gebruikt en niet C+C+C, dus in het patroon is de totale dikte kleiner, want C+C is E en niet D. Nou is dit niet zo'n heel groot verschil en waar het uiteindelijk om gaat is dat je dezelfde stekenverhouding krijgt, zodat je het patroon kunt volgen. Je kunt dus ook een proeflapje met een andere naalddikte proberen.
23.08.2022 - 19:10
![]() Katleen wrote:
Katleen wrote:
Hallo, Daar ik Drops Melody vermijd omwille van het pluizen heb ik de garenvervanger geconsulteerd, Twee draden brushed alpaca silk . De big delight wil ik vervangen door Air. Heb dus driemaal garen categorie C. Toch kom ik verre van de steekverhouding nl 7 st en 10 nld voor 10 x 10 cm. Heb je raad voor me ?
19.08.2022 - 23:30
![]() Pao Marie-Antoinette wrote:
Pao Marie-Antoinette wrote:
Hola, gracias por subir todos estos patrones son increíbles, pero tengo una pregunta, si es el panel trasero, por q hay q hacer disminución para el escote? Gracias :)
24.06.2022 - 06:17DROPS Design answered:
Hola Pao, normalmente se trabajan disminuciones en la espalda para que se asiente mejor el modelo, haciendo una pequeña forma de escote en la parte de la espalda (en vez de cerrar todos los puntos en la misma fila).
26.06.2022 - 13:24
![]() Marta wrote:
Marta wrote:
Buenos días, quisiera saber dónde ubicar los ojales para los dos botones, o si estos son decorativos.
09.07.2021 - 05:57DROPS Design answered:
Hola Marta, como los puntos son muy amplios, no se trabajan ojales, sino que se abotona usando el espacio entre los puntos.
15.07.2021 - 00:19
![]() Marta wrote:
Marta wrote:
Quisiera saber dónde ubicar los ojales para los dos botones, o si estos son solo decorativos. Agradecé mucho su respuesta.
09.07.2021 - 05:54
![]() Mirja wrote:
Mirja wrote:
Ich bin etwas verwirrt. Wird die Jacke mit Nadelstärke 15 gestrickt?? Wo finde ich die bei Drops.
14.06.2021 - 13:28
![]() Béatrice LASSALLE wrote:
Béatrice LASSALLE wrote:
Bonjour, Pour réaliser ce modèle de veste, vous utilisez des aiguilles circulaires en aller et retour. Puis-je le tricoter avec des aiguilles droites ? Merci d'avance.
24.01.2021 - 10:19DROPS Design answered:
Bonjour Mme Lassalle, on utilise des aiguilles circulaires pour avoir suffisamment de place pour y loger toutes les mailles, mais vous pouvez effectivement utiliser des aiguilles droites, pensez à bien vérifier votre tension car vos mailles seront plus serrées - retrouvez plus d'infos sur les aiguilles circulaires ici. Bon tricot!
25.01.2021 - 09:44
![]() Melfeu wrote:
Melfeu wrote:
Bonjour, je reçois la laine aujourd’hui... petite question lorsqu’il est dit : Quand l'ouvrage mesure 3 cm, continuer en jersey avec 1 maille lisière au POINT MOUSSE de chaque côté – voir ci-dessus on tricote le rang en jersey (1rang à l’endroit puis l’autre à l’envers) ou au point mousse (tout à l’endroit)? Merci pour votre réponse
15.01.2021 - 10:07DROPS Design answered:
Bonjour Mme Melfeu, vous tricotez en jersey (= à l'endroit sur l'endroit, à l'envers sur l'envers) mais les mailles lisières (= la 1ère et la dernière maille de chaque rang) sont tricotées au point mousse (= à l'endroit tous les rangs) - comme on le montre dans cette vidéo. Bon tricot!
15.01.2021 - 15:20
![]() Evelyne wrote:
Evelyne wrote:
Bonjour, je voudrais faire le gilet uniquement en Big Delight et en utilisant un seul fil (et donc des aiguilles adaptées). Quelle quantité de Big Delight dois-je prévoir pour une taille 40 (taille française) ? merci.
27.09.2020 - 17:06DROPS Design answered:
Bonjour Evelyne, nous ne sommes malheureusement pas en mesure de pouvoir adapter chacun de nos modèles à chaque demande. Ce modèle paraît toutefois correspondre à ce que vous cherchez et pourra au moins vous inspirer pour faire les ajustements nécessaires. Il se tricote en DROPS Air, qui est du même groupe que DROPS Big Delight. Bon tricot!
28.09.2020 - 10:24
![]() Nathalie wrote:
Nathalie wrote:
Bonjour, je ne trouve d'aiguilles N°15 sur la boutique Kalidou, comment faire? Cordialement, Nathalie
12.08.2020 - 16:53DROPS Design answered:
Bonjour Nathalie, n'hésitez pas à les contacter pour vérifier avec eux - même par mail ou téléphone, on saura vous répondre et vous conseiller. Bon tricot!
12.08.2020 - 17:09
|
|
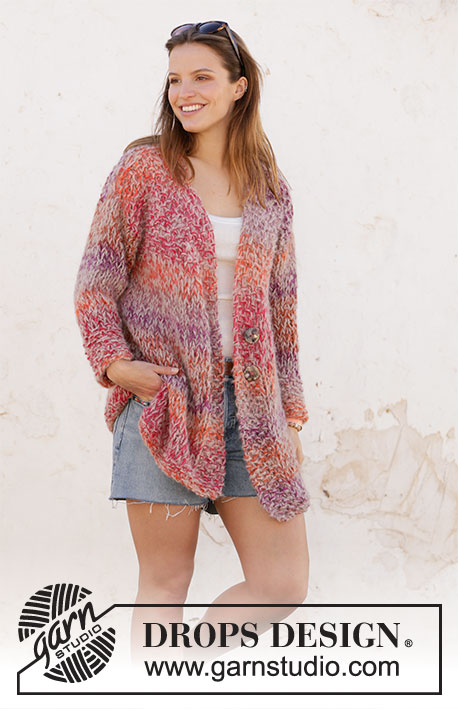
Sunsets and Sand Jacket#sunsetsandsandjacket |
|
 |
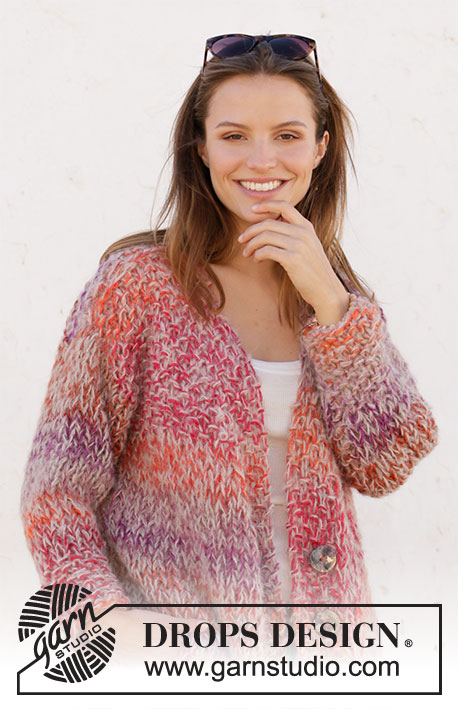 |
Knitted jacket with moss stitch and V-neck in DROPS Big Delight and DROPS Melody. Size XS–XXL.
DROPS 212-18 |
|
|
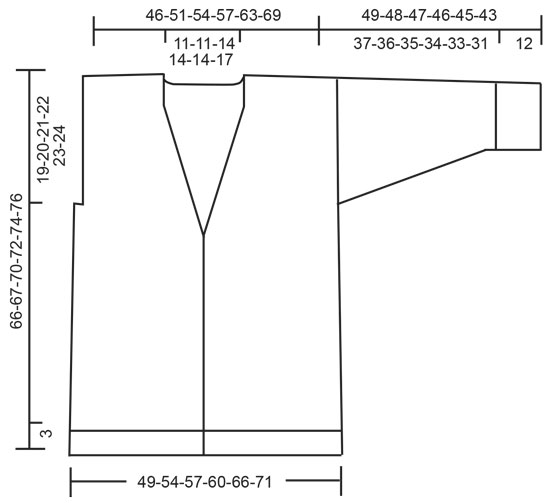
---------------------------------------------------------- EXPLANATION FOR THE PATTERN: ---------------------------------------------------------- GARTER STITCH (back and forth): Knit all rows. 1 ridge vertically = knit 2 rows. MOSS STITCH (work back and forth on needle): Row 1: * Knit 1, purl 1 *, repeat from *-*. Row 2: Knit over purl and purl over knit. Repeat 2nd row upwards. DECREASE TIP (applies to V-neck): All decreases are done from the right side. DECREASE AS FOLLOWS AFTER 6 BAND STITCHES: When first stitch is knit stitch: Slip 1 stitch knitwise, knit 1, pass slipped stitch over. When first stitch is purl stitch: Purl 2 twisted together (i.e. work in back loop of stitch instead of front). DECREASE AS FOLLOWS BEFORE 6 BAND STITCHES: When last stitch is knit stitch: Knit 2 together. When last stitch is purl stitch: Purl 2 together. ---------------------------------------------------------- START THE PIECE HERE: ---------------------------------------------------------- JACKET: Work jacket back and forth on circular needle in parts, and sew together in the side when finished. Stitches for sleeves are picked up in armhole on body, and sleeves are worked top down. BACK PIECE: Work piece back and forth on circular needle. Cast on 34-38-40-42-46-50 stitches on circular needle size 15 mm = US 19 with 1 strand of each yarn (= 2 strands). Work in MOSS STITCH - see explanation above. REMEMBER THE KNITTING GAUGE! When piece measures 3 cm = 1⅛", work in stockinette stitch and 1 edge stitch in GARTER STITCH in each side – see explanation above. When piece measures 47-48-49-50-51-52 cm = 18½"-19"-19¼"-19¾"-20"-20½", bind off 1 stitch in each side (marks armholes) = 32-36-38-40-44-48 stitches. When piece measures 48-50-52-54-56-58 cm = 19"-19¾"-20½"-21¼"-22"-22¾", work moss stitch over all stitches. Continue until piece measures 64-66-68-70-72-74 cm = 25¼"-26"-26¾"-27½"-28⅜"-29⅛". Bind off the middle 6-6-8-8-8-10 stitches for neck, and finish each shoulder separately. On next row towards the neck, decrease 1 stitch = 12-14-14-15-17-18 stitches remain on shoulder. Loosely bind off all stitches when piece measures 66-68-70-72-74-76 cm = 26"-26⅜"-27½"-28⅜"-29⅛"-30". Work the other shoulder the same way. LEFT FRONT PIECE: Work piece back and forth on circular needle. Cast on 21-23-24-25-27-29 stitches on circular needle size 15 mm = US 19 with 1 strand of each yarn (= 2 strands). Work in MOSS STITCH - see explanation above. REMEMBER THE KNITTING GAUGE! When piece measures 3 cm = 1⅛", continue working 1 edge stitch in garter stitch, stockinette stitch, but continue in moss stitch over the last 6 stitches on needle (seen from right side) = band. When piece measures 40-42-41-43-45-44 cm = 15¾"-16½"-16⅛"-17"-17¾"-17¼", decrease 1 stitch on the inside of band – READ DECREASE TIP. Repeat decrease every 3 cm = 1⅛" 8-8-9-9-9-10 times in total. AT THE SAME TIME when piece measures 47-48-49-50-51-52 cm = 18½"-19"-19¼"-19¾"-20"-20½", bind off 1 stitch at the beginning of row on the right side (marks armhole). When piece measures 48-50-52-54-56-58 cm = 19"-19¾"-20½"-21¼"-22"-22¾", continue with moss stitch over all stitches. Continue until piece measures 66-68-70-72-74-76 cm = 26"-26⅜"-27½"-28⅜"-29⅛"-30", bind off the remaining 12-14-14-15-17-18 stitches on shoulder. RIGHT FRONT PIECE: Cast on and work as left front piece but opposite, i.e. band is worked over the first 6 stitches on row, and bind off 1 stitch for armhole at the beginning of row on the wrong side. ASSEMBLY: Sew the shoulder seams. LEFT SLEEVE: Pick up stitches along the armhole at the top of jacket and work sleeve back and forth on circular needle, top down. Begin where 1 stitch was bind off for armhole on left front piece, and pick up 26-28-30-30-32-34 stitches from right side with 1 strand of each quality ( = 2 strands) on circular needle size 15 mm = US 19. Pick up stitches along armhole on front piece and down along armhole on back piece where 1 stitch was bind off for armhole. Work in stockinette stitch. When sleeve measures 3 cm = 1⅛", decrease 1 stitch in each side of piece. Decrease every 6-6-5-6-5-4 cm = 2⅜"-2⅜"-2"-2⅜"-2"-1⅛" 5-5-6-5-6-7 times in total = 16-18-18-20-20-20 stitches. When piece measures 37-36-35-34-33-31 cm = 14½"-14¼"-13¾"-13⅜"-13"-12¼" (shorter measurements in larger sizes because of shoulder shoulders), work moss stitch over all stitches. Bind off when piece measures 49-48-47-46-45-43 cm = 19¼"-19"-18½"-18"-17¾"-17". RIGHT SLEEVE: Work as left sleeve but begin on back piece. Pick up stitches along armhole on back piece and down along armhole on front piece where 1 stitch was bind off for armhole. ASSEMBLY - 2: Sew side and sleeve seams in one in outer loops of edge stitch. Sew buttons on to left front piece- see picture. Button between 2 stitches on band. |
|
 |
|
Have you finished this pattern?Tag your pictures with #dropspattern #sunsetsandsandjacket or submit them to the #dropsfan gallery. Do you need help with this pattern?You'll find 18 tutorial videos, a Comments/Questions area and more by visiting the pattern on garnstudio.com. © 1982-2026 DROPS Design A/S. We reserve all rights. This document, including all its sub-sections, has copyrights. Read more about what you can do with our patterns at the bottom of each pattern on our site. |
|


With over 40 years in knitting and crochet design, DROPS Design offers one of the most extensive collections of free patterns on the internet - translated to 17 languages. As of today we count 324 catalogs and 12290 patterns - 12280 of which are translated into English (US/in).
We work hard to bring you the best knitting and crochet have to offer, inspiration and advice as well as great quality yarns at incredible prices! Would you like to use our patterns for other than personal use? You can read what you are allowed to do in the Copyright text at the bottom of all our patterns. Happy crafting!
Post a comment to pattern DROPS 212-18
We would love to hear what you have to say about this pattern!
If you want to leave a question, please make sure you select the correct category in the form below, to speed up the answering process. Required fields are marked *.