
Popular categories
Looking for a yarn?


Comments / Questions (31)
![]() Question wrote:
Question wrote:
Bonjour et merci pour votre écoute.Comment lire le diagramme des torsades : Tricoter 4 rangs, faire les torsades, tricoter 3 rangs et ???? reprendre le diagramme au début ? Soit tricoter 7 rangs entre chaque torsade ? Dites-moi combien de rangs tricoter entre chaque torsade .... merci encore !
20.02.2026 - 15:08DROPS Design answered:
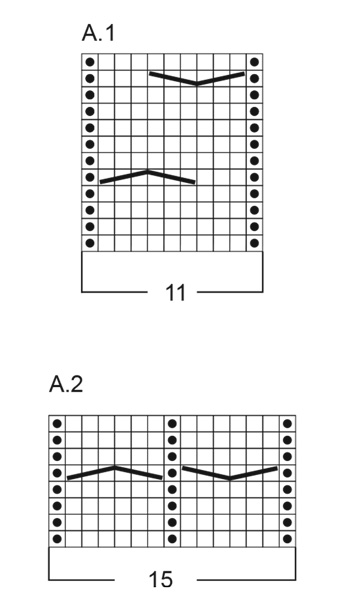
Bonjour, tricotez le diagramme de bas en haut en commençant sur l'endroit de droite à gauche (et de gauche à droite sur l'envers), autrement dit, dans A.1, vous avez d'abord 4 rangs sans torsades, la 1ère torsade au 5ème rang, puis 5 rangs sans torsades, puis 1 torsade au rang suivant, puis le dernier rang du diagramme et vous reprenez au 1er rang = vous aurez 5 rangs sans torsades entre chaque torsade. Bon tricot!
23.02.2026 - 07:26
![]() Nadia wrote:
Nadia wrote:
Bonjour, Les augmentations autour des marqueurs, pour moi à répéter 6 fois. Dois-je toujours faire les augmentations les unes sur les autres ? Ou dois-je les faire à partir des 6 mailles des côtés .... merci d'avance
18.02.2026 - 21:12DROPS Design answered:
Bonjour Nadia, vous devez augmenter à chaque fois comme indiqué sous AUGMENTATIONS au début des explications, autrement dit, augmentez 1 m avant chaque marqueur + 1 m après chaque marqueur (soit: 1 jeté, 1 m, marqueur, 1 m, 1 jeté). Le nombre de mailles entre les marqueurs augmente de 2 à chaque augmentation. Bon tricot!
19.02.2026 - 08:45
![]() Greet wrote:
Greet wrote:
Het is mij onduidelijk of ik dit met een rondbreinaald doe. Het staat wel bij de benodigdheden. Maar ik lees het niet in de beschrijving
07.12.2025 - 18:44
![]() Karin wrote:
Karin wrote:
Hi liebes Drops-Team, ich verstehe die Angaben nach A2 nicht.1-2-0-0-1-2. Ich bin bei 81M angelangt und weiß leider nicht weiter.
20.03.2024 - 13:09DROPS Design answered:
Liebe Karin, in die 4. Größe stricken Sie keine linke Masche nach A.2, dh so stricken Sie die 81 Maschen: 1 Randmasche krausrechts, A.2, glatt rechts bis 16 Maschen übrig sind, A.2, 1 Randmasche kraus rechts. Viel Spaß beim stricken!
20.03.2024 - 15:19
![]() Mona Ruth Østby wrote:
Mona Ruth Østby wrote:
Tøffelen får et helt utrolig merkelig form med en veldig lang smal fot. Dette kan ikke være riktig?
13.03.2024 - 11:25DROPS Design answered:
Hej Mona, den burde se nogenlunde sådan her ud, men med snoning langs med kanten på skaftet: Hvordan montere en tovet tøffel
19.03.2024 - 11:11
![]() Margaretha Parmann wrote:
Margaretha Parmann wrote:
Strikkerdisse tøflene. Lurer på når jeg strikker flettemønstret- er det vrangt der det er rett på retten? Strikker jo frem og tilbake.
28.02.2024 - 18:57DROPS Design answered:
Hej Margaretha. Ja det stämmer. Mvh DROPS Design
01.03.2024 - 11:50
![]() Vibeke Mejlvang wrote:
Vibeke Mejlvang wrote:
Forstår ikke hvordan skoen skal Sys sammen . Hvor lang er foden inden filtning?
17.12.2023 - 16:34DROPS Design answered:
Hei Vibeke. Når tøffelen er ferdig strikket, så bruk trådeenden i starten av arbeidet og snurp tåen sammen. Deretter syr du delene sammen, sømmen blir da oppå risten av foten. Sy i ytterste ledd av ytterste maske frem til de økte maskene, klipp og fest tråden. Deretter sy tøffelen sammen midt bak kant i kant. Hvor lang foten er innen tovingen kommer an på hvilken str. du har strikket. Se strikkefastheten både før og etter toving øverst i oppskriften. mvh DROPS Design
18.12.2023 - 10:09
![]() Ann wrote:
Ann wrote:
Hallo, na het vilten is het kabelpatroon niet meer zichtbaar. Het deel van de kabel ziet er bijna hetzelfde uit als de rest van de slof. Ik heb gebreid met Drops air. Kan dat de oorzaak zijn?
26.11.2023 - 22:16DROPS Design answered:
Dag Ann,
Ja, dat zou wel eens door DROPS Air kunnen komen. Dit is heel ander garen dan aangegeven in het patroon. Alaska is wat geschikter om te vilten.
29.11.2023 - 19:33
![]() Giuliana Franchi wrote:
Giuliana Franchi wrote:
Buongiorno,sulle indicazionì per la confezione delle pantodole c'é scritto di cucire la parte sopra del piede, e fin qui va bene. In seguito é indicato di cucire le "pantofole al centro, sul dietro"; nelle pantofole lavorate io non trovo nient'altro da cucire. grazie Giuliana
25.11.2023 - 14:16DROPS Design answered:
Buonasera Giuliana, le pantofole vanno cucite dalla punta fino alla fine del dietro. Buon lavoro!
26.11.2023 - 23:17
![]() Elke Brossart wrote:
Elke Brossart wrote:
Hallo, wie oft wird der Mustersatz A2 gestrickt , komme einfach nicht klar. Danke
22.11.2023 - 08:23DROPS Design answered:
Liebe Frau Brossard, je nach der Größe wird entweder A.1 oder A.2 so gestrickt:; 1 Randmasche, Zopf nach A.1 (in die 2 ersten Größen) oder A.2 (in die anderen Größen), 1-2-0-0-1-2 Masche links, glatt rechts und dann mit 1-2-0-0-1-2 Masche links + A.1 oder A.2 + 1 Randmasche enden. Viel Spaß beim stricken!
22.11.2023 - 09:18
|
|||||||||||||
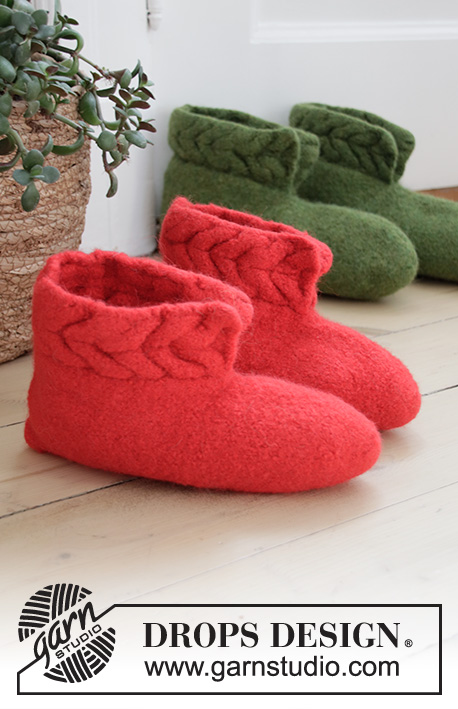
Heartfelt Christmas#heartfeltchristmasslippers |
|||||||||||||
 |
 |
||||||||||||
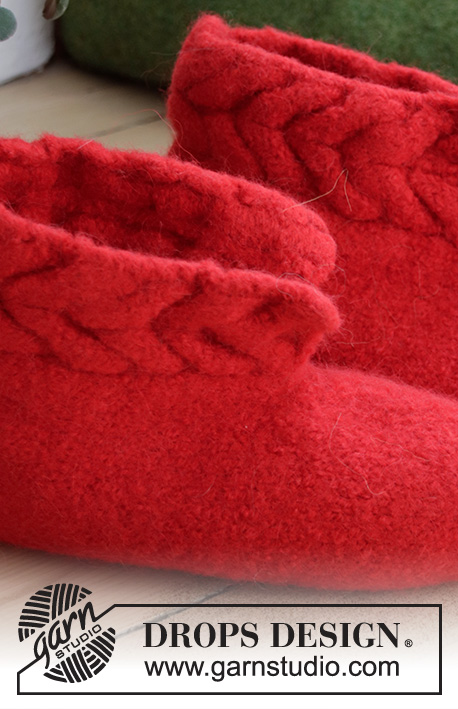
Felted slippers with cables for Christmas in DROPS Alaska. Sizes 26-44 = 8 1/2 (child)-10 1/2 (woman). Theme: Christmas.
DROPS Extra 0-1459 |
|||||||||||||
|
------------------------------------------------------- EXPLANATIONS FOR THE PATTERN: ------------------------------------------------------- RIDGE/GARTER STITCH (worked back and forth): Knit all rows. 1 ridge in height = Knit 2 rows. INCREASE TIP: All increases are done from the right side! Work until there is 1 stitch left before marker thread, make 1 yarn over, knit 2 (marker thread is between these 2 stitches), make 1 yarn over. Repeat on the other marker thread. On the next row, purl the yarn overs twisted to avoid a hole. PATTERN: See diagrams A.1 and A.2. Diagram A.1 applies to size 26/28-29/31 = 8 1/2/9 1/2 - 10 1/2/11 and A.2 applies to size 32/34-35/37-38/40-42/44 = 13/13 1/2 – 5/6 1/2 - 7 1/2/9 - 9 1/2/10 1/2. The diagrams show all rows in the pattern seen from the right side. ------------------------------------------------------- START THE PIECE HERE: ------------------------------------------------------- SLIPPER – SHORT OVERVIEW OF THE PIECE: The slipper is worked back and forth in one piece, from front to back and with the seam on top of the foot. SLIPPER: Cast on 8-9-10-11-12-13 stitches with needle size 5 mm = US 8 and Alaska; leave a strand-end of approx. 50 cm = 19¾" to sew the slipper together to finish. Purl 1 row from the wrong side AT THE SAME TIME as you increase 8-8-10-10-11-12 stitches evenly spaced = 16-17-20-21-23-25 stitches. REMEMBER THE KNITTING GAUGE! Insert 2 marker threads in the piece, 4-4-5-5-6-6 stitches in from each side. Work stockinette stitch, AT THE SAME TIME on row 4 increase 1 stitch on each side of the 2 marker threads (= 4 increased stitches) – read INCREASE TIP. Repeat the increase on each row from the right side 6 more times = 44-45-48-49-51-53 stitches. Continue working until the piece measures 11-11½-12½-13½-15-16½ cm = 4 ⅜"-4 ⅝"-5"-5 ⅜"-6"-6 ½". Now cast on 13-14-16-16-17-18 new stitches on each side = 70-73-78-81-85-89 stitches. Work the next row as follows: 1 stitch in garter stitch, A.1-A.1-A.2- A.2- A.2- A.2, purl 1-2-0-0-1-2 (seen from the right side), work stockinette stitch until there are 13-14-16-16-17-18 stitches left on the row, purl 1-2-0-0-1-2 (seen from the right side), A.1-A.1-A.2- A.2- A.2- A.2 and finish with 1 stitch in garter stitch. Continue this pattern. When the piece measures 24-25-27½-30½-33½-37 cm = 9½"-9¾"-10¾"-11⅞"-13⅛"-14½", loosely bind off. ASSEMBLY: Using the strand left at the beginning, sew through the stitch on the toe and pull tight, sew the seam mid top of foot in the outermost loop of the outermost stitch as far as the cast-on 13-14-15-16-17-18 stitches. Sew the slipper mid back, edge to edge so the seam is flat. FELTING: The piece can be felted either in the washing machine or the tumble dryer – read description below. Remember: Subsequent washes are as for a normal wool garment. IN WASHING MACHINE: Washing machines will vary when felting. If the piece is not felted enough, it can be felted again. If it is felted too much, it can be stretched to the correct size while still wet. DO THE FOLLOWING: Lay the piece in the washing machine, using a programme of approx. 40 minutes (not a wool programme). Wash at 40 degrees C = 104 degrees F without pre-wash, detergent is optional. After washing, shape the piece while it is still wet. IN TUMBLE DRYER: Felting in a tumble dryer gives good control over the degree of felting. The tumble dryer can be opened during drying to check the size of the piece. If it is not felted enough it can be thoroughly wetted and felted again. If it is felted too much it can be stretched to the correct size while still wet. DO THE FOLLOWING: Lay the piece in water so it becomes completely wet, then place it in the tumble dryer and begin the drying process. Dry to the desired size, checking regularly. |
|||||||||||||
Diagram explanations |
|||||||||||||
|
|||||||||||||
 |
|||||||||||||
Have you finished this pattern?Tag your pictures with #dropspattern #heartfeltchristmasslippers or submit them to the #dropsfan gallery. Do you need help with this pattern?You'll find 18 tutorial videos, a Comments/Questions area and more by visiting the pattern on garnstudio.com. © 1982-2026 DROPS Design A/S. We reserve all rights. This document, including all its sub-sections, has copyrights. Read more about what you can do with our patterns at the bottom of each pattern on our site. |
|||||||||||||


With over 40 years in knitting and crochet design, DROPS Design offers one of the most extensive collections of free patterns on the internet - translated to 17 languages. As of today we count 324 catalogs and 12290 patterns - 12280 of which are translated into English (US/in).
We work hard to bring you the best knitting and crochet have to offer, inspiration and advice as well as great quality yarns at incredible prices! Would you like to use our patterns for other than personal use? You can read what you are allowed to do in the Copyright text at the bottom of all our patterns. Happy crafting!
Post a comment to pattern DROPS Extra 0-1459
We would love to hear what you have to say about this pattern!
If you want to leave a question, please make sure you select the correct category in the form below, to speed up the answering process. Required fields are marked *.