
Popular categories
Looking for a yarn?


Comments / Questions (16)
![]() Susanne wrote:
Susanne wrote:
Har startet med 12 masker glat og ikke 8 m som i opskriften, så får jeg starten på arbejdet lige præcist hvor opslaget er startet. Forstår godt Ingvilds spørgsmål, for ellers kommer du til at bruge opslagsenden til at starten sammenhæftningen 2 cm inden på bundens sammensyning.
19.11.2020 - 11:14
![]() Ingvild Amble wrote:
Ingvild Amble wrote:
Hvorfor er det flere masker på bakstykket enn på forstykket? Vil ikke flettemønsteret trekke arbeidet litt sammen slik at dette blir veldig stor forskjell på foran og bak?
03.12.2019 - 23:44DROPS Design answered:
Hej Ingvild, da puden strikkes rundt, vil du ikke få en søm i siden. Det vil sige at du sørger for at mønsteret ligger midt på forstykket inden du syr bunden sammen. God fornøjelse!
04.12.2019 - 08:04
![]() Anna wrote:
Anna wrote:
Witam, czy jeśli zrobię poduszkę ze Waszego bezpłatnego wzoru to mogę ją sprzedać w sieci lub wystawić w moim sklepie bez konsekwencji finansowych? Czy muszę uzyskać jaką zgodę? Czy po prostu wzory są bezpłatne i cokolwiek zrobię to mogę to sprzedawać?
24.11.2019 - 09:46DROPS Design answered:
Witaj Anno! Sprzedaż gotowej odzieży wykonanej na bazie wzorów DROPS jest dozwolona, o ile są one wytwarzane jednostkowo lub na zlecenie. Każde inne wykorzystywanie naszych wzorów do celów handlowych jest zabronione. Powinno być wyraźnie zaznaczone, że ubranie zostało wykonane na bazie wzoru DROPS DESIGN. Wykorzystywanie etykietek, których częścią będzie nazwa DROPS DESIGN jest możliwe pod warunkiem dodania następującego tekstu: „Model DROPS DESIGN wykonany przez...”. Pozdrawiamy!
24.11.2019 - 23:19
![]() Carolina wrote:
Carolina wrote:
Hallo, bei den Umschlägen habe ich eine Frage: Das Muster lese ich so, das drei rechte Maschen gestrickt werden und in der einen Reihe eine zusätzlich aufgenommen wird und sodass vier da wären. Wie überspringe ich dann die vierte Masche? Abheben oder Abketten oder ganz anders? Danke für die Hilfe!
14.11.2019 - 22:20DROPS Design answered:
Liebe Carolina, bein den schmallen Zöpfen strickent man so: 1. Runde (über 3 Maschen): 1 Masche abheben, 2 Maschen rechts, die abgehobene Masche über die 2 gestrickten ziehen (= es sind jetzt nur noch 2 Maschen übrig); dann bei der 2. Runde stricken Sie: 1 Masche rechts, 1 Umschlag, 1 Masche rechts (= es sind wieder 3 Maschen). Bei den 2 nächsten Runden stricken Sie diese 3 Maschen rechts, dann von der 1. Runde wiederholen. Viel Spaß beim stricken!
15.11.2019 - 08:40
![]() Yolanda Ariño Schierloh wrote:
Yolanda Ariño Schierloh wrote:
Hola! Me gustaría saber, si es posible hacer este cojín con 2 agujas y no con una circular? El diagrama a seguir, seria el mismo,? O, como tendría que tejer las vueltas del revés? Gracias por vuestra respuesta!
20.09.2019 - 22:32DROPS Design answered:
Hola Yolanda! Si, puede hacerlo facilemente. Mira 2 lecciones DROPS Como adaptar un patron para agujas circulares y tejerlo con agujas rectas y Como leer los diagramas de punto. Buen trabajo!
08.10.2019 - 19:11
![]() JSanz wrote:
JSanz wrote:
No veo el diagrama...
28.08.2019 - 18:16
|
||||||||||||||||||||||||||||
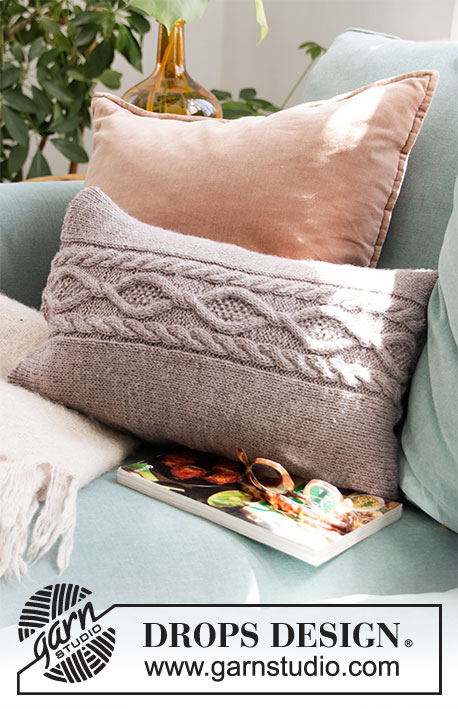
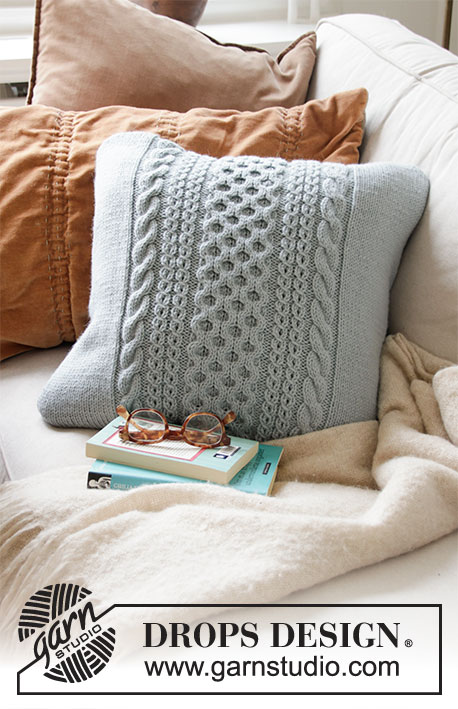
Cabled Comfort#cabledcomfortpillow |
||||||||||||||||||||||||||||
 |
 |
|||||||||||||||||||||||||||
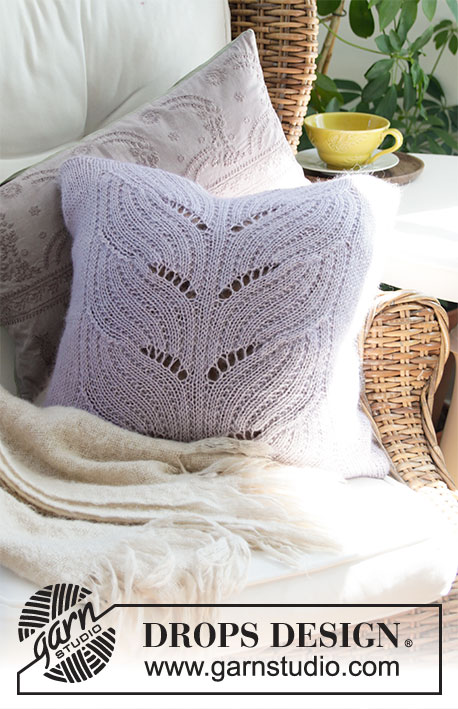
Knitted cushion cover with cables in DROPS Nepal.
DROPS 207-54 |
||||||||||||||||||||||||||||
|
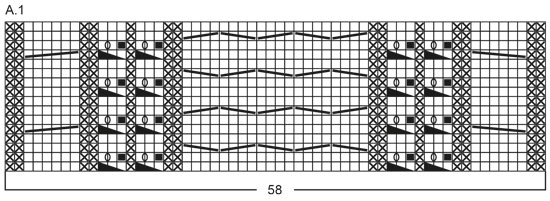
------------------------------------------------------- EXPLANATIONS FOR THE PATTERN: ------------------------------------------------------- RIDGE/GARTER STITCH (worked in the round): 1 ridge = 2 rounds; Knit 1 round and purl 1 round. PATTERN: See diagram A.1 ------------------------------------------------------- START THE PIECE HERE: ------------------------------------------------------- CUSHION COVER – SHORT OVERVIEW OF THE PIECE: The piece is worked in the round with circular needle and sewn together top and bottom to finish. There is a cable-pattern on the front and stockinette stitch on the back. COVER: Cast on 164 stitches with circular needle size 4.5 mm = US 7 and Nepal. Work 1 RIDGE – see description above. The next round is worked as follows: 8 stitches in stockinette stitch, A.1 over the next 58 stitches and stockinette stitch over the remaining 98 stitches. Continue like this until the piece measures 44 cm = 17¼". REMEMBER THE KNITTING GAUGE! Work 1 ridge over all stitches, then loosely bind off. ASSEMBLY: Sew the cast-on edge together in the outermost loop of the outermost stitch. Insert the cushion (make sure the cable-pattern is mid front) and sew the bind-off edge together. |
||||||||||||||||||||||||||||
Diagram explanations |
||||||||||||||||||||||||||||
|
||||||||||||||||||||||||||||
 |
||||||||||||||||||||||||||||
Have you finished this pattern?Tag your pictures with #dropspattern #cabledcomfortpillow or submit them to the #dropsfan gallery. Do you need help with this pattern?You'll find 18 tutorial videos, a Comments/Questions area and more by visiting the pattern on garnstudio.com. © 1982-2026 DROPS Design A/S. We reserve all rights. This document, including all its sub-sections, has copyrights. Read more about what you can do with our patterns at the bottom of each pattern on our site. |
||||||||||||||||||||||||||||


With over 40 years in knitting and crochet design, DROPS Design offers one of the most extensive collections of free patterns on the internet - translated to 17 languages. As of today we count 324 catalogs and 12290 patterns - 12280 of which are translated into English (US/in).
We work hard to bring you the best knitting and crochet have to offer, inspiration and advice as well as great quality yarns at incredible prices! Would you like to use our patterns for other than personal use? You can read what you are allowed to do in the Copyright text at the bottom of all our patterns. Happy crafting!
Post a comment to pattern DROPS 207-54
We would love to hear what you have to say about this pattern!
If you want to leave a question, please make sure you select the correct category in the form below, to speed up the answering process. Required fields are marked *.