
Popular categories
Looking for a yarn?


Comments / Questions (126)
![]() Sirkka Persson wrote:
Sirkka Persson wrote:
Varför har ni tagit bort virkmönstret? Maskförklaringen finns men ej i vilken ordning de virkas.
06.10.2020 - 20:05DROPS Design answered:
Hej Sirkka. Diagrammet finns precis under symbolförklaringen (över måttskissen). Eller är det något annat du menar saknas? Mvh DROPS Design
07.10.2020 - 08:36
![]() Sara wrote:
Sara wrote:
Very beginning of pattern, I'm on the A1 row with 7 dc fan, skip 2, sc, skip 2, 7 dc fan.... problem is the edges are not straight as the row begins and ends with a fan so it extends over the straight edge. Should i be starting with an sc?
03.06.2020 - 20:28DROPS Design answered:
Dear Sara, on this row, you will start with 1 chain to replace 1st sc and finish with 1 sc in the last st on row. You can always make a small crocheted edge along vents at the very end if you like to (like the one worked over armholes and neck). Happy crocheting!
04.06.2020 - 08:44
![]() Sylva wrote:
Sylva wrote:
Hallo, ich kann die Häkelschrift von A3 nicht finden. Wie wird an diesem Punkt weiter gehäkelt? Vielen Dank
16.05.2020 - 23:20DROPS Design answered:
Liebe Sylva, A.3 besteht aus den 6 letzten Reihen im Diagram. Viel Spaß beim stricken!
18.05.2020 - 08:23
![]() Catharine wrote:
Catharine wrote:
Can someone please explain what the treble between 2 trebles exactly is. I can't find it anywhere to understand what is required. Thanks
05.05.2020 - 00:16DROPS Design answered:
Dear Catharine, on row before you worked crossed treble crochets, on next row you will crochet 2 trebles between the 2 crossed trebles (ie you won't insert hook in the stitches from previous row but in the small hole between the 2 trebles that you worked crossed). Hope this helps. Happy crocheting!
05.05.2020 - 11:24
![]() Anneli wrote:
Anneli wrote:
Did anyone make this model into a long dress? How did you increas each row?
11.04.2020 - 06:43DROPS Design answered:
Dear Anneli, you could maybe ask other DROPS fans in our DROPS Workshop. Happy crocheting!
14.04.2020 - 10:56
![]() Anna wrote:
Anna wrote:
Dopiero zaczynam sukienkę i nie rozumiem wskazówki. Czy ona oznacza że jeśli oczka ścisłe i słupki nie liczą się jako słupki i oczka ścisłe to w pierwszych oczkach rzędu mamy 2 słupki lub dwa oczka ścisłe?
24.03.2020 - 17:54DROPS Design answered:
Witaj Anno. Schemat A.2 pokazuje jak zaczynać i kończyć okrążenia, gdy przerabiamy na okrągło (na początku okrążenia wykonujesz dodatkowo 1 lub 3 oł, a na końcu oczko zamykające). Przerabiając w tę i z powrotem zawsze wykonujesz na początku rzędu 1 lub 3 oł i następnie przerabiasz schemat A.1 czy A.3, dzięki temu brzeg będzie prosty. Pozdrawiamy!
25.03.2020 - 12:52
![]() Katho wrote:
Katho wrote:
Hi, ich hab eine Frage zu der Schulter. Im Text steht, dass Stäbchen gehäkelt werden sollen. Aber etwas weiter vorher stand, dass nach Diagramm A3 zu Ende gehäkelt werden soll. Wird die Schulter nur mit Stäbchen oder nach Diagramm gehäkelt? Vielen Dank für die ansonsten sehr tolle Anleitung :)
24.03.2020 - 08:08DROPS Design answered:
Liebe Katho, die Schulter häkeln Sie nur mit Stäbchen. Viel Spaß beim häkeln!
24.03.2020 - 10:18
![]() Isabelle wrote:
Isabelle wrote:
Hoi! Kan ik de jurk ook gewoon in voor - en achterpand haken en daarna aan elkaar haken? We haken toch heen en weer....
05.03.2020 - 08:48DROPS Design answered:
Dag Isabelle,
Je haakt heen en weer omdat anders de steken langzaamaan verschuiven in de breedte. Vandaar dat je steeds de toer sluit en dan weer terug haakt. Als je het voor en achterpand los van elkaar haakt, dan krijg je naden aan de zijkanten.
10.03.2020 - 19:37
![]() Annie wrote:
Annie wrote:
Pour les premières diminutions on dit répéter ces diminutions 6 fois au total aux 6 tours de brides ou des mailles serrées. Est-ce que je fais 6 tours (rangs) de brides seulement en ne suivant plus le patron ? Jusqu’à 45 cm ? Ensuite 3 cm selon la grille pour atteindre 48 cm (avec 120 mailles)
27.02.2020 - 17:57DROPS Design answered:
Bonjour Annie, vous continuez à suivre le diagramme, et au rang de brides ou de mailles serrées suivants, vous diminuez, vous continuez le diagramme et vous diminuez au rang de mailles serrées ou de brides suivant et ainsi de suite. Bon crochet!
28.02.2020 - 07:55
![]() Annie wrote:
Annie wrote:
Pour le 2e rang du devant on dit 78 mailles est ce qu’on compte la ml du début du rang et de la fin du rang ? Sinon j arrive à 76 . Pour la fin des rangs la grille ne montre pas s il faut faire 3 ml en l air pour tourner
10.02.2020 - 03:33DROPS Design answered:
Bonjour Annie, la maille en l'air pour tourner compte comme la 1ère maille serrée - ensuite, au début de chaque rang, on crochète 3 ml ou 1 ml (rang de brides ou de ms) - cf ASTUCE CROCHET, mais ces mailles en l'air ne comptent pas comme la 1ère maille et se font donc en plus du diagramme. Bon crochet!
10.02.2020 - 10:11
|
|||||||||||||||||||||||||||||||||||||
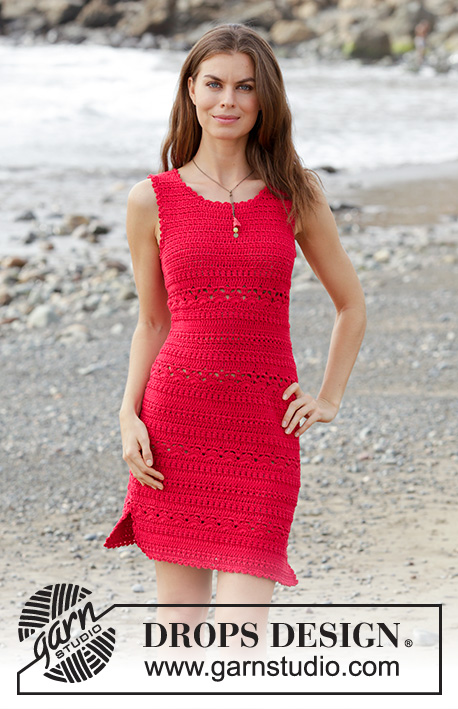
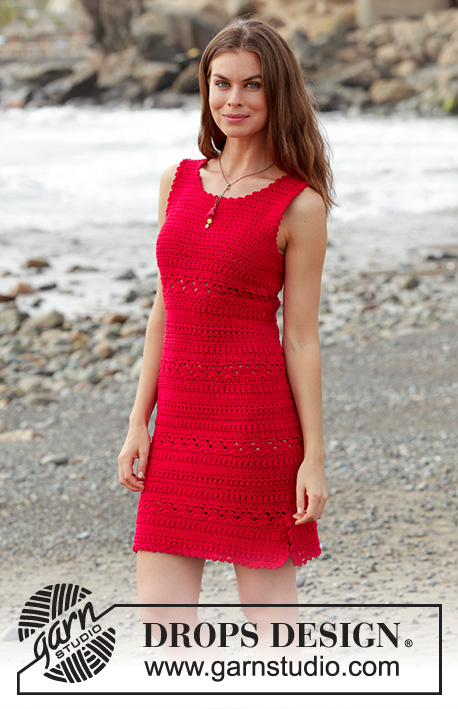
Belladonna#belladonnadress |
|||||||||||||||||||||||||||||||||||||
 |
 |
||||||||||||||||||||||||||||||||||||
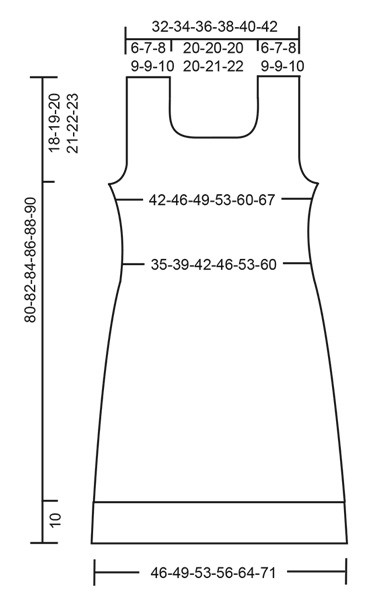
Crocheted dress with texture pattern. Size: S - XXXL Piece is crocheted in DROPS Muskat.
DROPS 187-5 |
|||||||||||||||||||||||||||||||||||||
|
INFORMATION FOR PATTERN: PATTERN: See diagrams A.1, A.2 and A.3. A.2 shows how round begins/ends when working in the round. CROCHET TIP – when working back and forth: Work 3 chain stitches at the beginning of rows starting with double crochets (does not replace first double crochet). Work 1 chain stitch at the beginning of rows starting with single crochets (Does not replace first single crochet). DECREASE TIP: DOUBLE CROCHET: Decrease 1 double crochet by working 2 double crochets together as follows: Work 1 double crochet in first stitch, but wait with last yarn over and pull through (= 2 loops on hook), work 1 double crochet in next stitch/around the chain stitch, but on last pull through pull yarn through all 3 loops on hook (= 1 double crochet decreased). SINGLE CROCHET: Decrease 1 single crochet by working 2 single crochets together as follows: Work 1 single crochet but wait with last yarn over and pull through (= 2 loops on hook), then work next single crochet but on last pull through, pull yarn through all 3 loops on hook (= 1 single crochet decreased) DECREASE TIP (evenly): To calculate how to decrease evenly, use the total number of stitches (e.g. 156 stitches) and divide stitches by number of decreases to be done (e.g. 6) = 26. In this example crochet approx. every 25th and 26th stitch together. -------------------------------------------------------- DRESS: There is a 10 cm / 4" vent at the bottom of dress, first work piece back and forth until vent is done, then work piece in the round but turn on every round and work back on round to make the texture the same all the way. When piece is divided at the armhole, work back and forth again. FRONT PIECE: Work 90-97-104-111-125-139 chain stitches with Muskat on hook size 4 mm / G/6. Continue with 1 single crochet in 2nd chain stitch from hook, then 1 single crochet in each of the next 4 chain stitches, * skip 1 chain stitch, 1 single crochet in each of the next 6 chain stitches *, repeat from *-* the entire row = 78-84-90-96-108-120 single crochets (chain stitch to turn with is also counted as 1 single crochet). Turn and work 1 single crochet in every single crochet. Now work according to diagram A.1 - read CROCHET TIP! REMEMBER THE CROCHET GAUGE! After 10 cm / 4" put piece aside and work the back piece. BACK PIECE: Work 90-97-104-111-125-139 chain stitches with Muskat on hook size 4 mm / G/6. Continue with 1 single crochet in 2nd chain stitch from hook, then 1 single crochet in each of the next 4 chain stitches, * skip 1 chain stitch, 1 single crochet in each of the next 6 chain stitches *, repeat from *-* the entire row = 78-84-90-96-108-120 single crochets (chain stitch to turn with is also counted as 1 single crochet). Turn and work 1 single crochet in every single crochet. Now work according to diagram A.1. Continue until piece measures 10 cm / 4" - finish on the same row as on front piece. DRESS after vent: Continue pattern like this - first work stitches over front piece, then work stitch over back piece, then work round together with a slip stitch in 1st/3rd stitch on round, work stitch in A.2, turn piece and work back. Insert 1 marker thread in transitions between front and back piece = sides. Continue like this back and forth with pattern according to diagram A.1 and A.2. On rounds with double crochets or single crochets there are now 156-168-180-192-216-240 stitches on round (A.2 is not counted in number of stitches). When piece measures approx. 30-31-32-33-34-35 cm / 11¾"-12¼"-12½"-13"-13⅜"-13¾" - adjust so that next round is a round with double crochets or single crochets (marked on diagram with star), decrease 6 stitches evenly - read DECREASE TIP and DECREASE TIP (evenly). Repeat decrease 6 times in total on the 6 marked rounds with double crochets or single crochets = 120-132-144-156-180-204 stitches on a round with double crochets or single crochets. After last decrease round work pattern as before for approx. 3 cm / 1" – adjust so that next round is a round marked with star (piece now measures approx. 48-49-50-51-52-53 cm / 19"-19¼"-19¾"-20"-20½"-21"). Now increase 6 stitches evenly on round by working 2 stitches in 1 stitch. Repeat increase 4 times in total vertically at the rounds marked in diagram = 144-156-168-180-204-228 stitches on a round with double crochets or single crochets after last increase. When piece measures approx. 60-61-62-63-64-65 cm / 23⅝"-24"-24⅜"-24¾"-25¼"-25½" – adjust after a round marked with star, finish dress according to diagram A.3 (turn as before with diagram A.2). When piece measures 62-63-64-65-66-67 cm / 24½"-24¾"-25¼"-25½"-26"-26½", divide the piece for front and back piece at the armholes. FRONT PIECE: Work slip stitches over the first 4-5-4-5-6-7 stitches, then work until 4-5-4-5-6-7 stitches remain before marker thread in the other side, turn piece. On next row work the 4 outermost stitches in each side together 2 by 2 – read DECREASE TIP! Repeat decrease on every row 0-0-1-1-2-3 more times. On next row work the 2 outermost stitches together, repeat decrease on every row 2-2-2-3-4-5 more times. After all decreases are done, 54-58-62-64-68-72 stitches remain on row. When piece measures 70-71-73-74-76-77 cm / 27½"-28"-28¾"-29"-30"-30½", finish each shoulder separately. SHOULDER: Continue with double crochets over the first 17-19-21-22-23-24 stitches from the right side of piece, turn and work the first 4 stitches together 2 by 2 for neck, then work the rest of row. Turn and work until 4 stitches remain before neck, work these together 2 by 2, turn. On next row work the first 2 stitches together, then work the rest of row. Turn and work until 2 stitches remain, work these together. Turn, work the first 2 stitches together, work the rest of row = 10-12-14-15-16-17 stitches remain on shoulder. Continue until piece measures 80-82-84-86-88-90 cm / 31½"-32¼"-33"-33⅞"-34⅝"-35½", fasten off. Work the other shoulder the same way, but in reverse. I.e. Start from the right side and working the decreases for neck at end of rows from WS. BACK PIECE: Work slip stitches over the first 4-5-4-5-6-7 stitches, then work until 4-5-4-5-6-7 stitches remain before marker thread in the side, turn piece. On next row work the 4 outermost stitches in each side together 2 by 2 – read DECREASE TIP! Repeat decrease on every row 0-0-1-1-2-3 more times. On next row work the 2 outermost stitches together, repeat decrease on every row 2-2-2-3-4-5 more times. After all decreases are done, 54-58-62-64-68-72 stitches remain on row. Continue to work until piece measures approx. 78-80-82-84-86-88 cm / 30¾"-31½"-32¼"-33"-33⅞"-34⅝". Then finish each shoulder separately as follows: Work 1 row over the first 12-14-16-17-18-19 stitches, turn, work the first 2 stitches together, work the rest of row. Turn and work until 2 stitches remain, work these together. Turn, work the rest of row, fasten off. Repeat on the other shoulder. ASSEMBLY: Sew shoulder seams edge to edge to avoid a chunky seam. DECORATING EDGE: Work a decorating edge around the neck, each armhole and at the bottom of body - as well as up and down each vent. Work decorating edge as follows: 1 single crochet, * 3 chain stitches, 1 double crochet in 3rd chain stitch from hook, skip approx. 1 cm / ⅜" and make 1 single crochet *. Repeat from *-* and finish with 1 slip stitch in first single crochet from beginning of round. |
|||||||||||||||||||||||||||||||||||||
Diagram explanations |
|||||||||||||||||||||||||||||||||||||
|
|||||||||||||||||||||||||||||||||||||
 |
|||||||||||||||||||||||||||||||||||||
 |
|||||||||||||||||||||||||||||||||||||
Have you finished this pattern?Tag your pictures with #dropspattern #belladonnadress or submit them to the #dropsfan gallery. Do you need help with this pattern?You'll find 13 tutorial videos, a Comments/Questions area and more by visiting the pattern on garnstudio.com. © 1982-2026 DROPS Design A/S. We reserve all rights. This document, including all its sub-sections, has copyrights. Read more about what you can do with our patterns at the bottom of each pattern on our site. |
|||||||||||||||||||||||||||||||||||||


With over 40 years in knitting and crochet design, DROPS Design offers one of the most extensive collections of free patterns on the internet - translated to 17 languages. As of today we count 324 catalogs and 12290 patterns - 12280 of which are translated into English (US/in).
We work hard to bring you the best knitting and crochet have to offer, inspiration and advice as well as great quality yarns at incredible prices! Would you like to use our patterns for other than personal use? You can read what you are allowed to do in the Copyright text at the bottom of all our patterns. Happy crafting!
Post a comment to pattern DROPS 187-5
We would love to hear what you have to say about this pattern!
If you want to leave a question, please make sure you select the correct category in the form below, to speed up the answering process. Required fields are marked *.