
Popular categories
Looking for a yarn?


Comments / Questions (126)
![]() Janneke wrote:
Janneke wrote:
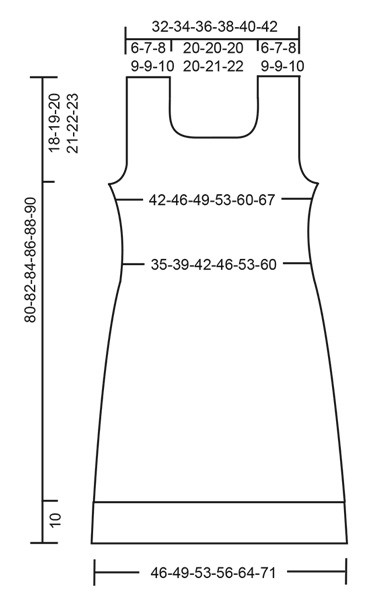
In het patroon staat dat het ongeveer 64 cm meet als we bij de armsgaten zijn aangekomen. Maar in de tekening staat langs de zijkant 84cm. Dat scheelt 20cm. Vergelijk ik verschillende maten met elkaar of is een van de twee niet correct?
11.07.2021 - 12:29
![]() Annukka wrote:
Annukka wrote:
Huomasin, että olin tehnyt kirjallisen ohjeen mukaan eli hameosassa A1-osiota toistaen, mutta kuvan mekossa on selvästi tehty A1+A3-osiota toistaen. A1-osalla tehtynä tulee kyllä kauniimpi mekko. Esim. viuhkakuvio toistuu useammin. Selvennystarve vai uusi kuva tarpeen?
08.07.2021 - 10:51
![]() Conny wrote:
Conny wrote:
Wat een prachtig jurkje. Heb 'm gehaakt in lila, wat aanpassingen om helemaal op maat te maken. Goed patroon, duidelijk. Heel blij mee.
30.06.2021 - 14:58
![]() Raquel Perez wrote:
Raquel Perez wrote:
Quiero hacer este vestido pero leyendo el patrón me ha surgido una duda. Tanto en el tipo para trabajar a ganchillo como en la corrección del 06/09/2018 pone que los puntos de cadeneta del comienzo de fila no sustituyen al 1° punto. Pero si eso es así en los primeros 10 cm. de la labor se irá aumentando un punto en cada fila. Porque luego pone que el punto de cadeneta en el que se gira hay que contarlo
08.06.2021 - 14:53DROPS Design answered:
Hola Raquel, cuando dicen que la cadeneta no cuenta como 1 punto bajo, el primer punto bajo se trabaja en el mismo sitio que la 1ª cadeneta y el último punto se trabaja en el primer punto bajo de la fila anterior. Por lo tanto, cuando cuenta como 1 punto bajo se trabaja en la 2ª cadeneta. Pero este paréntesis solo se aplica a la cadeneta de giro del inicio en la 1ª fila, en las siguientes no se tiene en cuenta.
13.06.2021 - 19:25
![]() Cindy wrote:
Cindy wrote:
I’m having a problem with Belladonna 187-5. A.1 row 10. 7 double crochets . When I’m done with the row it will not lay flat. I’ve even gone down in needle size. I’m making the dress in small and end up with 19 shells across. I’m making my Great Nieces graduation dress. I’ve never used a diagram to crochet before so I’m a little lost. Thank you in advance.
18.04.2021 - 07:50DROPS Design answered:
Dear Cindy, I would try to make a small swartch with the whole pattern, wash it and block it out, to see if the nect rows stabbilizing the fans, making them "fan out" less. The piece should be flat then. If you look it up on Ravely, a number of people made this dress succesfully, so it should work with the diagram. Happy Crafting!
18.04.2021 - 10:30
![]() Gina Carter wrote:
Gina Carter wrote:
Hello, I really want to make this dress for a friend. I have never followed a diagram so I am unsure of what I am doing. Is there a normal written pattern for this dress without the diagram? Thank you
15.04.2021 - 15:33DROPS Design answered:
Dear Gina, we do not have a written out pattern, not only because our patterns are available in several languages, but also, because we believe, that unlike with a written out pattern, in diagrams you can see not only the very next stitch, the very next step, but also how stitches and rows relate to each other "en large". Many knitters actually prefer diagrams. We do have a lesson on how to knit from diagrams HERE, and you can always ask for help (either over teh phone or in person) in the store where you bought your DROPS yarn from. Happy Knitting!
15.04.2021 - 17:27
![]() Sara wrote:
Sara wrote:
Varför har ni så små mönster, tror ni att vi är Barbiedockor, inte ens XL passar mig som i vanliga fall har M
02.04.2021 - 10:44DROPS Design answered:
Hei Sara. Vi kjører standard størrelser, men sjekk alltid målskissen til plagget og mål på deg selv for å se på cm målene og hvilken størrelse som vil passe. Og det er veldig viktig å overholde strikke/heklefastheten som er skrevet i oppskriften. mvh DROPS design
07.04.2021 - 15:02
![]() Dagmar wrote:
Dagmar wrote:
Why do I have a chain of 104 and reduce in the next row to 96? Why can’t I chain 96 right away?
20.02.2021 - 16:52DROPS Design answered:
Dear Dagmar, most of the time the foundation chains tends to be too tight, reason why you crochet here more chains and then skip chains evenly on first row (= to get 96 sts). Happy crocheting!
22.02.2021 - 10:08
![]() Susana wrote:
Susana wrote:
Hola, cuando dice "cuando la labor mida..."se refiere al vestido entero desde el inicio o se refiere a la labor después de la apertura? Gracias!
27.01.2021 - 19:33DROPS Design answered:
Hola Susana, el largo se mide a partir del punto más alto en el hombro (usualmente lo más cerca al escote), y en línea recta hasta la parte de abajo de la prenda. NO se mide a partir de la punta del hombro. Buen trabajo!
28.01.2021 - 10:14
![]() Chris Harings wrote:
Chris Harings wrote:
When you start a to or dress, how many do you chain in order to start?
30.12.2020 - 16:58
|
|||||||||||||||||||||||||||||||||||||
Belladonna#belladonnadress |
|||||||||||||||||||||||||||||||||||||
 |
 |
||||||||||||||||||||||||||||||||||||
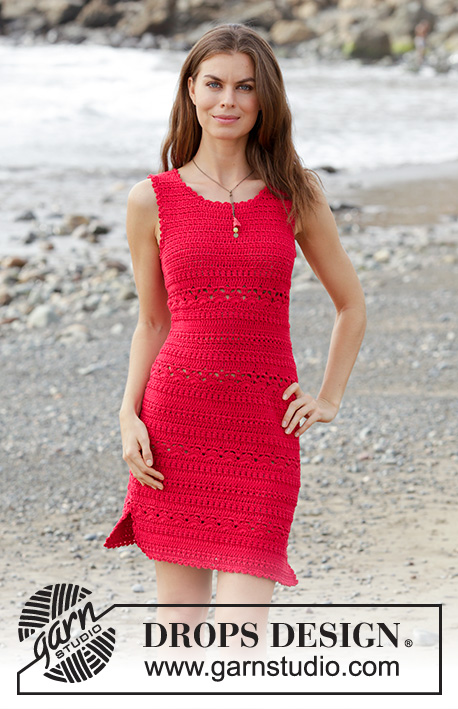
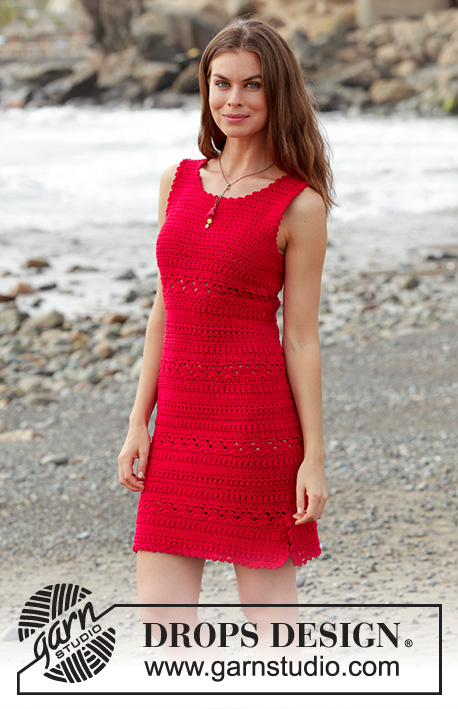
Crocheted dress with texture pattern. Size: S - XXXL Piece is crocheted in DROPS Muskat.
DROPS 187-5 |
|||||||||||||||||||||||||||||||||||||
|
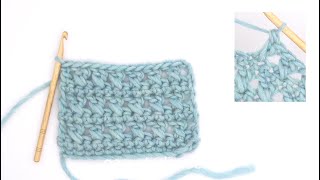
INFORMATION FOR PATTERN: PATTERN: See diagrams A.1, A.2 and A.3. A.2 shows how round begins/ends when working in the round. CROCHET TIP – when working back and forth: Work 3 chain stitches at the beginning of rows starting with double crochets (does not replace first double crochet). Work 1 chain stitch at the beginning of rows starting with single crochets (Does not replace first single crochet). DECREASE TIP: DOUBLE CROCHET: Decrease 1 double crochet by working 2 double crochets together as follows: Work 1 double crochet in first stitch, but wait with last yarn over and pull through (= 2 loops on hook), work 1 double crochet in next stitch/around the chain stitch, but on last pull through pull yarn through all 3 loops on hook (= 1 double crochet decreased). SINGLE CROCHET: Decrease 1 single crochet by working 2 single crochets together as follows: Work 1 single crochet but wait with last yarn over and pull through (= 2 loops on hook), then work next single crochet but on last pull through, pull yarn through all 3 loops on hook (= 1 single crochet decreased) DECREASE TIP (evenly): To calculate how to decrease evenly, use the total number of stitches (e.g. 156 stitches) and divide stitches by number of decreases to be done (e.g. 6) = 26. In this example crochet approx. every 25th and 26th stitch together. -------------------------------------------------------- DRESS: There is a 10 cm / 4" vent at the bottom of dress, first work piece back and forth until vent is done, then work piece in the round but turn on every round and work back on round to make the texture the same all the way. When piece is divided at the armhole, work back and forth again. FRONT PIECE: Work 90-97-104-111-125-139 chain stitches with Muskat on hook size 4 mm / G/6. Continue with 1 single crochet in 2nd chain stitch from hook, then 1 single crochet in each of the next 4 chain stitches, * skip 1 chain stitch, 1 single crochet in each of the next 6 chain stitches *, repeat from *-* the entire row = 78-84-90-96-108-120 single crochets (chain stitch to turn with is also counted as 1 single crochet). Turn and work 1 single crochet in every single crochet. Now work according to diagram A.1 - read CROCHET TIP! REMEMBER THE CROCHET GAUGE! After 10 cm / 4" put piece aside and work the back piece. BACK PIECE: Work 90-97-104-111-125-139 chain stitches with Muskat on hook size 4 mm / G/6. Continue with 1 single crochet in 2nd chain stitch from hook, then 1 single crochet in each of the next 4 chain stitches, * skip 1 chain stitch, 1 single crochet in each of the next 6 chain stitches *, repeat from *-* the entire row = 78-84-90-96-108-120 single crochets (chain stitch to turn with is also counted as 1 single crochet). Turn and work 1 single crochet in every single crochet. Now work according to diagram A.1. Continue until piece measures 10 cm / 4" - finish on the same row as on front piece. DRESS after vent: Continue pattern like this - first work stitches over front piece, then work stitch over back piece, then work round together with a slip stitch in 1st/3rd stitch on round, work stitch in A.2, turn piece and work back. Insert 1 marker thread in transitions between front and back piece = sides. Continue like this back and forth with pattern according to diagram A.1 and A.2. On rounds with double crochets or single crochets there are now 156-168-180-192-216-240 stitches on round (A.2 is not counted in number of stitches). When piece measures approx. 30-31-32-33-34-35 cm / 11¾"-12¼"-12½"-13"-13⅜"-13¾" - adjust so that next round is a round with double crochets or single crochets (marked on diagram with star), decrease 6 stitches evenly - read DECREASE TIP and DECREASE TIP (evenly). Repeat decrease 6 times in total on the 6 marked rounds with double crochets or single crochets = 120-132-144-156-180-204 stitches on a round with double crochets or single crochets. After last decrease round work pattern as before for approx. 3 cm / 1" – adjust so that next round is a round marked with star (piece now measures approx. 48-49-50-51-52-53 cm / 19"-19¼"-19¾"-20"-20½"-21"). Now increase 6 stitches evenly on round by working 2 stitches in 1 stitch. Repeat increase 4 times in total vertically at the rounds marked in diagram = 144-156-168-180-204-228 stitches on a round with double crochets or single crochets after last increase. When piece measures approx. 60-61-62-63-64-65 cm / 23⅝"-24"-24⅜"-24¾"-25¼"-25½" – adjust after a round marked with star, finish dress according to diagram A.3 (turn as before with diagram A.2). When piece measures 62-63-64-65-66-67 cm / 24½"-24¾"-25¼"-25½"-26"-26½", divide the piece for front and back piece at the armholes. FRONT PIECE: Work slip stitches over the first 4-5-4-5-6-7 stitches, then work until 4-5-4-5-6-7 stitches remain before marker thread in the other side, turn piece. On next row work the 4 outermost stitches in each side together 2 by 2 – read DECREASE TIP! Repeat decrease on every row 0-0-1-1-2-3 more times. On next row work the 2 outermost stitches together, repeat decrease on every row 2-2-2-3-4-5 more times. After all decreases are done, 54-58-62-64-68-72 stitches remain on row. When piece measures 70-71-73-74-76-77 cm / 27½"-28"-28¾"-29"-30"-30½", finish each shoulder separately. SHOULDER: Continue with double crochets over the first 17-19-21-22-23-24 stitches from the right side of piece, turn and work the first 4 stitches together 2 by 2 for neck, then work the rest of row. Turn and work until 4 stitches remain before neck, work these together 2 by 2, turn. On next row work the first 2 stitches together, then work the rest of row. Turn and work until 2 stitches remain, work these together. Turn, work the first 2 stitches together, work the rest of row = 10-12-14-15-16-17 stitches remain on shoulder. Continue until piece measures 80-82-84-86-88-90 cm / 31½"-32¼"-33"-33⅞"-34⅝"-35½", fasten off. Work the other shoulder the same way, but in reverse. I.e. Start from the right side and working the decreases for neck at end of rows from WS. BACK PIECE: Work slip stitches over the first 4-5-4-5-6-7 stitches, then work until 4-5-4-5-6-7 stitches remain before marker thread in the side, turn piece. On next row work the 4 outermost stitches in each side together 2 by 2 – read DECREASE TIP! Repeat decrease on every row 0-0-1-1-2-3 more times. On next row work the 2 outermost stitches together, repeat decrease on every row 2-2-2-3-4-5 more times. After all decreases are done, 54-58-62-64-68-72 stitches remain on row. Continue to work until piece measures approx. 78-80-82-84-86-88 cm / 30¾"-31½"-32¼"-33"-33⅞"-34⅝". Then finish each shoulder separately as follows: Work 1 row over the first 12-14-16-17-18-19 stitches, turn, work the first 2 stitches together, work the rest of row. Turn and work until 2 stitches remain, work these together. Turn, work the rest of row, fasten off. Repeat on the other shoulder. ASSEMBLY: Sew shoulder seams edge to edge to avoid a chunky seam. DECORATING EDGE: Work a decorating edge around the neck, each armhole and at the bottom of body - as well as up and down each vent. Work decorating edge as follows: 1 single crochet, * 3 chain stitches, 1 double crochet in 3rd chain stitch from hook, skip approx. 1 cm / ⅜" and make 1 single crochet *. Repeat from *-* and finish with 1 slip stitch in first single crochet from beginning of round. |
|||||||||||||||||||||||||||||||||||||
Diagram explanations |
|||||||||||||||||||||||||||||||||||||
|
|||||||||||||||||||||||||||||||||||||
 |
|||||||||||||||||||||||||||||||||||||
 |
|||||||||||||||||||||||||||||||||||||
Have you finished this pattern?Tag your pictures with #dropspattern #belladonnadress or submit them to the #dropsfan gallery. Do you need help with this pattern?You'll find 13 tutorial videos, a Comments/Questions area and more by visiting the pattern on garnstudio.com. © 1982-2026 DROPS Design A/S. We reserve all rights. This document, including all its sub-sections, has copyrights. Read more about what you can do with our patterns at the bottom of each pattern on our site. |
|||||||||||||||||||||||||||||||||||||


With over 40 years in knitting and crochet design, DROPS Design offers one of the most extensive collections of free patterns on the internet - translated to 17 languages. As of today we count 324 catalogs and 12290 patterns - 12280 of which are translated into English (US/in).
We work hard to bring you the best knitting and crochet have to offer, inspiration and advice as well as great quality yarns at incredible prices! Would you like to use our patterns for other than personal use? You can read what you are allowed to do in the Copyright text at the bottom of all our patterns. Happy crafting!
Post a comment to pattern DROPS 187-5
We would love to hear what you have to say about this pattern!
If you want to leave a question, please make sure you select the correct category in the form below, to speed up the answering process. Required fields are marked *.