
Popular categories
Looking for a yarn?


Comments / Questions (126)
![]() Lena Berg wrote:
Lena Berg wrote:
Hur vet man hur många maskor som ska minskas eller ökas? Hittar inte någonstans i mönstret. Tacksam för svar. Mvh Lena
29.06.2024 - 20:19DROPS Design answered:
Hej Lena, jo når du følger opskriften er det beskrevet hver gang du skal minska eller öka. Første gang du skal minska er efter sprundet: När arbetet mäter ca 30-31-32-33-34-35 cm - anpassa så att nästa varv är ett varv med stolpar eller fastmaskor (markerat på diagrammet med stjärna), minskas det 6 maskor jämnt fördelat :)
02.07.2024 - 12:31
![]() Linda Haas wrote:
Linda Haas wrote:
I worked the Front Piece for 12 rows following the pattern for A1 and A2. I am now up to the shoulder where I am instructed to continue with dc over the 1st 17 stitches (size small). When I turn to do the subsequent rows, am I continuing with double crochets or am I once again following the A1 pattern? So very much appreciate your assistance with this.
23.06.2024 - 16:30DROPS Design answered:
Dear Linda, when working the end of the shoulders, you should be working the A.3 pattern, not A.1. You work only over the 17 stitches of the shoulder back and forth, working double crochets. Then work over 17 sts on the other side, for the other shoulder. The rest of the stitches will be for the decorative edge. Happy crochetting!
23.06.2024 - 19:32
![]() Linda Haas wrote:
Linda Haas wrote:
Thank you for helping me with my previous question. I am up to the FRONT PIECE where I work slip stitches over the 1st 4 stitches for a size small. Then it says to "work until 4 stitches remain before marker thread..." My question is what stitches am I supposed to "work?" Am I resuming the pattern from A1 and continuing on to A3 for a total of 18 rows? just unclear as to how to proceed.
22.06.2024 - 23:19DROPS Design answered:
Dear Linda, "work" means continue work the pattern as you did before. (yes, resume the pattern). Happy Stitching!
23.06.2024 - 01:14
![]() Linda Haas wrote:
Linda Haas wrote:
Please clarify: Dress after vent - slip stitch in 1st/3rd stitch on round. Do you mean 1st and 3rd stitch?
14.06.2024 - 13:40DROPS Design answered:
Dear Linda, it is 1st OR 3rd. You slip stitch in the 1st stitch on double crochet (UK)/single crochet (US) rounds. You slip stitch in the 3rd stitch on treble crochet (UK)/double crochet (US) rounds. Happy crochetting!
16.06.2024 - 17:57
![]() Susan Kelly wrote:
Susan Kelly wrote:
One more question for A1 Row 9 (the fan row): How do you begin the row? Unclear if you skip the 1st 2 stitches of the row and put the fan directly into the 3rd stitch as shown in the diagram for A1 or if you start the fan directly in the 1st stitch of the row. (The pattern is 7dc fan, sk 2, 1sc, sk 2, fan, sk 2, 1 sc, sk 2, etc)
10.06.2024 - 01:37DROPS Design answered:
Dear Mrs Kelly, row 9 is a row worked from RS = read from the right towards the left, so start with 1 ch (A.2), then *skip 2 sts, work 7 dc fan in the next st, skip 2 sts and work 1 sc in the next sc* repeat from *to*. Happy crocheting!
10.06.2024 - 08:44
![]() Susan Kelly wrote:
Susan Kelly wrote:
A1 row 9: cannot interpret. Diagram shows a 7 dc fan stitch with 2 skipped stitches before and after. The photo shows 2 sk, 1 sc, 2 sk in between each fan group. When I tried that I came up with 99 stitches, up from the 78 on the previous row. Please help. Next row is afer the vent and should = 156 st (front & back; 78 = 78)
07.06.2024 - 23:04DROPS Design answered:
Dear Susan, remember that you repeat the pattern. So you start with what's shown but, in the next repeat horizontally, you should have: 7dc fan, skip 2, 1sc, skip 2, fan, skip 2, 1 sc, skip 2... e.t.c. For every 6 stitches you skip 4, work 2 and increase 6. So, from each repeat of A.1, you increase 2 stitches compared to the previous row. If you had 13 repeats in the previous row, you should have increased 26 stitches, that is, you have 104 stitches. Take into account that, in the next rows in A.1, you will decrease back from the fan and obtain 78 stitches again. So you can try and work a few more rows in the front and back piece to better adjust to 156 stitches. Happy crochetting!
09.06.2024 - 22:51
![]() Carmen wrote:
Carmen wrote:
Größe M besitzt genau meine Körpergröße. Wie kann ich das Kleid später anziehen? Einfach reinschlüpfen wird nicht gehen. Müsste nicht eigentlich die linke Seite offen bleiben in taillennähe und später ein Reißverschluss eingenäht werden?
23.04.2024 - 21:47DROPS Design answered:
Liebe Carmen, Sie können vielleicht die Größe L häkeln, oder wenn Sie lieber die Größe M häkeln möchten, dann können Sie irgendein Verschluss plannen. Gerne kann sicher Ihr DROPS Händler - auch per Telefon oder per E-Mail weiterhelfen. Viel Spaß beim Häkeln!
24.04.2024 - 10:55
![]() Princess wrote:
Princess wrote:
Thank you very much ❤️. Can I also apply this to crocheting. I would like to crochet a dress with a tight fitting at the under-bust after crocheting the bust how do I decrease it so I can get a snatched look. 🙏
15.04.2024 - 00:04DROPS Design answered:
Dear Princess, this is a crochet dress, so yes, you can apply the same logic to other crochet dresses. We recommend you check the explanations for the pattern for these decrease tips whenever you work one of our pattern, since it should advise you on how to work the decreases in that specific pattern. Happy crocheting!
15.04.2024 - 00:13
![]() Princess wrote:
Princess wrote:
Please could you explain the decrease tip again. Do you mean to decrease every 25 and 26th stitch in every row
13.04.2024 - 18:14DROPS Design answered:
Dear Princess, the decrease tip is only an example; you don't need to directly apply it to the pattern, it's just to know how to calculate it. In the example, to decrease 6 stitches evenly over 156 stitches work the 25th and 26th stitches together. After the decrease, start counting from one again and decrease the next 25th and 26th stitches together again; repeat like this the whole row. Depending on the number of stitches in the size/row and the number of necessary decreases the number will change in the pattern, but the logic is the same. Happy knitting!
14.04.2024 - 23:35
![]() Tita wrote:
Tita wrote:
Hello again, thanks for the previous quick and clear answer! Now I’m wondering about attaching the two sides after the slit, I’m supposed to crotchet front side and back side, so at first there is no A2? Just keep on crotcheting to back side when finished with front row? And after doing row on both, attaching the sides with a slipt stitch? Wont the two sides end up looking different if attached different way?
08.04.2024 - 17:47DROPS Design answered:
Dear Tita, begin and end the rounds as explained with A.2, ie start with 1 / 3 chains and end the round with 1 slip stitch in the first/3rd chain stitch from beg of round. Turn ad before to continue working alternately from right side and from wrong side joining with 1 slip stitch a the end of each row. Happy crocheting!
09.04.2024 - 09:09
|
|||||||||||||||||||||||||||||||||||||
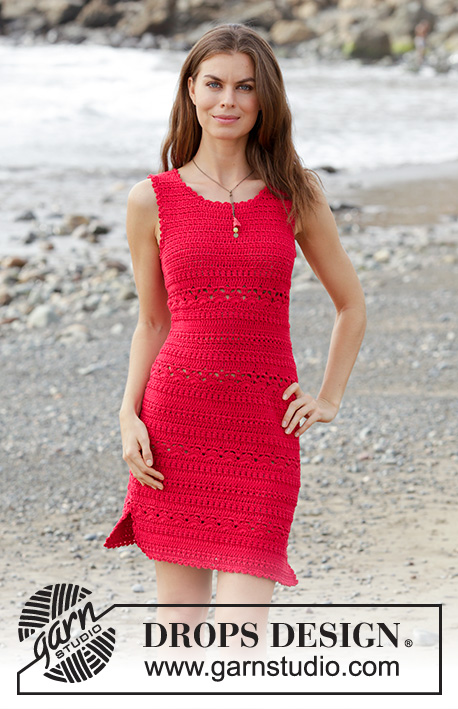
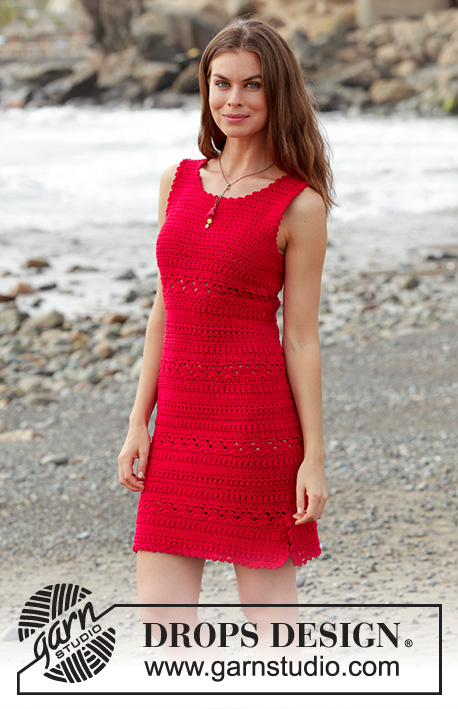
Belladonna#belladonnadress |
|||||||||||||||||||||||||||||||||||||
 |
 |
||||||||||||||||||||||||||||||||||||
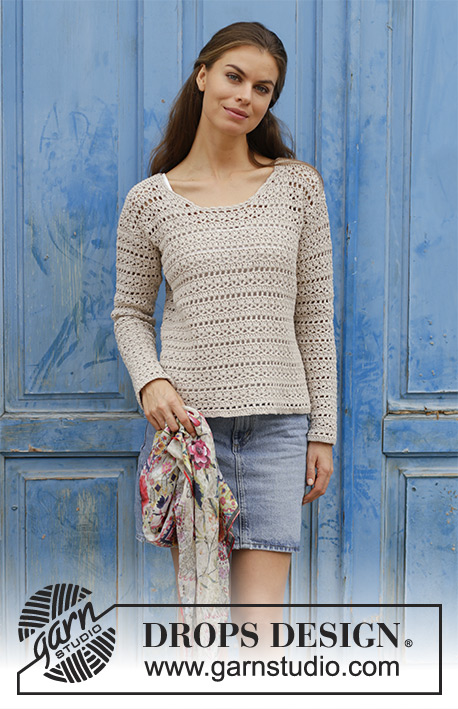
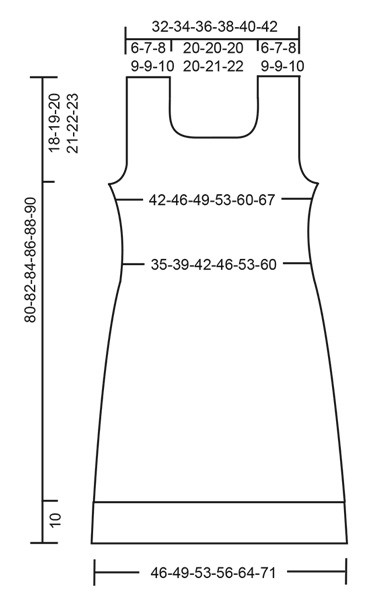
Crocheted dress with texture pattern. Size: S - XXXL Piece is crocheted in DROPS Muskat.
DROPS 187-5 |
|||||||||||||||||||||||||||||||||||||
|
INFORMATION FOR PATTERN: PATTERN: See diagrams A.1, A.2 and A.3. A.2 shows how round begins/ends when working in the round. CROCHET TIP – when working back and forth: Work 3 chain stitches at the beginning of rows starting with double crochets (does not replace first double crochet). Work 1 chain stitch at the beginning of rows starting with single crochets (Does not replace first single crochet). DECREASE TIP: DOUBLE CROCHET: Decrease 1 double crochet by working 2 double crochets together as follows: Work 1 double crochet in first stitch, but wait with last yarn over and pull through (= 2 loops on hook), work 1 double crochet in next stitch/around the chain stitch, but on last pull through pull yarn through all 3 loops on hook (= 1 double crochet decreased). SINGLE CROCHET: Decrease 1 single crochet by working 2 single crochets together as follows: Work 1 single crochet but wait with last yarn over and pull through (= 2 loops on hook), then work next single crochet but on last pull through, pull yarn through all 3 loops on hook (= 1 single crochet decreased) DECREASE TIP (evenly): To calculate how to decrease evenly, use the total number of stitches (e.g. 156 stitches) and divide stitches by number of decreases to be done (e.g. 6) = 26. In this example crochet approx. every 25th and 26th stitch together. -------------------------------------------------------- DRESS: There is a 10 cm / 4" vent at the bottom of dress, first work piece back and forth until vent is done, then work piece in the round but turn on every round and work back on round to make the texture the same all the way. When piece is divided at the armhole, work back and forth again. FRONT PIECE: Work 90-97-104-111-125-139 chain stitches with Muskat on hook size 4 mm / G/6. Continue with 1 single crochet in 2nd chain stitch from hook, then 1 single crochet in each of the next 4 chain stitches, * skip 1 chain stitch, 1 single crochet in each of the next 6 chain stitches *, repeat from *-* the entire row = 78-84-90-96-108-120 single crochets (chain stitch to turn with is also counted as 1 single crochet). Turn and work 1 single crochet in every single crochet. Now work according to diagram A.1 - read CROCHET TIP! REMEMBER THE CROCHET GAUGE! After 10 cm / 4" put piece aside and work the back piece. BACK PIECE: Work 90-97-104-111-125-139 chain stitches with Muskat on hook size 4 mm / G/6. Continue with 1 single crochet in 2nd chain stitch from hook, then 1 single crochet in each of the next 4 chain stitches, * skip 1 chain stitch, 1 single crochet in each of the next 6 chain stitches *, repeat from *-* the entire row = 78-84-90-96-108-120 single crochets (chain stitch to turn with is also counted as 1 single crochet). Turn and work 1 single crochet in every single crochet. Now work according to diagram A.1. Continue until piece measures 10 cm / 4" - finish on the same row as on front piece. DRESS after vent: Continue pattern like this - first work stitches over front piece, then work stitch over back piece, then work round together with a slip stitch in 1st/3rd stitch on round, work stitch in A.2, turn piece and work back. Insert 1 marker thread in transitions between front and back piece = sides. Continue like this back and forth with pattern according to diagram A.1 and A.2. On rounds with double crochets or single crochets there are now 156-168-180-192-216-240 stitches on round (A.2 is not counted in number of stitches). When piece measures approx. 30-31-32-33-34-35 cm / 11¾"-12¼"-12½"-13"-13⅜"-13¾" - adjust so that next round is a round with double crochets or single crochets (marked on diagram with star), decrease 6 stitches evenly - read DECREASE TIP and DECREASE TIP (evenly). Repeat decrease 6 times in total on the 6 marked rounds with double crochets or single crochets = 120-132-144-156-180-204 stitches on a round with double crochets or single crochets. After last decrease round work pattern as before for approx. 3 cm / 1" – adjust so that next round is a round marked with star (piece now measures approx. 48-49-50-51-52-53 cm / 19"-19¼"-19¾"-20"-20½"-21"). Now increase 6 stitches evenly on round by working 2 stitches in 1 stitch. Repeat increase 4 times in total vertically at the rounds marked in diagram = 144-156-168-180-204-228 stitches on a round with double crochets or single crochets after last increase. When piece measures approx. 60-61-62-63-64-65 cm / 23⅝"-24"-24⅜"-24¾"-25¼"-25½" – adjust after a round marked with star, finish dress according to diagram A.3 (turn as before with diagram A.2). When piece measures 62-63-64-65-66-67 cm / 24½"-24¾"-25¼"-25½"-26"-26½", divide the piece for front and back piece at the armholes. FRONT PIECE: Work slip stitches over the first 4-5-4-5-6-7 stitches, then work until 4-5-4-5-6-7 stitches remain before marker thread in the other side, turn piece. On next row work the 4 outermost stitches in each side together 2 by 2 – read DECREASE TIP! Repeat decrease on every row 0-0-1-1-2-3 more times. On next row work the 2 outermost stitches together, repeat decrease on every row 2-2-2-3-4-5 more times. After all decreases are done, 54-58-62-64-68-72 stitches remain on row. When piece measures 70-71-73-74-76-77 cm / 27½"-28"-28¾"-29"-30"-30½", finish each shoulder separately. SHOULDER: Continue with double crochets over the first 17-19-21-22-23-24 stitches from the right side of piece, turn and work the first 4 stitches together 2 by 2 for neck, then work the rest of row. Turn and work until 4 stitches remain before neck, work these together 2 by 2, turn. On next row work the first 2 stitches together, then work the rest of row. Turn and work until 2 stitches remain, work these together. Turn, work the first 2 stitches together, work the rest of row = 10-12-14-15-16-17 stitches remain on shoulder. Continue until piece measures 80-82-84-86-88-90 cm / 31½"-32¼"-33"-33⅞"-34⅝"-35½", fasten off. Work the other shoulder the same way, but in reverse. I.e. Start from the right side and working the decreases for neck at end of rows from WS. BACK PIECE: Work slip stitches over the first 4-5-4-5-6-7 stitches, then work until 4-5-4-5-6-7 stitches remain before marker thread in the side, turn piece. On next row work the 4 outermost stitches in each side together 2 by 2 – read DECREASE TIP! Repeat decrease on every row 0-0-1-1-2-3 more times. On next row work the 2 outermost stitches together, repeat decrease on every row 2-2-2-3-4-5 more times. After all decreases are done, 54-58-62-64-68-72 stitches remain on row. Continue to work until piece measures approx. 78-80-82-84-86-88 cm / 30¾"-31½"-32¼"-33"-33⅞"-34⅝". Then finish each shoulder separately as follows: Work 1 row over the first 12-14-16-17-18-19 stitches, turn, work the first 2 stitches together, work the rest of row. Turn and work until 2 stitches remain, work these together. Turn, work the rest of row, fasten off. Repeat on the other shoulder. ASSEMBLY: Sew shoulder seams edge to edge to avoid a chunky seam. DECORATING EDGE: Work a decorating edge around the neck, each armhole and at the bottom of body - as well as up and down each vent. Work decorating edge as follows: 1 single crochet, * 3 chain stitches, 1 double crochet in 3rd chain stitch from hook, skip approx. 1 cm / ⅜" and make 1 single crochet *. Repeat from *-* and finish with 1 slip stitch in first single crochet from beginning of round. |
|||||||||||||||||||||||||||||||||||||
Diagram explanations |
|||||||||||||||||||||||||||||||||||||
|
|||||||||||||||||||||||||||||||||||||
 |
|||||||||||||||||||||||||||||||||||||
 |
|||||||||||||||||||||||||||||||||||||
Have you finished this pattern?Tag your pictures with #dropspattern #belladonnadress or submit them to the #dropsfan gallery. Do you need help with this pattern?You'll find 13 tutorial videos, a Comments/Questions area and more by visiting the pattern on garnstudio.com. © 1982-2026 DROPS Design A/S. We reserve all rights. This document, including all its sub-sections, has copyrights. Read more about what you can do with our patterns at the bottom of each pattern on our site. |
|||||||||||||||||||||||||||||||||||||


With over 40 years in knitting and crochet design, DROPS Design offers one of the most extensive collections of free patterns on the internet - translated to 17 languages. As of today we count 324 catalogs and 12290 patterns - 12280 of which are translated into English (US/in).
We work hard to bring you the best knitting and crochet have to offer, inspiration and advice as well as great quality yarns at incredible prices! Would you like to use our patterns for other than personal use? You can read what you are allowed to do in the Copyright text at the bottom of all our patterns. Happy crafting!
Post a comment to pattern DROPS 187-5
We would love to hear what you have to say about this pattern!
If you want to leave a question, please make sure you select the correct category in the form below, to speed up the answering process. Required fields are marked *.