
Popular categories
Looking for a yarn?


Comments / Questions (126)
![]() Heather wrote:
Heather wrote:
What difficulty level is this pattern? Also, is the yarn supposed to sport weight, or worsted..?
03.10.2018 - 21:23DROPS Design answered:
Dear Heather, we do not have any difficulty level to our patterns, since this vary from country to country. Just read thouroughly the pattern - you are welcome to ask your questions here or contact your DROPS store for any individual assistance. You'll read more about the yarn under its shadecard. Happy crocheting!
04.10.2018 - 10:04Sahar Said wrote:
Good day Just wanted to ask you about the rows no. 3-5-8-12 in A1. It says to increase evenly. How many stiches should be increased in each row? Thank you
25.08.2018 - 01:51DROPS Design answered:
Hello Sahar. You increase 6 sts on each row. Happy crocheting!
27.08.2018 - 19:01
![]() Maria wrote:
Maria wrote:
Virkad både A1 och A3 upp till 60-65 cm?
13.08.2018 - 20:16DROPS Design answered:
Hej Maria, først A1 (och A2) sedan vid 60-65 cm virkas A3 :)
14.08.2018 - 13:56
![]() Paditz Natalie wrote:
Paditz Natalie wrote:
Die Übersetzung für die Häkelschrift ist leider nicht vollständig
12.08.2018 - 21:53DROPS Design answered:
Liebe Frau Paditz, Die Übersetzung für die Häkelschrift ist korrekt, sollten Sie eine Frage haben, dürfen Sie sie hier gerne stellen. Ihr DROPS Laden kann auch Ihnen entweder per Mail oder telefonisch weiterhelfen. Viel Spaß beim häkeln!
13.08.2018 - 10:25
![]() Maria wrote:
Maria wrote:
Virkas A1 och A3 upp till 60-65 cm, och därefter enbart A3?
08.08.2018 - 10:00DROPS Design answered:
Hej, när arb mäter 60-65 cm fortsätter du med A.3, men du ska även i fortsättningen vända arb med A.2 som förut.
13.08.2018 - 14:24
![]() Cathrine wrote:
Cathrine wrote:
Hva betyr tegnet med skråstrek i a2 ?
20.07.2018 - 13:25DROPS Design answered:
Hei Cathrine. Hver skrå strek er 1 luftmaske. God fornøyelse
26.07.2018 - 13:07
![]() Thea wrote:
Thea wrote:
Ik heb een week geleden een vraag gesteld maar nog geen antwoord. Ik zou graag de jurk afmaken maar kan niet verder.
16.07.2018 - 19:08
![]() Pat wrote:
Pat wrote:
Bonjour, j’ai achete lacwualité Muskst. Sur les 3 pelotes de 50gr déjà utilisées, j’si eu deux grands noeuds!!!!! Ceci est tres visible sur mon travail et inaccetable. Je n’ai pas achete des prlotes 2nde choix!!!! Que faire????? Merci
11.07.2018 - 22:16DROPS Design answered:
Bonjour Pat, Nous sommes désolés pour ce désagrément, mais si nous savons d’expérience que les nœuds sont désagréables quand on crochète, il peut malheureusement arriver qu’il y en ait, malgré tout le soin apporté à la fabrication de nos fils, le fil lui-même n’étant pas infini. Nous vous recommandons de le défaire et de joindre le fil tout comme pour une nouvelle pelote pour éviter les mauvaises surprises par la suite. N’hésitez pas à contacter votre magasin DROPS pour toute information complémentaire. Bon crochet!
12.07.2018 - 09:35
![]() Evelina wrote:
Evelina wrote:
Hej! Jag förstår inte stycket "Klänningen efter sprundet" när jag ska virka ihop fram- och bakstyckenas sprund. Jag förstår att jag ska fortsätta med A1 - men förstår inte A2 och i vilket skede jag virkar luftmaskor för att fästa ihop de två varven?
10.07.2018 - 21:39DROPS Design answered:
Hei Evelina. Du fortsetter å hekle A.1 over forstykket, og så videre over bakstykket. Så fester du bakstykket i forstykket med en kjedemaske – hvilken maske kjedemasken skal i avhenger av hvilken omgang av A.1 du er kommet til. Så hekles A.2, før du snur arbeidet og hekler neste omgang. God fornøyelse
13.07.2018 - 13:35
![]() Thea wrote:
Thea wrote:
Wat word bedoeld met “keer het werk zoals hiervoor met telpatroon A.2) en wordt het vanaf de armsgaten met stokjes verder gehaakt of patroon? Dat staat niet aangegeven
10.07.2018 - 20:21DROPS Design answered:
Dag Thea, Er wordt bedoelt dat je in plaats van A.1 nu A.3 haakt maar nog wel op dezelfde manier keert toen je A.1 haakte, dus je haakt A.3 en keert met A.2. Je haakt de jurk verder af in A.3 (niet met stokjes dus)
19.09.2018 - 19:18
|
|||||||||||||||||||||||||||||||||||||
Belladonna#belladonnadress |
|||||||||||||||||||||||||||||||||||||
 |
 |
||||||||||||||||||||||||||||||||||||
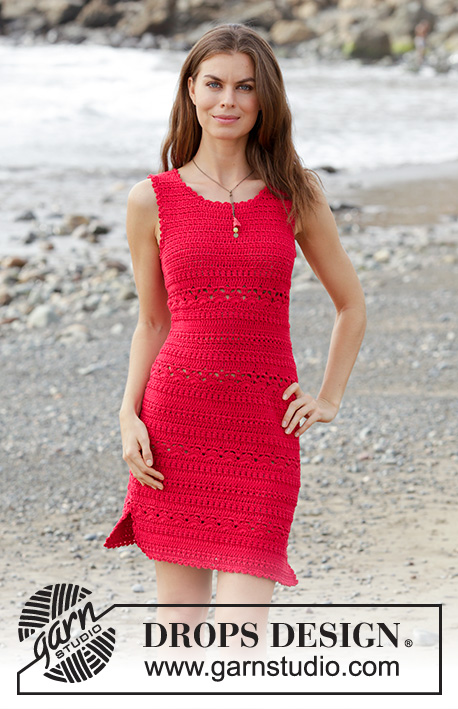
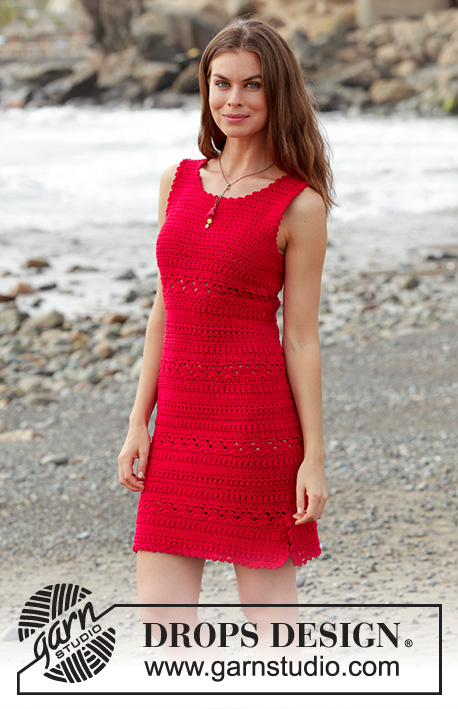
Crocheted dress with texture pattern. Size: S - XXXL Piece is crocheted in DROPS Muskat.
DROPS 187-5 |
|||||||||||||||||||||||||||||||||||||
|
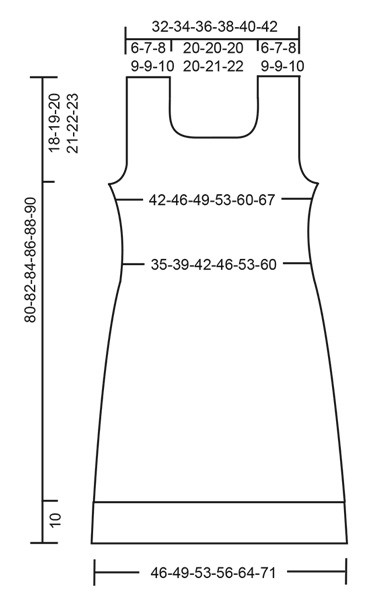
INFORMATION FOR PATTERN: PATTERN: See diagrams A.1, A.2 and A.3. A.2 shows how round begins/ends when working in the round. CROCHET TIP – when working back and forth: Work 3 chain stitches at the beginning of rows starting with double crochets (does not replace first double crochet). Work 1 chain stitch at the beginning of rows starting with single crochets (Does not replace first single crochet). DECREASE TIP: DOUBLE CROCHET: Decrease 1 double crochet by working 2 double crochets together as follows: Work 1 double crochet in first stitch, but wait with last yarn over and pull through (= 2 loops on hook), work 1 double crochet in next stitch/around the chain stitch, but on last pull through pull yarn through all 3 loops on hook (= 1 double crochet decreased). SINGLE CROCHET: Decrease 1 single crochet by working 2 single crochets together as follows: Work 1 single crochet but wait with last yarn over and pull through (= 2 loops on hook), then work next single crochet but on last pull through, pull yarn through all 3 loops on hook (= 1 single crochet decreased) DECREASE TIP (evenly): To calculate how to decrease evenly, use the total number of stitches (e.g. 156 stitches) and divide stitches by number of decreases to be done (e.g. 6) = 26. In this example crochet approx. every 25th and 26th stitch together. -------------------------------------------------------- DRESS: There is a 10 cm / 4" vent at the bottom of dress, first work piece back and forth until vent is done, then work piece in the round but turn on every round and work back on round to make the texture the same all the way. When piece is divided at the armhole, work back and forth again. FRONT PIECE: Work 90-97-104-111-125-139 chain stitches with Muskat on hook size 4 mm / G/6. Continue with 1 single crochet in 2nd chain stitch from hook, then 1 single crochet in each of the next 4 chain stitches, * skip 1 chain stitch, 1 single crochet in each of the next 6 chain stitches *, repeat from *-* the entire row = 78-84-90-96-108-120 single crochets (chain stitch to turn with is also counted as 1 single crochet). Turn and work 1 single crochet in every single crochet. Now work according to diagram A.1 - read CROCHET TIP! REMEMBER THE CROCHET GAUGE! After 10 cm / 4" put piece aside and work the back piece. BACK PIECE: Work 90-97-104-111-125-139 chain stitches with Muskat on hook size 4 mm / G/6. Continue with 1 single crochet in 2nd chain stitch from hook, then 1 single crochet in each of the next 4 chain stitches, * skip 1 chain stitch, 1 single crochet in each of the next 6 chain stitches *, repeat from *-* the entire row = 78-84-90-96-108-120 single crochets (chain stitch to turn with is also counted as 1 single crochet). Turn and work 1 single crochet in every single crochet. Now work according to diagram A.1. Continue until piece measures 10 cm / 4" - finish on the same row as on front piece. DRESS after vent: Continue pattern like this - first work stitches over front piece, then work stitch over back piece, then work round together with a slip stitch in 1st/3rd stitch on round, work stitch in A.2, turn piece and work back. Insert 1 marker thread in transitions between front and back piece = sides. Continue like this back and forth with pattern according to diagram A.1 and A.2. On rounds with double crochets or single crochets there are now 156-168-180-192-216-240 stitches on round (A.2 is not counted in number of stitches). When piece measures approx. 30-31-32-33-34-35 cm / 11¾"-12¼"-12½"-13"-13⅜"-13¾" - adjust so that next round is a round with double crochets or single crochets (marked on diagram with star), decrease 6 stitches evenly - read DECREASE TIP and DECREASE TIP (evenly). Repeat decrease 6 times in total on the 6 marked rounds with double crochets or single crochets = 120-132-144-156-180-204 stitches on a round with double crochets or single crochets. After last decrease round work pattern as before for approx. 3 cm / 1" – adjust so that next round is a round marked with star (piece now measures approx. 48-49-50-51-52-53 cm / 19"-19¼"-19¾"-20"-20½"-21"). Now increase 6 stitches evenly on round by working 2 stitches in 1 stitch. Repeat increase 4 times in total vertically at the rounds marked in diagram = 144-156-168-180-204-228 stitches on a round with double crochets or single crochets after last increase. When piece measures approx. 60-61-62-63-64-65 cm / 23⅝"-24"-24⅜"-24¾"-25¼"-25½" – adjust after a round marked with star, finish dress according to diagram A.3 (turn as before with diagram A.2). When piece measures 62-63-64-65-66-67 cm / 24½"-24¾"-25¼"-25½"-26"-26½", divide the piece for front and back piece at the armholes. FRONT PIECE: Work slip stitches over the first 4-5-4-5-6-7 stitches, then work until 4-5-4-5-6-7 stitches remain before marker thread in the other side, turn piece. On next row work the 4 outermost stitches in each side together 2 by 2 – read DECREASE TIP! Repeat decrease on every row 0-0-1-1-2-3 more times. On next row work the 2 outermost stitches together, repeat decrease on every row 2-2-2-3-4-5 more times. After all decreases are done, 54-58-62-64-68-72 stitches remain on row. When piece measures 70-71-73-74-76-77 cm / 27½"-28"-28¾"-29"-30"-30½", finish each shoulder separately. SHOULDER: Continue with double crochets over the first 17-19-21-22-23-24 stitches from the right side of piece, turn and work the first 4 stitches together 2 by 2 for neck, then work the rest of row. Turn and work until 4 stitches remain before neck, work these together 2 by 2, turn. On next row work the first 2 stitches together, then work the rest of row. Turn and work until 2 stitches remain, work these together. Turn, work the first 2 stitches together, work the rest of row = 10-12-14-15-16-17 stitches remain on shoulder. Continue until piece measures 80-82-84-86-88-90 cm / 31½"-32¼"-33"-33⅞"-34⅝"-35½", fasten off. Work the other shoulder the same way, but in reverse. I.e. Start from the right side and working the decreases for neck at end of rows from WS. BACK PIECE: Work slip stitches over the first 4-5-4-5-6-7 stitches, then work until 4-5-4-5-6-7 stitches remain before marker thread in the side, turn piece. On next row work the 4 outermost stitches in each side together 2 by 2 – read DECREASE TIP! Repeat decrease on every row 0-0-1-1-2-3 more times. On next row work the 2 outermost stitches together, repeat decrease on every row 2-2-2-3-4-5 more times. After all decreases are done, 54-58-62-64-68-72 stitches remain on row. Continue to work until piece measures approx. 78-80-82-84-86-88 cm / 30¾"-31½"-32¼"-33"-33⅞"-34⅝". Then finish each shoulder separately as follows: Work 1 row over the first 12-14-16-17-18-19 stitches, turn, work the first 2 stitches together, work the rest of row. Turn and work until 2 stitches remain, work these together. Turn, work the rest of row, fasten off. Repeat on the other shoulder. ASSEMBLY: Sew shoulder seams edge to edge to avoid a chunky seam. DECORATING EDGE: Work a decorating edge around the neck, each armhole and at the bottom of body - as well as up and down each vent. Work decorating edge as follows: 1 single crochet, * 3 chain stitches, 1 double crochet in 3rd chain stitch from hook, skip approx. 1 cm / ⅜" and make 1 single crochet *. Repeat from *-* and finish with 1 slip stitch in first single crochet from beginning of round. |
|||||||||||||||||||||||||||||||||||||
Diagram explanations |
|||||||||||||||||||||||||||||||||||||
|
|||||||||||||||||||||||||||||||||||||
 |
|||||||||||||||||||||||||||||||||||||
 |
|||||||||||||||||||||||||||||||||||||
Have you finished this pattern?Tag your pictures with #dropspattern #belladonnadress or submit them to the #dropsfan gallery. Do you need help with this pattern?You'll find 13 tutorial videos, a Comments/Questions area and more by visiting the pattern on garnstudio.com. © 1982-2026 DROPS Design A/S. We reserve all rights. This document, including all its sub-sections, has copyrights. Read more about what you can do with our patterns at the bottom of each pattern on our site. |
|||||||||||||||||||||||||||||||||||||


With over 40 years in knitting and crochet design, DROPS Design offers one of the most extensive collections of free patterns on the internet - translated to 17 languages. As of today we count 324 catalogs and 12290 patterns - 12280 of which are translated into English (US/in).
We work hard to bring you the best knitting and crochet have to offer, inspiration and advice as well as great quality yarns at incredible prices! Would you like to use our patterns for other than personal use? You can read what you are allowed to do in the Copyright text at the bottom of all our patterns. Happy crafting!
Post a comment to pattern DROPS 187-5
We would love to hear what you have to say about this pattern!
If you want to leave a question, please make sure you select the correct category in the form below, to speed up the answering process. Required fields are marked *.