
Popular categories
Looking for a yarn?


Comments / Questions (89)
![]() Loredana wrote:
Loredana wrote:
Ho risolto! Grazie mille
05.03.2018 - 11:25
![]() Loredana wrote:
Loredana wrote:
Buongiorno! Sono arrivata al terzo giro e per l'ennesima volta giunta al diagramma A5 mi trovo una maglia in meno (due maglie anziché 3) in pratica la prima gettata di A5 diventa parte del diagramma A4 (che si sposta verso destra) quindi non ho più le 3 maglie che occorrono per fare i tre dritti di A5. Riuscite ad aiutarmi? È già la quarta volta che sfilo e ricomincio.... Grazie Loredana
05.03.2018 - 11:12
![]() Lola wrote:
Lola wrote:
Hola,No tengo acceso a tienda .Le vuelvo a explicar mi problema .En la primera vuelta de A3 tenemos al finalizar 5 puntos y dos hebras que al hacer la vuelta 2 son 7 puntos ,pero para hacer la vuelta 3 se necesitan 8 puntos, donde está el punto que falta ? Es que hay que hacer 2 hebras seguidas después deA1 ?
05.03.2018 - 09:27DROPS Design answered:
Hola Lola. Estamos revisando el diagrama. Cualquier corrección se hará directamente en línea.
05.03.2018 - 21:04
![]() Loredana wrote:
Loredana wrote:
Buongiorno, sto impostando gli aumenti....se aumento 1 maglia da ciascun lato dei diagrammi A1 e A2 quando arrIvo tra A2 e A3 mi trovo a fare 2 gettate consecutive. È esatto così? Inoltre nel giro di ritorno arrivata ad A5 mi manca sempre una maglia....potrebbe esserci un errore nella descrizione d'impostazione? Grazie Loredana
04.03.2018 - 10:37DROPS Design answered:
Buonasera Loredana. Nel diagramma A3, sono riportati anche gli aumenti che deve fare in questo punto. Quindi non deve aggiungere una gettata, prima della gettata del diagramma. Buon lavoro!
04.03.2018 - 20:02
![]() Lola Benítez Muñoz wrote:
Lola Benítez Muñoz wrote:
Hola ,me encanta este modelo ,estoy intentando hacerlo pero tengo un problema en el delantero ,al hacerA3a y A7asiempre me falta un punto en la vuelta siguiente a pesar de hacer los aumentos como indica el gráfico ,¿ que estoy haciendo mal ? .Gracias.
02.03.2018 - 13:41DROPS Design answered:
Hola Lola. Te recomiendo acudir a la tienda de drops más cercana para obtener ayuda, ya que sin ver la labor no puedo ver qué fallo tienes.
04.03.2018 - 17:53
![]() Anne Viken wrote:
Anne Viken wrote:
På de 2 forskjellige flettemønstrene er det samme tekst, men forskjellige symboler. Når skal flettepinnen være foran og når skal den være bak?
28.02.2018 - 20:50DROPS Design answered:
Hei Anne. Her var det feil på den norske oppskriften og den siste diagramforklarigen. Det skal være: = sett 3 masker på flettepinne foran arbeidet, strikk 3 masker rett, strikk 3 masker rett fra flettepinnen. Takk for at du gjorde oss oppmerksom på dette og det er nå ordnet. God Fornøyelse!
01.03.2018 - 13:02
![]() Lisbeth Flindt Pedersen wrote:
Lisbeth Flindt Pedersen wrote:
Hejsa Jeg kan simpelthen ikke få A.3a og A.7a til at passe. Ifølge diagrammet er der to masker til sidst efter at man har slået om og strikket to masker sammen. Jeg mangler en maske hver gang? Hvor kommer den ind henne? Så skal man tage en maske ud på hver side af A.1a og A.1b og der skal strikkes ret så der bliver hul. Så vil det sige at der skal slås om to gange i træk?slå om, A.2a, slå om, A.3a ( starter med at slå om)? Det samme med A.7a og A.1a?
27.02.2018 - 21:50
![]() Maria Hovberg wrote:
Maria Hovberg wrote:
Hej jag får inte till vänstra framsidan. Högersidan blir perfekt. Det är som att A.5 inte passar in för att arbetet blir förskjutet hela tiden och hålmönstret går rakt ner istället för diagonalt. Orakar inte repa upp en gång till! Hjälp!!
15.02.2018 - 18:07DROPS Design answered:
Har du kontrollerat att du stickar diagrammen i den ordning som anges i mönstret? Då ska det bli som på bilden. Du kan även ta med dig stickningen till närmaste DROPS återförsäljare, de hjälper dig gärna att hitta vad som blivit fel med mönstret.
21.02.2018 - 14:14
![]() Petra Meurer wrote:
Petra Meurer wrote:
Hallo, ich habe jetzt bereits 3mal angefangen und wieder aufgezogen! Das Muster funktioniert nicht! Gibt es bald eine Korrektur? Ich möchte dieses schöne Modell wirklich gerne stricken.
04.02.2018 - 16:08DROPS Design answered:
Liebe Frau Meurer, können Sie bitte uns mehr sagen? Welche Größe Sie stricken, wo Sie genau Schwierigkeiten haben (welche Stelle) usw. Danke im voraus!
05.02.2018 - 09:48
![]() Genda Ruijgrok wrote:
Genda Ruijgrok wrote:
In de 3e toer staat bij het 2e deel van het achterpand dat je moet minderen, maar dit moet meerderen zijn.
02.02.2018 - 23:06
|
|||||||||||||||||||||||||||||||
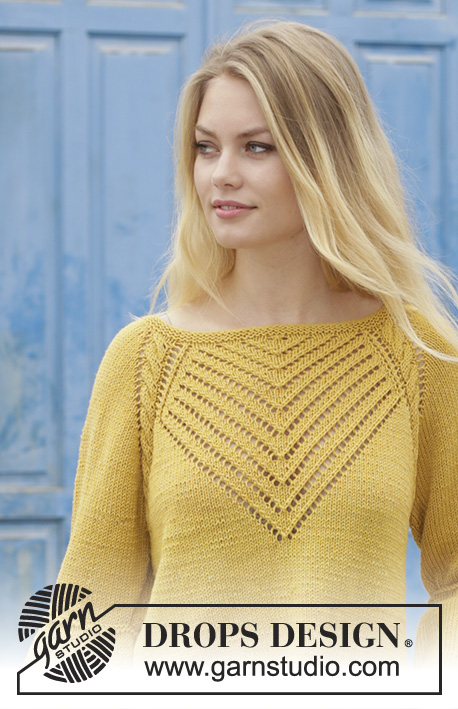
Hello Yellow#helloyellowsweater |
|||||||||||||||||||||||||||||||
 |
 |
||||||||||||||||||||||||||||||
Sweater with cables, lace pattern, raglan and A-shape, knitted top down. Size: S - XXXL Piece is knitted in DROPS Cotton Merino.
DROPS 187-4 |
|||||||||||||||||||||||||||||||
|
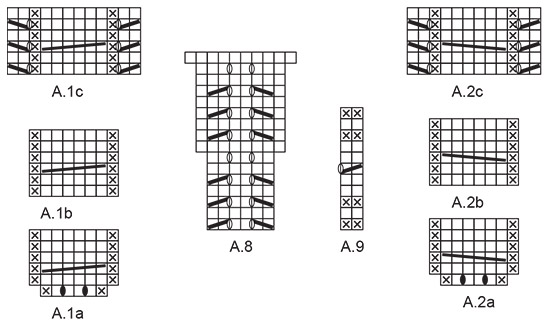
INFORMATION FOR PATTERN: GARTER STITCH (worked in the round): 1 ridge = 2 rounds. Knit 1 round and purl 1 round. PATTERN: See diagrams A.1 to A.9. INCREASE TIP: Increase 1 stitch by making 1 yarn over between 2 stitches. On next round work yarn over twisted to avoid holes. DECREASE TIP (applies to sleeves): Decrease 1 stitch on each side of marker thread as follows: Work until 3 stitches remain before marker thread, slip 1 stitch knitwise, knit 1, pass slipped stitch over stitch worked, knit 2 (marker thread is in the middle of these stitches), knit the next 2 stitches together. ---------------------------------------------------------- SWEATER: Yoke and body are worked in the round on circular needle, top down. Work sleeves in the round on double pointed needles/a short circular needle. YOKE: Cast on 92-96-100-108-112-120 stitches on a short circular needle size 4 mm / US 6 with Cotton Merino. Work 3 ridges in GARTER STITCH - see explanation above. Switch to circular needle size 4.5 mm / US 7. Work next round (round begins mid back) as follows: Knit 17-18-19-21-22-24 and increase 1 stitch – read INCREASE TIP (= half back piece), * 1 yarn over, knit 1 *, work from *-* 12 times in total (= 12 stitches increased = sleeve), knit 34-36-38-42-44-48 and increase 3-1-3-1-3-3 stitches evenly (= front piece), work from *-* 12 times in total (= 12 stitches increased = sleeve) and finish by knitting 17-18-19-21-22-24 and increasing 2-0-2-0-2-2 stitches evenly (= half back piece) = 122-122-130-134-142-150 stitches. Knit 1 round, work all yarn overs twisted, they should not make holes. Then work and increase for raglan on next round as follows: Knit 15-15-19-19-19-23, 1 yarn over (= half back piece = 1 stitch increased), A.1a (= 6 stitches), 1 yarn over (= 1 stitch increased), knit 18-18-14-16-20-16, 1 yarn over (= 1 stitch increased), A.2a (= 6 stitches) (= sleeve), A.3a (= 6 stitches, raglan increase is drawn in diagram), A.4a (= 4 stitches) over the next 4-4-8-8-8-12 stitches, A.4b (= 4 stitches), A.5 (= 3 stitches = middle of front piece), A.6a (= 4 stitches), repeat A.6b (= 4 stitches) over the next 4-4-8-8-8-12 stitches. A7a (= 6 stitches, raglan increase is drawn in diagram) (= front piece), A.1a over the next 6 stitches, 1 yarn over (= 1 stitch increased), knit 18-18-14-16-20-16, 1 yarn over (= 1 stitch increased), A.2a over the next 6 stitches (= sleeve), 1 yarn over (= 1 stitch increased) and finish by knitting 16-16-20-20-20-24 (= half back piece) (= 2 stitches increased in every A.1a and A.2a = 8 stitches increased. For raglan: 2 stitches have been increased on each sleeve and back piece and 1 stitch in A.3a and A.7a (= front piece) = 8 stitches increased for raglan = 16 stitches increased on round) = 138-138-146-150-158-166 stitches. Knit the increased yarn overs on each side of A.1 and A.2 on next round to make holes. REMEMBER THE GAUGE! Now increase for raglan AT THE SAME TIME work pattern, read both sections before continuing: PATTERN: When A.1a and A.2a have been worked 1 time vertically, work A.1b over A.1a and A.2b over A.2a. Repeat diagrams A.1b and A.2b vertically. Eyelet pattern in A.3a, A.4, A.6 and A.7a are displaced towards mid front and meet diagram A.5 (= mid front) where they are decreased together, i.e. there will be fewer and fewer eyelet lines when decreasing in A.5. Repeat diagram A.4 to A.6 vertically. I.e. there will be 1 less repeat of A.4a and A.6b in width for each repeat of A.4 and A.6 in height. When A.3a and A.7a have been worked 1 time vertically, work A.3b over A.3a and A.7b over A.7a. Eyelet pattern are decreased in A.5 as before, work the remaining stitches in stocking stitch and pattern as before. When all eyelet lines have been decreased, work in stockinette stitch over stitches in A.3, A.5 and A.7. RAGLAN: Now increase for raglan as follows: NOTE! The first 12 increase rounds for raglan are drawn into diagram A.3a and A.7a on front piece but increase on each sleeve and on back piece as follows: Increase 1 stitch on each side of every A.1 and A.2 (= 2 stitches increased on back piece, 2 stitches on each sleeve, 1 stitch increased in A.3a and 1 stitch increased in A.7a = 8 stitches in total increased). Knit the increased stitches to make holes. Increase like this every other round 21-25-27-30-33-36 times in total (the first increase is explained above. When 12 increase rounds have been done in total, A.3a and A.7a have been worked 1 time vertically, increases for raglan is no longer drawn in diagram, so continue increase as on back piece = 8 stitches increased in total on every increase round). When all increases are done there are 298-330-354-382-414-446 stitches on row. Then work A.1c over A.1b and A.2c over A.2b (adjust which round to start on according to pattern, i.e. continue cable as before and work eyelet pattern on each side of every cable). Continue to work until piece measures 20-23-24-27-29-31 cm / 8"-9"-9½"-10½"-11½"-12¼". Work 1 round while decreasing 2 stitches evenly over every A.1c and A.2c (= 8 stitches decreased in total) = 290-322-346-374-406-438 stitches. Continue working in stockinette stitch over A.1c and A.2c. Now divide yoke for body and sleeves as follows: Work 40-44-48-53-59-65 stitches (= half back piece), slip the next 64-72-76-80-84-88 stitches on a stitch holder for sleeve, cast on 8 stitches under sleeve, insert 1 marker in the middle of the new stitches, work 81-89-97-107-119-131 stitches (= front piece), slip the next 64-72-76-80-84-88 stitches on a stitch holder for sleeve, cast on 8 stitches under sleeve, insert 1 marker in the middle of the new stitches and finish with 41-45-49-54-60-66 stitches (= half back piece) = 178-194-210-230-254-278 stitches. Finish body and sleeves separately. Insert 1 marker thread here. NOW MEASURE THE PIECE FROM HERE! BODY: = 178-194-210-230-254-278 stitches. Work A.8 (= 6 stitches) over the middle stitches in the side under each sleeve (= 3 stitches on each side of each marker), work the remaining stitches in pattern and stockinette stitch. When lace pattern on front piece is done, continue in stockinette stitch with A.8 under each sleeve. When piece measures 31-30-31-30-30-30 cm / 12¼"-11¾"-12¼"-11¾"-11¾"-11¾" (there are approx. 218-230-250-266-290-314 stitches on needle) from where body was divided from sleeves, switch to circular needle size 4 mm / US 6 and work 3 ridges. Bind off. Make sure to avoid a tight bind-off edge, bind off with 1 larger needle size if needed. SLEEVE: Work sleeve in the round on circular needle/double pointed needles. Slip the 64-72-76-80-84-88 stitches from stitch holder in one side of piece on double pointed needles size 4.5 mm / US 7 and pick in addition up 1 new stitch in each of the 8 stitches cast on under sleeve = 72-80-84-88-92-96 stitches on needle. Insert a marker thread in the middle of the new stitches under the sleeve. Work in stockinette stitch in the round. When piece measures 1 cm / ⅜", decrease 2 stitches mid under sleeve - read DECREASE TIP. Decrease like this every 8th-4th-4th-3rd-2nd-2nd row 6-8-8-8-8-8 times in total = 60-64-68-72-76-80 stitches. When piece measures 17-14-14-11-9-7 cm / 6¾"-5½"-5½"-4½"-3½"-2¾" from where sleeve was divided from body, continue as follows: Work 2 ridges. Work 2 rounds in stockinette stitch. Work next round as follows: Work 0-2-1-0-2-1 stitches in stockinette stitch, * knit 6, 1 yarn over *, work from *-* until 0-2-1-0-2-1 stitch remains, work 0-2-1-0-2-1 stitch in stockinette stitch = 70-74-79-84-88-93 stitches. Work 2 rounds in stockinette stitch (always knit yarn overs twisted to avoid holes). Work next round as follows: Work 0-2-1-0-2-1 stitches in stockinette stitch, * knit 7, 1 yarn over *, work from *-* until 0-2-1-0-2-1 stitch remains, work 0-2-1-0-2-1 stitch in stockinette stitch = 80-84-90-96-100-106 stitches. Work 2 rounds in stockinette stitch (always knit yarn overs twisted to avoid holes). Work next round as follows: Work 0-2-1-0-2-1 stitches in stockinette stitch, * knit 8, 1 yarn over *, work from *-* until 0-2-1-0-2-1 stitch remains, work 0-2-1-0-2-1 stitch in stockinette stitch = 90-94-101-108-112-119 stitches. Continue in the round with stockinette stitch until sleeve measures 34-31-31-28-26-24 cm / 13½"-12¼"-12¼"-11"-10¼"-9½" in total from where sleeve was divided from body (knit yarn overs from first round twisted to avoid holes). Switch to circular needle size 4 mm / US 6 and work A.9 in the round AT THE SAME TIME on first round increase 0-0-1-0-0-1 stitch = 90-94-102-108-112-120 stitches. When A.9 has been worked 1 time vertically, bind off by knitting. Make sure to avoid a tight bind-off edge, bind off with 1 larger needle size if needed. Sleeve measures 37-34-34-31-29-27 cm / 14½"-13½"-13½"-12¼"-11½"-10½" in total from where sleeve was divided from body. Work the other sleeve the same way. |
|||||||||||||||||||||||||||||||
Diagram explanations |
|||||||||||||||||||||||||||||||
|
|||||||||||||||||||||||||||||||
 |
|||||||||||||||||||||||||||||||
 |
|||||||||||||||||||||||||||||||
 |
|||||||||||||||||||||||||||||||
 |
|||||||||||||||||||||||||||||||
Have you finished this pattern?Tag your pictures with #dropspattern #helloyellowsweater or submit them to the #dropsfan gallery. Do you need help with this pattern?You'll find 23 tutorial videos, a Comments/Questions area and more by visiting the pattern on garnstudio.com. © 1982-2026 DROPS Design A/S. We reserve all rights. This document, including all its sub-sections, has copyrights. Read more about what you can do with our patterns at the bottom of each pattern on our site. |
|||||||||||||||||||||||||||||||


With over 40 years in knitting and crochet design, DROPS Design offers one of the most extensive collections of free patterns on the internet - translated to 17 languages. As of today we count 324 catalogs and 12290 patterns - 12280 of which are translated into English (US/in).
We work hard to bring you the best knitting and crochet have to offer, inspiration and advice as well as great quality yarns at incredible prices! Would you like to use our patterns for other than personal use? You can read what you are allowed to do in the Copyright text at the bottom of all our patterns. Happy crafting!
Post a comment to pattern DROPS 187-4
We would love to hear what you have to say about this pattern!
If you want to leave a question, please make sure you select the correct category in the form below, to speed up the answering process. Required fields are marked *.