
Popular categories
Looking for a yarn?


Comments / Questions (26)
![]() Patricia wrote:
Patricia wrote:
J'ai donc tricoté ce modèle. La laine est belle et douce et les coloris sont beaux mais ce modèle est assez lourd sur les épaules et ma fille en voulait un aussi et l'a aussi trouvé lourd Dommage....
13.06.2025 - 10:21
![]() Patricia wrote:
Patricia wrote:
Bonjour Je ne comprends pas trop pourquoi les tailles L et XL XXL ont le même nombre de mailles 163 car celui que j ai tricote pour moi taille 40 me va et j en tricote un pour ma fille qui taille 44 A part la longueur ce ne devrait pas être la même largeur Pourquoi n y a t il pas une taille intermédiaire ? Merci
07.04.2025 - 16:53DROPS Design answered:
Bonjour Patricia, si les largeurs sont les mêmes dans ces deux tailles, notez que les longueurs sont différentes, elles viendront ainsi faire la différence. Bon tricot!
08.04.2025 - 09:19
![]() Romy wrote:
Romy wrote:
Sind die Löcher immer genau oberhalb? Bei mir geht sich das nicht aus. Vom Anfang an nicht. Könnten sie mir vielleicht einen Tipp geben. Vielen Dank im voraus
27.12.2024 - 15:04DROPS Design answered:
Liebe Romy, benutzen Sie Markierer zwischen jedem Diagram, so wird es einfacher zu folgen; in diesem Video zeigen wir, wie man ein ähnliches Muster strickt. Das kann Ihnen vielleicht helfen. Viel Spaß beim Stricken!
02.01.2025 - 12:23
![]() Gisella Werner wrote:
Gisella Werner wrote:
Hej, kan man sticka denna i slätstickning eller rätstickning, dvs utan vågmönstret? Eller pårverkas måtten av det? Mvh Gisella
18.12.2024 - 13:51DROPS Design answered:
Hej, ja det vil påvirke strikkefastheden, men hvis du kan få 20 masker på 10 cm, så vil du få samme størrelse som i måleskitsen :)
18.12.2024 - 14:31
![]() LEEN VANDE VELDE wrote:
LEEN VANDE VELDE wrote:
Op het laatste van m'n werk moet ik A5 breien (6x volledig ???) dat wordt dan wel hoog vanaf dat ik afgekant heb voor de mouwen. Na het afkanten van de mouwen heb ik A2 3x gebreid in de hoogte en dus nu nog 6x A5 kan je mij helpen aub
24.11.2024 - 16:52DROPS Design answered:
Dag Leen,
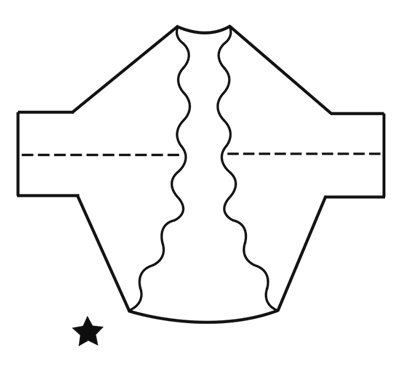
Ja dit klopt, je kunt de maten aanhouden zoals onderaan aangegeven in de tekenening. Het werk wordt op de stippellijnen aan elkaar genaaid. Vandaar dat dat nu een grote afstand lijkt.
27.11.2024 - 11:45
![]() LEEN VANDE VELDE wrote:
LEEN VANDE VELDE wrote:
HELP : telpatroon A1 : zijn dat in totaal 6naalden voor het hele telpatroon of 12 nld ? dus : 1 nld r, 1 nld av, nogmaals 1nld r en 1 nld av. en dan 2st samenbreien en overhalingen maken, en dan....1 nld av. ? en dan opnieuw (op 21 st.) ?
14.11.2024 - 11:03DROPS Design answered:
Dag Leen,
Alle naalden in de telpatronen zijn weergegeven, dus het zijn in totaal 6 naalden en niet 12 naalden.
12.12.2024 - 15:28
![]() LEEN VANDE VELDE wrote:
LEEN VANDE VELDE wrote:
Kan ik dit modelletje met gewone naalden breien (geen rondbrei), hebben jullie hier dan een beschrijving over ? mvg
13.11.2024 - 17:00DROPS Design answered:
Dag Leen,
Om een patroon aan te passen om op rechte naalden te breien hebben we een instructie gemaakt. Deze vind je hier.
Het is helaas niet voor ieder patroon geschikt. Bij dit patroon is het zo dat je heel veel steken tegelijkertijd op de naald hebt en dat gaat dan niet passen. (Dit hangt natuurlijk ook een beetje af van de maat die je maakt.)
13.11.2024 - 19:33
![]() Amanda L wrote:
Amanda L wrote:
I am having trouble figuring out which size to make since you fold and sew it into a different shape. Are there any measurements available of the finished size - or suggestions based on bust / back measurements? I knit size M or L sweaters from you usually but cant tell which works here. Any help would be appreciated.
25.09.2024 - 23:47
![]() Barbara wrote:
Barbara wrote:
Hello - how do I work A1? R1 knit all 161 stitches (plus 2 edge) R2 same as R1 R3 - k 2tog 4x, yo 6x, k2tog 4x and repeat over 161 stitches? etc Sorry for the long comment - is A1 6 rows of 163 st or a continuous pattern over only one row. I am confused because the instructions say "next row". But if it is just one row how would you get 7 repetitions of 23 stitches - what is being repeated. Thank you for all your help.
20.09.2024 - 22:05DROPS Design answered:
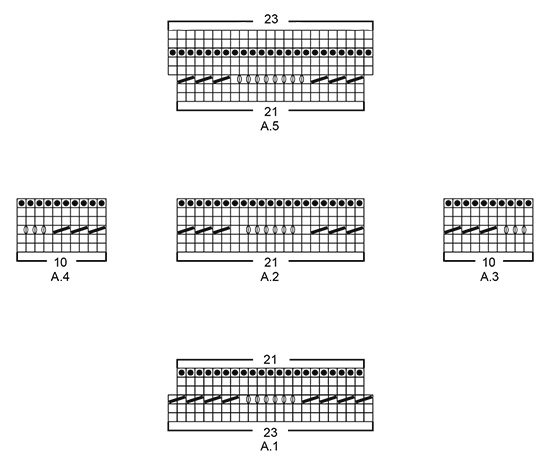
Dear Barbara, you can see more information on our knitting charts here: https://www.garnstudio.com/lesson.php?id=68&cid=19. On the first row of A.1, for the middle sizes, you work 1 edge stitch, then work the 23 stitches of the first row of A.1 (= knit all 23 stitches) 7 times in the row and finish with 1 edge stitch. Turn and purl over all stitches, except the edge stitches (remember that white square = purl from wrong side). On row 3, you work [4 k2tog, then (knit 1, 1 yarn over) 6 times, knit 1, 4 k2tog] and repeat from [ to ] 7 times in the row, over the 161 stitches (don't forget the edge stitches). Happy knitting!
23.09.2024 - 00:27
![]() Ruth wrote:
Ruth wrote:
Where has the diagram gone ? I was following this pattern online [because you can’t print it - the photos go on top of the text] when I noticed that the diagram had disappeared. Please put it back otherwise I won’t be able to finish my bolero.
25.06.2022 - 10:23DROPS Design answered:
Dear Ruth, we don't have a problem from our end for printing this pattern and the diagrams are found under the pattern as usual. Sometimes, there are problems both when printing and visualizing charts due to unusually high traffic on our website; in that case, we recommend trying again later to see if the problem is solved. If the problem persists, you can try using another browser as well. Happy knitting!
26.06.2022 - 13:06
|
||||||||||||||||
Billowing Rose#billowingroseshrug |
||||||||||||||||
 |
 |
|||||||||||||||
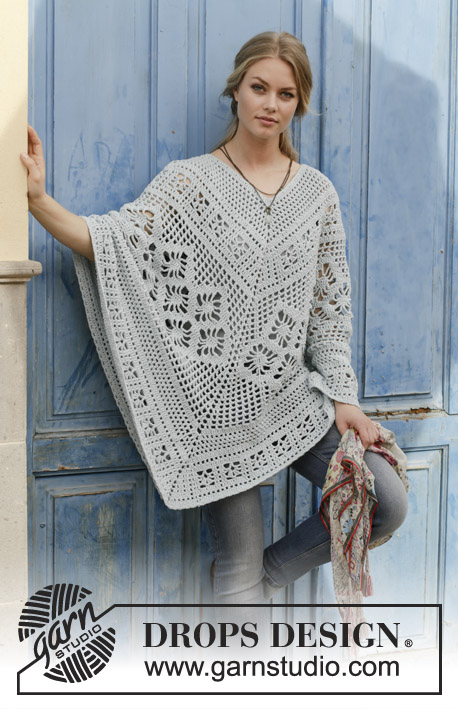
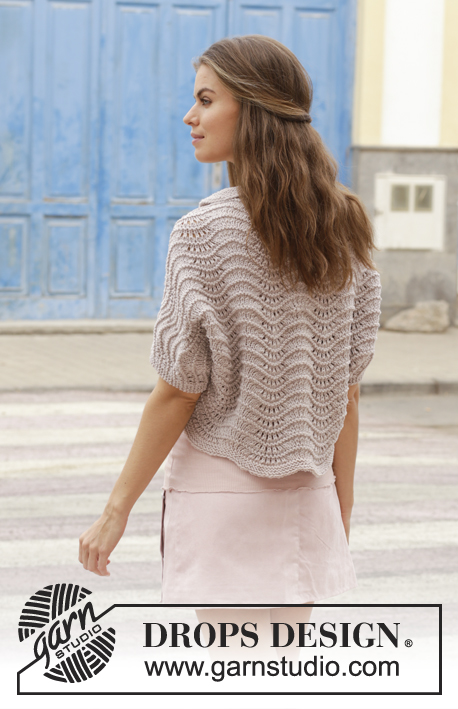
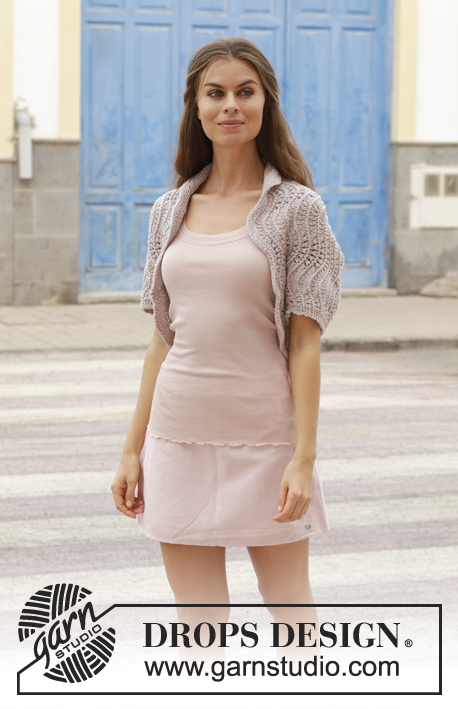
Knitted bolero with wave pattern. Size: S - XXXL Piece is knitted in DROPS Big Merino.
DROPS 188-32 |
||||||||||||||||
|
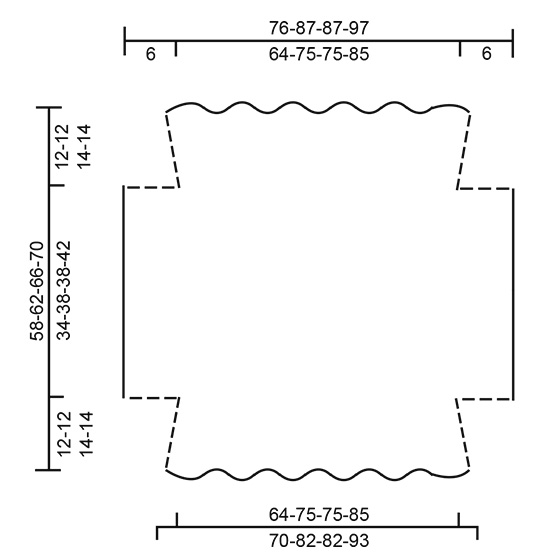
INFORMATION FOR PATTERN: GARTER STITCH (back and forth): 1 ridge = knit 2 rows. PATTERN: See diagrams A.1 to A.5. Diagrams show all rows in pattern seen from the right side. ---------------------------------------------------------- BOLERO: Piece is worked back and forth in one piece, then folded at the middle and sewn together under sleeves/in the sides (see dotted line on chart). Work on a circular needle to make room for all the stitches. Cast somewhat loosely on 140-163-163-186 stitches on circular needle SIZE 5.5 mm/US 9 / US 9 with Big Merino. Work 2 ridges in GARTER STITCH - see explanation above. Work next row as follows from right side: 1 edge stitch in garter stitch, work A.1 over the next 138-161-161-184 stitches (= 6-7-7-8 repetitions of 23 stitches), finish with 1 edge stitch in garter stitch. When A.1 has been worked, 128-149-149-170 stitches remain on needle. Then work A.2 with 1 edge stitch in garter stitch in each side. REMEMBER THE GAUGE! When A.2 has been worked 3-3-4-4 times in total vertically (piece measures approx. 12-12-14-14 cm / 4¾"-4¾"-5½"-5½" measured from middle of the waves), cast on 12 new stitch for sleeves at the end of the next 2 rows = 152-173-173-194 stitches. Work next row as follows from right side: 3 edge stitches in garter stitch, work A.3 (= 10 stitches – begin on 3rd row in diagram as the first 2 rows were worked when casting on new stitches for sleeves), continue A.2 over the next 126-147-147-168 stitches (begin on 3rd row in A.2), work A.4 (= 10 stitches – begin on 3rd row in A.4) and finish with 3 edge stitches in garter stitch. Continue pattern like this until piece measures approx. 46-50-52-56 cm / 18"-19¾"-20½"-22", finish after one whole repetition vertically. bind off 12 stitches at the beginning of the next 2 rows = 128-149-149-170 stitches. Then work A.2 with 1 edge stitch in garter stitch in each side (first time A.2 is worked, begin on 3rd row in A.2 since the first two rows were worked when binding off stitches in each side). When A.2 has been worked 3-3-4-4 times in total vertically, work A.5 with 1 edge stitch in garter stitch in each side (= 6-7-7-8 repetitions of 21 stitches). When A.5 has been worked, 140-163-163-186 stitches remain on needle. Work 2 ridges and bind off from right side with elastic bind-off edge as explained below. The bolero measures approx. 58-62-66-70 cm / 22¾"-24½"-26"-27½" vertically. ELASTIC BIND-OFF EDGE: Knit 2, insert left needle through the 2 stitch on right needle from left towards right and knit the two stitches together, * knit 1, insert left needle through the 2 stitch on right needle from left towards right and knit the two stitches together *, work from *-* until 1 stitch remain on needle. Cut the yarn and pull it through last stitch, tighten together and fasten. ASSEMBLY: Sew underarm and side seams in one - see dotted line on chart. NOTE! Sew in outer loops of edge stitches to avoid a chunky seam. |
||||||||||||||||
Diagram explanations |
||||||||||||||||
|
||||||||||||||||
 |
||||||||||||||||
 |
||||||||||||||||
 |
||||||||||||||||
Have you finished this pattern?Tag your pictures with #dropspattern #billowingroseshrug or submit them to the #dropsfan gallery. Do you need help with this pattern?You'll find 15 tutorial videos, a Comments/Questions area and more by visiting the pattern on garnstudio.com. © 1982-2026 DROPS Design A/S. We reserve all rights. This document, including all its sub-sections, has copyrights. Read more about what you can do with our patterns at the bottom of each pattern on our site. |
||||||||||||||||


With over 40 years in knitting and crochet design, DROPS Design offers one of the most extensive collections of free patterns on the internet - translated to 17 languages. As of today we count 325 catalogs and 12298 patterns - 12288 of which are translated into English (US/in).
We work hard to bring you the best knitting and crochet have to offer, inspiration and advice as well as great quality yarns at incredible prices! Would you like to use our patterns for other than personal use? You can read what you are allowed to do in the Copyright text at the bottom of all our patterns. Happy crafting!
Post a comment to pattern DROPS 188-32
We would love to hear what you have to say about this pattern!
If you want to leave a question, please make sure you select the correct category in the form below, to speed up the answering process. Required fields are marked *.