Comments / Questions (26)
![]() Maryse wrote:
Maryse wrote:
J'ai tricoté le col en côtes, je suis rendue aux augmentations et je ne comprends pas du tout! Dans ce premier rang d'augmentation : J'augmente de 28 m (soit aux 4 m) et en même temps 1 m à intervalle régulier (soit 28 m), puis 1 jeté, 1 m, 6 fois. Ces jetés doivent-elles être aux 28 m? 6 fois? Est-ce pour 6 rangs ou 6 fois dans le rang? Merci à l'avance de m'éclairer pour ce joli patron.
21.12.2018 - 04:40DROPS Design answered:
Bonjour Maryse, tricotez vos 125 m ainsi: 28 m end en augmentant 1-3 m (= 29-31 m end), puis vous tricotez 6 fois (1 jeté, 1 m end) (= vous avez ainsi 12 m), tricotez ensuite 57 m en augmentant 3 m (= vous avez 60 m), puis 6 fois (1 jeté, 1 m end) (= vous avez 12 m), et terminez par les 28 dernières m en augm. 1-3 m (= 29-31 m) soit: 29-31+12+60+12+29-31= 142 m en taille S et 146 m en taille M. Bon tricot!
21.12.2018 - 08:04
![]() Maria wrote:
Maria wrote:
Grazie ma ho ancora difficoltà. Quindi, se capisco bene, ricomincio il motivo centrale come all'inizio sulle righe 11 e 12. E poi? Ricomincio di nuovo da capo? Forse mi sfugge qualcosa. Grazie ancora
07.09.2018 - 08:54DROPS Design answered:
Buongiorno Maria. All'11° ferro riprende il primo ferro del motivo sulle maglie centrali e lo continua in modo che prosegua correttamente. Lavora le prime e ultime 6 maglie come indicato alle righe 11 e 12. Alla riga successiva, su queste maglie, ricomincia dall'inizio . Quindi la riga 13 diventa: prima riga del diagramma per le prime e ultime 6 maglie; terza riga per le maglie centrali. E' come se fossero due diagrammi separati. Buon lavoro.
07.09.2018 - 09:15
![]() Maria wrote:
Maria wrote:
Buongiorno. Non capisco come devo lavorare le righe 11 e 12, Cosa significano gli spazi bianchi dopo i primi 6 punti e prima degli ultimi 6? Grazie per il vostro aiuto. Maria
07.09.2018 - 08:28DROPS Design answered:
Buongiorno Maria. Alla riga 11, lavora le prime e le ultime sei maglie come indicato alla riga 11, le maglie centrali le lavora come la prima riga del diagramma A.1. Buon lavoro!
07.09.2018 - 08:34
![]() Marianne Steen wrote:
Marianne Steen wrote:
Det undrer mig da hele længden skal være 62 cm, at bærestykket er 28 cm, ryg og fortykke 23 cm og rib 7 cm. Det giver 58 cm. Hvor er så de sidste 4 cm. mvh Marianne Steen
11.02.2018 - 18:03DROPS Design answered:
Hej Marianne, det er de sidste 4 cm du får i selv raglanudskäringen. God fornöjelse !
12.02.2018 - 16:36
![]() Susanne Schweighofer wrote:
Susanne Schweighofer wrote:
Hallo, ich habe folgende Frage: Es wird ja Diagramm A mehrmals wiederholt. Wie werden Reihe 11 und 12 gestrickt, es sind ja nur die ersten und letzten 6 Reihen gezeichnet? Wenn ich nach Reihe 10 wieder bei Reihe 1 beginne, stimmt mir das Zopfmuster nicht. Bitte um Info. Danke, lg, Susi
10.02.2018 - 15:57DROPS Design answered:
Liebe Frau Schweighofer, nach den 9. Reihen wiederholen Sie das mittlere Muster von Reihe 1 gleichzeitig die 6 ersten und letzten Maschen in A.1 wie im Diagram stricken, nach der 12. Reihe diese 2 x 6 M von der Reihe 1 wiederholen. Viel Spaß beim stricken!
12.02.2018 - 08:46
![]() Margret Schaloske wrote:
Margret Schaloske wrote:
Hallo, wie komme ich zu Beginn der Passe von 130 M(bei L) auf 158M Es werden doch nur 2x3(bei je 28M) und 1x4 bei 56 M zugenommen,sind 10M wieso 9xZunahme?? Bitte um Aufklärung!? Danke und freundlichen Gruß Margret schaloske
09.01.2018 - 17:23DROPS Design answered:
Liebe Frau Schaloske, in der Größe L stricken Sie: 28 Maschen rechts stricken und gleichzeitig 3 Maschen gleichmäßig verteilt zunehmen (28+3=31) – * 1 Umschlag, 1 Masche rechts *, von *-* insgesamt 9 x arbeiten (= 2x9=18) , 56 Maschen rechts stricken und 4 Maschen gleichmäßig verteilt zunehmen (56+4=60), * 1 Umschlag, 1 Masche rechts *, von *-* insgesamt 9 x arbeiten (2x9=18), 28 Maschen rechts und 3 Maschen gleichmäßig verteilt zunehmen (28+3) = 31+18+60+18+31= 158 M. Viel Spaß beim stricken!
10.01.2018 - 08:50
![]() Elin Stensholm wrote:
Elin Stensholm wrote:
Hvordan strikkes rad 11 og 12 på A1? Der det er blankt i midten
12.12.2017 - 11:32DROPS Design answered:
Hei Elin. Da begynner du på rad 1 igjen, mens flettene (der diagrammet går høyeste) i siden strikkes etter diagrammet (2 omganger til før du starter på omgang 1 igjen). Dette er fordi flettene i siden ikke går opp med mønstret i midten i høyden av A.1. God Fornøyelse!
12.12.2017 - 14:33
![]() Helle wrote:
Helle wrote:
Hei. Det er to blanke ruter i tegnforklaringen, hvor den ene sier 2 r sm, og rett på retten og vrang på vrangen. Regner med at 2 r sm skal ha motsatt strek av løft en strikk en løft første over. :)
09.11.2017 - 07:48
![]() Marie wrote:
Marie wrote:
Bonjour, et merci pour ce joli modèle. On doit faire des augmentations pour le raglan entre une maille endroit et une maille envers d'un coté et une maille envers et une maille endroit de l'autre. Quels types de jetés doit-on faire pour avoir des jours de la même dimension des deux côtés du raglan ?
30.10.2017 - 07:48DROPS Design answered:
Bonjour Marie, faites le même type de jeté, et essayez de les faire et de les tricoter de la même façon pour qu'ils aient la même taille - après le lavage/blocage, ils devraient ensuite s'égaliser, n'hésitez pas à vérifier sur un échantillon au préalable si besoin. Bon tricot!
30.10.2017 - 10:31
![]() Loredana wrote:
Loredana wrote:
Buongiorno, sono arrivata alla divisione delle maglie tra dietro,davanti e maniche. Le istruzioni dicono di continuare con gli schemi A2 e A3 e a dritto le maglie intermedie (16 ).... le maglie aumentate sotto le maniche vanno lavorate a dritto? Grazie Loredana
20.10.2017 - 13:28DROPS Design answered:
Buongiorno Loredana. Le maglie aumentate sotto le maniche vanno lavorate a diritto. Buon lavoro!
20.10.2017 - 13:55
Für Elise#furelisesweater |
||||||||||||||||||||||
 |
 |
|||||||||||||||||||||
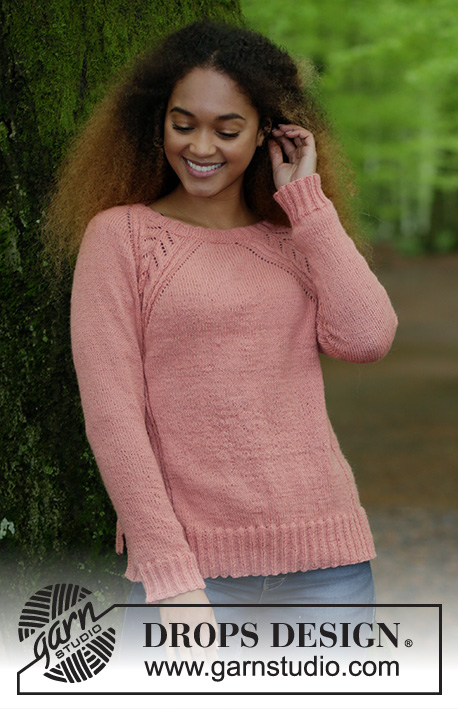
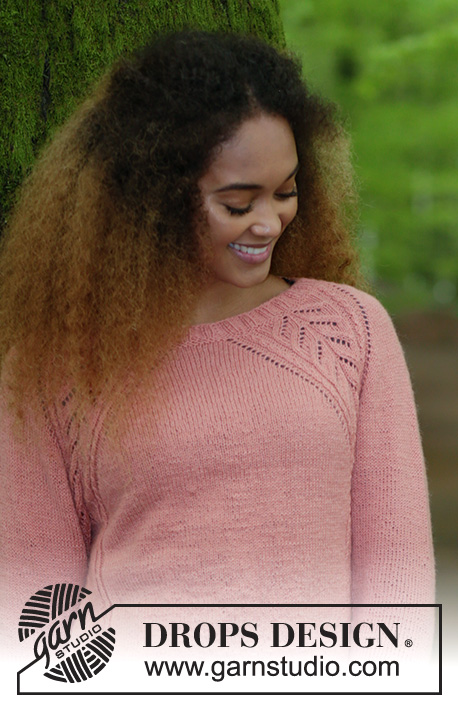
Knitted jumper with raglan, lace pattern, cables, and A-shape, knitted top down. Size: S - XXXL Piece is knitted in DROPS Flora.
DROPS 179-23 |
||||||||||||||||||||||
|
INFORMATION FOR PATTERN: GARTER STITCH (back and forth): 1 ridge = knit 2 rows. INCREASE TIP (evenly): To calculate how to increase evenly, use the number of stitches increases are done over (e.g. 28 stitches) and divide this number by number of increases to be done (e.g. 3) = 9.3. I.e. in this example increase by making a yarn over after approx. every 9th stitch. On next round knit the yarn over twisted to avoid hole. PATTERN: See diagrams A.1 to A.3. Diagrams show all rows in pattern seen from the right side. RAGLAN: Increase for raglan on each side of every repetition A.1 (= 8 increases on round) Increase 1 stitch by making 1 yarn over on each side of A.1. On next round knit the yarn overs to make holes. INCREASE TIP (applies to sides of body): Work until 5 stitches remain before marker, make 1 yarn over, knit 10 (marker thread is in the middle of these 10 stitches), make 1 yarn over (= 2 stitches increased). On next round knit yarn overs twisted to avoid holes. ---------------------------------------------------------- JUMPER: Worked in the round on circular needle. Work top down. Beginning of round is mid back. Work sleeves in the round on double pointed needles. YOKE: Cast on 125-125-130-130-140-145 stitches on a short circular needle size 2.5 mm / US 1.5 with Flora. Knit 1 round. Then work rib = knit 2/purl 3 until piece measures 3 cm / 1". Knit 1 round while increasing stitches as follows: Knit 28-28-28-28-30-30 while AT THE SAME TIME increasing 1-3-3-3-3-4 stitches evenly over these stitches – read INCREASE TIP (evenly), * 1 yarn over, knit 1 *, work *-* 6-6-9-9-10-12 times in total, knit 57-57-56-56-60-61 while AT THE SAME TIME increasing 3-3-4-4-4-5 stitches evenly over these stitches, * 1 yarn over, knit 1 *, work from *-* 6-6-9-9-10-12 times in total, knit 28-28-28-28-30-30 while AT THE SAME TIME increasing 1-3-3-3-3-4 stitches evenly over these stitches = 142-146-158-158-170-182 stitches. Knit 1 round where all the yarn overs are knitted twisted (to avoid holes). Purl 1 round, knit 1 round and purl 1 round. Switch to circular needle size 3 mm / US 2.5. REMEMBER THE GAUGE! Now work pattern as follows: Knit 5-6-9-9-12-15 (= half back piece), A.1 (= 28 stitches), knit 5 (= sleeve), A.1, knit 10-12-18-18-24-30 stitches (= front piece), A.1, knit 5 (= sleeve), A.1, knit 5-6-9-9-12-15 (= half back piece). Continue pattern like this AT THE SAME TIME on next round begin increase for RAGLAN – see explanation above. Increase like this every other round 23-27-29-33-36-38 times in total = 326-362-390-422-458-486 stitches. Work without increase until piece measures 22-25-26-28-30-31 cm / 8¾"-9¾"-10¼"-11"-11¾"-12¼" from cast-on edge mid back and down! Now divide piece for body and sleeves. NOTE: Middle of A.1 is not transition between body and sleeves! Continue with A.2 (= 6 stitches) over the first 6 stitches in A.1 and work A.3 (= 6 stitches) over the last 6 stitches in A.1, knit over the middle 16 stitches of A.1. Work next row as follows: Work 46-50-54-60-66-72 stitches (= half back piece), slip the next 71-81-87-91-97-99 stitches on a stitch holder (= sleeve), cast on 8-10-12-12-14-16 new stitches under sleeve, work the next 92-100-108-120-132-144 stitches (= front piece), slip the next 71-81-87-91-97-99 stitches on a stitch holder (= sleeve), cast on 8-10-12-12-14-16 new stitches under sleeve, work the remaining 46-50-54-60-66-72 stitches (= half back piece). NOW MEASURE PIECE FROM HERE! BODY: = 200-220-240-264-292-320 stitches. Insert 1 marker thread in the middle of the new stitches cast-on under each sleeve in each side (= 4-5-6-6-7-8 new stitches on each side of marker thread) and 100-110-120-132-146-160 stitches between marker threads. Continue in the round in stockinette stitch, A.2 and A.3 as before. When piece measures 4 cm / 1½", increase 1 stitch on each side of marker thread in the side - read INCREASE TIP (= 4 stitches increased). Increase like this every 6th round 10 times in total in all sizes = 240-260-280-304-332-360 stitches. When piece measures 23-22-23-23-23-24 cm / 9"-8¾"-9"-9"-9"-9½", divide the piece for front and back piece as follows: Work the first 28-33-38-42-48-53 stitches and increase at the same time 9-12-14-18-19-22 stitches evenly, work A.2, work 25-25-25-27-28-30 stitches and increase at the same time 7-7-7-10-9-12 stitches evenly, bind off the next 2 stitches (= vent), work 25-25-25-27-28-30 stitches and increase at the same time 7-7-7-10-9-12 stitches evenly, work A.3, work 56-66-76-84-96-106 stitches and increase 18-23-28-35-38-43 stitches evenly, work A.2, work 25-25-25-27-28-30 stitches and increase at the same time 7-7-7-10-9-12 stitches evenly, bind off the next 2 stitches (= vent), work 25-25-25-27-28-30 stitches and increase at the same time 7-7-7-10-9-12 stitches evenly, work A.3, work the remaining 28-33-38-42-48-53 stitches and increase at the same time 9-11-14-17-19-21 stitches evenly. Cut the yarn. Slip the stitches for back piece on a stitch holder. RIB FRONT PIECE: = 150-165-180-205-220-245 stitches. Work rib back and forth. Switch to circular needle size 2.5 mm / US 1.5. Work from right side as follows: 4 stitches in garter stitch, knit 2, * purl 3, knit 2 *, work from *-* until 4 stitches remain on row BUT continue with A.2 and A.3 over cables as before, and finish with 4 stitches in garter stitch. Continue like this back and forth until rib measures 7 cm / 2¾". Bind off stitches with knit over knit and purl over purl. To avoid a tight bind-off edge bind off with a needle in a larger size. RIB BACK PIECE: = 150-165-180-205-220-245 stitches. Work as on rib on front piece. SLEEVE: Slip the 71-81-87-91-97-99 stitches from stitch holder in one side of piece on double pointed needles size 3 mm / US 2.5 and pick in addition up 1 stitch in each of the 8-10-12-12-14-16 new stitches cast on under sleeve = 79-91-99-103-111-115 stitches. Insert a marker thread in the middle of the new stitches cast-on under sleeve (= 4-5-6-6-7-8 new stitches on each side of marker thread). Beginning of round is mid under sleeve. Work in stockinette stitch in the round but continue with A.2/A.3 over the 2 small cables from raglan line. When sleeve measures 4 cm / 1½" from division, decrease as follows: First decrease mid under sleeve: Work until 5 stitches remain before marker and knit 2 together, knit 6 (marker is between these stitches), slip 1 stitch knitwise, knit 1, pass slipped stitch over stitch worked (= 2 stitches decreased). Decrease like this every 8th-5th-4th-4th-3rd-3rd round 3-5-7-5-6-6 times in total = 73-81-85-93-99-103 stitches. Then decrease on the opposite side of A.2/A.3 (= on top side of sleeve), i.e. decrease as follows: Knit 5, work A.3, knit 1, knit 2 together, knit until 3 stitches remain before A.2, slip 1 stitch knitwise, knit 1, pass slipped stitch over (= 2 stitches decreased). Decrease like this every 8th-5th-4th-4th-3rd-3rd round 10-14-15-18-20-21 times in total = 53-53-55-57-59-61 stitches. Continue with stockinette stitch and A.2/A.3 until sleeve measures 38-35-35-33-31-31 cm / 15"-13¾"-13¾"-13"-12¼"-12¼" from division (NOTE: Shorter measurements in the larger sizes because of longer yoke). Work next round as follows: Work 5 stitches while increasing 2 stitches evenly, work A.3, work 31-31-33-35-37-39 stitches while increasing 8-8-11-9-7-10 stitches evenly, work A.2, work 5 stitches while increasing 2 stitches evenly = 65-65-70-70-70-75 stitches. Switch to double pointed needles size 2.5 mm / US 1.5. Now work rib as follows: Knit 1, purl 3, knit 2, purl 1, A.3, purl 1, * knit 2, purl 3 *, work from *-* 7-7-8-8-8-9 times, knit 2, purl 1, A.2, purl 1, knit 2, purl 3, knit 1. Continue rib in the round like this until rib measures 5 cm / 2". Bind off stitches with knit over knit and purl over purl. To avoid a tight bind-off edge bind off with a needle in a larger size. Sleeve measures approx. 43-40-40-38-36-36 cm / 17"-15¾"-15¾"-15"-14¼"-14¼" from division. Work the other sleeve the same way. |
||||||||||||||||||||||
Diagram explanations |
||||||||||||||||||||||
|
||||||||||||||||||||||
 |
||||||||||||||||||||||
 |
||||||||||||||||||||||
Have you finished this pattern?Tag your pictures with #dropspattern #furelisesweater or submit them to the #dropsfan gallery. Do you need help with this pattern?You'll find 26 tutorial videos, a Comments/Questions area and more by visiting the pattern on garnstudio.com. © 1982-2026 DROPS Design A/S. We reserve all rights. This document, including all its sub-sections, has copyrights. Read more about what you can do with our patterns at the bottom of each pattern on our site. |
||||||||||||||||||||||


Post a comment to pattern DROPS 179-23
We would love to hear what you have to say about this pattern!
If you want to leave a question, please make sure you select the correct category in the form below, to speed up the answering process. Required fields are marked *.