
Popular categories
Looking for a yarn?


Comments / Questions (23)
![]() Leeanne wrote:
Leeanne wrote:
Addtnl. info for my last comments: I was confused by the first sentence in the short rows instructions stating to do 6 rows over all stitches. I thought that was part of the directions and the piece started with 6 rows before starting the short row repeat cycle but that is incorrect. This sentence is just telling you that there are 6 rows included in the short row instruction cycle that are not, in fact, short rows – 6 full rows and 2 short rows (not in that order) are listed in the row cycle.
06.09.2025 - 15:15
![]() Leeanne wrote:
Leeanne wrote:
(Cont. from previous two comments) next row starts with R3 and finishes with L3 and last row starts with L4 and finishes with R4. Then you start the cycle again with the first short row. So yes, the short row cycle is short row, full row, short row, full row, full row, full row, full row, full row as the pattern states (1 SR followed by 1 full row followed by 1 SR followed by 5 full rows). There are no edges in which you are not doing a picot edge instruction which allows for an even 8 row cycle
06.09.2025 - 15:08
![]() Leeanne wrote:
Leeanne wrote:
(continued from my previous comment) work the L2 row to the first marker and turn to work back to the “beginning” of the left side row, ending with L3, turn and start a new row with L4, working all the way across, ending with R4, (all the remaining rows in the cycle go all the way across – no more short rows) next row begins with R1 and goes all the way across to the last 4 stitches, ending in L1, turn and start with L2 and go all the way across to finish with R2, (cont. in next comment)
06.09.2025 - 15:03
![]() Leeanne wrote:
Leeanne wrote:
For anyone that needs it, here is the cycle of rows, combining picot edge with short rows instructions (it helps to draw this out on paper): start with right side 1 (R1) and work a short row (to first marker only, not all the way across), turn and work back to the beginning and knit the last four with R2, turn to start next row beginning with R3 and knit all the way across, ending this row with L1, then start the second short row with L2, (continued in next comment)
06.09.2025 - 14:58
![]() Leeanne wrote:
Leeanne wrote:
I figured it out! It is definitely not too complicated but they could have written this pattern differently so it wouldn’t take weeks or trial and error to figure out how to work the short rows in with the picot edge. Maybe we were just making it too complicated. I don’t have enough room to write the pattern in this comment so I’ll start a new one. It is easier to draw your lines and mark each end with the picot line number but I’ll try to write it here in my next comment.
06.09.2025 - 14:55
![]() Leeanne wrote:
Leeanne wrote:
I think I get it! I will test it in the morning and comment again trying to explain it for others if I have it right. My last two comments are wrong for sure. It helps to draw the rows as a picture on paper and mark the ends with the line number.
06.09.2025 - 05:10
![]() Leeanne wrote:
Leeanne wrote:
Revising my last comment: I now have it written as: short row, R1 &L1 on the same row, short row, R2 & L2, short row, R3 & L3, short row, R4 & L4. But this adds up to 8 rows on the sides and only 4 rows in the middle, not 6. Also not sure why the short rows directions refers to the middle stitches as being 70 (for the second size) when it’s only 30 (if excluding 25 on each end) or 72 (if excluding only the outermost 4 on each end).
06.09.2025 - 04:26
![]() Leanne wrote:
Leanne wrote:
The directions for the short rows are difficult to figure out. I’ve been working at this for a few weeks with my MIL, have restarted my project 7 times and we still don’t have it right. So we are alternating between right and left rows 1, 2, etc. when doing full rows? We are not doing any picot edge instructions when doing short rows, correct? To incoorporate the short rows, does it go: left row 1, right row 1, short row, left row 2, right row 2, short row, etc. through all four edge rows?
06.09.2025 - 02:40
![]() Leeanne wrote:
Leeanne wrote:
In addition to my last comment, I’m also confused because it says for garter stitch to knit two rows. The main directions says start with the right Picot edge, then knit the directions for garter stitch for the rest of the row, except for the last four and then knit the directions for the left edge on the last four. How do you knit two rows for the garter stitch directions in between doing the right and left edges?
14.07.2025 - 19:22DROPS Design answered:
Dear Leeanne, the garter stitch structure is 2 knit rows. So whenever most of the stitches in the row are knitted, both from the right side and the wrong side, the resulting texture will be garter stitch. In the picot edges we are already using garter stitch, since all other stitches except for the 4 stitches on each side for the picot are knitted from the right side and the wrong side. So you just need to work as indicated; the edges will have the picot texture while the remaining stitches are knitted. Happy knitting!
19.07.2025 - 17:47
![]() Leeanne wrote:
Leeanne wrote:
A video of the actual pattern, please! This is so confusing. I’ve now learned how to do picot edges and short rows, but I can’t understand how to do both at the same time. How do you know which row of the picot edge you’re on if you’ve turned around and gone the other direction halfway through a row? And then when you start the next row do you count as if half the row is row 5 and half is row 6 or just continue with the next direction for that edge in sequence, ignoring row numbers?
14.07.2025 - 19:18DROPS Design answered:
Dear Leeanne, please remember to mark your comments as questions so that we can see them and answer sooner. When you are combining the short rows and the picot edges, count only the rows where you reach the edges; those rows where you turn before reaching the edges are not taken into account for the picot edges on that side. Happy knitting!
19.07.2025 - 17:48
|
|
Berry Kiss#berrykissvest |
|
 |
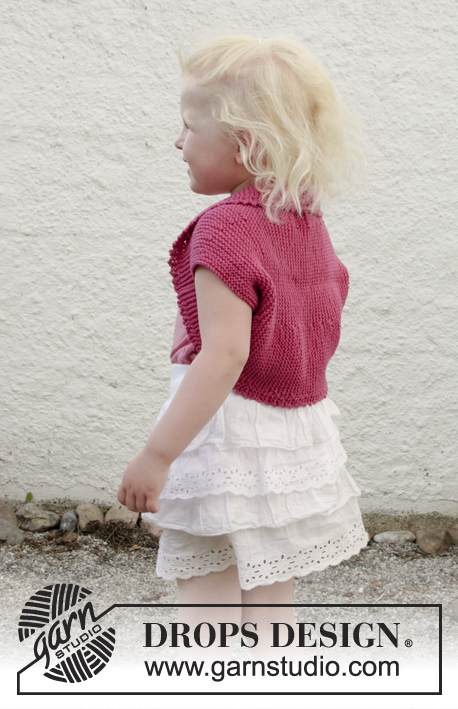 |
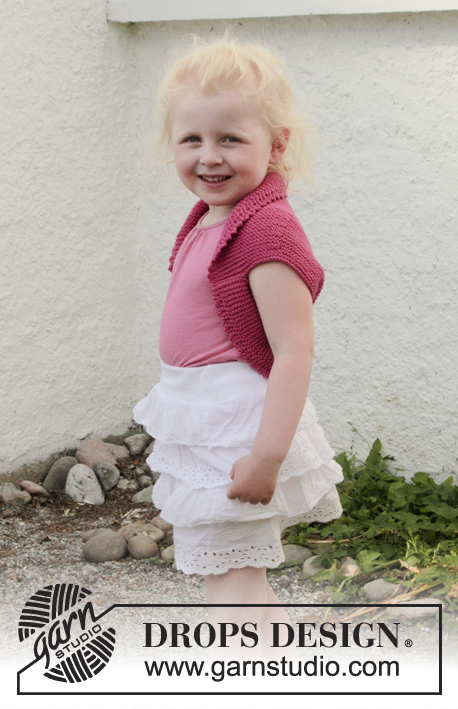
Knitted bolero with short rows, picot edges and garter stitch in DROPS Cotton Merino. Size children 3 - 12 years.
DROPS Children 28-7 |
|
|
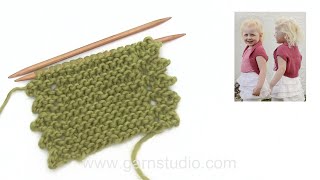
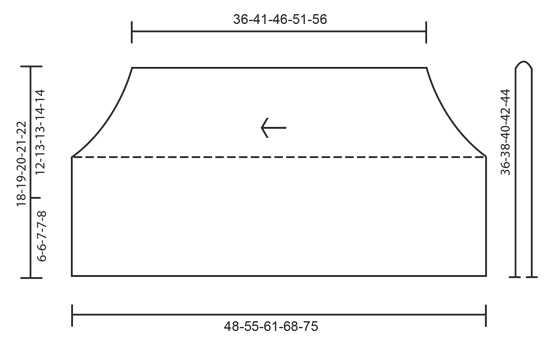
GARTER STITCH (Worked back and forth): 1 ridge = Knit 2 rows. PICOT EDGE (back and forth on the needle): RIGHT SIDE: ROW 1 (= right side): Knit. ROW 2 (= wrong side): Knit until there are 4 stitches left, these are worked as follows: Knit 2 together, 1 yarn over, in each of the 2 last stitches knit 2 stitches = 2 new stitches on the needle. ROW 3 (= right side): Slip the 1st stitch as if to knit, knit 1, pass the slipped stitch over, knit 1 and pass the rearmost stitch on the right needle over the foremost, 2 stitches have been decreased – then knit the rest of the row. ROW 4 (= wrong side): Knit. Repeat rows 1 to 4. LEFT SIDE: ROW 1 (= right side): Knit until there are 4 stitches left, these are worked as follows: Knit 2 together, 1 yarn over, in each of the 2 last stitches knit 2 stitches = 2 new stitches on the needle. ROW 2 (= wrong side): Slip the 1st stitch as if to knit, knit 1, pass the slipped stitch over, knit 1 and pass the rearmost stitch on the right needle over the foremost, 2 stitches have been decreased – then knit the rest of the row. ROW 3 (= right side): Knit. ROW 4 (= wrong side): Knit. Repeat rows 1 to 4. SHORT ROWS: Work 6 rows over all stitches, * work 24-25-26-27-28 stitches (to the first marker), turn, tighten the strand and work to end of row. Work 1 row over all stitches, turn, work 24-25-26-27-28 stitches (to the first marker), turn, tighten the strand and work to end of row. Work 5 rows over all stitches *, repeat from *-*. In other words, you work 6 rows garter stitch (= 3 ridges) over the middle 66-70-72-80-86 stitches and 8 rows garter stitch (4 ridges) over the stitches in each side in each repeat. -------------------------------------------------------- BOLERO: The piece is worked sideways, back and forth with circular needle from armhole to armhole. Then the bolero is folded double and the side seams are sewn. Cast on 76-80-84-88-92 stitches with Cotton Merino and circular needle size 4 mm / US 6. Insert 1 marker in the piece 24-25-26-27-28 stitches in from each side (= 28-30-32-34-36 stitches between the markers). Work as follows – from the right side: PICOT EDGE RIGHT SIDE, GARTER STITCH – see descriptions above, over the next 68-72-76-80-84 stitches, PICOT EDGE LEFT SIDE over the next 4 stitches. REMEMBER THE GAUGE! Continue with garter stitch and picot edge over the outermost 4 stitches in each side, AT THE SAME TIME work SHORT ROWS – see description above! When the piece measures approx. 36-41-46-51-56 cm / 14¼"-16"-18"-20"-22" (measured at the shortest point) loosely bind off. ASSEMBLY: Fold the bolero double – the sketch shows the piece when it has been folded. Sew the bottom 6-6-7-7-8 cm / 2¼"-2¼"-2¾"-2¾"-3" together, edge to edge in each side (= 12-13-13-14-14 cm / 4¾"-5"-5"-5½"-5½" armhole). |
|
 |
|
Have you finished this pattern?Tag your pictures with #dropspattern #berrykissvest or submit them to the #dropsfan gallery. Do you need help with this pattern?You'll find 17 tutorial videos, a Comments/Questions area and more by visiting the pattern on garnstudio.com. © 1982-2026 DROPS Design A/S. We reserve all rights. This document, including all its sub-sections, has copyrights. Read more about what you can do with our patterns at the bottom of each pattern on our site. |
|


With over 40 years in knitting and crochet design, DROPS Design offers one of the most extensive collections of free patterns on the internet - translated to 17 languages. As of today we count 324 catalogs and 12290 patterns - 12280 of which are translated into English (US/in).
We work hard to bring you the best knitting and crochet have to offer, inspiration and advice as well as great quality yarns at incredible prices! Would you like to use our patterns for other than personal use? You can read what you are allowed to do in the Copyright text at the bottom of all our patterns. Happy crafting!
Post a comment to pattern DROPS Children 28-7
We would love to hear what you have to say about this pattern!
If you want to leave a question, please make sure you select the correct category in the form below, to speed up the answering process. Required fields are marked *.