
Popular categories
Looking for a yarn?


Comments / Questions (16)
![]() Maria wrote:
Maria wrote:
Ho lo stesso problema segnalato da Monica tempo fa.:Buongiorno nelle istituzioni per il davanti è indicato di ripetere A2 per 2 volte in totale nella parte fra il 1 e 2 marker, e poi continuare a legaccio, dalla foto sembrerebbe che A2 venga invece ripetuto una volta soltanto nella parte destinata allo scollo, vorrei un chiarimento. Potreste spiegare?
18.02.2024 - 11:22DROPS Design answered:
Buonasera Maria, quale taglia sta lavorando? A.2 viene ripetuto 1 volta per le taglie S e M. Buon lavoro!
17.03.2024 - 19:07
![]() Teresa wrote:
Teresa wrote:
Me encantaría poder hacer esta prenda pero las instrucciones son extremadamente complejas y temo empezar para no poder terminar. No entiendo como se hace el primer cuadrado de partida con 8-8-8-8-8 yo entiendo que solo son 4 grupos de 8, no 5 y por otra parte la 5ª aguja se usa para tricotar los puntos de las otras 4 no?
24.01.2019 - 01:30DROPS Design answered:
Hola Teresa. Todos los patrones de Drops están escritos para las tallas S-XXL. Cuando hay números seguidos como en tu caso ( 8-8-8-8-8 ) significa, que para la talla S hay que montar 8 puntos, para la talla M - 8 puntos etc. Después estos 8 puntos se reparten en 4 agujas para trabajar. Si solo hay un número es porque es el mismo para todas las tallas.
24.01.2019 - 15:21
![]() Britt Dagkvist wrote:
Britt Dagkvist wrote:
Jag har köpt garn till denna tröja. Förstår inte riktigt hur jag stickar den. Skall börja med strumpstickor. Sen när det gäller mönstret, skall man bara räkna detta från rätsidan?
06.10.2018 - 13:54DROPS Design answered:
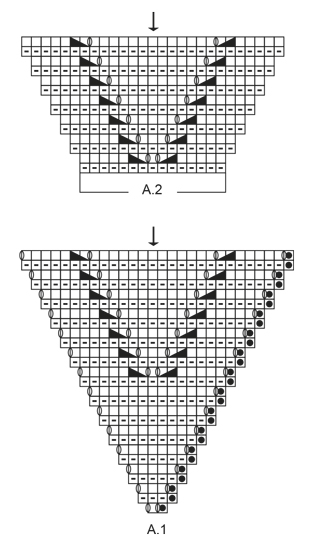
Hej Britt, du stickar framstycket från mitten och ut, dvs att du bara stickar från rätsidan. Du stickar och ökar enligt A.1. Diagram A.1 stickas 4 ggr på varje varv. Lycka till :)
09.10.2018 - 09:41
![]() Nataliya wrote:
Nataliya wrote:
Hvordan kan man sjekke ferdig mål når alt er på rundpinner i en slag av lomme? Man får ikke å strekke arbeidet for å måle. Det var en kommentar. Sporsmål: jeg er nesten ferdig med forstykket og forstår ikke hvordan å felle?Hva er delen som skal strikkes 2 pinner til? Hvorfor?
26.04.2018 - 20:07
![]() Marie Mamieflo wrote:
Marie Mamieflo wrote:
Merci beaucoup J'ai réessayé avec une autre laine et là ça va tout seul. Mais avec cette laine Brushed Alpaca Silk très fine et poilue, ce n'est vraiment pas facile . je vais m'y remettre à nouveau, mais...
07.03.2018 - 17:09
![]() Marie wrote:
Marie wrote:
Je n'y arrive pas . J'ai compris le montage, compris le diagramme mais cela fait quatre fois que je recommence et pour moi c'est impossible avec ces 4 aiguilles , pourtant je tricote beaucoup de chaussettes, robes pulls adultes enfants bébés mais là, j'abandonne , que faire de mes deux manches, de la laine ?
06.03.2018 - 21:18DROPS Design answered:
Bonjour Marie, vous pouvez essayer avec la technique du magic loop, certaines la préfère aux 4 aiguilles. Le début peut paraître un peu complexe, mais ça vaut le coup de s'y attacher. Cette vidéo montre le début d'un carré d'un autre modèle et pourra peut-être vous aider à avancer. N'hésitez pas à vous adresser à votre magasin, il pourra fort probablement vous aider. Bon tricot!
07.03.2018 - 08:34
![]() Marie wrote:
Marie wrote:
J'ai tricoté les deux manches mais pour le devant je ne comprends pas cela ne se tricote pas en rond ? mais en aller et retour j'ai essayé deux fois, c'est difficile le démarrage. J'ai tout défait, j'ai besoin d'aide. Merci
02.03.2018 - 21:59DROPS Design answered:
Bonjour Marie, le devant se tricote en rond à partir du milieu du motif, on va d'abord tricoter un carré (=4 x A.1) puis A.2. Quand le carré aura la bonne taille, on va glisser en attente les mailles de l'encolure et continuer en allers et retours à partir de l'encolure. Bon tricot!
05.03.2018 - 08:15
![]() Irina P wrote:
Irina P wrote:
Verstehe! Vielen Dank für die schnelle Antwort! Der Pulli wird echt schön wrden. Stricke mit original Wolle in der gleichen Farbe. DANKE
05.02.2018 - 11:24
![]() Irina.P wrote:
Irina.P wrote:
Hallo liebe Federica, habe Vorder-und Rückenteil fertig gestrickt, nun sind die Ärmel dran, aber , ich verstehe nicht wie die Lochstreifen verlaufen sollen. Leider kann man es auch auf dem Foto nicht siehen, Sind es zwei Streifen insgesamt ?
05.02.2018 - 01:04DROPS Design answered:
Liebe Irina, mitte unter der Ärmel wird man Maschen zunehmen - siehe ZUNAHMEINFO, damit es immer Löcher mitte unter der Ärmel gibt, wird man stricken wie unter LOCHSTREIFEN (Ärmel) beschrieben. Viel Spaß beim stricken!
05.02.2018 - 10:36
![]() Monica wrote:
Monica wrote:
Ho notato che sono state apportate delle correzioni al testo del pattern che io ho stampato tempo addietro. Mi potete indicare quali sono le modifiche?
22.12.2017 - 05:19DROPS Design answered:
Buongiorno Monica. Le modifiche sono modifiche di terminologia e sono davvero molto limitate. Non sono state modificate misure o numero delle maglie. Buon lavoro!
24.12.2017 - 11:26
|
||||||||||||||||||||||
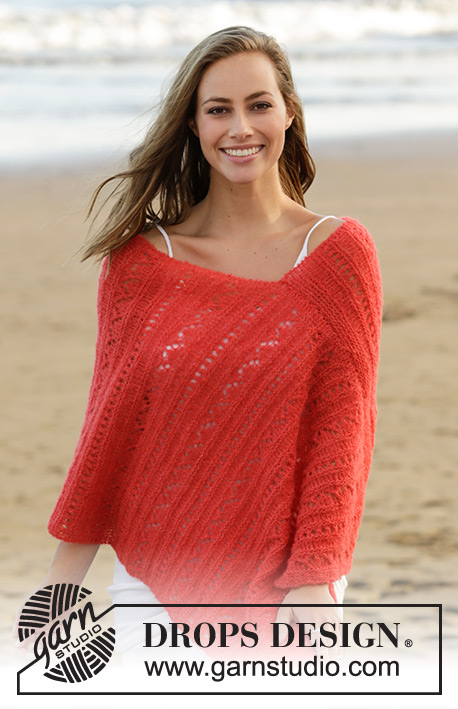
Center of my Heart#centerofmyheartsweater |
||||||||||||||||||||||
 |
 |
|||||||||||||||||||||
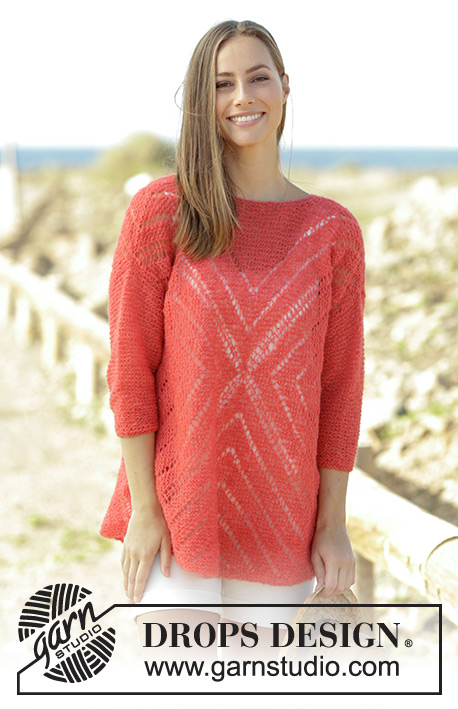
Jumper with lace pattern, worked from middle and outwards in a square in DROPS Brushed Alpaca Silk. Size: S - XXXL
DROPS 178-56 |
||||||||||||||||||||||
|
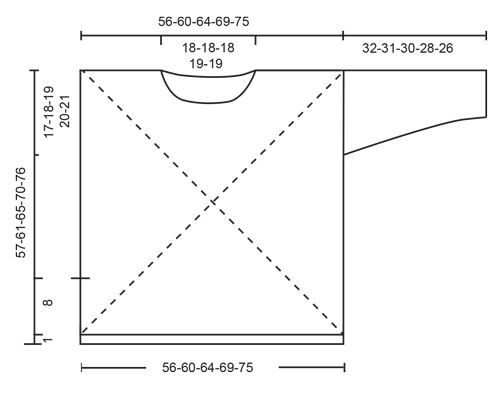
GARTER STITCH (worked in the round): 1 ridge = 2 rounds. Knit 1 round and purl 1 round. GARTER STITCH (back and forth): 1 ridge = knit 2 rows. PATTERN: See diagrams A.1 and A.2. Diagrams show all rows in pattern seen from the right side. EYELET ROW: New eyelet rows begins in the middle of 2nd round of A.2 and goes diagonally towards corner stitches with markers. All eyelet rows in A.1 and A.2 continues outwards until the entire part is finished. Diagram A.2 (= 14 rounds) is repeated vertically until part is finished (except from the neck-side). Make sure that stitches with arrow is placed directly above each other. HOLES (sleeve): On the sleeves there are eyelet rows towards the seam under sleeve, knit on rows with increases and increase with yarn overs = holes. On all other rows work as follows: ROW 1 (= right side): Knit 2, 1 yarn over, slip 1 stitch knitwise, knit 1, pass slipped stitch over stitch worked, knit until 4 stitches remain, knit 2 together, 1 yarn over, knit 2. ROW 2 (= wrong side): Knit all stitches. Repeat these 2 rows upwards. INCREASE INFO: All increases are done from the right side. Increase 1 stitch by making 1 yarn over inside 2 stitches knit, on next row knit yarn over (should make holes). ---------------------------------------------------------- JUMPER: Work front piece and back piece separately as squares. Begin in the middle. Cast on and work on double pointed needles, switch to circular needle when needed. FRONT PIECE: Cast on 8-8-8-8-8 stitches with Brushed Alpaca Silk and divide them on 4 double pointed needles size 6 mm / US 10 (= 2 stitches per needle). Insert 1 marker in the first, third, fifth and seventh stitch (= 4 corner stitches with markers), move the markers upwards when working. The other four stitches are middle stitches. Work as follows: Work A.1 4 times in total on round. REMEMBER THE KNITTING GAUGE When A.1 has been worked vertically, there are 29-29-29-29-29 stitches between every stitch with marker in it = 120-120-120-120-120 stitches on needle. Repeat A.2 vertically – READ EYELET ROW above. Increase 1 stitch on each side of every corner stitch as before (= 8 stitches increased in total every other round) - NOTE: Between 1st and 2nd marker (= neck side) repeat A.2, 1-1-2-2-3 more times (then work this side in garter stitch), while on the other 3 sides repeat A.2 until finished measurements. Continue like this until there are 240-264-288-304-336 stitches on needle (= 29-32-35-37-41 increases and 59-65-71-75-83 stitches between every stitch with marker) and piece measures approx. 40-44-48-51-56 cm / 15¾"-17¼"-19"-20"-22". Stop after 1 round purl. Knit 1 round with pattern and increases as before, and slip the middle 15-15-15-17-17 stitches between 1st and 2nd marker on a stitch holder for neck after they have been worked. Cut the yarn. Then work piece back and forth. Begin at the neck and work next round from wrong side. Continue with GARTER STITCH - see explanation above, increases and new eyelet rows. AT THE SAME TIME bind off towards the neck as follows on every other row: Bind off at beginning of every row, 2 stitches 2 times and 1 stitch 2 times. Continue increases until there are 309-333-357-387-419 stitches on needle (= 41-44-47-51-55 increases). There are now 83-89-95-103-111 stitches between every stitch with marker, 28-31-34-37-41 stitches on each shoulder). Now continue working between 3rd and 4th marker while binding off the remaining stitches as follow: Start from the wrong side at the shoulder, cast of all stitches towards 4th marker and cast of the stitch with 4th marker, knit all stitches until the 3rd marker, cast of the remaining stitches. Cut the yarn. Start from the right side, work 2 ridges back and forth over the 83-89-95-103-111 stitches, bind off. Insert a marker thread in each side, 17-18-19-20-21 cm / 6¾"-7"-7½"-8"-8¼" down from shoulder. These show where sleeves are sewn in. BACK PIECE: Cast on and work as front piece until there are 240-264-288-304-336 stitches on needle (= 29-32-35-37-41 increases and 59-65-71-75-83 stitches between every marker thread). On back piece continue the same way until there are 288-312-336-368-392 stitches on needle (= 35-38-41-45-48 increases and 71-77-83-91-97 stitches between every marker thread). Stop after 1 round purl. Now knit 1 round with pattern and increases as before, and bind off middle 27-27-27-29-29 stitches between 1st and 2nd marker for neck. Work the rest of round and cut the yarn. Then work piece back and forth. Begin at the neck and work next row from wrong side. Continue with garter stitch, increases and eyelet rows as before. Continue increases until there are 309-333-357-387-419 stitches on needle (= 41-44-47-51-55 increases). There are now 83-89-95-103-111 stitches between every stitch with marker, 28-31-34-35-41 stitches on each shoulder). Now continue working between 3rd and 4th marker while binding off the remaining stitches as follow: Start from the wrong side at the shoulder, cast of all stitches towards 4th marker and cast of the stitch with 4th marker, knit all stitches until the 3rd marker, cast of the remaining stitches. Cut the yarn. Start from the right side, work 2 ridges back and forth over the 83-89-95-103-111 stitches, bind off. Insert a marker thread in each side, 17-18-19-20-21 cm / 6¾"-7"-7½"-8"-8¼" down from shoulder. These show where sleeves are sewn in. SLEEVE: Work piece back and forth on circular needle. Cast on 33-34-35-36-39 stitches on circular needle size 6 mm / US 10 with Brushed Alpaca Silk. Work 2 ridges. Continue in garter stitch and with HOLES – see explanation above. When piece measures 3-4-4-2-4 cm / 1"-1½"-1½"-¾"-1½", increase 1 stitch on each side – read INCREASE INFO. Repeat increase every 3-2½-2-2-1½ cm / 1"-⅞"-¾"-¾"-½" 9-10-11-12-12 more times = 53-56-59-62-65 stitches. Bind off when piece measures 32-31-30-28-26 cm / 12½"-12¼"-11¾"-11"-10¼" (shorter measurements in the larger sizes because of wider shoulders). ASSEMBLY: Sew the shoulder seams. Sew in sleeves, down to markers on front/back piece. Sew underarm seams and side seams in one inside 1 edge stitch, stop when 9 cm / 3½" remain = vents. NECK EDGE: Pick up approx. 66 to 74 sts (including stitches on stitch holder) on a short circular needle around the neck. Work 2 ridges in the round and bind off. |
||||||||||||||||||||||
Diagram explanations |
||||||||||||||||||||||
|
||||||||||||||||||||||
 |
||||||||||||||||||||||
 |
||||||||||||||||||||||
Have you finished this pattern?Tag your pictures with #dropspattern #centerofmyheartsweater or submit them to the #dropsfan gallery. Do you need help with this pattern?You'll find 25 tutorial videos, a Comments/Questions area and more by visiting the pattern on garnstudio.com. © 1982-2026 DROPS Design A/S. We reserve all rights. This document, including all its sub-sections, has copyrights. Read more about what you can do with our patterns at the bottom of each pattern on our site. |
||||||||||||||||||||||


With over 40 years in knitting and crochet design, DROPS Design offers one of the most extensive collections of free patterns on the internet - translated to 17 languages. As of today we count 325 catalogs and 12298 patterns - 12288 of which are translated into English (US/in).
We work hard to bring you the best knitting and crochet have to offer, inspiration and advice as well as great quality yarns at incredible prices! Would you like to use our patterns for other than personal use? You can read what you are allowed to do in the Copyright text at the bottom of all our patterns. Happy crafting!
Post a comment to pattern DROPS 178-56
We would love to hear what you have to say about this pattern!
If you want to leave a question, please make sure you select the correct category in the form below, to speed up the answering process. Required fields are marked *.