
Popular categories
Looking for a yarn?


Comments / Questions (16)
Marta wrote:
Hallo! Ich habe jetzt das Vorderteil gestrickt und es ist an den Seiten durch das Lochmuster sehr unregelmäßig. Ist das trotzdem richtig? Außerdem ist mein Teil in der Höhe an einer Seite länger. Habe ich was falsch gemacht? Herzlichen Dank und lieben Gruß aus Deutschland Marta
19.07.2017 - 12:49DROPS Design answered:
Liebe Marta, am besten Ihr Strickstück Ihr DROPS Laden zeigen (auch per mail), so können Sie eine bessere Antwort bekommen, prüfen Sie mal, daß die verkürzten Reihen auf beiden Seiten korrekt sind, damit beide Seiten genau so lang sind. Viel Spaß beim stricken!
20.07.2017 - 09:16
![]() Marie wrote:
Marie wrote:
Bonjour! N'y aurait-il pas une erreur dans le nombre de rangs indiqués pour l 'échantillon en point mousse: " échantillon de 21 mailles et 42 rangs au point mousse ", le 42 me parait peu probable ? Merci.
26.06.2017 - 07:19
![]() Rebecca wrote:
Rebecca wrote:
Could you please tell me if the pattern from the front bottom is triangular? I don't want to continue knitting if I'm wrong! It would have been helpful to have a photo of the entire finished jumper but as the model is seated, I don't know what the bottom is supposed to look like. Many thanks, Rebecca
05.05.2017 - 21:45DROPS Design answered:
Hi Rebecca, Yes, there will be a triangular shape at the bottom of the front and back pieces. Kind regards, Deirdre
08.05.2017 - 09:05
![]() Birgit wrote:
Birgit wrote:
Kan det være feil i oppskriften her? På side 2 etter andra økt med forkortede pinner står det at man skal strikke 7 riller i størrelse L mens M har 1 og XL har 3 riller. Jeg strikket etter mønsteret og er ferdig med forstykket, men den er jo over 10 cm for lang. Jeg mistenker at det skal være 2 riller og ikke 7, altså jeg har 10 riller for mye. Kommentar?
28.04.2017 - 08:30DROPS Design answered:
Hej Birgit, opskriften stemmer, så hvis du følger den og strikkefastheden, får du målene som på måleskitsen. God fornøjelse!
19.09.2017 - 08:21
![]() Jorunn Gjøslien wrote:
Jorunn Gjøslien wrote:
Det hadde vært fint med bilde av genseren, hele. Når du strikker forkortede pinner og øker med 5, skal du strikke helt tilbake eller over 10?
25.04.2017 - 09:03DROPS Design answered:
Hei Jorunn, Du skal bare strikke tilbake over 10, øker 4-4-5-5-5 masker mer på hver pinne fra vrangen og tilbake over disse maskene i tillegg. Håper dette hjelper. Mvh, Deirdre
26.04.2017 - 08:28
![]() Simone wrote:
Simone wrote:
Jubbii, jeg var bange for at denne opskrift ville gå i glemmebogen da den ikke var blandt forårsnyhederne :) Glæder mig til at strikke den :)
23.02.2017 - 10:04
|
|||||||||||||
Afternoon Stroll#afternoonstrollsweater |
|||||||||||||
 |
 |
||||||||||||
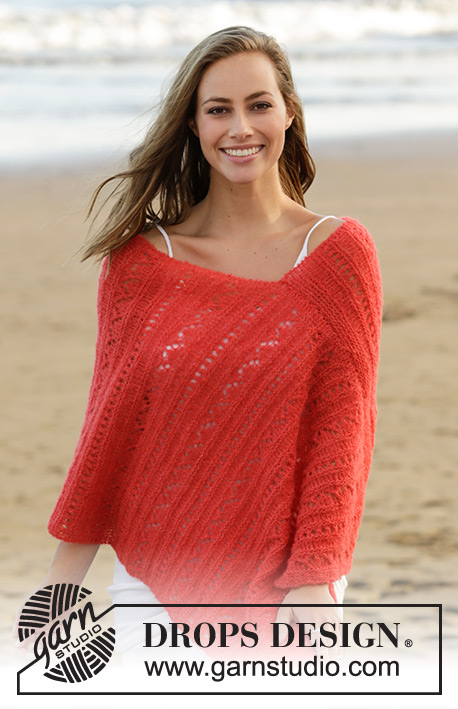
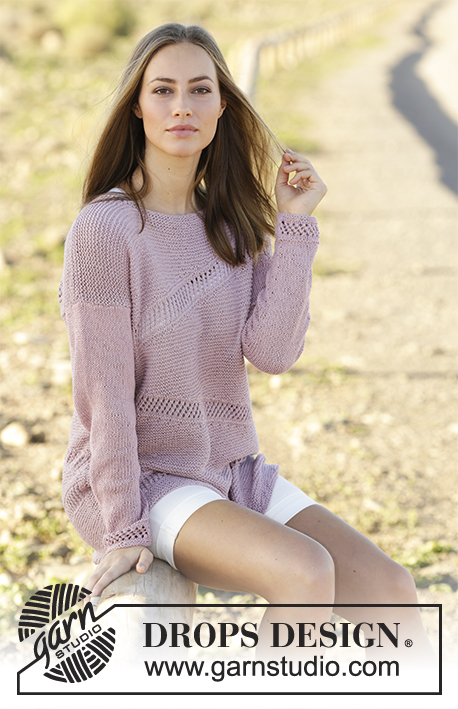
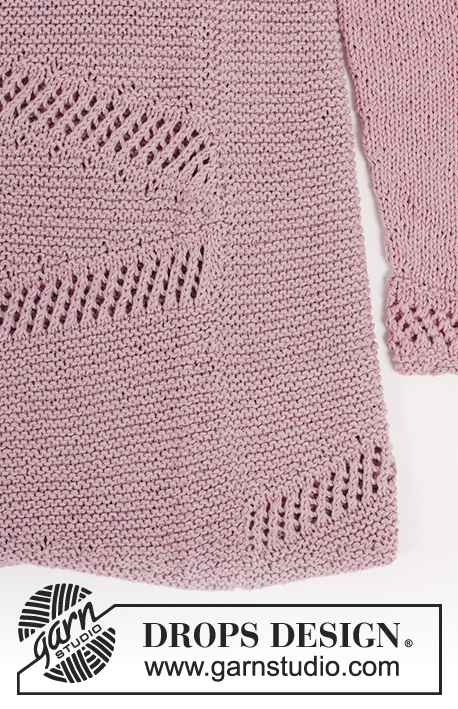
Jumper with short rows and lace pattern, worked bottom up in DROPS Belle. Size: S - XXXL
DROPS 178-14 |
|||||||||||||
|
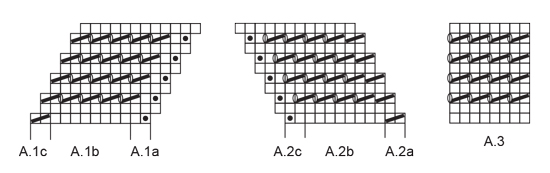
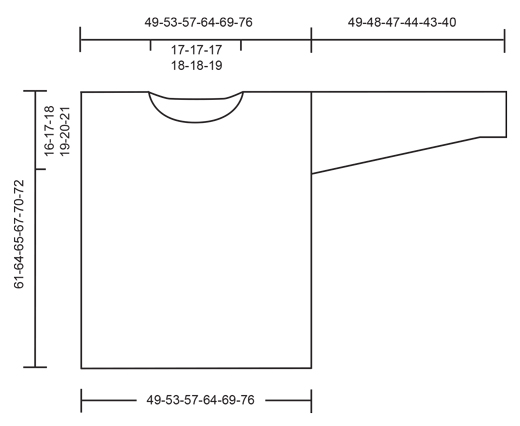
GARTER STITCH (back and forth): Knit all rows. 1 ridge = knit 2 rows. GARTER STITCH (worked in the round): 1 ridge= knit 1 round and purl 1 round. PATTERN: See diagrams A.1 to A.6. Diagrams show all rows in pattern seen from the right side. INCREASE TIP: Work until 2 stitches remain before marker thread, 1 yarn over, knit 4, 1 yarn over (= 2 stitches increased). On next round knit yarns over twisted to avoid holes. MEASURING TIP: Because of the weight of the yarn and the garter stitch, this garment will get longer in use. Length measurements on chart are shorter than the finished garment when worn. Measure the pieces flat. ---------------------------------------------------------- JUMPER: Work front and back piece back and forth on circular needle. Work sleeves in the round on double pointed needles.Read MEASURING TIP! FRONT PIECE: Cast on 104-112-120-135-145-160 stitches on circular needle size 4 mm / US 6 with Belle. Work 2 ridges in GARTER STITCH back and forth - see explanation above! Work garter stitch and short rows as follows: ROW 1 (= from right side): Knit the first 4-4-5-5-5-5 stitches, turn and tighten yarn to avoid a hole. ROW 2 (= from wrong side): Knit the 4-4-5-5-5-5 stitches. ROW 3: Knit the first 8-8-10-10-10-10 stitches, turn, tighten yarn to avoid a hole. ROW 4: Knit the 8-8-10-10-10-10 stitches. Repeat 3rd and 4th row but every time you work from right side work 4-4-5-5-5-5 stitches more than last time, finish by working 1 ridge over all stitches = 104-112-120-135-145-160 stitches. REMEMBER THE KNITTING GAUGE Then work diagram A.1 from right side as follows: Work A.1a (= 2 stitches), work A.1b until 2 stitches remain, work A.1c (= 2 stitches). When entire diagram A.1 has been worked vertically, work 1 ridge over all stitches. Work garter stitch and short rows as follows: ROW 1 (= from right side): Knit all stitches. ROW 2 (= from wrong side): K the first 4-4-5-5-5-5 stitches, turn and tighten yarn. ROW 3: Knit the 4-4-5-5-5-5 stitches. ROW 4: Knit 8-8-10-10-10-10 stitches, turn and tighten yarn. ROW 5: Knit the 8-8-10-10-10-10 stitches. Repeat 4th and 5th row but every time you work from wrong side knit 4-4-5-5-5-5 stitches more than last time, and then finish by knitting all stitches from wrong side. Work 1-1-7-3-3-1 ridge in garter stitch. Work garter stitch and short rows as follows: ROW 1 (= from right side): Knit all stitches. ROW 2 (= from wrong side): Knit until 4-4-5-5-5-5 stitches remain on row, turn and tighten yarn. ROW 3: Knit the 100-108-115-130-140-155 stitches. ROW 4: Knit until 8-8-10-10-10-10 stitches remain on row, turn and tighten yarn. ROW 5: Knit the 96-104-110-125-135-150 stitches. Repeat 4th and 5th row but every time you work from wrong side knit 4-4-5-5-5-5 stitches less than last time, and then finish by knitting 4-4-5-5-5-5 stitches from wrong side. Knit back over these 4-4-5-5-5-5 stitches, cut the yarn. Work 1 ridge over all stitches (1st row = from right side) = 104-112-120-135-145-160 stitches. Then work diagram A.2 from right side as follows: Work A.2a (= 2 stitches), repeat A.2b until 2 stitches remain, work A.2c (= 2 stitches). When entire diagram A.2 has been worked 1 time vertically, work 1 ridge over all stitches. Work garter stitch and short rows as follows: ROW 1 (= from right side): Knit 4-4-5-5-5-5 stitches, turn and tighten yarn. ROW 2 (= from wrong side): Knit 4-4-5-5-5-5 stitches. ROW 3: Knit 8-8-10-10-10-10 stitches, turn and tighten yarn. ROW 4: Knit 8-8-10-10-10-10 stitches. Repeat 3rd and 4th row but every time you work from right side knit 4-4-5-5-5-5 stitches more than last time, and then finish by knitting all stitches. Work 1-1-7-3-3-1 ridge over all stitches = 104-112-120-135-145-160 stitches. Work garter stitch and short rows as follows: ROW 1 (= from right side): Knit until 4-4-5-5-5-5 stitches remain on row, turn and tighten yarn. ROW 2 (= wrong side): Knit 100-108-115-130-140-155 stitches. ROW 3: Knit until 8-8-10-10-10-10 stitches remain on row, turn and tighten yarn. ROW 4: Knit 96-104-110-125-135-150 stitches. Repeat 3rd and 4th row but every time you work from right side knit 4-4-5-5-5-5 stitches less than last time, finish by knitting 4-4-5-5-5-5 stitches from right side. Knit back over these 4-4-5-5-5-5 stitches. Work 1 ridge over all stitches. Then work diagram A.1 from right side as follows: Work A.1a (= 2 stitches), repeat A.1b until 2 stitches remain, work A.1c (= 2 stitches). When entire A.1 has been worked vertically, work 1 ridge over all stitches. Then work garter stitch and short rows as follows: ROW 1 (= from right side): Knit all stitches (= 104-112-120-135-145-160 stitches). ROW 2 (= from wrong side): Knit the first 4-4-5-5-5-5 stitches, turn and tighten yarn. ROW 3: Knit the 4-4-5-5-5-5 stitches. ROW 4: Knit 8-8-10-10-10-10 stitches, turn and tighten yarn. ROW 5: Knit the 8-8-10-10-10 stitches. Repeat 4th and 5th row but every time you work from wrong side knit 4-4-5-5-5-5 stitches more than last time, finish by knitting all stitches from wrong side. Piece measures approx. 53-56-56-57-60-62 cm / 21"-22"-22"-22½"-23½"-24½". Then finish piece in garter stitch. Work 1 ridge over all stitches. On next row slip the middle 28-28-28-29-29-32 stitches on a stitch holder for neck and finish each shoulder separately. Then bind off in each side for neck on every row from neck as follows: bind off 2 stitches 1 time and 1 stitch 2 times = 34-38-42-49-54-60 stitches remain on shoulder. Continue in garter stitch until piece measures approx. 8-8-9-10-10-10 cm / 3"-3"-3½"-4"-4"-4" from stitches on stitch holder. Piece measures approx. 61-64-65-67-70-72 cm / 24"-25¼"-25½"-26½"-27½"-28½". Bind off. Work the other shoulder the same way. Insert 1 marker thread in each side, 16-17-18-19-20-21 cm / 6¼"-6¾"-7"-7½"-8"-8¼" down from shoulder (marks armholes). BACK PIECE: Cast on and work as front piece until short rows are done. Continue in garter stitch until piece measures 59-62-63-65-68-70 cm / 23¼"-24½"-24¾"-25½"-26¾"-27½". Bind off the middle 34-34-34-35-35-38 stitches for neck and finish each shoulder separately. Then bind off 1 stitch on next row from neck =34-38-42-49-54-60 stitches remain for shoulder. Bind off when 2 cm / ¾" have been worked since last neck decrease was made. Piece measures approx. 61-64-65-67-70-72 cm / 24"-25¼"-25½"-26½"-27½"-28½". Insert 1 marker thread in each side, 16-17-18-19-20-21 cm / 6¼"-6¾"-7"-7½"-8"-8¼" down from shoulder = marks armholes. SLEEVE: Work sleeve in the round on double pointed needles. Cast on 40-42-44-46-48-50 stitches on double pointed needles size 4 mm / US 6 with Belle. Work 2 ridges in GARTER STITCH in the round - see explanation above. Then work A.3 over all stitches. Work 1 ridge, then work in stockinette stitch over all stitches. Insert 1 marker thread at beginning of round (= mid under sleeve). When piece measures 8-9-6-6-9-6 cm / 3"-3½"-2½"-2½"-3½"-2½", increase 1 stitch on each side of marker thread - READ INCREASE TIP. Increase like this every 8th-7th-7th-6th-5th-5th round 14-15-16-17-18-19 times in total = 68-72-76-80-84-88 stitches. Bind off when piece measures 49-48-47-44-43-40 cm / 19¼"-19"-18½"-17¼"-17"-15¾". ASSEMBLY: Sew side seams up to marker thread- sew in outer loops of edge stitches to avoid a chunky seam. Sew shoulder seams together with grafting/kitchener stitches. Sew sleeves in body inside bind-off edge on sleeves and in outer stitch along armhole. NECK: Pick up approx. 90-102 stitches around the neck (including stitches on stitch holder) on a short circular needle size 4 mm / US 6 with Belle. Work 2 ridges. Bind off. Make sure that the bind-off edge is not too tight. |
|||||||||||||
Diagram explanations |
|||||||||||||
|
|||||||||||||
 |
|||||||||||||
 |
|||||||||||||
Have you finished this pattern?Tag your pictures with #dropspattern #afternoonstrollsweater or submit them to the #dropsfan gallery. Do you need help with this pattern?You'll find 29 tutorial videos, a Comments/Questions area and more by visiting the pattern on garnstudio.com. © 1982-2026 DROPS Design A/S. We reserve all rights. This document, including all its sub-sections, has copyrights. Read more about what you can do with our patterns at the bottom of each pattern on our site. |
|||||||||||||


With over 40 years in knitting and crochet design, DROPS Design offers one of the most extensive collections of free patterns on the internet - translated to 17 languages. As of today we count 325 catalogs and 12298 patterns - 12288 of which are translated into English (US/in).
We work hard to bring you the best knitting and crochet have to offer, inspiration and advice as well as great quality yarns at incredible prices! Would you like to use our patterns for other than personal use? You can read what you are allowed to do in the Copyright text at the bottom of all our patterns. Happy crafting!
Post a comment to pattern DROPS 178-14
We would love to hear what you have to say about this pattern!
If you want to leave a question, please make sure you select the correct category in the form below, to speed up the answering process. Required fields are marked *.