
Popular categories
Looking for a yarn?


Comments / Questions (16)
![]() Monica Bostedt wrote:
Monica Bostedt wrote:
Jag undrar om det är fel i mönstret på ett ställe. På framstycket står det i slutet på 3:e stycket att man ska sticka 2-2-14-6-6-2 varv rätstickning. Jag stickar storlek large, alltså står det att jag ska sticka 14 varv rätstickning. Ska det vara så, tycker det är konstigt att man ska sticka så många fler varv rätstickning i storlek large än de andra storlekarna. Hoppas på ett snabbt svar så att jag kan fortsätta sticka. Mvh Monica Bostedt
21.08.2020 - 07:06DROPS Design answered:
Hej Monica. Det är för att få måtten på måttskissen att stämma i den storleken som det är mer rätstickade varv på de partierna (vissa andra partier är kortare i den storleken), så det som står i mönstret stämmer. Mvh DROPS Design
25.08.2020 - 11:14
![]() Christina wrote:
Christina wrote:
Can you please only allow questions and comments in english. And your explanations in english. We all spend useless time in translating. This would facilitate for all and very quick give a view of the issues. Kind regards/christina
18.08.2020 - 21:22DROPS Design answered:
Dear Christina, we are unfortunately not able to translate every comment in every possible language - thanks for your comprehensions- If you have a question about that pattern, just feel free to ask it here. Happy knitting!
19.08.2020 - 08:19
![]() Lorie Métivier wrote:
Lorie Métivier wrote:
Pourquoi je ne suis pas capable de télécharger votre modèle
13.04.2019 - 21:28DROPS Design answered:
Bonjour Mme Métivier, nos modèles peuvent seulement être imprimés, pour les télécharger sous format PDF, lancez l'impression et choisissez une imprimante virtuelle. Bon tricot!
23.04.2019 - 09:49
![]() Lorie Métivier wrote:
Lorie Métivier wrote:
Vous avez de beau modèle je suis ravie de faire partie de votre site
13.04.2019 - 21:24
![]() Lorraine Métivier wrote:
Lorraine Métivier wrote:
J'ai hate de tricotter ce plull il est très beau
13.04.2019 - 21:16
![]() Helen Johansson wrote:
Helen Johansson wrote:
Birgit menar jag, som har samma problem som mig. Tror jag river upp och gör om. Det kan inte vara rätt med så många extravarv ....
17.03.2019 - 18:23
![]() Helen Johansson wrote:
Helen Johansson wrote:
Har samma problem som jorunn. Stickfasthet är korrekt. Men med 14 varv på strl L istället för de 4 jag misstänker är rätt, blir stycket 10cm för långt!
17.03.2019 - 18:18
![]() Larry wrote:
Larry wrote:
I would like to make this garment, but I am only 5 foot tall and I am afraid that it would be too long for me. How can I make it fit? Should I maybe use a size US 3 needle?
21.07.2018 - 17:39DROPS Design answered:
Dear Larry, we are unfortunately not able to adjust every pattern to every individual request, please contact the store where you bought the yarn for any assistance. Happy knitting!
23.07.2018 - 08:53
![]() FOIRATIER wrote:
FOIRATIER wrote:
Bonjour. Je commence ce joli pull et je souhaiterai savoir s'il fait tricoter en rg raccourcis sur les 112 mailles du rg ou s'arrêter au 4eme rang. Merci d'avance pour votre réponse. Madame FOIRATIER
10.08.2017 - 12:50DROPS Design answered:
Bonjour Mme Foiratier, vous tricotez les rangs raccourcis sur la totalité des mailles, soit les 112 m en taille M, c'est-à-dire que vous tricotez 4 m de plus tous les rangs sur l'endroit: aux rangs 5 et 6, tricotez 12 m, aux rangs 7 et 8, tricotez 16 m, aux rangs 8 et 9, tricotez 20 m et ainsi de suite jusqu'à ce que toutes les mailles aient été tricotées. Bon tricot!
10.08.2017 - 13:49
![]() YM wrote:
YM wrote:
Je suis entrain de réaliser ce modèle. À un momoent donnée après avoir terminé la 3e serie de rangs raccourcis, c'est ecrit " couper le fil" puis "tricoter 1 côte mousse". Est ce que là il faut couper le fil et commencer de l'autre côté de l'ouvrage, ce qui veut dire faire deux fois le rang à l'endroit??
21.07.2017 - 03:29DROPS Design answered:
Bonjour Mme YM, à la fin de ces rangs raccourcis, le dernier rang est sur l'endroit, coupez le fil (il se trouve à gauche, vu sur l'endroit), reprenez toutes les mailles et tricotez 2 rangs sur toutes les mailles en commençant sur l'endroit. Bon tricot!
21.07.2017 - 08:36
|
|||||||||||||
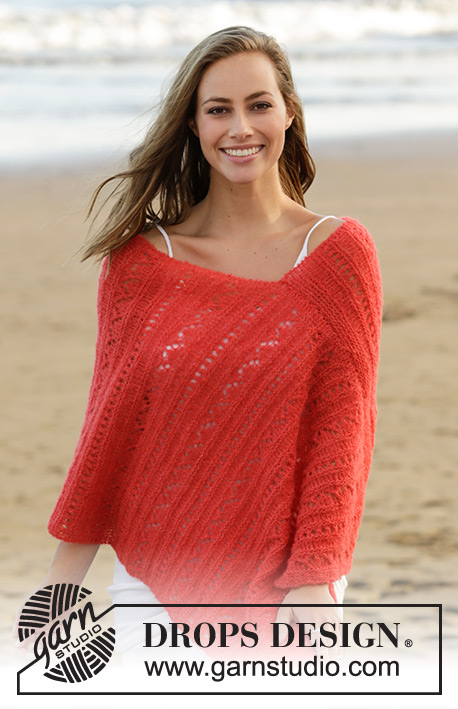
Afternoon Stroll#afternoonstrollsweater |
|||||||||||||
 |
 |
||||||||||||
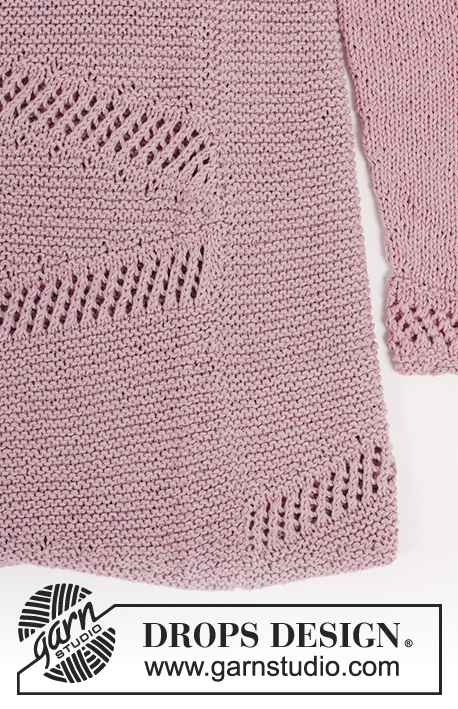
Jumper with short rows and lace pattern, worked bottom up in DROPS Belle. Size: S - XXXL
DROPS 178-14 |
|||||||||||||
|
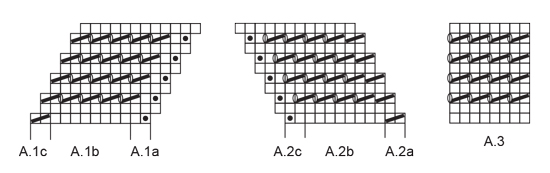
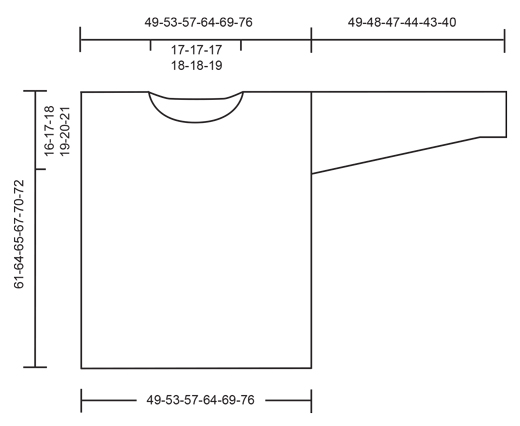
GARTER STITCH (back and forth): Knit all rows. 1 ridge = knit 2 rows. GARTER STITCH (worked in the round): 1 ridge= knit 1 round and purl 1 round. PATTERN: See diagrams A.1 to A.6. Diagrams show all rows in pattern seen from the right side. INCREASE TIP: Work until 2 stitches remain before marker thread, 1 yarn over, knit 4, 1 yarn over (= 2 stitches increased). On next round knit yarns over twisted to avoid holes. MEASURING TIP: Because of the weight of the yarn and the garter stitch, this garment will get longer in use. Length measurements on chart are shorter than the finished garment when worn. Measure the pieces flat. ---------------------------------------------------------- JUMPER: Work front and back piece back and forth on circular needle. Work sleeves in the round on double pointed needles. Read MEASURING TIP! FRONT PIECE: Cast on 104-112-120-135-145-160 stitches on circular needle size 4 mm with Belle. Work 2 ridges in GARTER STITCH back and forth - see explanation above! Work garter stitch and short rows as follows: ROW 1 (= from right side): Knit the first 4-4-5-5-5-5 stitches, turn and tighten yarn to avoid a hole. ROW 2 (= from wrong side): Knit the 4-4-5-5-5-5 stitches. ROW 3: Knit the first 8-8-10-10-10-10 stitches, turn, tighten yarn to avoid a hole. ROW 4: Knit the 8-8-10-10-10-10 stitches. Repeat 3rd and 4th row but every time you work from right side work 4-4-5-5-5-5 stitches more than last time, finish by working 1 ridge over all stitches = 104-112-120-135-145-160 stitches. REMEMBER THE KNITTING TENSION Then work diagram A.1 from right side as follows: Work A.1a (= 2 stitches), work A.1b until 2 stitches remain, work A.1c (= 2 stitches). When entire diagram A.1 has been worked vertically, work 1 ridge over all stitches. Work garter stitch and short rows as follows: ROW 1 (= from right side): Knit all stitches. ROW 2 (= from wrong side): K the first 4-4-5-5-5-5 stitches, turn and tighten yarn. ROW 3: Knit the 4-4-5-5-5-5 stitches. ROW 4: Knit 8-8-10-10-10-10 stitches, turn and tighten yarn. ROW 5: Knit the 8-8-10-10-10-10 stitches. Repeat 4th and 5th row but every time you work from wrong side knit 4-4-5-5-5-5 stitches more than last time, and then finish by knitting all stitches from wrong side. Work 1-1-7-3-3-1 ridge in garter stitch. Work garter stitch and short rows as follows: ROW 1 (= from right side): Knit all stitches. ROW 2 (= from wrong side): Knit until 4-4-5-5-5-5 stitches remain on row, turn and tighten yarn. ROW 3: Knit the 100-108-115-130-140-155 stitches. ROW 4: Knit until 8-8-10-10-10-10 stitches remain on row, turn and tighten yarn. ROW 5: Knit the 96-104-110-125-135-150 stitches. Repeat 4th and 5th row but every time you work from wrong side knit 4-4-5-5-5-5 stitches less than last time, and then finish by knitting 4-4-5-5-5-5 stitches from wrong side. Knit back over these 4-4-5-5-5-5 stitches, cut the yarn. Work 1 ridge over all stitches (1st row = from right side) = 104-112-120-135-145-160 stitches. Then work diagram A.2 from right side as follows: Work A.2a (= 2 stitches), repeat A.2b until 2 stitches remain, work A.2c (= 2 stitches). When entire diagram A.2 has been worked 1 time vertically, work 1 ridge over all stitches. Work garter stitch and short rows as follows: ROW 1 (= from right side): Knit 4-4-5-5-5-5 stitches, turn and tighten yarn. ROW 2 (= from wrong side): Knit 4-4-5-5-5-5 stitches. ROW 3: Knit 8-8-10-10-10-10 stitches, turn and tighten yarn. ROW 4: Knit 8-8-10-10-10-10 stitches. Repeat 3rd and 4th row but every time you work from right side knit 4-4-5-5-5-5 stitches more than last time, and then finish by knitting all stitches. Work 1-1-7-3-3-1 ridge over all stitches = 104-112-120-135-145-160 stitches. Work garter stitch and short rows as follows: ROW 1 (= from right side): Knit until 4-4-5-5-5-5 stitches remain on row, turn and tighten yarn. ROW 2 (= wrong side): Knit 100-108-115-130-140-155 stitches. ROW 3: Knit until 8-8-10-10-10-10 stitches remain on row, turn and tighten yarn. ROW 4: Knit 96-104-110-125-135-150 stitches. Repeat 3rd and 4th row but every time you work from right side knit 4-4-5-5-5-5 stitches less than last time, finish by knitting 4-4-5-5-5-5 stitches from right side. Knit back over these 4-4-5-5-5-5 stitches. Work 1 ridge over all stitches. Then work diagram A.1 from right side as follows: Work A.1a (= 2 stitches), repeat A.1b until 2 stitches remain, work A.1c (= 2 stitches). When entire A.1 has been worked vertically, work 1 ridge over all stitches. Then work garter stitch and short rows as follows: ROW 1 (= from right side): Knit all stitches (= 104-112-120-135-145-160 stitches). ROW 2 (= from wrong side): Knit the first 4-4-5-5-5-5 stitches, turn and tighten yarn. ROW 3: Knit the 4-4-5-5-5-5 stitches. ROW 4: Knit 8-8-10-10-10-10 stitches, turn and tighten yarn. ROW 5: Knit the 8-8-10-10-10-10 stitches. Repeat 4th and 5th row but every time you work from wrong side knit 4-4-5-5-5-5 stitches more than last time, finish by knitting all stitches from wrong side. Piece measures approx. 53-56-56-57-60-62 cm. Then finish piece in garter stitch. Work 1 ridge over all stitches. On next row slip the middle 28-28-28-29-29-32 stitches on a stitch holder for neck and finish each shoulder separately. Then cast off in each side for neck on every row from neck as follows: Cast off 2 stitches 1 time and 1 stitch 2 times = 34-38-42-49-54-60 stitches remain on shoulder. Continue in garter stitch until piece measures approx. 8-8-9-10-10-10 cm from stitches on stitch holder. Piece measures approx. 61-64-65-67-70-72 cm. Cast off. Work the other shoulder the same way. Insert 1 marker thread in each side, 16-17-18-19-20-21 cm down from shoulder (marks armholes). BACK PIECE: Cast on and work as front piece until short rows are done. Continue in garter stitch until piece measures 59-62-63-65-68-70 cm. Cast off the middle 34-34-34-35-35-38 stitches for neck and finish each shoulder separately. Then cast off 1 stitch on next row from neck =34-38-42-49-54-60 stitches remain for shoulder. Cast off when 2 cm have been worked since last neck decrease was made. Piece measures approx. 61-64-65-67-70-72 cm. Insert 1 marker thread in each side, 16-17-18-19-20-21 cm down from shoulder = marks armholes. SLEEVE: Work sleeve in the round on double pointed needles. Cast on 40-42-44-46-48-50 stitches on double pointed needles size 4 mm with Belle. Work 2 ridges in GARTER STITCH in the round - see explanation above. Then work A.3 over all stitches. Work 1 ridge, then work in stocking stitch over all stitches. Insert 1 marker thread at beginning of round (= mid under sleeve). When piece measures 8-9-6-6-9-6 cm, increase 1 stitch on each side of marker thread - READ INCREASE TIP. Increase like this every 8th-7th-7th-6th-5th-5th round 14-15-16-17-18-19 times in total = 68-72-76-80-84-88 stitches. Cast off when piece measures 49-48-47-44-43-40 cm. ASSEMBLY: Sew side seams up to marker thread- sew in outer loops of edge stitches to avoid a chunky seam. Sew shoulder seams together with grafting/kitchener stitches. Sew sleeves in body inside cast-off edge on sleeves and in outer stitch along armhole. NECK: Pick up approx. 90-102 stitches around the neck (including stitches on stitch holder) on a short circular needle size 4 mm with Belle. Work 2 ridges. Cast off. Make sure that the cast-off edge is not too tight. |
|||||||||||||
Diagram explanations |
|||||||||||||
|
|||||||||||||
|
|||||||||||||
|
|||||||||||||
Have you finished this pattern?Tag your pictures with #dropspattern #afternoonstrollsweater or submit them to the #dropsfan gallery. Do you need help with this pattern?You'll find 30 tutorial videos, a Comments/Questions area and more by visiting the pattern on garnstudio.com. © 1982-2025 DROPS Design A/S. We reserve all rights. This document, including all its sub-sections, has copyrights. Read more about what you can do with our patterns at the bottom of each pattern on our site. |
|||||||||||||


With over 40 years in knitting and crochet design, DROPS Design offers one of the most extensive collections of free patterns on the internet - translated to 17 languages. As of today we count 314 catalogues and 11822 patterns translated into English (UK/cm).
We work hard to bring you the best knitting and crochet have to offer, inspiration and advice as well as great quality yarns at incredible prices! Would you like to use our patterns for other than personal use? You can read what you are allowed to do in the Copyright text at the bottom of all our patterns. Happy crafting!
Post a comment to pattern DROPS 178-14
We would love to hear what you have to say about this pattern!
If you want to leave a question, please make sure you select the correct category in the form below, to speed up the answering process. Required fields are marked *.