
Popular categories
Looking for a yarn?


Comments / Questions (43)
![]() Ekaterina wrote:
Ekaterina wrote:
Dear Drops! Thank you for your prompt reply, but I still have problems with the shoulder. I understand that I have to replace the first tr with 3 chains but I don't understand where exactly the row begins. Should I count from the corner= 2tr+3ch +2tr or start the shoulder over 13 trebles and work A. 3A in the tr in stich from previous row?
27.05.2020 - 00:43DROPS Design answered:
Dear Ekaterina, in the 2nd size you have to work a total of 13 sts in A.3A and A.3B, count the last 13 sts from the end of the previous row (from the left towards the right, seen from RS) and join yarn here, You will then have enough room to work: A.3A and repeat A.3B a total of 6 times in width. Hope this helps. Happy crocheting!
27.05.2020 - 08:55
![]() Ekaterina wrote:
Ekaterina wrote:
Dear Drops! I need to specify the start of the shoulder- should I start A. 3A = 1 tr at the corner or at the 3 ch stitches after the corner? Should I work A. 3B over the last 13 tr?
25.05.2020 - 22:24DROPS Design answered:
Dear Ekaterina, you have to replace the first tr with 3 chains (see info crochet), so that A.3A will be worked with 3 chains at the beg of the row and as 1 treble at the end of row from WS - A.3B will end with 1 tr from RS and start with 3 ch (instead of 1 tr) from WS. Happy crocheting!
26.05.2020 - 08:41
![]() Ekaterina wrote:
Ekaterina wrote:
Thanks a lot for all your help.
25.05.2020 - 13:19
![]() Ekaterina wrote:
Ekaterina wrote:
Dear Drops! I need your help again, this time I don' t understand how to crochet shoulder. Should I work only A. 3A, A. 3B and what about A. 3C? My front piece ends with a corner 2tr3ch st2tr, then 3 ch and 13 tr to the end. And the 1st row in diagrams show 1ch st, 2 tr in chain space. Please, help me to solve this problem.
23.05.2020 - 21:57DROPS Design answered:
Dear Ekaterina, you should also start A.3 with A.3A and repeat A.3B over the last sts on the left side (end of rows from RS with A.4/A.5): count 5-6-7 times 2 sts (for each A.3B), then 1 more stitch for A.3A and start now with a.3A = 1 treble, and repeat A.3B (1 chain, skip 1 st, 1 treble). So that you have the correct number of sts: 11-13-15 sts. Happy crocheting!
25.05.2020 - 09:13
![]() Ekaterina wrote:
Ekaterina wrote:
If I crochet left front piece the same way as right front piece, I will need to turn it to have half circle look to the centre. But in this case last row will be done on the WS.
22.05.2020 - 11:06DROPS Design answered:
Dear Ekaterina, work the same way as on right front piece, then when crocheting shoulder, instead of working over the first stitches on the right side as for right front piece, you will now work over the last stitches on the left side (seen from RS). Happy crocheting!
22.05.2020 - 12:28
![]() Ekaterina wrote:
Ekaterina wrote:
Dear Drops! Would you be so kind to help me with the following problem. I failed to crochet left front piece. How should I begin? Could you explain the first rows, thanks in advance.
21.05.2020 - 01:38DROPS Design answered:
Dear Ekaterina, you start the same way but crochet then shoulder over the last stitches instead of the first stitches so that left front piece will be a mirrored image of the right front piece. Happy crocheting!
22.05.2020 - 09:07
![]() AlmuSG wrote:
AlmuSG wrote:
Hola, No me queda claro cómo hay que proceder para realizar los aumentos del frente derecho. Cuando se refiere "Aumentar 0-6-6 puntos altos sobre A.4A (= 27-33-33 puntos altos)". ¿Hay que hacer los aumentos en la última vuelta? ¿cuántos puntos (0-6-6)? Agradecería una explicación más concreta. Gracias.
14.05.2020 - 18:57DROPS Design answered:
Hola AlmySG, tu aumentas puntos en la última vuelta de los diagramas. Aumentar 0-6-6 puntos altos sobre A.4A depende de que talla haces (0 puntos en la talla S/M, 6 punos en las tallas L/XL y XXL/XXXL). Buen trabajo!
22.11.2020 - 20:17
![]() Ekaterina wrote:
Ekaterina wrote:
Dear Drops! What kind of yarn is used for the vest in the photo. It looks much thinner than Paris.
13.05.2020 - 22:47DROPS Design answered:
Dear Ekaterina, the modell was made with Paris yarn. Happy Crafting!
14.05.2020 - 01:39
![]() Marjon De Vries wrote:
Marjon De Vries wrote:
Ik mis telpatroon A1 en a2 van drops 175-24, deze zat niet bij het patroon en garen die ik besteld had, zou u de missende telpatroon alsnog kunnen sturen per mail, wil heel graag het mooie giletje haken. Groetjes Marjon
09.05.2020 - 17:56DROPS Design answered:
Dag Marjon,
Je kunt de telpatronen afdrukken via de afdrukknop bij het patroon op de site. Hier vind je de afbeeling van A.1 en A.2.
13.05.2020 - 10:08
![]() Sylvie Plancher wrote:
Sylvie Plancher wrote:
Re bonjour, Excusez moi, j'ai bien compris que les côtés doivent être symétriques, mais je ne comprends toujours pas ce que veut dire "en sens inverse" pour un diagramme en demi cercle. par quoi dois-je commencer ? cordialement
22.04.2020 - 16:53DROPS Design answered:
Bonjour Mme Plancher, vous crochetez le devant gauche comme le droit mais A.3 sera à gauche au lieu de à droite (vu sur l'endroit) pour que les deux demi-cercles soient symétriques et que les arrondis des demi-cercles soient face à face et l'épaule sur le côté "droit" du devant (= à droite sur le devant droit et à gauche sur le devant gauche). Bon crochet!
23.04.2020 - 10:19
|
||||||||||||||||||||||||||||||||||||||||||||||
Bonita#bonitavest |
||||||||||||||||||||||||||||||||||||||||||||||
 |
 |
|||||||||||||||||||||||||||||||||||||||||||||
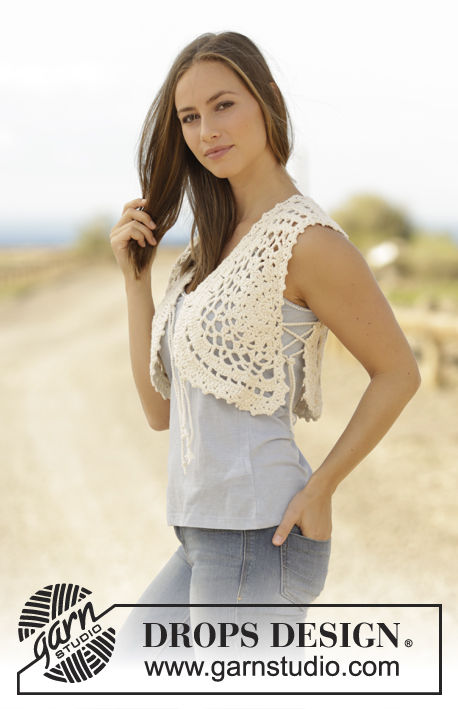
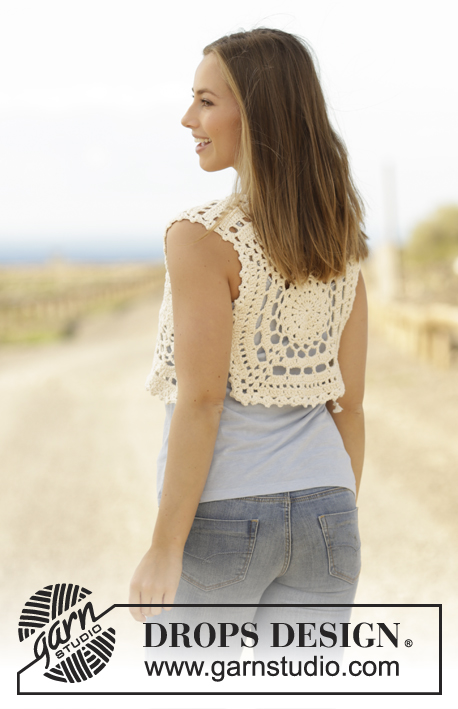
Crochet vest with crochet square and lace pattern in DROPS Paris. Size: S - XXXL
DROPS 175-24 |
||||||||||||||||||||||||||||||||||||||||||||||
|
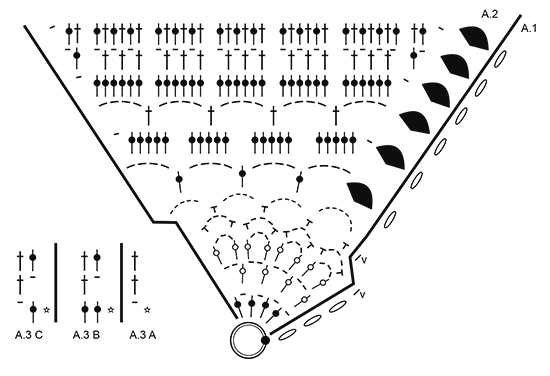
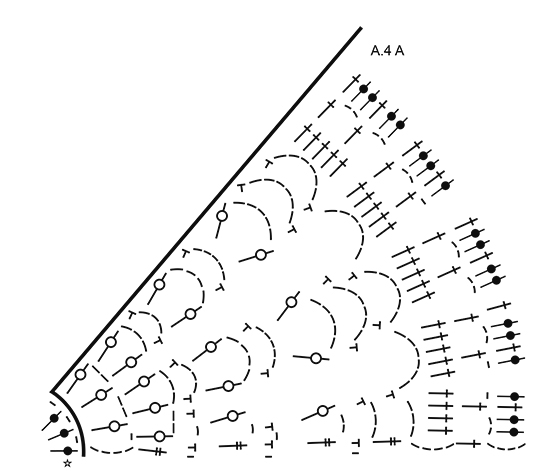
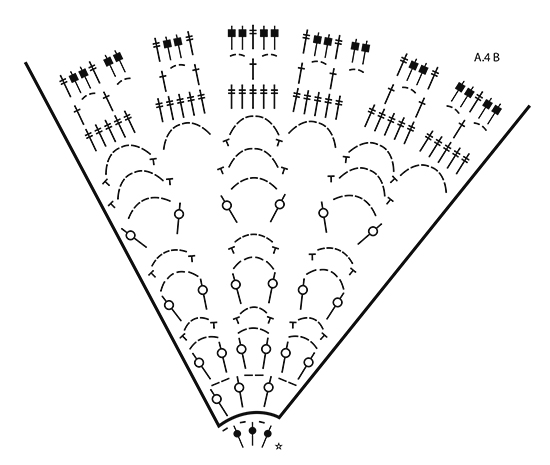
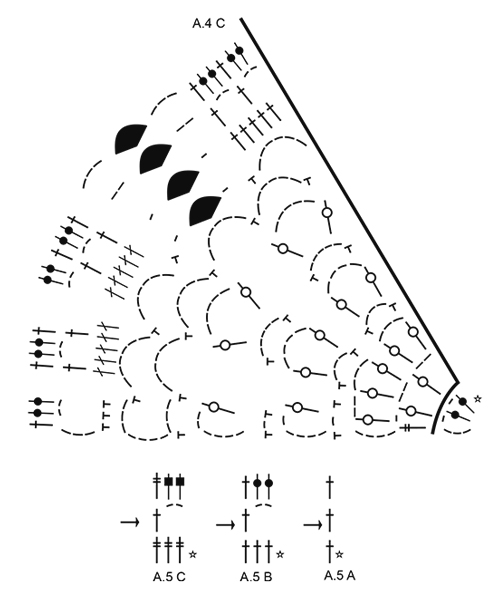
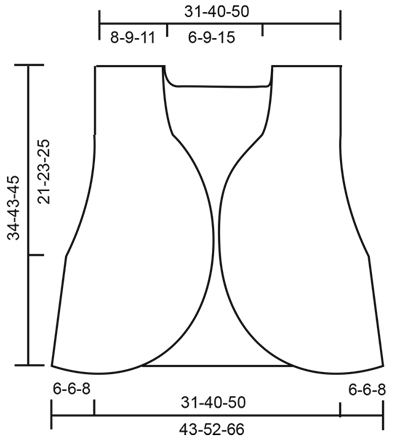
PATTERN: See diagrams A.1 to A.5. CROCHET INFO: At beginning of every round/row with double crochet replace first double crochet on round/row with 3 chain stitches. At beginning of every round/row with single crochet work 1 chain stitch (does not replace first single crochet). INCREASE TIP: Increase 1 double crochet by working 2 double crochet in same stitch. Increase 1 treble crochet by working 2 treble crochet in same stitch. ---------------------------------------------------------- VEST: The vest is worked in 3 parts. Work back piece as a square separately. Work front pieces as a half circle and continue up to shoulder. When front pieces and back piece are sewn together, work 1 round with picots along entire outer edge. BACK PIECE: Begin with crochet hook size 5 mm / H/8 and Paris and work pattern according to diagram A.2 4 times in total on round (A.1 shows how round begins and ends). REMEMBER THE CROCHET GAUGE! When A.2 has been worked, there are 35 double crochet along each side and 4 corners that consist of 2 double crochet, 3 chain stitches and 2 double crochet. The square for back piece is done for size S/M, fasten off. Crochet square measures approx. 28 x 28 cm / 11" x 11". Continue in the round in size L/XL and XXL/XXXL as follows: L/XL: Repeat the last 2 rounds. Increase 1 double crochet before and after each corner. There are now 2 double crochet more on each of the 4 sides = 39 double crochet along each side. Fasten off. Crochet square measures approx. 37 x 37 cm / 14½" x 14½". XXL/XXXL: Repeat the last 2 rounds. Increase 1 double crochet before and after each corner. There are now 2 double crochet more on each of the 4 sides = 43 double crochet along each side. Work slip stitches until chain space with 3 chain stitches in first corner. Then work from 2nd row in diagrams A.3A to A.3C back and forth along one side as follows: Work A.3A around this chain space (shows how row begins and ends) - READ CROCHET INFO. Work A.3B until 1 treble remains before chain space in next corner, work A.3C (= 1 chain stitch, skip 1 double crochet and work 1 double crochet around chain space in corner). Turn and work last row in diagrams. Fasten off. Work the same way along the side on opposite side of square. Fasten off. Crochet square measures approx. 47 x 37 cm / 18½" x 14½". RIGHT FRONT PIECE: Work 4 chain stitches on hook size 5 mm / H/8 with Paris and form a ring with 1 slip stitch in first chain stitch. Then work a half circle as follows: ROW 1: Work 4 chain stitches, * 1 double crochet around chain stitch ring, 1 chain stitch *, repeat from *-* 7 more times, finish with 1 double crochet around ring. Turn and work as follows from right side: Work A.4A, A.4B, A.4C. On last row in diagrams increase evenly as follows - READ INCREASE TIP: Increase 0-6-6 double crochet over A.4A (= 27-33-33 double crochet) and 0-9-9 treble crochet over A.4B (= 30-39-39 double double crochet). Increase 0-3-3 double crochet before corner in A.4C (= 6-9-9 double crochet ) and increase 0-3-3 double crochet after corner (= 13-16-16 double crochet). there are 76-97-97 stitches in total + corner (= 2 double crochet, 3 chain stitches, 2 double crochet) on last row. Size S/M is now done, fasten off. Work back and forth in the 2 next sizes as follows: L/XL- XXL/XXXL: Turn and work from wrong side. Work from row marked with arrow in diagrams as follows: Work A.5B over the first 15 double crochet, A.5A, 3 chain stitches, (2 double crochet, 3 chain stitches, 2 double crochet) around chain space in corner, 3 chain stitches, A.5B over the next 9 double crochet, A.5C over the next 39 treble crochet, A.5B over the next 32 double crochet, finish with A.5A in the last double crochet on row. Work last row in diagrams the same way. There are now 97 double crochet/treble crochet + 1 corner (= 2 double crochet, 3 chain stitches, 2 double crochet) on last row. Fasten off. SHOULDER: Now work back and forth over the first double crochet from right side in A.4 (in size S/M) and A.5 (in size L/XL and XXL/XXXL), begin from 2nd row in diagrams as follows: Work A.3A, A.3B 5-6-7 times in total in width. Turn and work last row. Repeat the 2 last rows in diagrams 3-3-4 more times. Fasten off. LEFT FRONT PIECE: Work as right front piece but reversed. ASSEMBLY: S/M and L/XL: Sew shoulder on to each side at the top edge on crochet square/back piece. Sew stitches together one by one. On back piece there are now 17-21 double crochet for neck between shoulder pieces. Cut the yarn and fasten off. XXL/XXXL: Sew shoulder on to each side at the top edge on crochet square/back piece. Sew the 6 outermost double crochet on shoulder to the side of the 2 outermost rows on back piece and sew the other stitches together one by one. On back piece there are now 25 double crochet for neck between shoulder pieces. Cut the yarn and fasten off. PICOT EDGE: Begin on top of one shoulder and work a picot edge as follows: Work * 1 double crochet in double crochet/around row, 3 chain stitches, 1 slip stitches in first of the 3 chain stitches, 2 double crochet in same double crochet/around row, skip approx. 2.5 cm / ⅞" *, repeat from *-* around the entire vest, i.e. around both armholes, along edge on front pieces, back of neck along bottom edge on back piece. Finish with a slip stitch in first double crochet on round. Fasten off. TWINED STRING: Cut 2 lengths of 1.5 metres each. Twine the strands tog until they resist, fold the string double so that it twines again. Make a knot at each end. Thread string through picot edge at the front on one front piece and tie a knot. Make another 3 strings the same way. Fasten one to the other front piece. Use the 2 other strands to keep front and back piece together in each side: Start approx. 21-23-25 cm / 8¼"-9"-9¾" from top of one of the front pieces and the back piece. Thread the string back and forth through holes in the picot edge, between the front and back piece in zig zags (like a shoe lace) and tie them together at the bottom - see picture. Adjust length on string so that distance between front piece and back piece is approx. 6-6-8 cm / 2½"-2½"-3". Repeat in the other side. |
||||||||||||||||||||||||||||||||||||||||||||||
Diagram explanations |
||||||||||||||||||||||||||||||||||||||||||||||
|
||||||||||||||||||||||||||||||||||||||||||||||
 |
||||||||||||||||||||||||||||||||||||||||||||||
 |
||||||||||||||||||||||||||||||||||||||||||||||
 |
||||||||||||||||||||||||||||||||||||||||||||||
 |
||||||||||||||||||||||||||||||||||||||||||||||
 |
||||||||||||||||||||||||||||||||||||||||||||||
Have you finished this pattern?Tag your pictures with #dropspattern #bonitavest or submit them to the #dropsfan gallery. Do you need help with this pattern?You'll find 14 tutorial videos, a Comments/Questions area and more by visiting the pattern on garnstudio.com. © 1982-2026 DROPS Design A/S. We reserve all rights. This document, including all its sub-sections, has copyrights. Read more about what you can do with our patterns at the bottom of each pattern on our site. |
||||||||||||||||||||||||||||||||||||||||||||||


With over 40 years in knitting and crochet design, DROPS Design offers one of the most extensive collections of free patterns on the internet - translated to 17 languages. As of today we count 324 catalogs and 12290 patterns - 12280 of which are translated into English (US/in).
We work hard to bring you the best knitting and crochet have to offer, inspiration and advice as well as great quality yarns at incredible prices! Would you like to use our patterns for other than personal use? You can read what you are allowed to do in the Copyright text at the bottom of all our patterns. Happy crafting!
Post a comment to pattern DROPS 175-24
We would love to hear what you have to say about this pattern!
If you want to leave a question, please make sure you select the correct category in the form below, to speed up the answering process. Required fields are marked *.