
Popular categories
Looking for a yarn?


Comments / Questions (18)
![]() Giulia wrote:
Giulia wrote:
Buongiorno Mi può indicare meglio come iniziare il diagramma A1 dopo le 4 maglie a legaccio ? Inizio subito con un aumento ? Nel ferro di rovescio 2. riga inizio con un aumento? Grazie Giulia
21.11.2024 - 23:44
![]() Els Jansen wrote:
Els Jansen wrote:
Ik zie dat de voorbies samen met de steken daarnaast erg naar binnen rolt. Hoe kan dat en hoe kan ik dat voorkomen?
02.10.2024 - 15:13DROPS Design answered:
Dag Els,
Dit kun je verhelpen door het werk, als het klaar is, voorzichtig op te persen. Leg een natte (thee)doek tussen het werk en de strijkbout en dep heel voorzichtig. Let erop dat je dit voorzichtig doet omdat je anders de textuur van het breiwerk wat kunt verstoren.
08.10.2024 - 21:09
![]() Maria Hammond wrote:
Maria Hammond wrote:
This is a question: In the pattern called Little Adventure Jacket, at the beginning of the instructions for the yoke, immediately after the ribbing, something called "an elevation in the back" is instructed. Usually an elevation means a raised surface, a podium to stand on. What is this "elevation"? Is it a pocket?? in the back?!? what is its purpose? can I leave it out? A speedy answer would be appreciated. I order my wool online, so the warehouse cannot advise me.
21.08.2024 - 10:13DROPS Design answered:
Dear Mrs Hammond, the elevation here consists on short rows worked so that the neckline on back piece will be higher than the neckline on front piece, see also this video. Happy knitting!
21.08.2024 - 13:28
![]() Petra Sondermann wrote:
Petra Sondermann wrote:
Hallo, ich habe eine Frage zum Umschlag in A1 zwischen 2 M: Ich beginne unten rechts mit 4 Blenden-M., dann 1 Umschlag, dann 6 M im Muster, dann 1 Umschlag, dann 6 M im Muster .... am Schluss 1 M im Muster? (= 93 M). Was soll dann heißen: "jedoch nicht bei der zusätzlichen einen M von A1 vor der Blende zunehmen"? Vielen Dank für schnelle Antwort. Petra Sondermann
29.10.2023 - 10:41DROPS Design answered:
Liebe Frau Sondermann, ja genau, am Ende stricken Sie die 1. Masche aber ohne Zunahme dh bei den Reihen mit Umschlägen stricken Sie keinen Umschlag nur die 1. Masche vom Diagram. Viel Spaß beim stricken!
30.10.2023 - 16:24
![]() Nadine Sailer wrote:
Nadine Sailer wrote:
Wenn ich diese Jacke in Gr. 164 stricken möchte, wie rechne ich das um? oder gibt es das Muster auch in dieser Größe?
17.01.2023 - 10:33DROPS Design answered:
Liebe Frau Sailer, leider können wir nicht jede Anleitung nach jeder Anfrage anpassen - Sie können ein ähnliches Modell mit derselben Maschenprobe und in der gewünschten Größe als Beispiel nehmen, so können Sie Anleitung umrechnen - vielleicht kann Ihnen ein Modell für Damen auch mithelfen? (mehr lesen Sie hier. Viel Spaß beim stricken!
17.01.2023 - 14:52
![]() Gabriele wrote:
Gabriele wrote:
Sind in dem Diagramm nur die Hinreihen eingezeichnet, oder Hin- und Rückreihen?
18.01.2021 - 13:51DROPS Design answered:
Liebe Gabriele, alle Reihen werden gezeichnet, dh die Hin sowie die Rückreihen - hier lesen Sie mehr über Diagramme. Viel Spaß beim stricken!
18.01.2021 - 15:25
![]() Gosia wrote:
Gosia wrote:
Czy instrukcja o przerabianiu podwyższenia na dekolt tyłu dżersejem uwzględnia oczka obszycia przodu ? Tj czy powinno zostać następująco: przer. na prawo aż zostaje 8-10-10-12-12 o. Licząc Wraz z oczkami obszycia?
15.01.2020 - 23:12DROPS Design answered:
Witaj Gosiu! Tak, jest to wraz z oczkami obszycia przodu. Pozdrawiamy!
15.01.2020 - 23:57
![]() ÅSE wrote:
ÅSE wrote:
Hej. Hvor mange pinde skal der strikkes ,til man øger til ærmen og hvor mange m er det rundt om ærmet.med mønsterstrik.ikke under ærmet.
25.10.2019 - 20:43DROPS Design answered:
Hei Åse. Det kommer an på hvilken størrelse du skal strikke, først strikkes det en halskant (3 cm), deretter en forhøyning bak og så strikkes det etter diagram A.1 og da startes også økningene til ermene. Det er ikke skrevet hvor mange masker man har rundt ermet med mønsterstrikk ettersom det skal økes jevnt fordelt på pinnen før det deles til erme. Etter denne økningen har man 221-237-253-273 eller 289 masker og det skal settes 44-48-52-58 eller 62 masker på 1 tråd til erme. God Fornøyelse!
28.10.2019 - 11:44
![]() Elena wrote:
Elena wrote:
Buonasera ho comprato la lana per questo modello, taglia 9/10 anni ma ahimè poi ho visto che è top down ma ho provato a realizzarlo ma per me è molto difficile... Non c'è un modo per farlo nella maniera tradizionale ovvero eseguire i vari pezzi separatamente (dietro, davanti, le maniche ecc..)? o al limite un altro modello utilizzando questa stessa lana? grazie
15.04.2019 - 23:11DROPS Design answered:
Buongiorno Elena, purtroppo questo modello è stato progettato con questa costruzione, ma non si lasci spaventare, se segue le istruzioni riuscirà a realizzarlo. E' un cardigan, quindi lavorato in piano e non in tondo: accetti la sfida e se ha bisogno di aiuto ci scriva pure! Buon lavoro!
16.04.2019 - 08:29
![]() Loredana Brusamolino wrote:
Loredana Brusamolino wrote:
Grazie molte per la chiarezza della risposta.
24.01.2019 - 21:16
|
|||||||||||||||||||
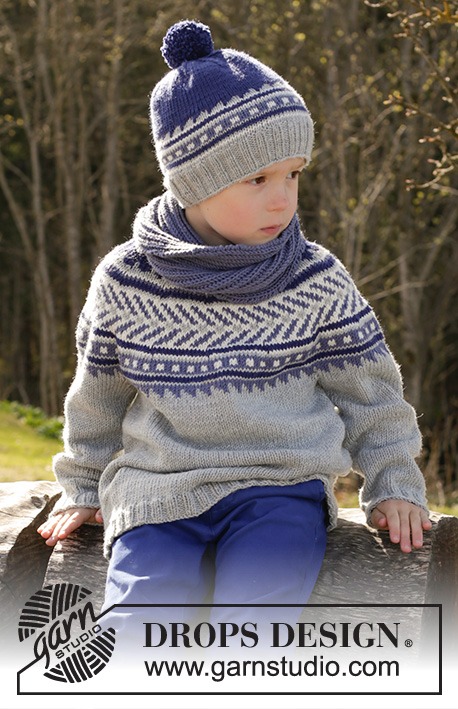
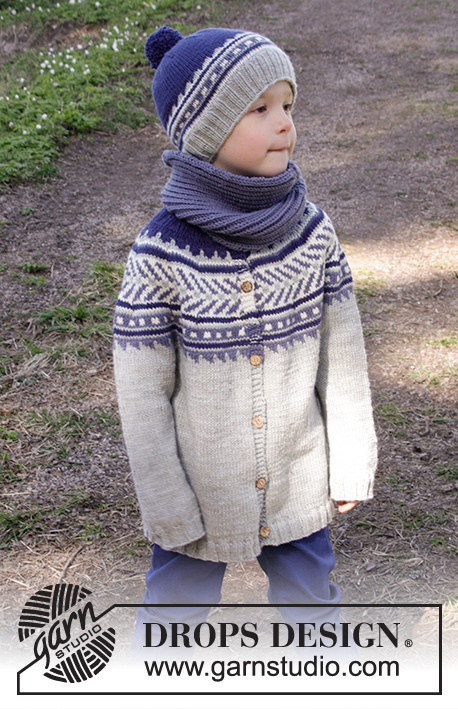
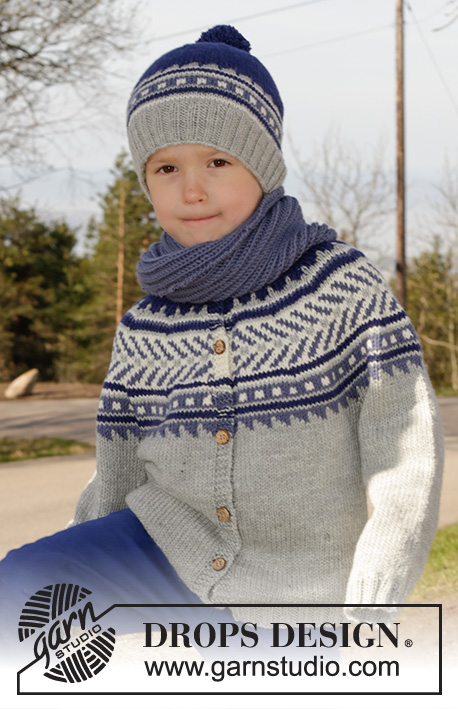
Little Adventure Jacket#littleadventurejacket |
|||||||||||||||||||
 |
 |
||||||||||||||||||
Knitted jacket worked top down with round yoke and multi-coloured pattern in DROPS Merino Extra Fine. Size children 3 - 12 years
DROPS Children 27-31 |
|||||||||||||||||||
|
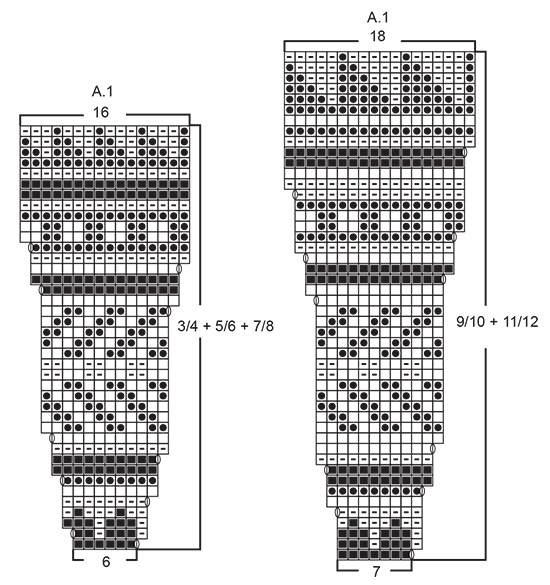
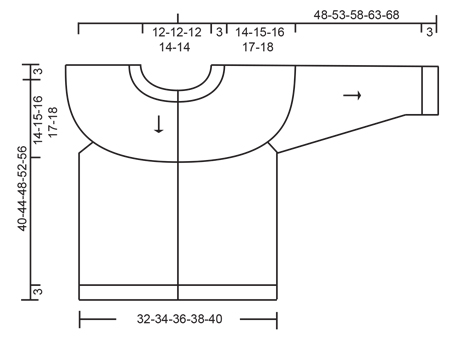
GARTER ST (back and forth): K all rows. 1 ridge = K2 rows. PATTERN: See diagram A.1 - NOTE: Choose diagram for correct size. Work entire pattern in stockinette st. KNITTING TIP (applies to bands): On the rows where there are either stripes or pattern border work the color in the stripes or the base color of pattern border also over the 4 band sts in each side but do yarn change between band and body (to avoid fastening the yarn on band). INCREASE TIP: Inc 1 st with a YO, on next row work YO twisted to avoid holes. DECREASE TIP (applies to mid under sleeve): Dec 1 st on each side of marker as follows: Beg 3 sts before marker and K 2 tog, K 2 (marker is between these 2 sts), slip 1 st as if to K, K 1, psso (= 2 sts dec). BUTTONHOLES: Dec for buttonholes on right band (when garment is worn). 1 button hole = beg from WS and K tog second and third st from edge and make 1 YO. On next round K the YO to make a hole. Dec for buttonholes when piece measures: SIZE 3/4 YEARS: 2, 9, 16, 23, 30 and 37 cm SIZE 5/6 YEARS: 2, 10, 18, 26, 34 and 42 cm SIZE 7/8 YEARS: 2, 9, 17, 24, 32, 39 and 46 cm SIZE 9/10 YEARS: 2, 10, 18, 26, 34, 42 and 50 cm SIZE 11/12 YEARS: 2, 11, 19, 28, 36, 45 and 53 cm ---------------------------------------------------------- JACKET: Work back and forth on circular needle from mid front, work top down. YOKE: Cast on 94-98-102-110-118 sts (includes 4 band sts in each side towards mid front) on a circular needle size 3 mm / US 2.5 with dark blue. P 1 row from WS. Work next row as follows from RS: 4 band sts in GARTER ST - see explanation above - * K 2, P 2 *, repeat from *-* until 6 sts remain on needle, finish with K 2 and 4 bands sts in garter st. Continue rib like this for 3 cm / 1" – remember BUTTONHOLES on right band – see explanation above and finish after 1 row from RS (= neck edge). Switch to circular needle size 4 mm / US 6. P 1 row from WS while dec 7-5-3-3-4 sts evenly (do not dec over bands) = 87-93-99-107-114 sts. Then work an elevation at the back in stockinette st as follows: K until 8-10-10-12-12 sts remain on row, turn, tighten yarn and P until 8-10-10-12-12 sts in the other side, turn, tighten yarn and K until 16-18-18-20-20 sts, turn, tighten yarn and P until 16-18-18-20-20 sts in the other side. Continue to working 8 sts less on every turn 2 more times in each side, turn, tighten yarn and K the rest of row, then P 1 row from WS (work bands in garter st). Work next row as follows from RS: 4 band sts in garter st, work pattern according to diagram A.1 until 5 sts remain on row - NOTE: Choose diagram for correct size (= 13-14-15-14-15 repetitions of 6-6-6-7-7 sts), work first st in A.1 (so that pattern beg and ends the same way inside band in each) and finish with 4 band sts in garter st. Continue pattern like this and inc as shown in diagram (do not inc the extra st at the end of row before band) – READ KNITTING TIP, REMEMBER KNITTING GAUGE. When A.1 has been worked, there are 217-233-249-261-279 sts on needle. Work 0-1-2-0-1 cm / 0"-½"-¾"-0"-½" with light gray. Piece now measures approx. 14-15-16-17-18 cm / 5½"-6"-6¼"-6¾-7" mid front (measured without rib in the neck). Finish piece in stockinette st with light gray. First K 1 row from RS while inc 4-4-4-12-10 sts evenly - READ INCREASE TIP (do not inc over bands) = 221-237-253-273-289 sts. Work next row as follows from WS: Work 35-37-39-41-43 sts as before, slip the next 44-48-52-58-62 sts on 1 stitch holder for sleeve (without working them first), cast on 6 new sts on row, work 63-67-71-75-79 sts (= back piece), slip the next 44-48-52-58-62 sts on 1 stitch holder for sleeve (without working them first), cast on 6 new sts on row and work 35-37-39-41-43 sts as before. BODY: = 145-153-161-169-177 sts. NOW MEASURE PIECE FROM HERE! Continue back and forth in stockinette st with 4 band sts in garter st in each side for 23-26-29-32-35 cm / 9"-10¼"-11½"-12½"-13¾". Switch to circular needle size 3 mm / US 2.5. P 1 row from WS while inc 13-13-13-17-17 sts evenly (continue bands in garter st and do not inc over bands) = 158-166-174-186-194 sts. Work next row as follows from RS: 4 band sts in garter st, * K 2, P 2 *, repeat from *-* until 6 sts remain on needle, finish with K 2 and 4 bands sts in garter st. Continue rib like this for 3 cm / 1", then LOOSELY bind off with garter st over garter st, K over K and P over P. Entire jacket now measures approx. 40-44-48-52-56 cm / 15¾"-17¼"-19"-20½"-22" mid front (measured without rib in the neck). SLEEVE: Slip sts from one stitch holder on double pointed needles size 4 mm / US 6, pick in addition up 1 st in each of the 6 sts cast on in the side of body (insert 1 marker in the middle of these new sts = mid under sleeve) = 50-54-58-64-68 sts on row. NOW MEASURE PIECE FROM HERE! Work in stockinette st in the round with light gray. When sleeve measures 2 cm / ¾", dec 2 sts mid under sleeve - READ DECREASE TIP. Dec like this every 3-2½-3-2½-2½ cm / 1⅛"-⅞"-1⅛"-⅞"-⅞" a total of 7-9-10-13-14 times = 36-36-38-38-40 sts. When sleeve measures 22-26-30-33-37 cm / 8¾"-10¼"-11¾"-13"-14½", inc 4-4-6-6-8 sts evenly = 40-40-44-44-48 sts. Switch to double pointed needle size 3 mm / US 2.5 and work rib in the round = K 2/P 2 for 3 cm / 1", then LOOSELY bind off with K over K and P over P. Work the other sleeve the same way. ASSEMBLY: Sew the buttons on to the left band. |
|||||||||||||||||||
Diagram explanations |
|||||||||||||||||||
|
|||||||||||||||||||
 |
|||||||||||||||||||
 |
|||||||||||||||||||
Have you finished this pattern?Tag your pictures with #dropspattern #littleadventurejacket or submit them to the #dropsfan gallery. Do you need help with this pattern?You'll find 31 tutorial videos, a Comments/Questions area and more by visiting the pattern on garnstudio.com. © 1982-2026 DROPS Design A/S. We reserve all rights. This document, including all its sub-sections, has copyrights. Read more about what you can do with our patterns at the bottom of each pattern on our site. |
|||||||||||||||||||


With over 40 years in knitting and crochet design, DROPS Design offers one of the most extensive collections of free patterns on the internet - translated to 17 languages. As of today we count 324 catalogs and 12291 patterns - 12281 of which are translated into English (US/in).
We work hard to bring you the best knitting and crochet have to offer, inspiration and advice as well as great quality yarns at incredible prices! Would you like to use our patterns for other than personal use? You can read what you are allowed to do in the Copyright text at the bottom of all our patterns. Happy crafting!
Post a comment to pattern DROPS Children 27-31
We would love to hear what you have to say about this pattern!
If you want to leave a question, please make sure you select the correct category in the form below, to speed up the answering process. Required fields are marked *.