
Popular categories
Looking for a yarn?


Comments / Questions (65)
![]() Jayeeta Chattopadhyay wrote:
Jayeeta Chattopadhyay wrote:
Nice pattern
12.02.2021 - 03:58
![]() Jayeeta Chattopadhyay wrote:
Jayeeta Chattopadhyay wrote:
Should I decrease the neck first and then do the picot edge or vice versa while doing the left front piece?
12.02.2021 - 03:58DROPS Design answered:
Dear Mrs Chattopadhyay, on right front piece, you decreased for neck after the stitches on picot edge (beg of row from RS), on left front piece, picot edge is worked at the end of row from RS, you will decrease before the sts on picot edge. Happy knitting!
12.02.2021 - 08:05
![]() Yvonne wrote:
Yvonne wrote:
Hallo ik heb geen rondbrei naald kan je de panden ook gewoon op breinaalden breien dan afhechten en later aan het achterland naaien? Bestaat het achterland ook met aangebreide mouwen? Alvast mijn dank
12.10.2019 - 21:36DROPS Design answered:
Dag Yvonne,
Er wordt een rondbreinaald geadviseerd omdat je (met name in de grotere maten) op een gegeven moment veel steken op de naald hebt, vanwege de aangebreide mouw. Als het aantal steken geen probleem is kan het vest ook prima op rechte naalden gebreid worden.
15.10.2019 - 18:36
![]() Beatriz wrote:
Beatriz wrote:
Serait-il possible d'avoir d'autres modèles de boléro, exemple pour danseuse de ballet? Merci
21.09.2019 - 13:13DROPS Design answered:
Bonjour Beatriz, vous trouverez ici tous nos modèles de boléros et là tous nos modèles de cache-coeurs. Bon tricot!
23.09.2019 - 08:44
![]() Marijke Jaspers wrote:
Marijke Jaspers wrote:
U geeft als steekverhouding 17 steken 34 naalden dit is 10x10. Als ik, voor het vestje dat ik wil maken nl 134/140, 52 steken opzet, kom ik niet aan 38 cm. 52 : 17 = 3x10 = 30 cm. Waar denk ik verkeerd? Of moet ik meer steken opzetten?
07.05.2019 - 19:21DROPS Design answered:
Dag Marijke,
Het (rechter) voorpand met overslag beslaat niet de volledige breedte van het vest. Aan de onderkant van het achterpand (wat wel over de hele breedte is) heb je 64 steken.
22.05.2019 - 14:02
![]() Marijke Jaspers wrote:
Marijke Jaspers wrote:
Met welk Drops garen kan ik dit vestje breien als ik niet met het voorgestelde garen wil werken? Graag een garen dat gewoon in de wasmachine gewassen kan worden
03.05.2019 - 07:24DROPS Design answered:
Dag Marijke,
Je zou bijvoorbeeld Big Merino kunnen gebruiken. Dit komt ongeveer overeen met de aanbevolen garendikte (C) en kun je in de machine wassen (wel even de wasvoorschirften lezen.)
05.05.2019 - 17:45
![]() Beatriz wrote:
Beatriz wrote:
Bonjour, je tricote l\'échantillon avec une aiguille numéro 5 comme suggéré mais je seulement 5 centimètres de tricot. ce n\'est pas normal, quoi faire s\'il vous plaît, merci
02.04.2019 - 11:21DROPS Design answered:
Bonjour Beatriz, tricotez-vous bien avec 1 fil Alpaca et 1 fil Kid-Silk en même temps (= 2 fils)? Vous devez bien avoir 17 m en largeur et 34 rangs au point mousse (= 17 côtes mousse) en hauteur. Bon tricot!
02.04.2019 - 12:40
![]() Finette wrote:
Finette wrote:
Bonjour j’ai fait les 2 devants et je ne comprends pas comment relier et faire le dos.. vos explications ne sont pas très claires pour mon petit niveau de tricoteuse.. pouvez vous m’aider? J
28.01.2019 - 17:51DROPS Design answered:
Bonjour Finette, vous allez rassembler les deux devants, sur l'endroit: tricotez les mailles du devant gauche, montez les mailles de l'encolure dos et tricotez ensuite les mailles du devant droit. Continuez maintenant au point mousse, vous rabattre ensuite les mailles des manches et terminez le dos. cette vidéo montre comment monter les mailles à la fin du devant gauche, quand toutes les mailles sont montées, tricotez les mailles du devant droit. Bon tricot!
29.01.2019 - 08:42
![]() Jany wrote:
Jany wrote:
Bonjour le cache cœur je voudrais savoir si l'on peut le faire avec des aiguilles normales si oui pourrais je avoir l’explication pour du 8 ans merci beaucoup
02.12.2018 - 08:40DROPS Design answered:
Bonjour Jany, le cache-coeur se tricote en allers et retours sur aiguille circulaire pour avoir suffisamment de place pour y loger toutes les mailles. Vous pouvez tricoter sur aiguilles droites, mais vos mailles seront plus serrées, pensez à bien conserver la bonne tension. Vous trouverez ici plus d'informations sur les aiguilles circulaires. Bon tricot!
03.12.2018 - 09:28
![]() Monica wrote:
Monica wrote:
Buongiorno, vorrei sapere se per questo modello è possibile utilizzare il filato Brushed Alpaca Silk. Grazie.
13.11.2018 - 12:02DROPS Design answered:
Buongiorno Monica. Sì, può lavorare con Brushed Alpaca Silk. A questa pagina trova indicazioni utili per la sostituzione dei filati. Per ogni ulteriore aiuto può rivolgersi al suo rivenditore Drops di fiducia. Buon lavoro!
13.11.2018 - 12:45
|
|
Titania#titaniacardigan |
|
|
|
|
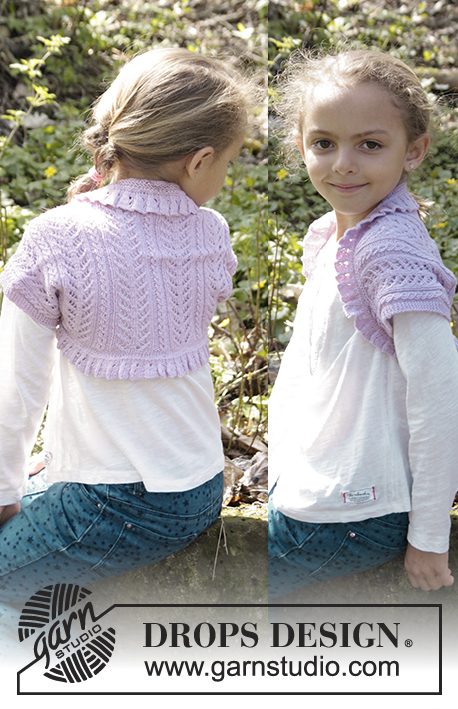
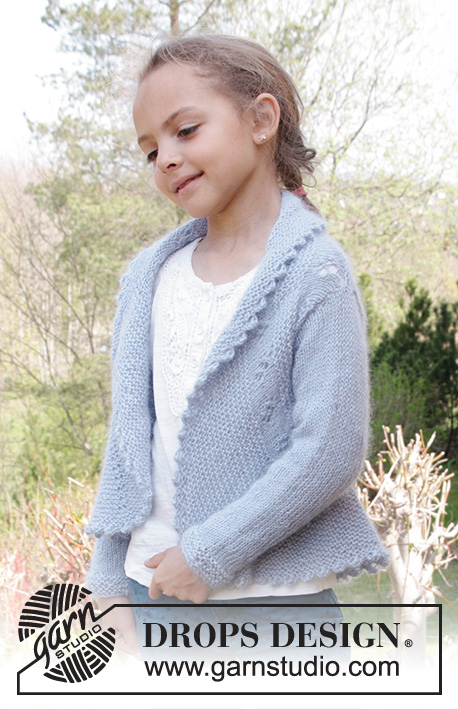
Knitted wrap around jacket in garter st in DROPS Alpaca and DROPS Kid-Silk. Size children 3-12 years.
DROPS Children 27-13 |
|
|
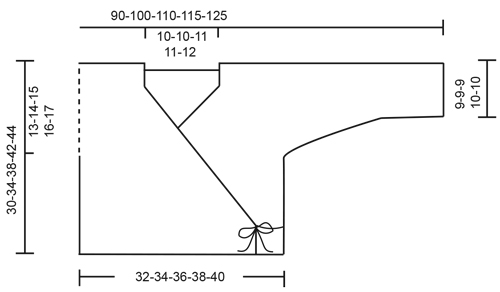
GARTER ST (back and forth on circular needle): K all rows. 1 ridge = K2 rows. DECREASE TIP: Dec inside 4 sts towards mid front (= inside picot edge). All dec are done from RS! Dec as follows after 4 sts: Slip 1 st as if to K, K 1, psso. Dec before 4 sts as follows: K 2 tog. PICOT EDGE (back and forth on needle): RIGHT FRONT PIECE: ROW 1 (= RS): K all sts. ROW 2 (= WS): K until 4 sts remain, work these sts as follows: K 2 tog, 1 YO, K 2 sts in each of the last 2 sts = 2 new sts on row. ROW 3 (= RS): Slip 1st st as if to K, K 1, psso, K 1 and slip the last st on right needle over the foremost st, 2 sts dec - then K the remaining sts. ROW 4 (= WS): K all sts. Repeat rows 1 to 4. LEFT FRONT PIECE: ROW 1 (= RS): K until 4 sts remain, work these sts as follows: K 2 tog, 1 YO, K 2 sts in each of the last 2 sts = 2 new sts on row. ROW 2 (= WS): Slip 1st st as if to K, K 1, psso, K 1 and slip the last st on right needle over the foremost st, 2 sts dec - then K the remaining sts. ROW 3 (= RS): K all sts. ROW 4 (= WS): K all sts. Repeat rows 1 to 4. ---------------------------------------------------------- JACKET: Worked back and forth on circular needle. Beg on front piece, cast on sts for sleeve and work up to the shoulder. Work the other front piece, place both front pieces tog and work down the back piece. RIGHT FRONT PIECE: LOOSELY cast on 44-46-50-52-54 sts on circular needle size 5 mm / US 8 with one strand Kid-Silk and one strand Alpaca (= 2 strands) work in GARTER ST - see explanation above (1st row = RS). Work a picot edge over the outermost 4 sts towards mid front (i.e. the first 4 sts on needle) READ ALL OF THE FOLLOWING SECTION BEFORE CONTINUING! When piece measures 3-5-6-9-10 cm / 1"-2"-2½"-3½"-4" (adjust so that next row is worked from RS), dec 1 st inside picot edge at beg of row - READ DECREASE TIP. Repeat dec every cm / ½" 24-24-27-28-29 more times. REMEMBER THE KNITTING GAUGE AT THE SAME TIME when piece measures 17-20-23-26-27 cm / 6¾"-8"-9"-10¼"-10½" cast on new sts at the end of row towards the side of sleeve as follows: 5-4-4-4-4 sts 5-7-9-9-11 times in total and then 25-28-27-30-28 sts 1 time. After all inc and dec there are 69-77-85-89-96 sts on the needle for shoulder/sleeve. Continue in garter st until piece measures 30-34-38-42-44 cm / 11¾"-13½"-15"-16½"-17¼". Insert 1 marker = mid on top of shoulder. Continue to work until piece measures 2 cm / ¾" from the marker, finish with 1 row K from WS. Put all sts on a stitch holder. LEFT FRONT PIECE: Cast on and work as right but reversed i.e. dec for neck inside picot edge at the end of row from RS (instead of at the beg of row from RS). BACK PIECE: Work left front piece on to circular needle (= K from RS), cast on 16-16-18-18-20 new sts (= back of neck) and work right front piece on to circular needle (= K from RS) = 154-170-188-196-212 sts. NOW MEASURE PIECE FROM MARKERS ON SHOULDERS. Continue to work in garter st back and forth on needle. When piece measures 9-9-9-10-10 cm / 3½"-3½"-3½"-4"-4", bind off sleeve sts as follows: bind off at beg of every row in each side as follows: 25-28-27-30-28 sts 1 time and 5-4-4-4-4 sts 5-7-9-9-11 times = 54-58-62-64-68 sts on needle. Continue until piece measures approx. 30-34-38-42-44 cm / 11¾"-13½"-15"-16½"-17¼" – fold piece at the markers on shoulders and check that front and back pieces are the same length – loosely bind off. ASSEMBLY: Sew side and sleeve seams tog edge to edge in outer loops of edge stss. TIES: Where dec for neck on right front piece beg work a tie as follows, work with 1 strand of each quality with crochet hook size 5 mm / H/8. 1 sc at the tip, then work ch for 20-25 cm / 8"-9¾", turn and work 1 sl st in every ch. Work a tie the same way on the outside of seam in the left side - make sure that tie is in the same height as on front piece. Then work another tie on the inside of the seam in the right side and another one where dec for neck starts on the left front piece – make sure that all of the ties are at the same height. |
|
 |
|
Have you finished this pattern?Tag your pictures with #dropspattern #titaniacardigan or submit them to the #dropsfan gallery. Do you need help with this pattern?You'll find 17 tutorial videos, a Comments/Questions area and more by visiting the pattern on garnstudio.com. © 1982-2026 DROPS Design A/S. We reserve all rights. This document, including all its sub-sections, has copyrights. Read more about what you can do with our patterns at the bottom of each pattern on our site. |


With over 40 years in knitting and crochet design, DROPS Design offers one of the most extensive collections of free patterns on the internet - translated to 17 languages. As of today we count 324 catalogs and 12285 patterns - 12275 of which are translated into English (US/in).
We work hard to bring you the best knitting and crochet have to offer, inspiration and advice as well as great quality yarns at incredible prices! Would you like to use our patterns for other than personal use? You can read what you are allowed to do in the Copyright text at the bottom of all our patterns. Happy crafting!
Post a comment to pattern DROPS Children 27-13
We would love to hear what you have to say about this pattern!
If you want to leave a question, please make sure you select the correct category in the form below, to speed up the answering process. Required fields are marked *.