
Popular categories
Looking for a yarn?


Comments / Questions (46)
![]() Mette wrote:
Mette wrote:
Nu er jeg så nået til 3.række. Jeg laver trøjen i str. XXXL Jeg tæller 104 m men når jeg tæller igennem opskriften får jeg det kun til 88! Jeg kan bare ikke få det til at passe Hvad gør jeg forkert?
07.05.2017 - 12:07DROPS Design answered:
Hækl 3.række i mønsteret Samtidig med at der tages ud jævnt fordelt således (= fra retsiden): Hækl A.1a 2 m, A.1b 12 m og tag 4 st ud jævnt fordelt, A.2 6mx2=12(= 2 gange i bredden), A.1b 8 m og tag 4 st ud jævnt fordelt, A.2 som før = 12m, A.1b 28 m og tag 8 st ud jævnt fordelt, A.2 som før = 12, A.1b 8 m og tag 4 st ud jævnt fordelt, A.2 som før = 12, A.1b 12 m og tag 4 st ud jævnt fordelt, afslut med A.1c 2 m = 144 st
10.05.2017 - 08:28
![]() Mette wrote:
Mette wrote:
Er det rigtig forstået hvis jeg har læst mig frem til at 2. Række er hvid og skiftevis fastmaske og luftmaske? Jeg synes ikke der står noget om mærketråde! Hvor skal de være?
28.04.2017 - 18:00DROPS Design answered:
Hej Mette, Ja det stemmer striberne starter med naturhvid. Mærketrådene kommer længere nede i opskriften. God fornøjelse!
03.05.2017 - 11:25
![]() Mette wrote:
Mette wrote:
Er det kun mig der synes at opskriften er skrevet/gjort mega kompliceret at tyde. Kunne den ikke være skrevet meget mere enkelt? Jeg har købt garn og glædede mig til at hækle dem, men har mistet modet og jeg er kun lige gået i gang 😕 Overvejer kraftigt at bruge garnet til noget andet
27.04.2017 - 19:42
![]() Malin wrote:
Malin wrote:
Jag tycker att det är ett märkligt och väldigt icke- serviceminded svar. Jag har köpt ert garn och vill ha hjälp här. Det syns i kommentarsfältet att fler med mig har problem med mönstret. Jag har ökat i varv 3 och 5 och vid varv 5 stämmer antalet maskor, men när jag gör varv 7 räcker stolparna inte varvet ut och jag förstår inte vad jag gör för fel. Jag önskar förklaring och hjälp!
01.03.2017 - 19:15DROPS Design answered:
Hej Malin, Fra 7.rad øger du kun ifølge A.2. Om du sætter en mærketråd på hver side af A.2 helt i starten, så bliver det tydeligere for dig hvor mange st du skal øge hver gang du hækler diagram A.2. Ifølge diagrammet skal du skal øge 2 st for hver rad med st. God fornøjelse!
02.03.2017 - 09:32
![]() Johanna wrote:
Johanna wrote:
Hur ser varv 7 i stl L ut? Är det A1a över 2 m, A1b över 12 m, A2 2 gånger, A1b över 10 m, A2 2 gånger, A1b över 26 m, A2 2 gånger, A1b lver 10 m, A2 2 gånger, A1b över 12 m, A1c över 2 m?
27.02.2017 - 15:26DROPS Design answered:
Hej Johanna, På varv 5 har du øget over A.1b så de øgede masker må du lægge til A1b når du hækler dem på varv 7. Nu skal du kun øge over A.2 ifølge diagrammet. Sæt gerne mærketråde som markerer A.1b og A.2 så du er sikker på at få alle økninger med. God fornøjelse!
02.03.2017 - 09:39
![]() Malin wrote:
Malin wrote:
Jag får inte ihop mönstret. Kan ni berätta hur många stolpar det ska vara sammanlagt i oket i varv 7, 9, 11, 13, 15, 19?
26.02.2017 - 15:35DROPS Design answered:
Hej Malin. Jeg kan ikke give dig antallet per varv i hver str. Men du skal fölge diagrammerne. Du tager ud i A.1 i varv 3 og 5 (i de naevnte str) og du tager ud automatisk som du hekler A.2
28.02.2017 - 16:37Wesam wrote:
Beautiful cardigan I'm making it now but I'm having a little problem understanding the 5th row also the continue pattern part. Should I continue with just a2 or continue with last 4 rows. Thank you for your work and time
24.02.2017 - 20:58DROPS Design answered:
Dear Mrs Wesam, on row 5 work pattern as described (= row 5 in diagram), inc evenly over A.1b and inc in A.2 as shown in diagram. After row 5, continue following diagrams as before inc at the same time as shown in A.2. Happy crocheting!
27.02.2017 - 08:59
![]() Helen wrote:
Helen wrote:
Hej Jag har börjat virka 173-38. Vid start av varv tre står att man SAMTIDIGT med mönster A.2 öka enligt beskrivningen. När hela diagrammet är klart ska jag ha 175 maskor (XL). Vid varv 17 har jag redan 324.Ska man inte öka både enligt beskrivningen OCH enligt diagrammet? Helen
17.01.2017 - 20:56DROPS Design answered:
Hej Helen. Der ökes jaevnt fordelt i varv 3 udover diagrammet. Det gaelder kun for varv 3 (ligesom der ökes udover diagrammet i varv 5). Det er altsaa kun i disse 2 varv at du skal öke udover diagrammet - Ellers faar du for mange st
18.01.2017 - 15:47
![]() Malin wrote:
Malin wrote:
1. I virkinfo står det BÅDE "ersätter första stolpe" och "ersätter inte första stolpe". Vilket gäller och när gäller det? 2. Ok: (inkl 3 lm att vända med). Är de lm inräknade i det antal som står (100-103-107..) el ska jag lägga till dem? 3. Vad menas med "1 st i var och en av de nästa 5-1-5-5-1-1 lm"?
05.01.2017 - 15:00DROPS Design answered:
Hej Malin. Det er fordi der er forskel paa om du hekler rundt (omg/v) eller frem og tilbage (rader/varv), saa derfor to forskellige. Der staar: Virka 100-103-107-114-117-124 lm (inkl 3 lm att vända med), saa det er inklusiv, du skal ikke laegge til her.
11.01.2017 - 12:37
![]() Melanie Kaiser wrote:
Melanie Kaiser wrote:
Guten Morgen, ich finde die vorgestellte Jacke wunderschön und bin hochmotiviert , sie zu häkeln (nicht zuletzt auch wegen dem schönen Garn). Ich habe bereits einige Jacke Häkelerfahrung, komme aber mit Häkelschrift und Diagrammen leider nicht gut zurecht. Gibt es irgendwo die Möglichkeit, die Anleitung "in Ausführlich" zu erwerben? Herzlichen Dank für Ihre Hilfe und viele Grüße! M. Kaiser
02.11.2016 - 10:39DROPS Design answered:
Liebe Frau Kaiser, jedes Symbol in Häkelschrift entspricht 1 Masche - Lesen Sie mal jedes Diagram von unten in der rechen Ecke nach links (Hinreihe) und von links nach rechts (Rückreihe). Schriftliche Anleitung sollen Sie gleichzeitig lesen. Ihr DROPS Laden wird Ihnen gerne hilfen, auch telefonish oder per mail.
02.11.2016 - 11:13
|
||||||||||||||||||||||
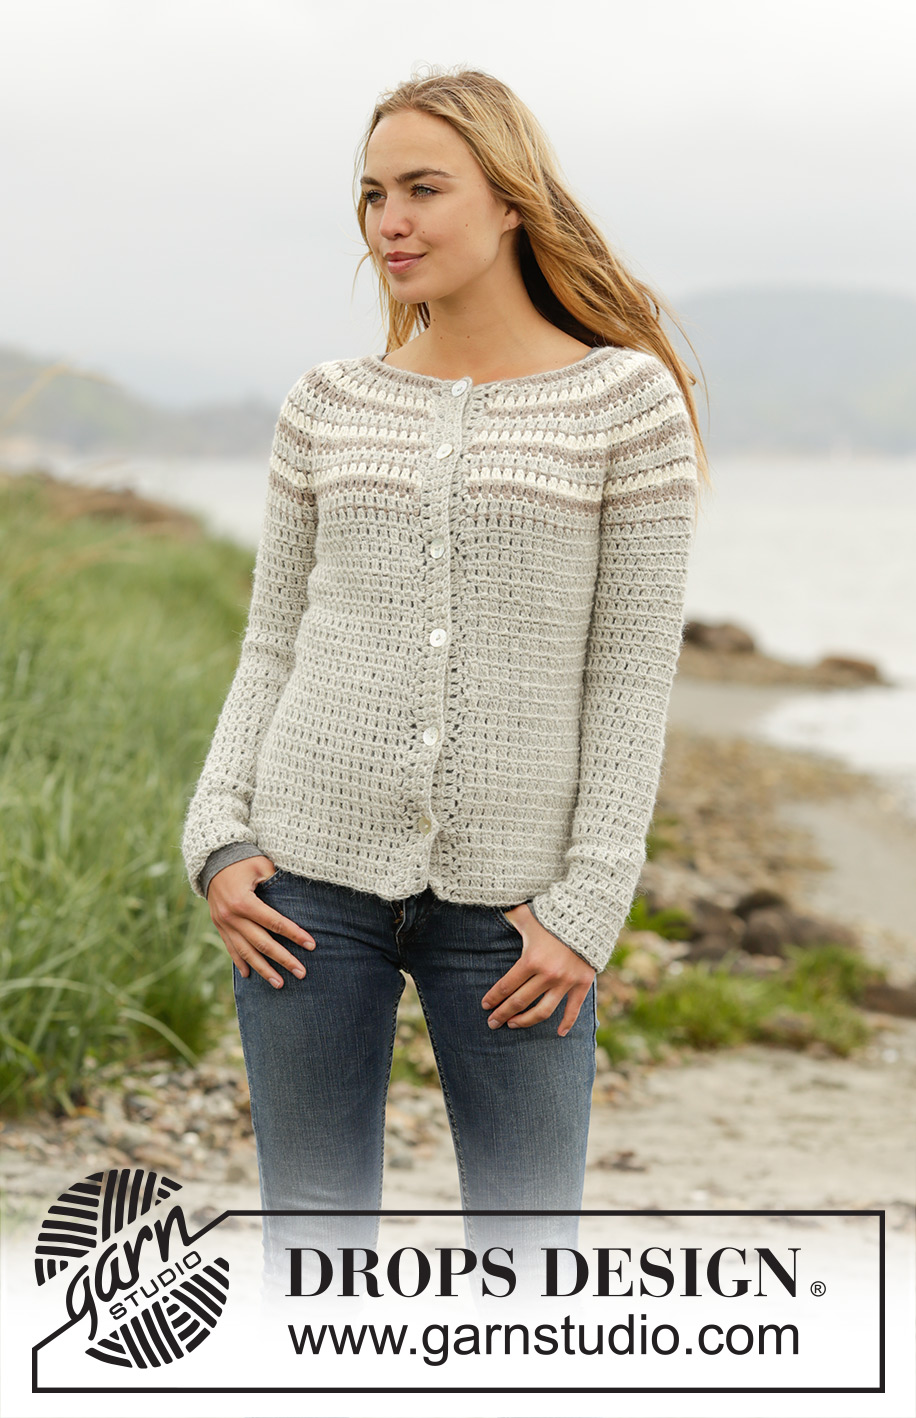
Misty Mountain Cardigan#mistymountaincardigan |
||||||||||||||||||||||
|
|
||||||||||||||||||||||
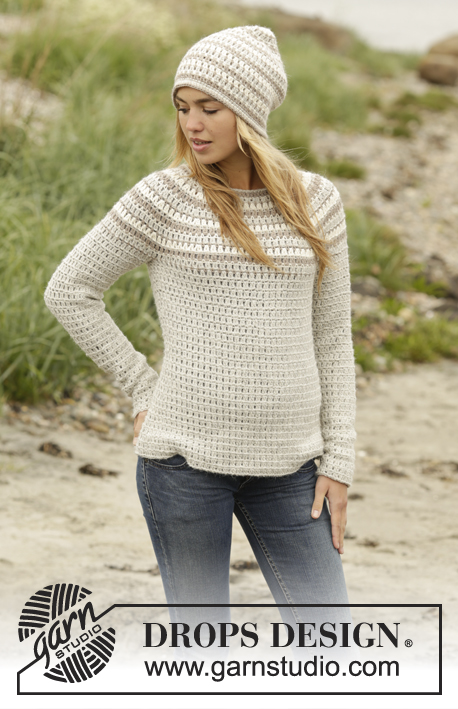
Crochet DROPS jacket with stripes, worked top down in ”Puna”. Size: S - XXXL.
DROPS 173-38 |
||||||||||||||||||||||
|
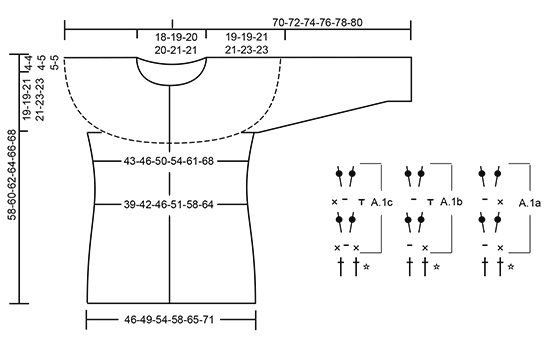
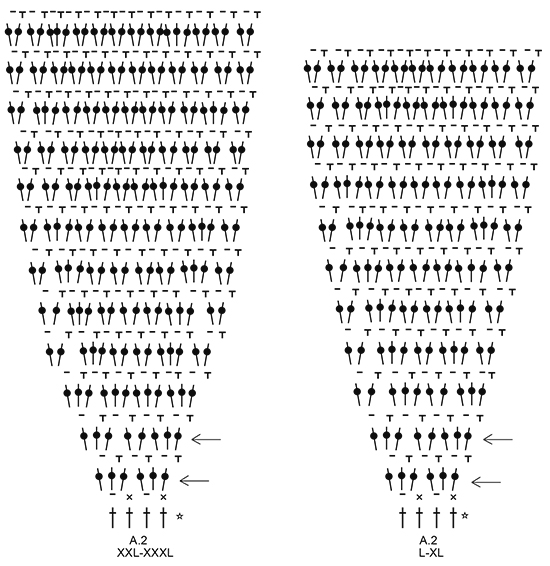
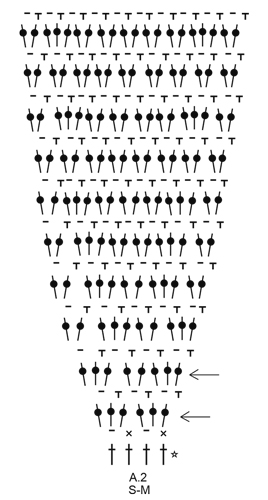
PATTERN: See diagrams A.1 and A.2. All rows with dc = RS. See diagram for correct size. CROCHET INFO: When working back and forth: Beg every dc row with 3 ch (does not replace first dc). Beg every sc row with 1 ch (does not replace first sc). At the end of every row with dc/sc work as follows: Before last pull through of last dc/sc switch color as follows: Get next color, i.e. 2 rows down (1 dc row and 1 sc row), with the new color work 1 sl st around row it was worked on (i.e. around last dc/sc), ch 4, pull then through last loop on hook. This is done to avoid a tight strand in the side of piece. When working in the round: Beg every sc round with 1 ch (this replaces first sc) and finish with 1 sl st in first ch from beg of round. Beg every round with dc with 3 ch (= first dc) and finish with 1 sl st in 3rd ch at beg of round. STRIPES: STRIPE 1: 1 row off white. STRIPE 2: 1 row light gray. STRIPE 3: 1 row taupe. DECREASE TIP (applies to body): Adjust so that next row is 1 row with dc. Work as before until 1 ch remains before marker, * work 1 dc around next ch, but wait with last pull through, work 1 dc more around same ch, but on last pull through, pull yarn through all sts on hook (= 1 dc dec) *, repeat from *-* around next ch (i.e. on the other side of marker) = 2 dc dec at each marker (= 4 dc in total). Every time you dec, repeat A.1b 2 times less in total in width. INCREASE TIP: Adjust so that next row is 1 row with dc. Work as before until 1 ch remains before marker, * work 3 dc around next ch *, repeat from *-* 2 times in total = 2 dc inc at marker, repeat at both markers (= 4 dc inc in total). Every time you inc, repeat A.1b 2 more times in total in width. DECREASE TIP-1 (applies to sleeve): Adjust so that next round is 1 round with dc. * Work 1 dc around first/next ch on round but wait with last pull through, work 1 dc more around the same ch but on last pull through, pull yarn through all sts on hook (= 1 dc dec) *, repeat from *-* around next ch = 2 dc dec. Every time you dec, repeat A.1b 1 time less in total in width. Dec alternately at beg and end of round (i.e. when dec at the end work as before until 2 ch remain on round). ---------------------------------------------------------- JACKET: Worked top down, back and forth. Work band at the end. YOKE: Work 100-103-107-114-117-124 ch (includes 3 ch to turn with) on hook size 4.5 mm/US 7 with taupe. Work 1 dc in 4th ch from hook - READ CROCHET INFO, 1 dc in each of the next 5-1-5-5-1-1 ch, * skip ch 1, 1 dc in each of the next 6 ch *, repeat from *-* the entire row = 84-86-90-96-98-104 dc. Work 2nd row in pattern as follows (= from WS with sc/ch) in STRIPES - see explanation above. Work A.1c over the next 2 dc, A.1b over the first 8-8-10-10-10-12 dc (= 4-4-5-5-5-6 times in width), A.2 over the next 8 dc (= 2 times in width), A.1b over the next 6-6-6-8-8-8 dc (= 3-3-3-4-4-4 times in width), A.2 over the next 8 dc (= 2 times in width), A.1b over the next 20-22-22-24-26-28 dc (= 10-11-11-12-13-14 times in width), A.2 over the next 8 dc (= 2 times in width), A.1b over the next 6-6-6-8-8-8 dc (= 3-3-3-4-4-4 times in width), A.2 over the next 8 dc (= 2 times in width), A.1b over the next 8-8-10-10-10-12 dc (= 4-4-5-5-5-6 times in width), finish with A.1a over the last 2 dc. Repeat A.1a to A.1c vertically and inc as shown in A.2 AT THE SAME TIME inc evenly as follows: Work 3rd row in pattern AT THE SAME TIME inc evenly as follows (= from RS): Work A.1a over the first 2 sts, A.1b over the next 8-8-10-10-10-12 sts and inc 0-2-2-4-4-4 dc evenly, A.2 as before (= 2 times in width), A.1b over the next 6-6-6-8-8-8 sts and inc 0-4-4-4-4-4 dc evenly, A.2 as before, A.1b over the next 20-22-22-24-26-28 sts and inc 0-4-4-6-6-8 dc evenly, A.2 as before, A.1b over the next 6-6-6-8-8-8 sts and inc 0-4-4-4-4-4 dc evenly, A.2 as before, A.1b over the next 8-8-10-10-10-12 sts and inc 0-2-2-4-4-4 dc evenly, finish with A.1c over the last 2 sts = 100-118-122-134-136-144 dc (includes inc in A.2). REMEMBER THE CROCHET GAUGE! Work 4th row in pattern as follows (= from WS): Work A.1c over the first 2 dc, A.1b over the next 8-10-12-14-14-16 dc, A.2 as before, A.1b over the next 6-10-10-12-12-12 dc, A.2 as before, A.1b over the next 20-26-26-30-32-36 dc, A.2 as before, A.1b over the next 6-10-10-12-12-12 dc, A.2 as before, A.1b over the next 8-10-12-14-14-16 dc, finish with A.1a over the last 2 sts. Work 5th row in pattern AT THE SAME TIME inc evenly as follows (= from RS): Work A.1a over the first 2 sts, A.1b over the next 8-10-12-14-14-16 sts and inc 0-0-0-0-2-4 dc evenly, A.2 as before (= 2 times in width), A.1b over the next 6-10-10-12-12-12 sts and inc 0-2-4-4-0-0 dc evenly, A.2 as before, A.1b over the next 20-26-26-30-32-36 sts and inc 0-0-2-4-4-8 dc evenly, A.2 as before, A.1b over the next 6-10-10-12-12-12 sts and inc 0-2-4-4-0-0 dc evenly, A.2 as before, A.1b over the next 8-10-12-14-14-16 sts and inc 0-0-0-0-2-4 dc evenly, finish with A.1c over the last 2 sts = 116-138-148-162-160-176 dc (includes inc in A.2). Continue pattern and inc in A.2. When last row remains in A.2, piece measures approx. 18-18-19-19-21-21 cm / 7"-7"-7½"-7½"-8¼"-8¼" from neck edge (= 212-234-260-274-304-320 dc). Work last row of A.2 from WS as follows: Work A.1c over the first 2 dc, A.1b over the next 8-10-12-14-16-20 dc, A.2 over the next 20-20-22-22-26-26 dc (= 1 time in width), 8-8-8-10-10-12 ch, skip the next 46-52-58-60-64-64 dc (i.e. 20-20-22-22-26-26 dc A.2, 6-12-14-16-12-12 dc A.1b and 20-20-22-22-26-26 dc A.2 for sleeve), A.2 over the next 20-20-22-22-26-26 dc (= 1 time in width), A.1b over the next 20-26-28-34-36-44 dc, A.2 over the next 20-20-22-22-26-26 dc (= 1 time in width), 8-8-8-10-10-12 ch, skip the next 46-52-58-60-64-64 dc (i.e. 20-20-22-22-26-26 dc A.2, 6-12-14-16-12-12 dc A.1b and 20-20-22-22-26-26 dc A.2 for sleeve), A.2 over the next 20-20-22-22-26-26 dc (= 1 time in width), A.1b over the next 8-10-12-14-16-20 dc, finish with A.1a over the last 2 dc = 137-147-161-175-197-217 sts. Continue piece with light gray. Work next row as follows from RS: Work A.1a over the first 2 dc, A.1b over the next 28-30-34-36-42-46 sts, 1 dc in each of the 8-8-8-10-10-12 ch under sleeve, insert 1 marker between these sts, A.1b over the next 60-66-72-78-88-96 sts, 1 dc in each of the 8-8-8-10-10-12 ch under sleeve, insert 1 marker between these, A.1b over the next 28-30-34-36-42-46 sts, finish with A.1c over the last 3 sts. Insert 1 marker in piece, NOW MEASURE PIECE FROM HERE. Work next row as follows from WS: Work A.1c over the first 2 dc as before, repeat A.1b over the next 132-142-156-170-192-212 dc, finish with A.1a over the last 2 dc. Continue pattern like this. When piece measures 4 cm / 1½" from marker, dec 2 dc at each marker - READ DECREASE TIP. Dec like this every 4-4½-4½-5½-5½-6 cm / 1½"-1¾"-1¾"-2¼"-2¼"-2½" 3 times in total = 124-134-148-162-184-204 dc. When piece measures 14-16-16-17-17-19 cm / 5½"-6¼"-6¼"-6¾"-6¾"-7½" from marker, inc 2 dc at each marker – see INCREASE TIP. Inc like this every 2½ cm / ⅞" a total of 6 times = 148-158-172-186-208-228 dc. Continue pattern until piece measures 35-37-37-38-38-40 cm / 13¾"-14½"-14½"-15"-15"-15¾" from marker (= 54-56-58-59-61-63 cm / 21¼"-22"-22¾"-23¼"-24"-24¾" from neck edge), adjust to finish with 1 row dc. Fasten off. SLEEVE: = 46-52-58-60-64-64 dc. Work first round on sleeve with same color as last stripe in sc on body. Sleeve is worked in the round, top down. Beg by working mid under sleeve as follows: Work 1 sc in the 5th-5th-5th-5th-5th-6th ch of the 8-8-8-10-10-12 ch worked in armhole on body, work 1 ch (= 1 sc), work 1 sc in each of the next 3-3-3-5-5-6 ch, A.1b (i.e. 1 round with sc and ch) over the 46-52-58-60-64-64 dc over sleeve, finish with 1 sc in each of the remaining 4-4-4-4-4-5 ch under sleeve = 54-60-66-70-74-76 sts. Continue piece with light gray. Insert 1 marker in piece, NOW MEASURE PIECE FROM HERE. Work A.1b in the round. When piece measures 3 cm / 1" from marker, dec 2 dc under sleeve - READ DECREASE TIP-1. Dec like this every 3-2½-2-2-2-2 cm / 1⅛"-⅞"-¾"-¾"-¾"-¾" 11-13-15-17-18-18 times in total = 32-34-36-36-38-40 sts. When piece measures 42-44-43-45-45-47 cm / 16½"-17¼"-17"-17¾"-17¾"-18½" from marker, adjust to finish with 1 round dc. Fasten off. Work the other sleeve the same way. LEFT BAND: Beg at the bottom of jacket from WS. Worked back and forth. Work with light gray as follows: Work 1 sl st around first dc, 1 sc, * ch 2, skip approx. 1 cm / ⅜", 1 sc around next dc *, repeat from *-* evenly up along edge on jacket, adjust to finish with 1 sc in last dc at the top of neck. On next row work 2 dc around every ch-space. Then work A.1a over the first 2 dc, repeat A.1b until 2 dc remain, finish with A.1c over the last 2 dc. Work a total of 3 rows of A.1 (= last row is a row with sc and ch). Fasten off. RIGHT BAND: Work as left but now from the top of jack down along the edge of jacket from WS. NECK EDGE: Work with light gray from RS as follows: Beg with 1 sl st around first dc on band, 1 ch (= 1 sc), work 1 sc around same dc, 2 sc around each of the next dc on band, 1 sc in every ch where dc was worked in first row (= 84-86-90-96-98-104 sc), finish with 2 sc around every dc over band. Fasten off. ASSEMBLY: Sew on buttons on left band. Fasten 1st button approx. 2 cm / ¾" from neck edge, then fasten them approx. 8 cm / 3⅛" apart. Button between 2 dc on right band. |
||||||||||||||||||||||
Diagram explanations |
||||||||||||||||||||||
|
||||||||||||||||||||||
 |
||||||||||||||||||||||
 |
||||||||||||||||||||||
 |
||||||||||||||||||||||
Have you finished this pattern?Tag your pictures with #dropspattern #mistymountaincardigan or submit them to the #dropsfan gallery. Do you need help with this pattern?You'll find 12 tutorial videos, a Comments/Questions area and more by visiting the pattern on garnstudio.com. © 1982-2026 DROPS Design A/S. We reserve all rights. This document, including all its sub-sections, has copyrights. Read more about what you can do with our patterns at the bottom of each pattern on our site. |
||||||||||||||||||||||


With over 40 years in knitting and crochet design, DROPS Design offers one of the most extensive collections of free patterns on the internet - translated to 17 languages. As of today we count 324 catalogs and 12285 patterns - 12275 of which are translated into English (US/in).
We work hard to bring you the best knitting and crochet have to offer, inspiration and advice as well as great quality yarns at incredible prices! Would you like to use our patterns for other than personal use? You can read what you are allowed to do in the Copyright text at the bottom of all our patterns. Happy crafting!
Post a comment to pattern DROPS 173-38
We would love to hear what you have to say about this pattern!
If you want to leave a question, please make sure you select the correct category in the form below, to speed up the answering process. Required fields are marked *.