
Popular categories
Looking for a yarn?


|
||||||||||||||||||||||
Misty Mountain |
||||||||||||||||||||||
|
|
||||||||||||||||||||||
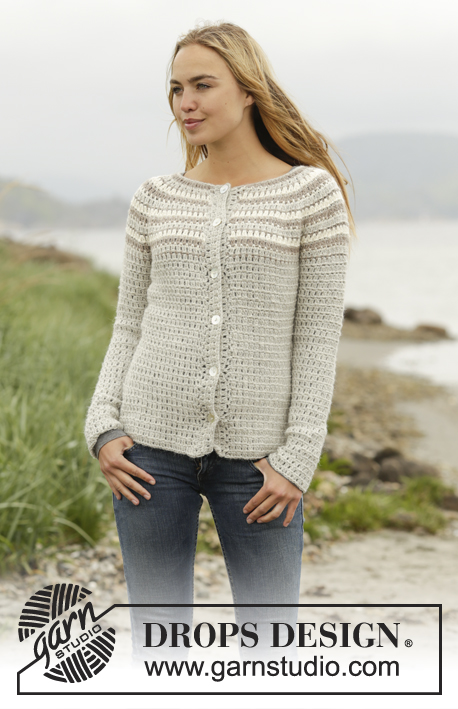
Crochet DROPS jumper and hat with stripes, worked top down in “Puna”. Size: S - XXXL.
DROPS 173-37 |
||||||||||||||||||||||
|
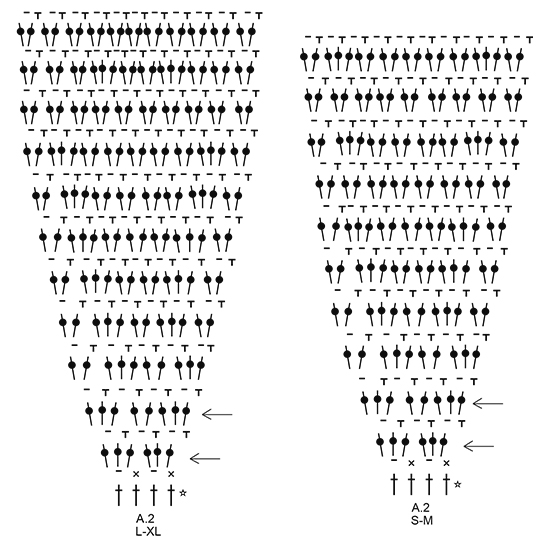
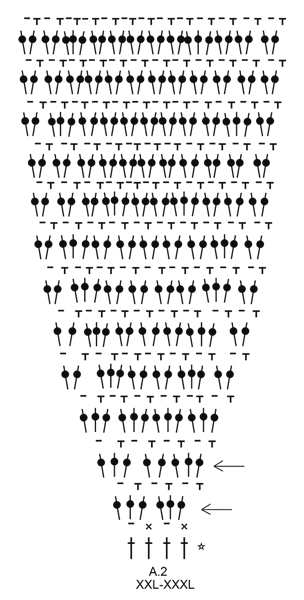
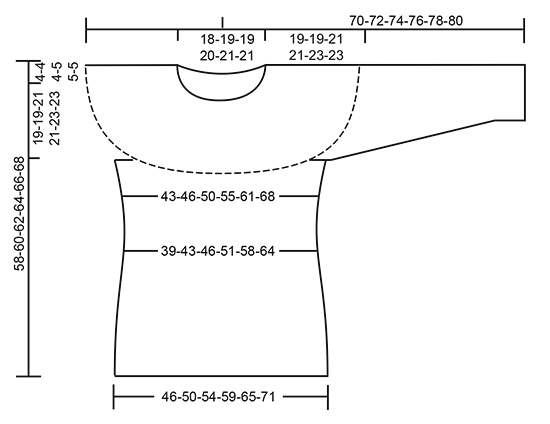
PATTERN: See diagrams A.1 to A.3. See diagram for correct size. CROCHET INFO: Beg every sc round with 1 ch (this replaces first sc) and finish with 1 sl st in first ch from beg of round. Beg every round with dc with 3 ch (= first dc) and finish with 1 sl st in 3rd ch at beg of round. At the end of every round with dc/sc work as follows: Before last pull through of last dc/sc switch color as follows: Get next color, i.e. 2 round down (1 dc round and 1 sc round), with the new color work 1 sl st around round it was worked on (i.e. around last dc/sc), ch 4, pull then through last loop on hook. This is done to avoid a tight strand in the piece. STRIPES: STRIPE 1: 1 round off white. STRIPE 2: 1 round light gray. STRIPE 3: 1 round taupe. DECREASE TIP (applies to body): Adjust so that next round is 1 round with dc. Work as before until 1 ch remains before marker, * work 1 dc around next ch, but wait with last pull through, work 1 dc more around same ch, but on last pull through, pull yarn through all sts on hook (= 1 dc dec) *, repeat from *-* around next ch (i.e. on the other side of marker) = 2 dc dec at each marker (= 4 dc in total). Every time you dec, repeat A.1 2 times less in total in width. INCREASE TIP: Adjust so that next round is 1 round with dc. Work as before until 1 ch remains before marker, * work 3 dc around next ch *, repeat from *-* 2 times in total = 2 dc inc at marker, repeat at both markers (= 4 dc inc in total). Every time you inc, repeat A.1 2 more times in total in width. DECREASE TIP-1 (applies to sleeve): Adjust so that next round is 1 round with dc. * Work 1 dc around first/next ch on round but wait with last pull through, work 1 dc more around the same ch but on last pull through, pull yarn through all sts on hook (= 1 dc dec) *, repeat from *-* around next ch = 2 dc dec. Every time you dec, repeat A.1 1 time less in total in width. Dec alternately at beg and end of round (i.e. when dec at the end work as before until 2 ch remain on round). ---------------------------------------------------------- JUMPER: The piece is worked top down. Rounds start mid back. YOKE: Work 96-101-101-110-115-120 ch on hook size 4.5 mm/US 7 with taupe and form a ring with 1 sl st in first ch. Work 3 ch (= 1 dc) - READ CROCHET INFO, 1 dc in each of the next 5-3-3-5-3-1 ch, * skip ch 1, 1 dc in each of the next 6 ch *, repeat from *-* the entire row = 84-88-88-96-100-104 dc. Work 2nd round (= round with sc/ch) in pattern as follows in STRIPES – see explanation above. Work A.1 over the first 10-12-12-12-14-14 dc (= 5-6-6-6-7-7 times in width), A.2 over the next 8 dc (= 2 times in width), A.1 over the next 6-6-6-8-8-8 dc (= 3-3-3-4-4-4 times in width), A.2 over the next 8 dc (= 2 times in width), A.1 over the next 20-22-22-24-26-28 dc (= 10-11-11-12-13-14 times in width), A.2 over the next 8 dc (= 2 times in width), A.1 over the next 6-6-6-8-8-8 dc (= 3-3-3-4-4-4 times in width), A.2 over the next 8 dc (= 2 times in width), A.1 over the last 10-10-10-12-12-14 dc (= 5-5-5-6-6-7 times in width). Repeat A.1 vertically and inc as shown in A.2 AT THE SAME TIME inc evenly as follows: Work 3rd round in pattern AT THE SAME TIME inc evenly as follows: Work A.1 over the first 10-12-12-12-14-14 sts and inc 0-2-2-4-4-4 dc evenly, A.2 as before (= 2 times in width), A.1 over the next 6-6-6-8-8-8 sts and inc 0-4-4-4-4-4 dc evenly, A.2 as before, A.1 over the next 20-22-22-24-26-28 sts and inc 0-4-4-6-6-8 dc evenly, A.2 as before, A.1 over the next 6-6-6-8-8-8 sts and inc 0-4-4-4-4-4 dc evenly, A.2 as before, A.1 over the last 10-10-10-12-12-14 sts and inc 0-2-2-2-4-4 dc evenly = 100-120-120-132-138-144 dc (includes inc in A.2). REMEMBER THE CROCHET GAUGE! Work 4th round in pattern as follows: Work A.1 over the first 10-14-14-16-18-18 dc, A.2 as before, A.1 over the next 6-10-10-12-12-12 dc, A.2 as before, A.1 over the next 20-26-26-30-32-36 dc, A.2 as before, A.1 over the next 6-10-10-12-12-12 dc, A.2 as before, A.1 over the last 10-12-12-14-16-18 dc. Work 5th round in pattern AT THE SAME TIME inc evenly as follows: Work A.1 over the first 10-14-14-16-18-18 sts and inc 0-0-0-2-0-4 dc evenly, A.2 as before (= 2 times in width), A.1 over the next 6-10-10-12-12-12 sts and inc 0-2-4-4-0-0 dc evenly, A.2 as before, A.1 over the next 20-26-26-30-32-36 sts and inc 0-0-2-4-4-8 dc evenly, A.2 as before, A.1 over the next 6-10-10-12-12-12 sts and inc 0-2-4-4-0-0 dc evenly, A.2 as before, A.1 over the last 10-12-12-14-16-18 sts and inc 0-0-2-2-2-4 dc evenly = 116-140-148-164-160-176 dc (includes inc in A.2). Continue pattern and inc in A.2. When last round remains in A.2, piece measures approx. 18-18-19-19-21-21 cm / 7"-7"-7½"-7½"-8 1/4"-8 1/4" from neck edge (= 212-236-260-276-304-320 dc). Work last round of A.2 as follows: Work A.1 over the first 10-14-14-18-18-22 dc, A.2 over the next 20-20-22-22-26-26 dc (= 1 time in width), 8-8-8-10-10-12 ch, skip the next 46-52-58-60-64-64 dc (i.e. 20-20-22-22-26-26 dc A.2, 6-12-14-16-12-12 dc A.1 and 20-20-22-22-26-26 dc A.2 for sleeve), A.2 over the next 20-20-22-22-26-26 dc (= 1 time in width), A.1 over the next 20-26-28-34-36-44 dc, A.2 over the next 20-20-22-22-26-26 dc (= 1 time in width), 8-8-8-10-10-12 ch, skip the next 46-52-58-60-64-64 dc (i.e. 20-20-22-22-26-26 dc A.2, 6-12-14-16-12-12 dc A.1 and 20-20-22-22-26-26 dc A.2 for sleeve), A.2 over the next 20-20-22-22-26-26 dc (= 1 time in width), A.1 over the last 10-12-14-16-18-22 dc = 136-148-160-176-196-216 sts. Continue piece with light gray. Work next round as follows: Work A.1 over the first 30-34-36-40-44-48 sts, 1 dc in each of the 8-8-8-10-10-12 ch under sleeve, insert 1 marker between these sts, A.1 over the next 60-66-72-78-88-96 sts, 1 dc in each of the 8-8-8-10-10-12 ch under sleeve, insert 1 marker between these, A.1 over the last 30-32-36-38-44-48 sts. Insert 1 marker in piece, NOW MEASURE PIECE FROM HERE. Then repeat A.1 over all sts. When piece measures 4 cm / 1½'' from marker, dec 2 dc at each marker - READ DECREASE TIP. Dec like this every 4-4½-4½-5½-5½-6 cm / 1½"-1 3/4"-1 3/4"-2 1/4"-2 1/4"-2 1/2" 3 times in total = 124-136-148-164-184-204 sts. When piece measures 14-16-16-17-17-19 cm / 5½"-6 1/4"-6 1/4"-6 3/4"-6 3/4"-7½" from marker, inc 2 dc at each marker – see INCREASE TIP. Inc like this every 2½ cm / 7/8" a total of 6 times = 148-160-172-188-208-228 dc. Continue pattern until piece measures 35-37-37-38-38-40 cm / 13 3/4"-14½"-14½"-15"-15"-15 3/4" from marker (= 54-56-58-59-61-63 cm / 21 1/4"-22"-22 3/4"-23 1/4"-24"-24 3/4" from neck edge), adjust to finish with 1 round dc. Fasten off. SLEEVE: = 46-52-58-60-64-64 dc. Work first round on sleeve with same color as last stripe in sc on body. Sleeve is worked in the round, top down. Beg by working mid under sleeve as follows: Work 1 sc in the 5th-5th-5th-5th-5th-6th ch of the 8-8-8-10-10-12 ch worked in armhole on body, work 1 ch (= 1 sc), work 1 sc in each of the next 3-3-3-5-5-6 ch, A.1 (i.e. 1 round with sc and ch) over the 46-52-58-60-64-64 dc over sleeve, finish with 1 sc in each of the remaining 4-4-4-4-4-5 ch under sleeve = 54-60-66-70-74-76 sts. Continue piece with light gray. Insert 1 marker in piece, NOW MEASURE PIECE FROM HERE. Work A.1 in the round. When piece measures 3 cm / 1'' from marker, dec 2 dc under sleeve - READ DECREASE TIP-1. Dec like this every 3-2½-2-2-2-2 cm / 1 1/8"-7/8"-3/4"-3/4"-3/4"-3/4" 11-13-15-17-18-18 times in total = 32-34-36-36-38-40 sts. When piece measures 42-44-43-45-45-47 cm / 16½"-17 1/4"-17"-17 3/4"-17 3/4"-18½" from marker, adjust to finish with 1 round dc. Fasten off. Work the other sleeve the same way. NECK EDGE: Work with light gray from RS as follows: Work 1 sc in every ch where dc was worked in first round (= 84-88-88-96-100-104 sc). Fasten off. ---------------------------------------------------------- HAT: Work piece top down, in STRIPES - see explanation above. Work 4 ch on hook size 3.5 mm/E/4 with taupe and form a ring with 1 sl st in first ch. Work A.3 – see CROCHET INFO! After the 3 first rounds of A.3 (= 36 dc) repeat A.3 4 times in total on the round. REMEMBER THE CROCHET GAUGE! When working last round of A.3, inc 0-2-4 dc evenly = 96-98-100 dc. Piece measures approx. 17 cm / 6 3/4'' in diameter. Then work A.1 over all sts (= 48-49-50 times on round). When piece measures 23-24-25 cm / 9"-9½"-9 3/4'' in total from the top, adjust so that last round is a round with dc, work 1 sc in every dc (continue with stripes). Work 3 rounds in total with 1 sc in every st. Piece measures 24-25-26 cm / 9½"-9 3/4"-10 1/4" in total from the top. Fasten off. |
||||||||||||||||||||||
Diagram explanations |
||||||||||||||||||||||
|
||||||||||||||||||||||

|
||||||||||||||||||||||
|
||||||||||||||||||||||
|
||||||||||||||||||||||
|
||||||||||||||||||||||
|
Have you made this or any other of our designs? Tag your pictures in social media with #dropsdesign so we can see them! Do you need help with this pattern?You'll find tutorial videos, a Comments/Questions area and more by visiting the pattern on garnstudio.com. © 1982-2024 DROPS Design A/S. We reserve all rights. This document, including all its sub-sections, has copyrights. Read more about what you can do with our patterns at the bottom of each pattern on our site. |
||||||||||||||||||||||


With over 40 years in knitting and crochet design, DROPS Design offers one of the most extensive collections of free patterns on the internet - translated to 17 languages. As of today we count 304 catalogs and 11422 patterns - 11417 of which are translated into English (US/in).
We work hard to bring you the best knitting and crochet have to offer, inspiration and advice as well as great quality yarns at incredible prices! Would you like to use our patterns for other than personal use? You can read what you are allowed to do in the Copyright text at the bottom of all our patterns. Happy crafting!
Comments / Questions (107)
Hej Jeg er begyndt på opskrift 173-37 i størrelse S men jeg er i tvivl om hvordan opskriften skal læses. Hvad skal fx hækles i omgang 2 og omgang 3? Og hvad menes der med at man skal gentage A1 i højden og samtidig tage ud som i A2? Hvis man skulle skrive opskriften kun til S hvilke tal skal jeg så kigge på? Venlig hilsen Lea
04.03.2024 - 21:28DROPS Design answered:
Hej Lea, du skal kigge på det først tal til størrelse S. Så du starter med 96 lm og hækler ifølge diagrammerne :)
07.03.2024 - 15:37Jeg har forsøkt å hekle både jakka 173-38 og genseren 173-37, uten å få det til. Det er noe som virker galt med økningen i de første omgangene, det blir alt for mange masker. F.eks. Økning i str XL (genser), mellom 1. omg (96 m), 2. omg (økning 16 m =112 m), 3. omg (økning 38 m = 150 m). Ifølge oppskrifta skal det bare være 132 m etter 3. omg. Hva er galt?
18.01.2024 - 22:07Bonjour, merci pour votre réponse :) Pour ce fameux 3eme tour, lorsque je regarde la grille a.2, je comptes 8 brides (3 dans la 1ere m. en l'air, 2 dans la suivante et 3 dans la dernière). Si je dois faire la grille 2 fois comme vous l'indiquez, cela fait 16 brides au total. Est ce que je me trompes dans la ligne à lire sur la grille a.2 ? Merci encore pour votre aide.
30.11.2023 - 21:23DROPS Design answered:
Bonjour Nina, le 3ème tour du diagramme A.2 est le 1er tour avec la flèche, autrement dit, celui où on crochète 6 brides (3 brides autour de chacune des mailles en l'air suivantes); le tour avec la 2ème flèche où on crochète 8 brides est le 5ème tour du diagramme, où on devra aussi augmenter à intervalles réguliers dans A.1 (pas dans A.2). Bon crochet!
01.12.2023 - 08:28Bonjour, je tente de réaliser ce modèle en taille M mais jai des difficultés avec les comptes de brides. Au tour 3, si je fais les augmentations en a.1 et a.2, je compte : 14 brides a.1 + 16 b a.2 + 10 b a.1 + 16 b a.2 + 26 b a.1 + 16 b a.2 + 10 b a.1 + 16 b a.2 + 12 b a.1 = 136 b au total. Pourtant il est écrit pour ce tour : " 120 B [y compris les augm. de la grille 2]". Je ne comprends pas où est mon erreur. Est-ce que vous pouvez maider sur cette étape ? Merci :)
29.11.2023 - 18:54DROPS Design answered:
Bonjour Nina, au 3ème tour vous devez avoir: 12 brides dans chacun des A.2, pas 16: vous crochetez 2 fois A.2 en largeur soit 2 fois (3 brides autour de chacun des 2 arceaux), vous aurez ainsi 120 brides. Bon crochet!
30.11.2023 - 10:07Ik kan niet goed terugvinden welke maat het beste bij mijn lichaamsafmetingen zou passen. Is er een maattabel waar ik dit op kan opzoeken? Met vriendelijke groet, Kristel.
20.07.2023 - 23:30DROPS Design answered:
Dag Kristel,
Het handigst is om een kledingstuk erbij te pakken dat je lekker zit en daarmee de maten te vergelijken. Ook vind je veel informatie op kledingmaat.nl
24.07.2023 - 20:14Jag förstår inte riktigt hur minskningen i mönstret ska göras. Vad menas med minska så med 4 cm mellanrum totalt 3 ggr. Ska jag virka 4 cm till på längden från första minskningen eller ska alla minskningar göras på samma varv?
22.03.2023 - 19:05DROPS Design answered:
Hei Emma. Ja, du skal virka 4 cm till på längden från första minskningen, så virka 4 cm till og minska. Minska totalt 3 ganger. mvh DROPS Design
27.03.2023 - 11:29Do you have any yarn substitutions recommendations for yarns that are machine washable? I have a baby and am constantly getting dirty so machine washable is a must!
01.11.2022 - 13:29DROPS Design answered:
Dear Leigh, always follow the instructions on the label / shade card, you will find even more tips here - your Yarn store might have even more tipps for you, feel free to contact them even per mail or telephone. Happy knitting!
01.11.2022 - 15:48Hello, what does treble around chain mean? Thank you
17.09.2022 - 15:51DROPS Design answered:
Dear Evie, it means that you need to work treble crochet under the chain, not inside it. Happy crocheting!
17.09.2022 - 16:09Buongiorno, nel.diagramma A2 il motivo parte con 4 m.a. da ripetere 2, nell'ultima riga le m.a. sono 20 (conti le maglie sul.diagrsmma) da ripetere 2 volte. Se fa i conti dei punti per ogni giro, tra aumenti in A1 e in A 2, il numero dei punti non corrisponde mai a quanto riportato sul testo di descrizione del lavoro......
06.01.2022 - 16:24DROPS Design answered:
Buongiorno Antonella, ad esempio il 3° giro per la taglia M si lavora in questo modo: A.1 (12 maglie) + 2 aumenti, A.2 ripetuto 2 volte (= 12 maglie), A.1 (6 maglie) + 4 aumenti, A.2 ripetuto 2 volte (= 12 maglie), A.1 (22 maglie) + 4 aumenti, A.2 ripetuto 2 volte (= 12 maglie), A.1 (6 maglie) + 4 aumenti, A.2 ripetuto 2 volte (= 12 maglie), A.1 (10 maglie) + 2 aumenti = 120 maglie. Poi prosegue con lo stesso approccio per i giri successivi. Buon lavoro!
08.01.2022 - 13:27I suggerimenti ricevuti non mi hanno aiutata. Avete controllato il testo e confrontato con il diagramma? Ripeto oltre a non essere assolutamente chiari, sono fuorvianti con i conteggi dei punti e gli aumenti indicati . Altro che schemi semplici! Secondo me ci sono errori di punteggiatura nel testo che dovreste rivedere. Nel frattempo ho acquistato la lana che non riesco a usare, sperienza NEGATIVA e lavoro a uncinetto da 40 anni!
04.01.2022 - 09:54DROPS Design answered:
Buonasera Antonella, ci dispiace per la sua esperienza negativa: noi abbiamo risposto a TUTTE le sue domande e commenti, cercando di aiutarla. Il diagramma A.2 è parte con 4 maglie che diventano 6 al 3° giro e ogni volta che si lavora A.2 si lavorano 2 ripetizioni, partendo quindi da 8 maglie (= 2 ripetizioni per volta) al 1° giro e arrivando a 12 maglie (= 2 ripetizioni per volta). Inoltre al 3° giro per la taglia M deve aumentare il numero di maglie indicato nei diagrammi A.1. Buon lavoro!
04.01.2022 - 20:57