
Popular categories
Looking for a yarn?


Comments / Questions (74)
![]() Annick wrote:
Annick wrote:
Bonjour,es que vos modèles aisance et comprise dans l explication du modèle . merci bonne journée
11.04.2026 - 08:53DROPS Design answered:
Bonjour Annick, découvrez ici comment choisir votre taille et l'aisance souhaitée. Bon tricot!
13.04.2026 - 08:00
![]() Inge wrote:
Inge wrote:
Jeg påtænker at strikke denne søde bluse. Ifølge opskriften så måler den 68 cm i længden i str. XXXL. Jeg vil gerne have den færdige længde på 72 cm. Hvor mange nøgler garn skal jeg bruge ekstra?
09.09.2025 - 09:28DROPS Design answered:
Hei Inge. Det har vi ingen oversikt over, siden vi ikke har strikket den lengre. Men vil tippe du trenger i underkant av 2 nøster ekstra. mvh DROPS Design
15.09.2025 - 11:55
![]() Mervi Matis-Suominen wrote:
Mervi Matis-Suominen wrote:
Kysyisin missä napinlävet näkyy puserossa kun ohjeen kuvasta en niitä löydä? Onko niiden tarkoitus olla siis vain koristeena? Kudon melko vähän niin en ehkä vain ymmärrä ohjeen tarkoitusta.
31.03.2025 - 12:06DROPS Design answered:
Hei, napit kiinnitetään takakappaleeseen, eli napitus on keskellä takana.
31.03.2025 - 17:58
![]() Benthe Andersen wrote:
Benthe Andersen wrote:
Hej Mener jeg havde skrevet, men kan ikke finde det. Jeg er gået helt i stå. Har strikket A2 færdig, og 263 m, str M. Nu mangler jeg at strikke spidsen af bladrække 2 færdig. Der er 3 m på hvert blad , med et omslag i hver side. Når jeg starter på A3, får jeg en maske i overskud på hver bladspids, da jeg kun skal tage 2 m sammen. Håber på hjælp Vh Benthe
25.02.2025 - 15:13DROPS Design answered:
Hej Benthe, i spidsen af bladet tager du de 3 masker ind til 1 maske (ved at tage 1 maske løst af, strik 2 ret sammen og løft den løse maske over=1 tilbage) med 1 omslag på hver side :)
05.03.2025 - 14:35
![]() Benthe wrote:
Benthe wrote:
Hej Jeg strikker str m. Har slået 95 m op. Nu er jeg ved enden af p 4 i mønster A1. Jeg ender med 1 løs ret- 1 ret- træk over- slå om. Og nu er der 6 masker tilbage. Der skal kun være 5 m( til kant) Hvad gør jeg med den maske der er i overskud Vh Benthe
15.02.2025 - 16:38DROPS Design answered:
Hej Benthe, den sidste maske strikker du ret - God fornøjelse! :)
18.02.2025 - 11:21
![]() Birgit Clemmensen wrote:
Birgit Clemmensen wrote:
Arbejdet strikkes oppefra, skal mønstret så også startes oppefra? vh Birgit
08.02.2025 - 14:24DROPS Design answered:
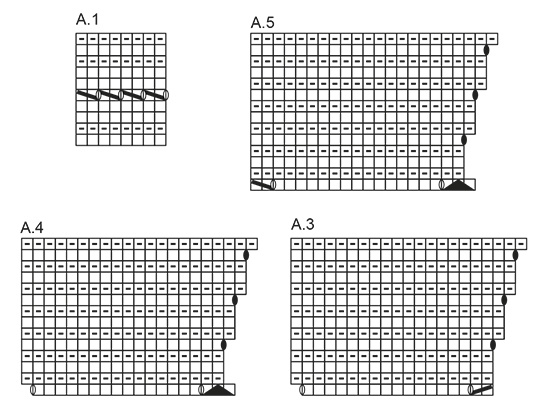
Hej Birgit, du starter mønsteret nederst til højre i diagrammerne :)
12.02.2025 - 11:40
![]() Monica wrote:
Monica wrote:
Hej Når jeg skal til A3-A5, måler mit arb 35 cm(str m) Kan det være rigtigt Vh Monica
01.05.2024 - 17:40DROPS Design answered:
Hej Monica, A.1 og A.2 strikkes over 58 pinde og ifølge opskriften skal du have 35 pinde på 10 cm hvilket betyder at A.1 og A.2 skal måle cm 17 cm i højden. Strikker du med DROPS Muskat? Og har du 35 pinde på 10 cm mønster?
03.05.2024 - 14:29
![]() Caron Donatienne wrote:
Caron Donatienne wrote:
I also have a problem for choosing the right size… Chest of my body measures 100 cm, this means I should choose a XL??? Never had such big size! What is the positive ease? I am used to Danish patterns. These are so much clearer to follow. Unless you could help me…
26.03.2023 - 16:09DROPS Design answered:
Dear Caron, the measurements indicated in the schematic are the measurements of the garment. So you will work one size or another depending on your desired ease. Since size naming sometimes varies between countries, we recommend using the measurements in the schematic as a guide, instead of the size names at the top of the pattern. Happy knitting!
26.03.2023 - 19:36
![]() Caron Donatienne wrote:
Caron Donatienne wrote:
Why are you talking from bottom band and bottom holes (at the beginning and even in assembling the model after knitting), since this model is a top and not a cardigan? This is really not clear to me. Even hesitating if I should start knitting your model 🤔(I am an experienced knitter though..😉) tnx for your help 🤗
26.03.2023 - 15:11DROPS Design answered:
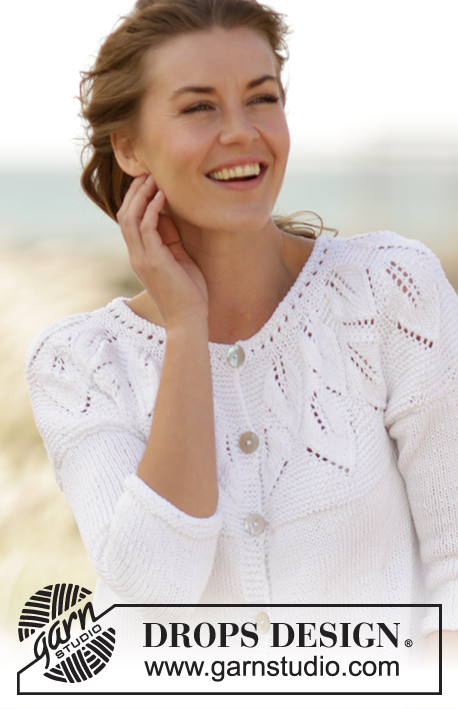
Dear Caron, the bottom band references the band that is under the band with buttonholes, not at the bottom of the garment. Also, the pattern is correct; there are buttons and buttonholes, which are worked at the back (as explained in the summary of the Top at the beginning of the pattern) which isn't seen in the photo of the garment. Happy knitting!
26.03.2023 - 19:35
![]() Riet wrote:
Riet wrote:
A2 lees ik in de 2e nld van links naar rechts. Als ik dan eindig met de 1e st van A2 krijg ik juist een a-symetrisch resultaat. Begin ik net als in de 1e nld van rechts naar links dan klopt het wel. Aan beide zijden naast de 5 ribbelsteken zijn er dan 3 steken. Wat doe ik verkeerd? Met vr.gr.
03.03.2023 - 15:16
|
||||||||||||||||||||||
Summer Leaves Top#summerleavestop |
||||||||||||||||||||||
|
|
||||||||||||||||||||||
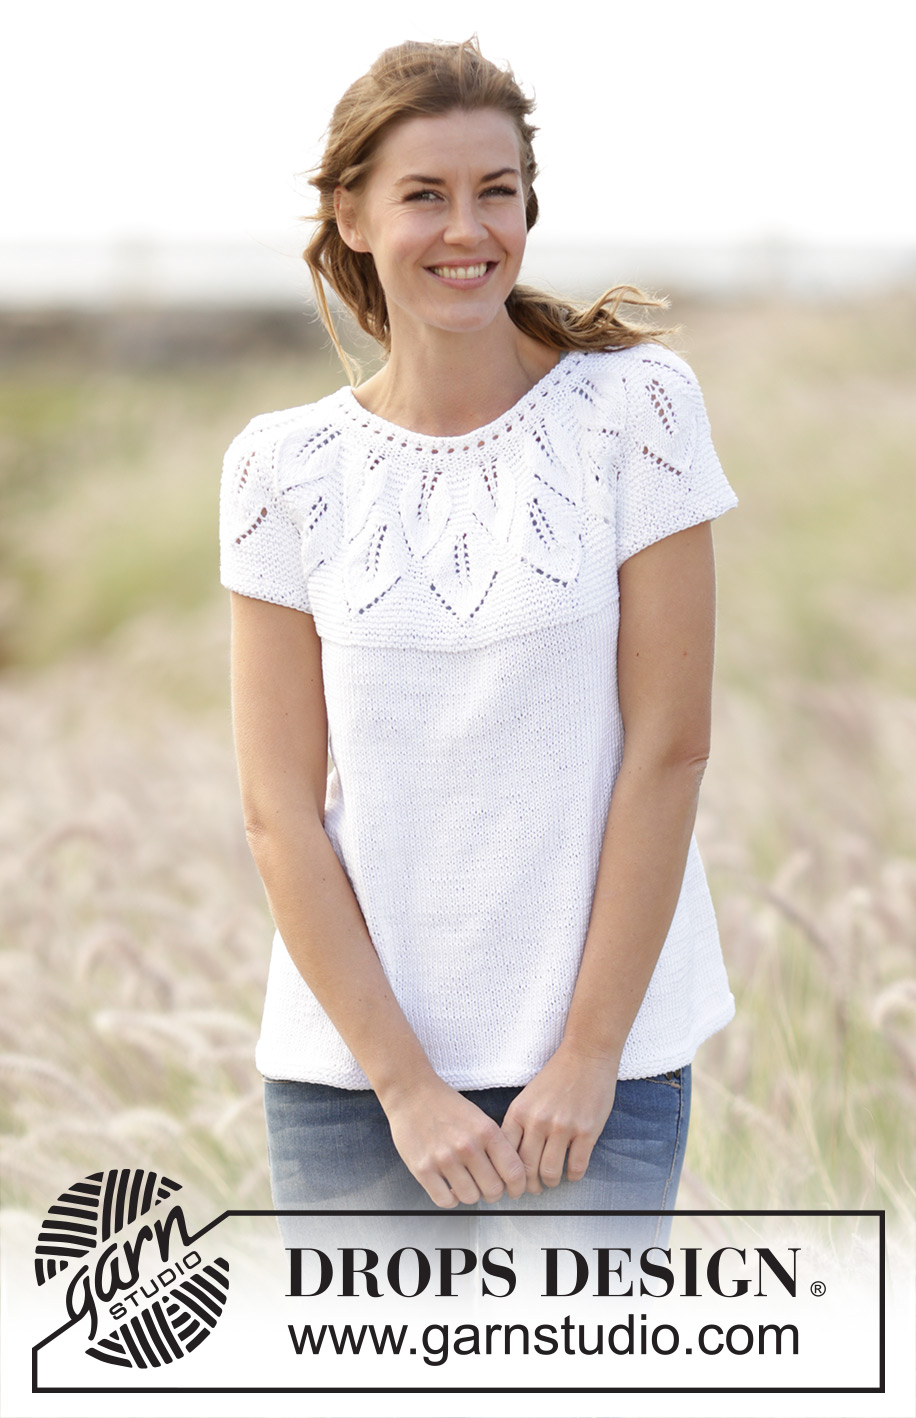
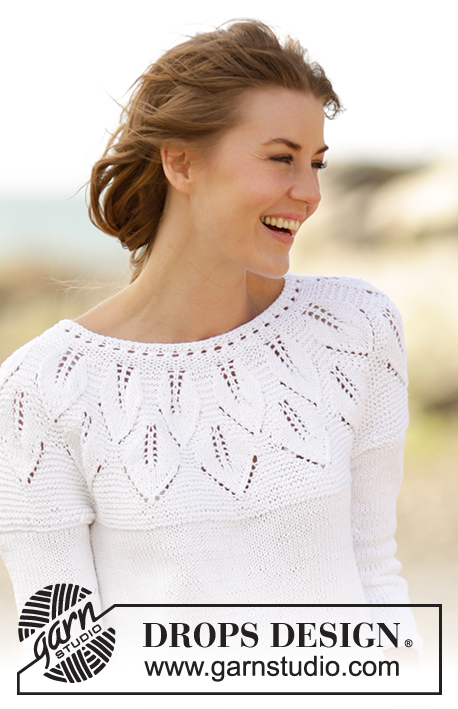
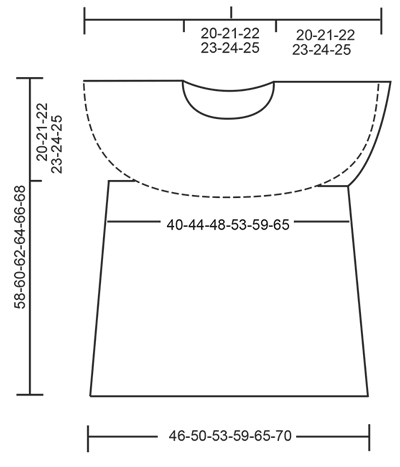
Knitted DROPS top with leaf pattern, ridges, round yoke and short sleeves, worked top down in ”Muskat”. Size S-XXXL.
DROPS 170-27 |
||||||||||||||||||||||
|
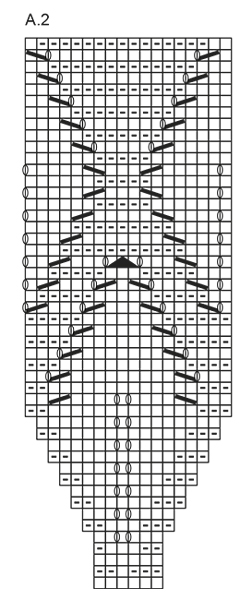
GARTER ST (back and forth): K all rows. 1 ridge = K2 rows. GARTER ST (worked in the round): 1 ridge = 2 rounds. * K 1 round and P 1 round *, repeat from *-*. PATTERN: See diagrams A.1 to A.5. The diagrams show all rows in pattern seen from RS. BUTTONHOLES: Dec for buttonhole on band at the end of row seen from RS. Work until 4 sts remain. Make 1 YO, K the next 2 sts tog, work the last 2 sts on row. Dec for buttonholes when piece measures (from cast-on edge and along the band): SIZE S: 2, 8, 14 and 19 cm SIZE M: 2, 8, 14 and 20 cm SIZE L: 2, 8, 14 and 21 cm SIZE XL: 2, 8, 15 and 22 cm SIZE XXL: 2, 9, 16 and 23 cm SIZE XXXL: 2, 9, 16 and 24 cm ---------------------------------------------------------- TOP: The piece is worked top down. Yoke is worked back and forth on circular needle with button band on the back, then work the body in the round. YOKE: Cast on 89-95-101-113-125-131 sts on circular needle size 3.5 mm / US 4 with Muskat. Bind off for BUTTON HOLES mid back - see explanation above. Work 5 sts in GARTER ST - see explanation above (= band), A.1 until 5 sts remain, 5 sts in garter st (= band). When A.1 has been worked 1 time vertically, continue as follows: 5 sts in garter st, A.2 (= 6 sts), repeat A.2 13-14-15-17-19-20 times in total, finish with first st in A.2 (so that pattern is the same in each side), finish with 5 sts in garter st. REMEMBER THE KNITTING GAUGE When A.2 has been worked 1 time vertically, there are 245-263-281-317-353-371 sts on needle. Then work as follows: 5 sts in garter st, A.3 (= 17 sts), repeat A.4 11-12-13-15-17-18 times, A.5 (= 20 sts) and 5 sts in garter st. When A.3-A.5 have been worked 1 time vertically, there are 284-305-326-368-410-431 sts on needle. Continue in garter st until piece measures 20-21-22-23-24-25 cm / 8"-8¼"-8¾"-9"-9½"-9¾", on last row from WS adjust no of sts to 283-307-331-365-397-429. Continue to work as follows (from RS): bind off the first 5 sts, work the first 39-43-47-53-59-65 sts (= half back piece), slip the next 61-65-69-74-78-82 sts on a stitch holder (= sleeve), cast on 6 new sts under sleeve, work the next 78-86-94-106-118-130 sts (= front piece), slip the next 61-65-69-74-78-82 sts on a stitch holder (= sleeve), cast on 6 new sts under sleeve, work the remaining 39-43-47-53-59-65 sts (= half back piece). BODY: There are now 168-184-200-224-248-272 sts for body. Insert a marker in each side of body where new sts were cast on under sleeve (= 3 new sts on each side of marker). NOW MEASURE THE PIECE FROM HERE. Switch to circular needle size 4 mm / US 6. Continue with stockinette st, now work in the round. When piece measures 4 cm / 1½", inc 1 st on each side of each marker (= 4 sts inc). Repeat inc every 5-5-5-6-6-6 cm / 2"-2"-2"-2⅜"-2⅜"-2⅜" 5 more times = 192-208-224-248-272-296 sts. Continue in stockinette st until piece measures 34-35-36-37-38-39 cm / 13⅜"-13¾"-14¼"-14½"-15"-15¼", switch to circular needle size 3.5 mm / US 4 and work 3 ridges in GARTER ST - see explanation above. Bind off. The whole piece measures approx. 58-60-62-64-66-68 cm / 22¾"-23⅝"-24⅜"-25¼"-26"-26¾". SLEEVE EDGE: Slip sts from stitch holder back on double pointed needles size 3.5 mm / US 4 (= 61-65-69-74-78-82 sts). Pick up 1 st in each of the 6 sts cast on under sleeve = 67-71-75-80-84-88 sts. Work 2 ridges in GARTER ST – see explanation above, then bind off. ASSEMBLY: Place band without buttonholes under band with buttonholes and fasten the bottom band. Sew on buttons. |
||||||||||||||||||||||
Diagram explanations |
||||||||||||||||||||||
|
||||||||||||||||||||||
 |
||||||||||||||||||||||
 |
||||||||||||||||||||||
 |
||||||||||||||||||||||
Have you finished this pattern?Tag your pictures with #dropspattern #summerleavestop or submit them to the #dropsfan gallery. Do you need help with this pattern?You'll find 28 tutorial videos, a Comments/Questions area and more by visiting the pattern on garnstudio.com. © 1982-2026 DROPS Design A/S. We reserve all rights. This document, including all its sub-sections, has copyrights. Read more about what you can do with our patterns at the bottom of each pattern on our site. |
||||||||||||||||||||||


With over 40 years in knitting and crochet design, DROPS Design offers one of the most extensive collections of free patterns on the internet - translated to 17 languages. As of today we count 324 catalogs and 12291 patterns - 12281 of which are translated into English (US/in).
We work hard to bring you the best knitting and crochet have to offer, inspiration and advice as well as great quality yarns at incredible prices! Would you like to use our patterns for other than personal use? You can read what you are allowed to do in the Copyright text at the bottom of all our patterns. Happy crafting!
Post a comment to pattern DROPS 170-27
We would love to hear what you have to say about this pattern!
If you want to leave a question, please make sure you select the correct category in the form below, to speed up the answering process. Required fields are marked *.