
Popular categories
Looking for a yarn?


Comments / Questions (168)
![]() Nathalie wrote:
Nathalie wrote:
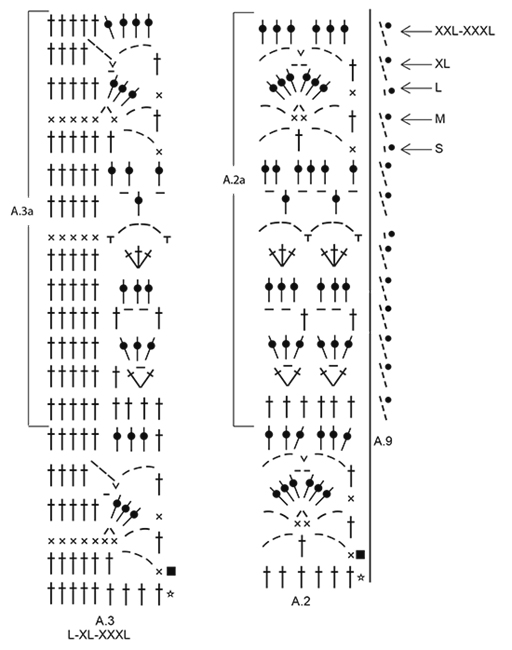
2/2 Dan heb ik dus 11 losse die ik in de 1e stk na de mouwopening vast maak, maar daarna zou ik 12 keer A2a moeten herhalen, echter is de laatste toer niet telkens met 3 stk in de ruimte van de vorige toer gemaakt. Hoe moet ik nu verder? Zijn die 8+3 l wel correct? En wat is dat "friemeltje" bij A2a aan de rechterkant van de verticale streep?
25.07.2017 - 09:58DROPS Design answered:
Hoi Nathalie, A.9 laat zien hoe de toer begint en eindigt. Aan het begin van de toer vervang je ieder stokje door 3 lossen en aan het eind van de toer maak je de toer af met een halve vaste in de eerste steek van de vorige toer. Onder de arm maak je dus 8 lossen (niet 8 + 3).
30.07.2017 - 21:49
![]() Nathalie wrote:
Nathalie wrote:
Ik ben begonnen met maat S. Ik ben inmiddels een "gevorderde" beginner, echter is dit de eerste keer dat ik een kledingstuk maak. Nu is het met moeite gelukt om het eerste deel (17 cm) te haken, maar nu moet ik met het lijf beginnen en dan ga ik volledig onderuit. Het eerste stuk lukt, maar dan kom ik vervolgens met de A2a niet uit tot aan de markeerder. Ik zit nog met de 3 losse die nergens aan vast zit. Dan zou ik 8 losse moeten doen en dan de mouw (48 steken) moeten overslaan. 1/2
25.07.2017 - 09:57DROPS Design answered:
Hoi Nathalie, De reactie staat onder je volgende vraag.
30.07.2017 - 21:50
![]() Melinda R. W. wrote:
Melinda R. W. wrote:
Gleder meg til å se ferdig resultat. Første gangen jeg hekler etter oppskrift, gode spørsmål i kommentarfeltet da jeg har stusset på mye av det samme. Veldig spent på om jeg har valgt riktig størrelse ^^,
22.07.2017 - 03:34
![]() Marine wrote:
Marine wrote:
Bonjour, Au rang suivant les 8 m du dessous de manche, faut-il réaliser le même point du rang sur cette chaînette de 8m ? (Soit: B, 2m,2ms, 2m) ou faire 8 brides, comme sur la vidéo ? Merci par avance.
10.07.2017 - 16:49DROPS Design answered:
Bonjour Marine, après avoir sauté les mailles des manches, crochetez les 8 m sous les manches comme la 1ère m de A.6 jusqu'au dernier rang de A.6/A.2a/A.8. Bon crochet!
11.07.2017 - 09:20
![]() Sylvie wrote:
Sylvie wrote:
Bonjour Merci. Il y a donc une dissymétrie: d'un côté il y aura deux brides avec un espace... La bordure sera composée de 6 brides ? (En comptant les 3 premières mailles de début.)Tout comme dans les diagrammes A1 et A3 il y a des mailles serrées sur certains rangs de brides... C'est bien cela ? Et que signifient les mailles dessinées en oblique ? Merci d'avance.
01.07.2017 - 17:10DROPS Design answered:
Bonjour Sylvie, la bordure des devants (= A.1 et A.3) sera symétrique, la première m de A.3 sur l'endroit (= la dernière m de A.3 sur l'envers) permet de faire la transition entre A.2 et la bordure devant. Les 3 ml du début des rangs remplacent la 1ère bride, ainsi A.1 = 5 brides et A.2 = 6 brides, y compris les 3 ml. 1 tiret = 1 ml, au rang 1 de A.1/A.3 par ex (celui avec le carré noir), crochetez: 3 ml (= 1ère bride), 3 brides, 3 ml, et continuez en crochetant A.2 (qui commence par 1 ms). Bon crochet!
03.07.2017 - 09:24
![]() Marine wrote:
Marine wrote:
Bonjour, Très joli modèle, mais...je suis perdue ! Au 3 ième rang, je ne comprends pas : Crochetez le rang suivant (en Brides ?) tout en plaçant les marqueurs... 5 brides pour la bordure puis on commence les diagrammes...? Puis les flèches de côté pour indiquer l'arrêt pour les tailles ? X fois en largeur veut dire qu'on répète X fois le motif correspondant au diagramme ? Je vous remercie par avance...
30.06.2017 - 18:13DROPS Design answered:
Bonjour Marine, après avoir crocheté le 1er rang de brides après la chaînette de base, crochetez le rang suivant en brides en plaçant des marqueurs pour délimiter chaque section et en augmentant dans les sections indiquées - crochetez les diagrammes en largeur 1 à X fois (cf taille) - les flèches à droite dans les diagrammes serviront plus tard. Bon crochet!
03.07.2017 - 08:45
![]() Sylvie wrote:
Sylvie wrote:
Dès le tout début: doit on crocheter deux brides, puis sauter une maille,une bride dans chacune des six mailles suivantes et donc terminer par deux brides ? Ou bien six brides, sauter une maille puis répéter ce motif Merci d' avance
29.06.2017 - 19:21DROPS Design answered:
Bonjour Sylvie, on saute des mailles en l'air à intervalles réguliers au tout 1er rang pour évite que la chaînette de base ne soit trop serrée, crochetez: 1 B dans la 4ème ml à partir du crochet (les 3 premières ml = 1ère bride = on a ainsi maintenant 2 brides), puis en taille S ou M, répétez: (sautez 1 ml, 1 B dans chacune des 6 ml suivantes), c'est-à-dire que l'on a 6 brides au-dessus de 7 ml, on répète de (à) tout le rang. Bon crochet!
30.06.2017 - 09:03
![]() Sonia wrote:
Sonia wrote:
Bonjour, quelle est la signification des symboles "point noir et suite de 3 pointillés en oblique" situés à gauche des diagrammes A2 et A9?dans le motif A2a et A7, les flèches signifient elles le rang de départ du motif pour chaque taille, par exemple pour la taille L le motif A2a se résume t-il aux 3 derniers rangs? Sauf erreur de ma part, je n'ai pas trouvé d'aide sur ces symboles sur votre site. Merci par avance
27.06.2017 - 07:42DROPS Design answered:
Bonjour Sonia, en début de tour 1 pointillé = 1 ml (cf légende), le point noir représente la maille coulée faite en fin de tour dans cette/ces ml. Dans les explications, vous pourrez lire à quoi correspondent ces flèches et à quel niveau on les utilise (A.7= dernier rang crocheté et A.2 (= début du diagramme). Bon crochet!
27.06.2017 - 09:05
![]() Manen Burger wrote:
Manen Burger wrote:
Hallo, Gisteren stelde ik een vraag over 8e toer, maat xxl. Volgens mij komen jullie met 3 stokken meerderen op 39 omdat jullie de eerste steken ook meetellen. Alleen kom ik dan op 38. 5 stokken van a1 en dan 33 stokken in a2. Kunnen jullie mij verheldering bieden? Alvast bedankt voor het antwoord
15.06.2017 - 12:16DROPS Design answered:
Hoi Manon, Na het meerderen van op toer 8 heb je in totaal 39 stokjes voor de 8e markeerder. Dit aantal zou moeten kloppen, controleer evt. even goed of je alle meerderingen en stokjes hebt gemaakt. (Na de 1e markeerder heb je 38 stokjes, dus in totaal 77 tussen markeerdraad 1 en 8.)
17.06.2017 - 20:48
![]() Manon Burger wrote:
Manon Burger wrote:
Hallo, Dit vest maak ik in xxl. Ik ben aangekomen bij toer 8 van het telpatroon. Daar staat dat ik voor de 8e markeerder 3stk moet meerderen. 39 stk. Maar ik kom van 30 stk van toer 7. Dan moet ik toch 9 stk meerderen? Of bedoelen jullie 3 stokgroepjes? Alvast bedankt voor uw reactie. Groetjes manon
14.06.2017 - 11:58
|
||||||||||||||||||||||||||||
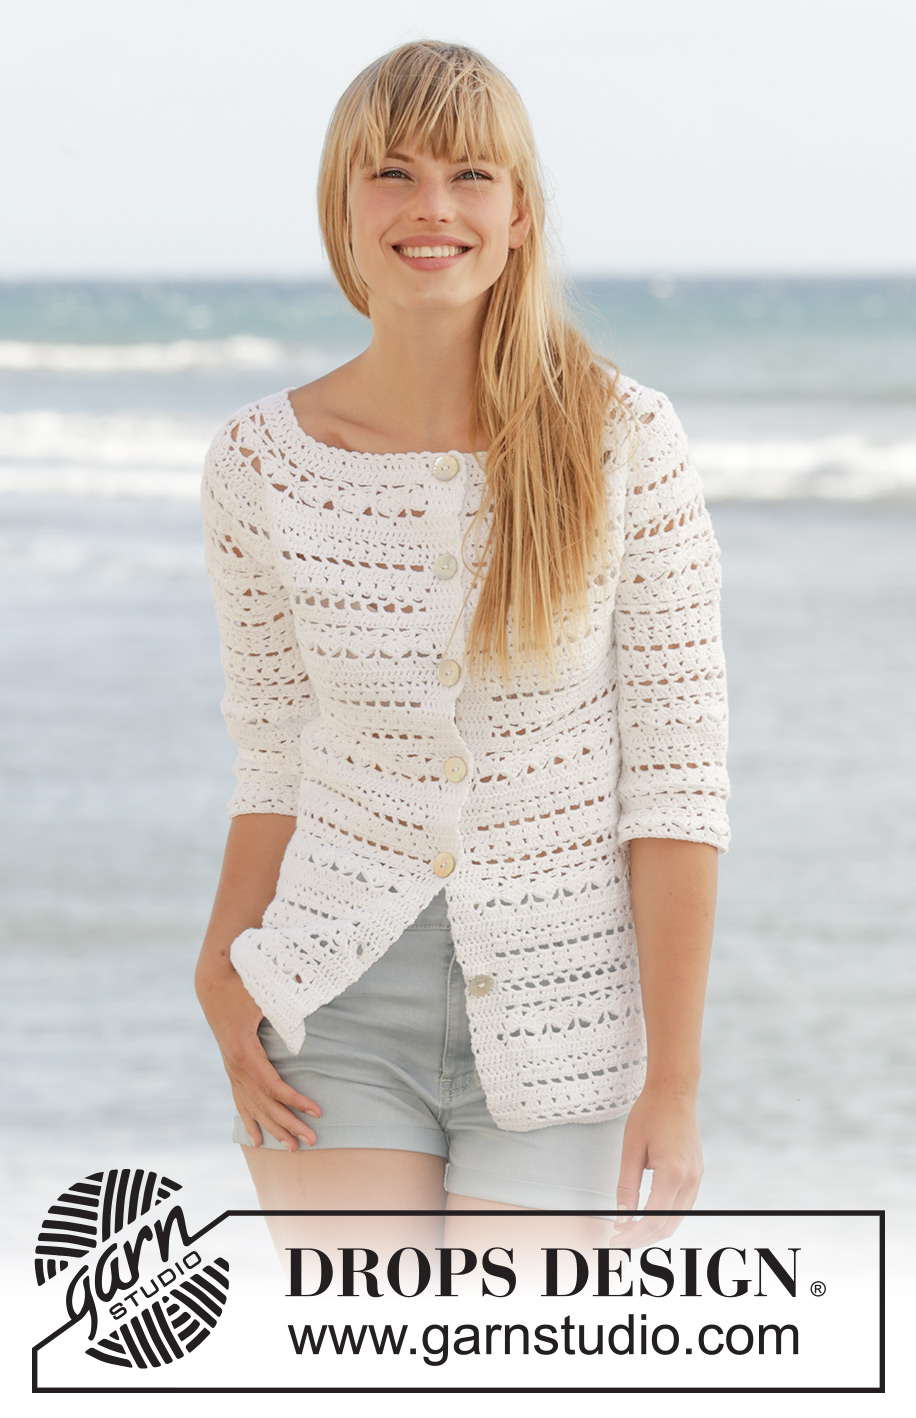
Seashore Bliss Cardigan#seashoreblisscardigan |
||||||||||||||||||||||||||||
|
|
||||||||||||||||||||||||||||
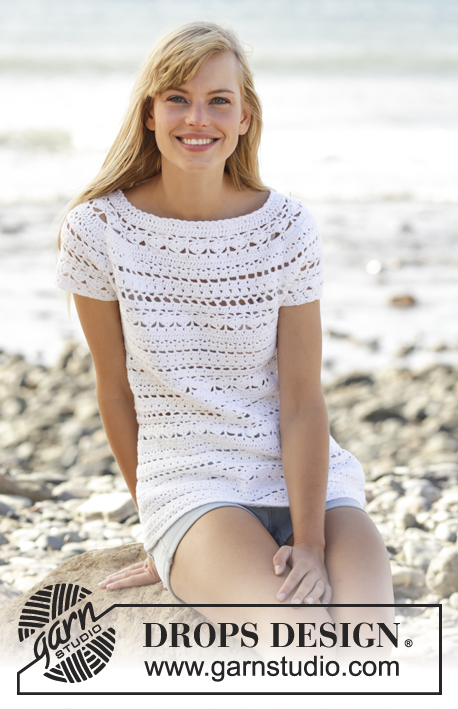
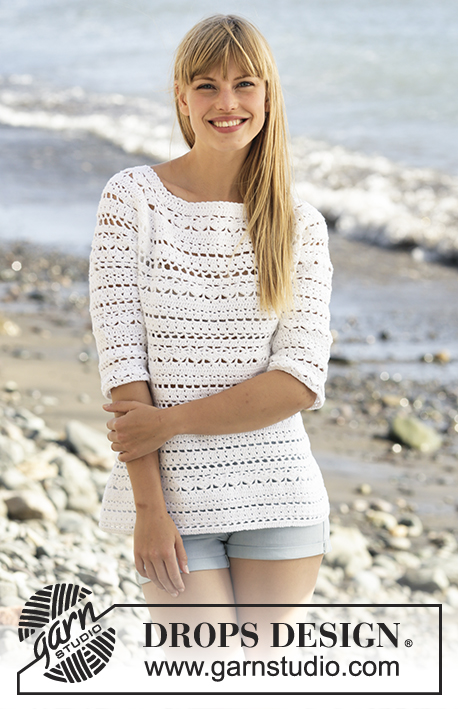
Crochet DROPS jacket with lace pattern and round yoke in ”Cotton Light”. The piece is worked top down. Size: S - XXXL.
DROPS 169-16 |
||||||||||||||||||||||||||||
|
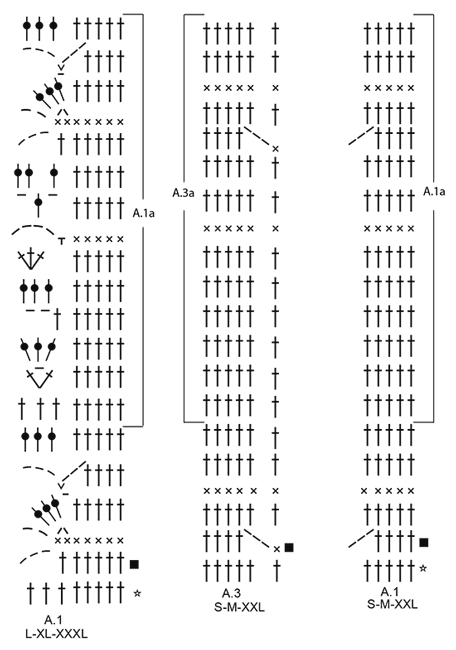
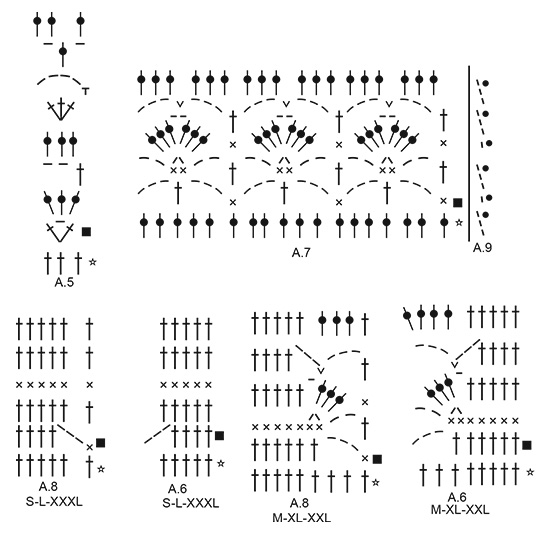
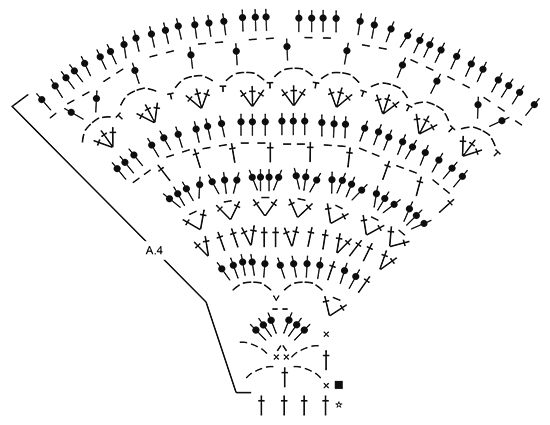
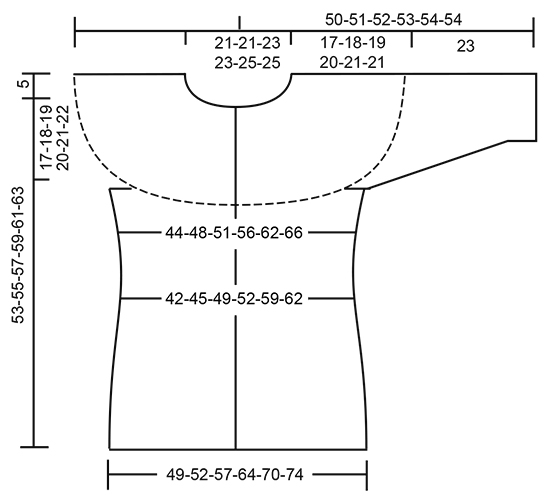
PATTERN: See diagrams A.1 to A.9. Choose diagram for correct size. Diagram A.9 show how to start and end when working in the round. CROCHET INFO: Replace first dc at beg of every dc row with 3 ch. Replace first sc at beg of every sc row with 1 ch. Replace first dc at beg of every dc round with ch 3, finish the round with 1 sl st in 3rd ch from beg of round. At beg of every sc round, replace first sc with 1 ch and finish round with 1 sl st in 1st ch from beg of round. INCREASE TIP: Inc 1 dc by working 2 dc in same dc. DECREASE TIP: Dec 1 dc by working 2 dc tog as follows: Work 1 dc but wait with last pull through (= 2 sts on hook), then work next dc but on last pull through, pull yarn through all 3 sts on hook. TIP ARMHOLE: Size S, M and XL: In the last repeat of A.2 before marker 1 and marker 3 (= beginning of armhole), replace the last chain stitch with a double crochet in the last stitch of the same repeat on previous row. ---------------------------------------------------------- JACKET: Worked back and forth, top down. NOTE: It is important to keep the crochet gauge vertically so that the measurements on yoke will be correct. YOKE: Work 123-123-134-134-138-140 ch on hook size 4 mm / G/6 with Cotton Light. Work 1 dc in 4th ch from hook (= 2 dc) - READ CROCHET INFO, 1 dc in each of the next 0-0-4-4-1-3 ch, * skip ch 1, 1 dc in each of the next 6 ch *, repeat from *-* the entire row = 104-104-114-114-117-119 dc. Work 1 row with 1 dc in every dc and inc 19-19-21-21-30-40 dc evenly - READ INCREASE TIP = 123-123-135-135-147-159 dc. Work next row and insert 8 markers in the piece as follows: Work A.1 (= 5-5-8-8-5-8 sts), repeat A.2 over the next 18-18-18-18-24-24 dc (= 3-3-3-3-4-4 times in width), insert 1st marker, A.4 over the first 4 dc, insert 2nd marker, A.2 over the next 12 dc (= 2 times in width), insert 3rd marker, A.4 over the next 4 dc, insert 4th marker, work A.2 over the next 36-36-42-42-48-54 dc (= 6-6-7-7-8-9 times in width), insert 5th marker, A.4 over the next 4 dc, insert 6th marker, A.2 over the next 12 dc (= 2 times in width), insert 7th marker, A.4 over the next 4 dc, insert 8th marker, A.2 over the next 18-18-18-18-24-24 dc (= 3-3-3-3-4-4 times in width), finish with A.3 (= 6-6-9-9-6-9 dc). REMEMBER THE CROCHET GAUGE! SIZE XXL-XXXL: On 5th row (row with dc from RS) in A.2 inc evenly as follows: Between 2nd and 3rd marker and 6th and 7th marker: Inc 6-6 dc. 12-12 dc have been inc in total on row (= 18-18 dc between 2nd and 3rd marker and 6th and 7th marker). Repeat A.2 3-3 times between 2nd and 3rd marker and between 6th and 7th marker: ALL SIZES: On 6th row (row with dc from WS) in A.2 inc evenly as follows: Before 8th marker: Inc 0-3-3-3-6-6 dc (= 24-27-30-30-36-39 dc before 8th marker). Between 7th and 6th marker and 3rd and 2nd marker: Inc 0-0-6-6-6-6 dc (= 12-12-18-18-24-24 dc between these markers). Between 5th and 4th marker: Inc 0-6-6-6-12-12 dc (= 36-42-48-48-60-66 dc between each of these markers). After 1st marker: Inc 0-3-3-3-6-6 dc (= 23-26-29-29-35-38 dc after 1st marker). There are now 179-191-215-215-251-263 dc in total on row. Work next row as follows from RS: Work A.1 over the first 5-5-8-8-5-8 dc as before, A.5 over the next 0-3-3-3-0-0 dc, repeat A.2 over the next 18-18-18-18-30-30 dc (= 3-3-3-3-5-5 times in width), A.4 as before, repeat A.2 over the next 12-12-18-18-24-24 dc (= 2-2-3-3-4-4 times in width), A.4 as before, repeat A.2 over the next 36-42-48-48-60-66 dc (= 6-7-8-8-10-11 times in width), A.4 as before, repeat A.2 over the next 12-12-18-18-24-24 dc (= 2-2-3-3-4-4 times in width), A.4 as before, repeat A.2 over the next 18-18-18-18-30-30 dc as before (= 3-3-3-3-5-5 times in width), A.5 over the next 0-3-3-3-0-0 dc, finish with A.3 over the last 6-6-9-9-6-9 dc as before. SIZE XL-XXL-XXXL: On 8th row (row with dc from WS) in A.2 inc evenly as follows: Before 8th marker: Inc 3-3-3 dc (= 33-39-42 dc before 8th marker). Between 4th and 5th marker: Inc 6-6-6 dc (= 54-66-72 dc between 4th and 5th marker). After 1st marker: Inc 3-3-3 dc (= 32-38-41 dc after 1st marker). Work next row as follows from RS: Work A.1 over the first 8-5-8 dc as before, A.5 over the next 0-3-3 dc, repeat A.2 over the next 24-30-30 dc (= 4-5-5 times in width), A.4 as before, repeat A.2 over the next 18-24-24 dc (= 3-4-4 times in width), A.4 as before, repeat A.2 over the next 54-66-72 dc (= 9-11-12 times in width), A.4 as before, repeat A.2 over the next 18-24-24 dc (= 3-4-4 times in width), A.4 as before, repeat A.2 over the next 24-30-30 dc as before (= 4-5-5 times in width), A.5 over the next 0-3-3 dc, finish with A.3 over the first 9-6-9 dc as before. ALL SIZES: On last row in A.4 (= from WS) insert 1 new marker in the middle of every A.4 (i.e. 18 dc on each side of marker in A.4 = 4 markers). Remove the old markers (= 4 markers remain in piece). Sts between markers are for sleeves (= 48-48-54-54-60-60 dc on each sleeve). When A.4 has been worked 1 time vertically, there are 251-263-287-299-335-347 dc on row. Yoke is now done in size S. SIZE M-L-XL-XXL-XXXL: Work next row from RS as follows: Work A.6 over the first 8-5-8-8-5 dc, continue with A.2 over the next 18-24-24-30-36 dc (= 3-4-4-5-6 times in width), * A.7 over the next 36 dc (= 2 times in width, marker is in the middle of these repetitions), A.2 over the next 12-18-18-24-24 dc (= 2-3-3-4-4 times in width), A.7 over the next 36 dc (= 2 times in width, marker is in the middle of these repetitions) *, A.2 over the next 42-48-54-66-72 dc as before, repeat from *-*, A.2 over the next 18-24-24-30-36 dc (= 3-4-4-5-6 times in width), finish with A.8 over the last 9-6-9-9-6 dc. Work 1-2-3-4-4 rows of A.7. ALL SIZES: Piece now measures 17-18-19-20-21-21 cm / 6¾"-7"-7½"-8"-8¼"-8¼" vertically. BODY: SIZE M-XL: Work as follows from WS: Work A.8 as before, repeat A.2a (see arrow on where pattern beg in the different sizes) 6-7 times in total in width until 1st marker (= right front piece), work 8-10 ch, skip sts between 1st and 2nd marker (= sleeve), work A.2a 13-15 times in total in width until next marker (= back piece), work 8-10 ch, skip sts between 3rd and 4th marker (= sleeve), work A.2a 6-7 times in total in width, finish with A.6. Insert 1 marker in piece, NOW MEASURE PIECE FROM HERE. SIZE S-L-XXL-XXXL: Work as follows from RS: Work A.6, repeat A.2a (see arrow on where pattern beg in the different sizes) 6-7-8-9 times in total in width until 1st marker (= left front piece), work 8-8-10-10 ch, skip sts between 1st and 2nd marker (= sleeve), work A.2a 12-14-17-18 times in total in width until 3rd marker (= back piece), work 8-8-10-10 ch, skip sts between 3rd and 4th marker (= sleeve), work A.2a 6-7-8-9 times in total in width, finish with A.8. Insert 1 marker in piece, NOW MEASURE PIECE FROM HERE. SIZE S-M-L-XL: Work A.6/A.2a/A.8 as before, work the 8-8-8-10 sts under each sleeve as 1st st in A.6. On last row in A.6 and A.8 (row with dc) dec 4-4-4-2 dc evenly on entire row – READ DECREASE TIP = 167-179-191-209 dc. When A.6 and A.8 have been worked 1 time vertically, work next row as follows from WS: Work A.3a over the first 6-6-9-9 dc, repeat A.2a 26-28-29-32 times in total in width, finish with A.1a over the last 5-5-8-8 dc. SIZE XXL-XXXL: Work from WS: A.3a over the first 6-9 dc, repeat A.2a 37-38 times in total AT THE SAME TIME dec 2-2 dc evenly – READ DECREASE TIP, finish with A.1a over the last 5-8 dc = 233-245 dc. ALL SIZES: Repeat A.1a to A.3a vertically. When piece measures 12 cm / 4¾", adjust so that next row is with dc, dec 6 dc evenly = 161-173-185-203-227-239 dc. Now repeat A.2a 25-27-28-31-36-37 times in width. SIZE XL-XXL-XXXL: Repeat dec when piece measures 16 cm / 6¼" from marker = 197-221-233 dc. Now repeat A.2a 30-35-36 times in width. ALL SIZES: When piece measures 20-21-22-23-24-25 cm / 8"-8¼"-8¾"-9"-9½"-9¾" from marker – adjust so that next row is with dc, inc 6 dc evenly. Repeat inc every 3½-3½-2½-2-2-2 cm / 1¼"-1¼"-⅞"-¾"-¾"-¾" 3-3-4-6-6-6 more times = 185-197-215-239-263-275 dc. Repeat A.2a 1 more in width on every inc. When all inc are done, repeat A.2a 29-31-33-37-42-43 times in width. Work until piece measures 36-37-38-39-40-41 cm / 14¼"-14½"-15"-14¼"-15¾"-16⅛" from marker, adjust to finish nicely according to pattern. Fasten off. SLEEVE: SIZE S: Worked in the round. Beg by working mid under armhole as follows: Work 1 sl st in 4th ch of the 8 ch worked in armhole on body. Work 1 ch (= 1 sc). Then work 1 sc in each of the next ch 4, work A.7 over the next 18 dc, work A.2a (adjust pattern according to A.7) 2 times in total in width, work A.7 over the next 18 dc, finish with 1 sc in each of the last 3 ch. Work the 8 sts under sleeve as 1st st in A.7. When A.7 has been worked 1 time vertically, there are 56 dc on last round. SIZE M-XL-XXL-XXXL: Worked in the round. Beg by working mid under sleeve as follows: Work 1 sl st in 4th ch of the 8-10-10-10 ch worked in armhole on body. Work 3 ch (= 1 dc). Then work 1 dc in each of the next 4-6-6-6 ch, work A.7 as before, work A.2a (adjust pattern according to A.7) 2-3-4-4 times in total in width as before, work A.7, finish with 1 dc in each of the last 3 ch. Work the 8-10-10-10 sts under sleeve as 1st st in A.7. When A.7 has been worked 1 time vertically, there are 56-64-70-70 dc on last round. SIZE L: Worked in the round. Beg by working mid under sleeve as follows: Work 1 sl st in 4th ch of the 8 ch worked in armhole on body. Work 1 ch (= 1 sc). Then work 1 sc in each of the next ch 4, work A.7 as before, work A.2a (adjust pattern according to A.7) 3 times in total in width as before, work A.7, finish with 1 sc in each of the last 3 ch. Work the 8 sts under sleeve as 1st st in A.7. When A.7 has been worked 1 time vertically, there are 62 dc on last round. ALL SIZES: = 56-56-62-64-70-70 dc. Repeat A.2a 9-9-10-10-11-11 times in total in width while AT THE SAME TIME on first round with dc dec 2-2-2-4-4-4 dc evenly = 54-54-60-60-66-66 dc. When piece measures 10 cm / 4", adjust so that next round is with dc, dec 6 dc evenly = 48-48-54-54-60-60 dc. Then repeat A.2a 8-8-9-9-10-10 times in width. When piece measures 23 cm / 9", adjust to finish nicely according to pattern, fasten off. Work another sleeve the same way. NECK EDGE: Crochet an edge around the neck. Beg mid front. Work * 1 sc in first dc, ch 3, skip approx. 1 cm / ⅜" *, repeat from *-* around the entire neck. Make sure to avoid a tight neck edge, adjust to finish with 1 sc in last dc on row. Fasten off. ASSEMBLY: Fasten the buttons on left front piece, fasten the top button approx. 2 cm / ¾" from neck edge, fasten the remaining buttons approx. 8-9-9-8-8-9 cm / 3"-3½"-3½"-3"-3"-3½" apart. Button between 2 dc on right front piece. |
||||||||||||||||||||||||||||
Diagram explanations |
||||||||||||||||||||||||||||
|
||||||||||||||||||||||||||||
 |
||||||||||||||||||||||||||||
 |
||||||||||||||||||||||||||||
 |
||||||||||||||||||||||||||||
 |
||||||||||||||||||||||||||||
 |
||||||||||||||||||||||||||||
Have you finished this pattern?Tag your pictures with #dropspattern #seashoreblisscardigan or submit them to the #dropsfan gallery. Do you need help with this pattern?You'll find 14 tutorial videos, a Comments/Questions area and more by visiting the pattern on garnstudio.com. © 1982-2026 DROPS Design A/S. We reserve all rights. This document, including all its sub-sections, has copyrights. Read more about what you can do with our patterns at the bottom of each pattern on our site. |
||||||||||||||||||||||||||||


With over 40 years in knitting and crochet design, DROPS Design offers one of the most extensive collections of free patterns on the internet - translated to 17 languages. As of today we count 325 catalogs and 12291 patterns - 12281 of which are translated into English (US/in).
We work hard to bring you the best knitting and crochet have to offer, inspiration and advice as well as great quality yarns at incredible prices! Would you like to use our patterns for other than personal use? You can read what you are allowed to do in the Copyright text at the bottom of all our patterns. Happy crafting!
Post a comment to pattern DROPS 169-16
We would love to hear what you have to say about this pattern!
If you want to leave a question, please make sure you select the correct category in the form below, to speed up the answering process. Required fields are marked *.