
Popular categories
Looking for a yarn?


Comments / Questions (174)
![]() Veronique wrote:
Veronique wrote:
Bonjour, j'ai du rater quelques chose au niveau du placement des marqueurs. A la fin du rang il me reste 4 mailles en trop. Pourtant 130 - 5-19-20-38-20-19-5 =4 Où est mon erreur ? Merci pour votre aide et votre réponse
30.10.2018 - 13:08DROPS Design answered:
Bonjour Véronique, il doit s'agir des 4 mailles avec les marqueurs, ces derniers se mettent dans une maille, pas entre les mailles, soit ainsi: 5 m env (bordure), 19 m end, 1 m (= marqueur), 20 m end, 1 m (marqueur), etc. Bon tricot!
30.10.2018 - 16:04
![]() Rose-Marie Danielsson wrote:
Rose-Marie Danielsson wrote:
På stl xl står det 438 m efter alla ökningar. Jag får 482 med de 44 raglanm. Hur går jag vidare?
28.10.2018 - 15:51
![]() Jacqui Grier wrote:
Jacqui Grier wrote:
Regarding right and left bands, are these 5 stitches purled every row...both right and wrong side?
17.09.2018 - 22:24DROPS Design answered:
Dear Jacqui, yes those stitches are purled. While the garter stitch on the body of the garment is knit on each row, the buttonbands are purled, so the ridges are facing the opposite way, making the buttonband slightly separated from the rest of the body. Happy Knitting!
18.09.2018 - 04:46Roberta Gartland wrote:
A little query regarding Sweet Olivia. After increasing stitches I have 130 stitches, but the marker directions only account for 126. Should I absorb the 4 extra stitches into the back piece ?
24.05.2018 - 06:00DROPS Design answered:
Hi Roberta, The 4 stitches unaccounted for are the 4 stitches with the markers inserted in them. These are knitted at the same time as you insert the markers. Then you have all the 130 stitches. Happy knitting!
24.05.2018 - 08:06
![]() Charlot Gaëlle wrote:
Charlot Gaëlle wrote:
Je ne saisis pas comment on distingue ces deux augmentations : on alterne une fois tous les 2, puis une fois tous les 4 rangs ? Ou bien on augmente régulièrement tous les 2 rangs ( 13 fois ), et ensuite seulement, on augmente tous les 4 ?
06.04.2018 - 11:54DROPS Design answered:
Bonjour Mme Charlot, vous augm. 13x tous les 2 rangs et 14x tous les 4 rangs ainsi: devant gauche: avant les 11 m du raglan, dos: après les 11 m du raglan au début du dos et avant les 11 m du raglan à la fin du dos et devant droit: au début du devant, après les 11 m du raglan. Augm. pour les manches: après les 11 m du raglan au début de la manche et avant les 11 m du raglan à la fin de la manche. En taille S, vous augm. 13x 8 m (= dos, devants et manches) tous les 2 rangs, puis 14 x tous les 4 rangs pour le dos/les devants et en même temps vous augm. pour les manches encore 4x tous les 2 rangs (= 17 x au total) puis 12x tous les 4 rangs. Bon tricot!
06.04.2018 - 13:12
![]() Charlot Gaëlle wrote:
Charlot Gaëlle wrote:
Je ne comprends pas les explications concernant la différence d'augmentation de dos/devant et manches : "13 fois tous les 2 rangs, et 14 fois tous les 4" pour le dos/devant : d'abord tous les deux rangs, puis tous les 4 rangs (soit 27 augmentations pour le dos/devant) c'est ça ? Et 17 fois tous les 2 rangs puis 12 fois tous les 4 rangs pour les manches ( soit 29 augmentations) ?
06.04.2018 - 10:59DROPS Design answered:
Bonjour Mme Charlot, c 'est bien cela, vous augmentez à un rythme différent sur le dos/les devants (27 fois au total) et sur les manches (29 fois au total), vous augmenterez donc parfois 8 m (= sur les devants, le dos et les manches) et parfois seulement 4 m (= dos/devant seulement ou manches seulement). Bon tricot!
06.04.2018 - 11:32
![]() Bettina Falk wrote:
Bettina Falk wrote:
Ich brauche eine Tip: .... "die Zunahmen an der Passe: GLEICHZEITIG in der ersten Hin-R mit den RAGLANZUNAHMEN beginnen – siehe oben. BITTE BEACHTEN: am Rumpfteil und an den Ärmeln wird in unterschiedlichem Rhythmus zugenommen:, 42x am Rumpfteil, 18x am Ärmel... Wo sind diese Stellen ? Wo werden weniger Maschen aufgenommen? Im Rückenbereich oder vorne?..
18.01.2018 - 04:59DROPS Design answered:
Liebe Frau Falk, so werden Sie für den Raglan in der 5. Größe: Rumpfteil: 42 x in jeder 2. Reihe und dann 4x in jeder 4. Reihe, gleichzeitig wird für die Ärmel so zugenommen: 18x in jeder 2. Reihe und 16x in jeder 4. Reihe. dh Sie werden zuerst 8 M zunahmenn (Rumpfteil + Ärmel) dann abwechselnd 4 M (nur Rumpfteil) und 4 M (= Rumpfteil + Ärmel) dann wieder 8 M (Rumpfteil + Ärmel), und dann nur 4 M (= Rumpfteil). Viel Spaß beim stricken!
18.01.2018 - 09:30
![]() Lone.mortensen wrote:
Lone.mortensen wrote:
Der tages forskelligt ud på Ryg/forstykker og ærmer!!! Kan det forklares anderledes, jeg syndes jo det hele hænger sammen?? Så hvad er er hvad?
31.12.2017 - 01:10DROPS Design answered:
Hei Lone. Rygg og bakstykke har samme raglansøkningen, slik: Øk på hver 2.p (dvs på hver p fra retten) totalt 13-21-26-34-42-53 ganger og deretter på hver 4.p (dvs på annenhver p fra retten) totalt 14-11-10-7-4-0 ganger. Mens på erme øker du slik: ERME: Øk på hver 2.p totalt 17-19-18-20-18-21 ganger og deretter på hver 4.p totalt 12-12-14-14-16-16 ganger. God Fornøyelse.
08.01.2018 - 14:37
![]() AnnaPia wrote:
AnnaPia wrote:
Kan man göra denna i slätstickning? Finns tips på hur skapa en krage på den? Tack :-)
03.11.2017 - 13:39DROPS Design answered:
Hei AnnaPia. Om du ønsker å strikke denne i glattstrikk, må du huske at den oppgitte strikkefastheten og garnmengden kan blir noe annet. Om du ønsker en krage på denne modellen, kan du evnt ta en titt på andre jakker og beskrivelser og tilpasse det til denne modellen. Vi har dessverre ikke muligheten til å omskrive denne oppskriften. God Fornøyelse!
06.11.2017 - 07:49
![]() Joke wrote:
Joke wrote:
Ik vroeg mij af of het patroon klein of groot valt. Met welke damesmaat zijn de maten xxl en xxxl te vergelijken? Ik twijfel namelijk voor welke van de twee ik moet gaan.
23.10.2017 - 19:24DROPS Design answered:
Hoi Joke, We hebben helaas geen tabellen op de site waarmee je de confectiematen kunt vergelijken. Het beste is om te vergelijken met een bestand kledingstuk en te kijken naar de maattekenin onderaan het patroon. Zie ook deze link voor meer informatie daarover. Hopelijk kom je er op deze manier uit.
25.10.2017 - 09:56
|
|||||||
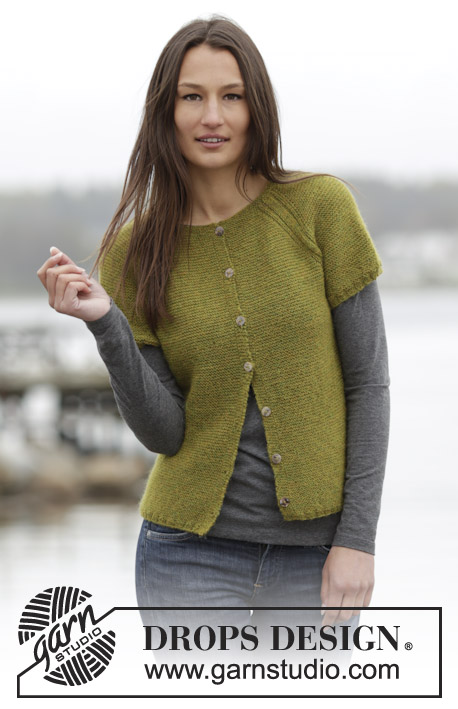
Sweet Olivia Cardigan#sweetoliviacardigan |
|||||||
|
|
|||||||
Knitted DROPS jacket in garter st with raglan, worked top down in "Alpaca". Size: S - XXXL.
DROPS 164-42 |
|||||||
|
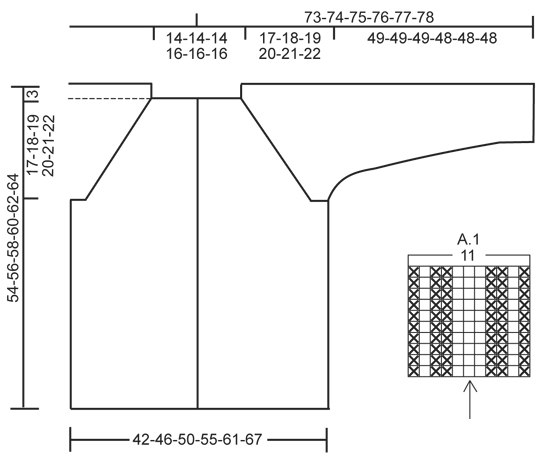
GARTER ST (back and forth): K all rows. 1 ridge = K2 rows. PATTERN: See diagram A.1. The diagram shows all rows in pattern seen from RS. BUTTONHOLES: Dec for buttonholes on right band. 1 buttonhole = work until 3 sts remain on needle (seen from RS), make 1 YO, P 2 tog and P the last 1 st. Dec for buttonholes when piece measures: SIZE S: 2, 9, 16, 24, 32, 40 and 48 cm / ¾",3½",6¼",9½",12½",15¾",19" SIZE M: 2, 10, 18, 26, 34, 42 and 50 cm / ¾",4",7",10¼",13½",16½",19¾" SIZE L: 2, 10, 18, 26, 34, 42 and 50 cm / ¾",4",7",10¼",13½",16½",19¾" SIZE XL: 2, 10, 18, 26, 34, 43 and 52 cm / ¾",4",7",10¼",13½",17",20½" SIZE XXL: 2, 10, 18, 27, 36, 45 and 54 cm / ¾",4",7",10½",14¼",17¾",21¼" SIZE XXXL: 2, 11, 20, 29, 38, 47 and 56 cm / ¾",4½",8",11½",15",18½",22" RAGLAN: Inc 1 st on each side of the 11 raglan sts. Inc by K 2 in st both before and after the 11 raglan sts (= 2 sts inc at every A.1). All inc are done from RS. MEASURING TIP: Because of garter st the garment will be longer when worn. All length measurements must therefore be done while holding up the garment. ---------------------------------------------------------- JACKET: Work back and forth on circular needle from mid front, work top down. YOKE: Cast on 106-106-106-114-114-114 sts (includes 5 band sts each side towards mid front) on circular needle size 2.5 mm / US 1.5 with Alpaca. Work 3 ridges in GARTER ST - see explanation above. Switch to circular needle size 3 mm / US 2.5 and K 1 row from RS while inc 24 sts evenly - NOTE: P the outermost 5 sts in each side towards mid front and do not inc over these sts (= band sts) = 130-130-130-138-138-138 sts on row. Insert 4 markers in the piece as follows (from WS): P 5 (= band sts), K 19-19-19-21-21-21 (= right front piece), insert 1 marker in next st, K 20 (= sleeve), insert 1 marker in next st, K 38-38-38-42-42-42 (= back piece), insert 1 marker in next st, K 20 (= sleeve), insert 1 marker in next st, K 19-19-19-21-21-21 (= left front piece) and finish with P 5 (= band sts). READ ALL OF THE FOLLOWING SECTION BEFORE CONTINUING: Then work ridges (1st row = RS) but in every transition between body and sleeves work A.1 (= 11 sts - NOTE: St with marker should fit with st with arrow in diagram), P the 5 band sts in each side towards mid front on every row until finished measurements. REMEMBER THE KNITTING GAUGE and remember to dec for BUTTONHOLES on right band - see explanation above. AT THE SAME TIME on first row from RS beg inc for RAGLAN – see explanation above. NOTE: Inc differently on body and sleeves: BODY: Inc every other row (i.e. every row from RS) a total of 13-21-26-34-42-53 times and then every 4th row (i.e. every other row from RS) a total of 14-11-10-7-4-0 times. SLEEVE: Inc every other row a total of 17-19-18-20-18-21 times, and on every 4th row a total of 12-12-14-14-16-16 time. After all inc for raglan there are 354-382-402-438-458-498 sts on row and piece measures approx. 20-21-22-23-24-25 cm / 8"-8¼"-8¾"-9"-9½"-9¾" from shoulder. Work next row as follows from WS: Work 52-57-61-68-73-80 sts (= right front piece), slip the next 78-82-84-88-88-94 sts on 1 stitch holder (= sleeve), cast on 6-6-8-8-10-10 new sts (= under sleeve), work 94-104-112-126-136-150 sts (= back piece), slip the next 78-82-84-88-88-94 sts on 1 stitch holder (= sleeve), cast on 6-6-8-8-10-10 sts (= under sleeve), work the remaining 52-57-61-68-73-80 sts (= left front piece). BODY: = 210-230-250-278-302-330 sts. Continue to work in garter st back and forth and P bands - remember buttonholes on right band. When piece measures 33-34-35-36-37-38 cm / 13"-13⅜"-13¾"-14¼"-14½"-15", measured from where sleeve was divided under sleeve (or desired length) – READ MEASURING TIP, P 1 row from WS while inc 2 sts evenly = 212-232-252-280-304-332 sts on needle. Switch to circular needle size 2.5 mm / US 1.5 and work 3 rows rib (= K 2/P 2) with 5 band sts in garter st and 2 K in each side towards mid front (seen from RS). Then LOOSELY bind off sts with K over K and P over P. Entire jacket measures approx. 54-56-58-60-62-64 cm / 21¼"-22"-22¾"-23⅝"-24⅜"-25¼" from shoulder. SLEEVE: Worked in the round on double pointed needles. Slip the 78-82-84-88-88-94 sts from stitch holder in one side of piece back on double pointed needles size 3 mm / US 2.5 and cast in addition on 6-6-8-8-10-10 new sts mid under sleeve = 84-88-92-96-98-104 sts. Insert 1 marker – NOW MEASURE PIECE FROM HERE. Work in stockinette st in the round. AT THE SAME TIME after 3 rounds dec 2 sts mid under sleeve. Repeat dec every 4th round 4-4-4-5-5-5 times in total and then every 4½-3½-3-3-3-2 cm / 1¾"-1¼"-1"-1"-1"-¾" 9-11-12-13-13-16 times in total = 58-58-60-60-62-62 sts. When sleeve measures 48-48-48-47-47-47 cm / 19"-19"-19"-18½"-18½"-18½" (or at desired length), K 1 round while dec 2-2-4-0-2-2 sts evenly = 56-56-56-60-60-60 sts on needle. Work 3 rounds rib (= K 2/P 2). Then LOOSELY bind off sts with K over K and P over P. Work the other sleeve the same way. ASSEMBLY: Sew the openings under the sleeves. Sew the buttons on to the left band. |
|||||||
Diagram explanations |
|||||||
|
|||||||
 |
|||||||
Have you finished this pattern?Tag your pictures with #dropspattern #sweetoliviacardigan or submit them to the #dropsfan gallery. Do you need help with this pattern?You'll find 20 tutorial videos, a Comments/Questions area and more by visiting the pattern on garnstudio.com. © 1982-2026 DROPS Design A/S. We reserve all rights. This document, including all its sub-sections, has copyrights. Read more about what you can do with our patterns at the bottom of each pattern on our site. |
|||||||


With over 40 years in knitting and crochet design, DROPS Design offers one of the most extensive collections of free patterns on the internet - translated to 17 languages. As of today we count 324 catalogs and 12290 patterns - 12280 of which are translated into English (US/in).
We work hard to bring you the best knitting and crochet have to offer, inspiration and advice as well as great quality yarns at incredible prices! Would you like to use our patterns for other than personal use? You can read what you are allowed to do in the Copyright text at the bottom of all our patterns. Happy crafting!
Post a comment to pattern DROPS 164-42
We would love to hear what you have to say about this pattern!
If you want to leave a question, please make sure you select the correct category in the form below, to speed up the answering process. Required fields are marked *.