
Popular categories
Looking for a yarn?


Comments / Questions (183)
![]() Lelletta wrote:
Lelletta wrote:
Scusate, ho sbagliato....ho usato l'uncinetto numero 2...
22.07.2017 - 19:02DROPS Design answered:
Buongiorno Lelletta, il suo campione corrisponde a quello indicato? In ogni caso proceda come le abbiamo indicato. Buon lavoro!
23.07.2017 - 11:28
![]() Lelletta wrote:
Lelletta wrote:
Buonasera! Nonostante stia lavorando per la taglia S la vita è troppo larga. Come posso adattare lo schema affinchè la circonferenza sia di cm80? Ho anche usato un uncinetto più piccolo (2,5)ma è sempre troppo grande! Potete aiutarmi?Grazie!
22.07.2017 - 18:52DROPS Design answered:
Buongiorno Lelletta. Potrebbe provare a ridurre il numero di catenelle avviate di un numero che sia multiplo di 8 e lavorare il primo giro come indicato per la taglia S. Verifichi la correttezza della misura e aggiusti il numero delle maglie per poter lavorare correttamente il diag A1. Per ogni aiuto più personalizzato può rivolgersi al suo rivenditore Drops di fiducia. Buon lavoro!
23.07.2017 - 08:39
![]() Ines wrote:
Ines wrote:
Ich habe eine Frage zum erhöhten Rückenteil. Nach 154 Maschen soll wieder zum Markierer zurück gehäkelt werden und dann eine neue Runde anfangen. Also wieder wenden und bei Rundenende den Höhenausgleich durch eine Kettmasche schaffen?
13.07.2017 - 20:34DROPS Design answered:
Liebe Ines, genau, und dann weiter 1 Runde mit feste Maschen häkeln. Viel Spaß beim häkeln!
14.07.2017 - 09:59
![]() Ines wrote:
Ines wrote:
Ich habe soeben eine Maschenprobe angefangen mit 26 Maschen und Stäbchenreihen. In der Breite stimmen die 10 cm genau, aber in der Höhe überhaupt nicht. Soll die Probe vielleicht mit festen Maschen erfolgen??
11.07.2017 - 17:41DROPS Design answered:
Liebe Ines, die Maschenprobe ist mit Stb gehäkelt. Versuchen Sie, den Faden nicht zu "hoch" zu ziehen wenn Sie den Arbeitsfaden holen. Viel Spaß beim häkeln!
12.07.2017 - 08:54
![]() Emma wrote:
Emma wrote:
Hej! Är lite utav en nybörjare och undrar vad förkortningen arb står för? Arbetet kanske? Sen har jag en fråga angående A1 också. I diagrammet ser det ut som att det ska vara två lm i varje A1, en i mitten och en på slutet men videon gör de bara den i slutet. Har jag missuppfattat något? Tack på förhand!
29.05.2017 - 09:38DROPS Design answered:
Hej! Jo, förkortningen arb står för arbetet. I diagram A.1 virkas det endast 1 luftmaska i varje rapport, den i mitten. Det blir alltså 1 luftmaska mellan varje stolpe.
29.05.2017 - 15:44
![]() Jenny wrote:
Jenny wrote:
Hello! How can I made these child size please? 4-5 years. thank you
15.02.2017 - 18:22DROPS Design answered:
Dear Jenny, we are unfortunately not able to adjust each our patterns to each individual request, you are welcome to contact your DROPS store for any personnal assistance. Happy crocheting!
16.02.2017 - 09:31
![]() Victoria wrote:
Victoria wrote:
Buenos días, muchas gracias por su bonito patrón. Acabo de terminar la elevación del short y no entiendo muy bien lo que hay que hacer ahora, en particular, esta frase "Continuar trabajando 1 vta de p.b. y AL MISMO TIEMPO aum 28-16-2 p.b. repartidos = 224-256-288 p.b.". Por favor, me podrían decir donde tengo que hacer exactamente los aumentos teniendo en cuenta que la talla que estoy tejiendo es la L? Muchas gracias de antemano por sus aclaraciones.
08.12.2016 - 22:23DROPS Design answered:
Hola Victoria. Los aumentos se trabajan a lo largo de la vuelta aprox con el mismo número de pts entre aumentos (es decir, si hay 240 pts y tenemos que aumentar 16 pts: 240/16 = 15 pts entre cada aumento)
10.12.2016 - 21:21Jemimah wrote:
I am working my piece with the same hook size and all but I've not finished the increases at the sides and the mid back but it's already 22 cm at the mid front and 27 cm at the mid back. Please I am stuck and don't know what to do next
09.09.2016 - 21:20DROPS Design answered:
Dear Jemimah, are you sure that you're tension correspond to that indicated in the pattern? Hook size is only a suggestion, you have to be sure that your gauge is 26 tr x 16 rows. Happy crocheting!
11.09.2016 - 09:55
![]() Beate wrote:
Beate wrote:
The shorts turned out as lovely as on the picture! I also struggled with getting the size right. After a few attempts, I found out that you have to work really, really tight - but it is possible! I also discovered that my very old 2,5 mm needle had a much bigger hook/head than what I found in stores now (even if the actual needle size or 'neck' was the same). Bought a new needle as it was easier to work tight enough with the smaller 'head'.
24.07.2016 - 08:28
![]() Joslami Torres wrote:
Joslami Torres wrote:
En el patrón piden hacer la muestra con aguja del 2,5 pero el patrón se teje con aguja del 3. Soy nueva haciendo ganchillo comencé con el cal actual y quiero intentar hacer este patrón. Gracias
05.06.2016 - 12:06DROPS Design answered:
Hola Joslami. Ha sido una errata, ya está corregido, la aguja correcta es de 2.5 mm
07.06.2016 - 22:16
|
||||||||||||||||||||||||||||
Elly May#ellymayshorts |
||||||||||||||||||||||||||||
 |
 |
|||||||||||||||||||||||||||
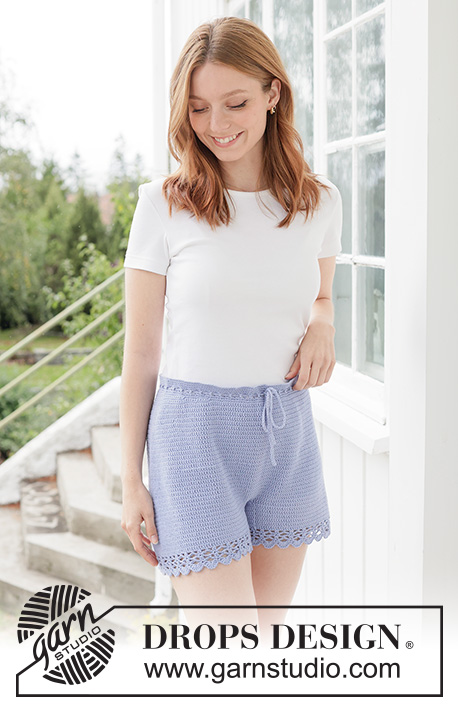
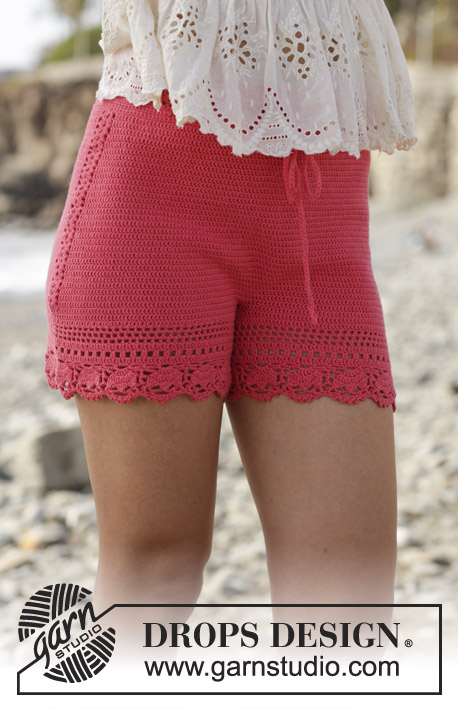
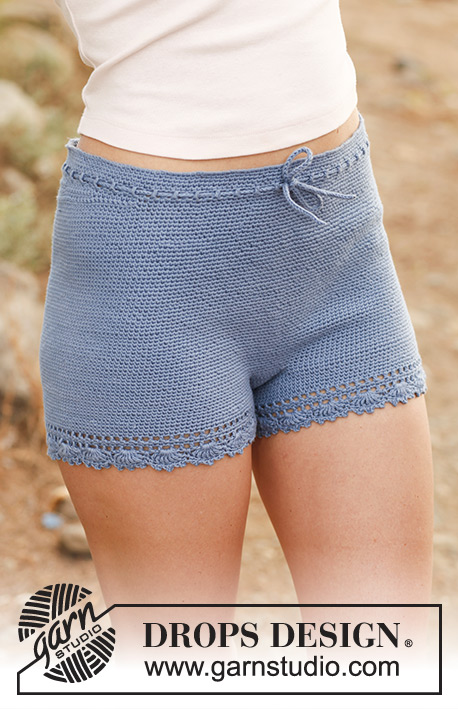
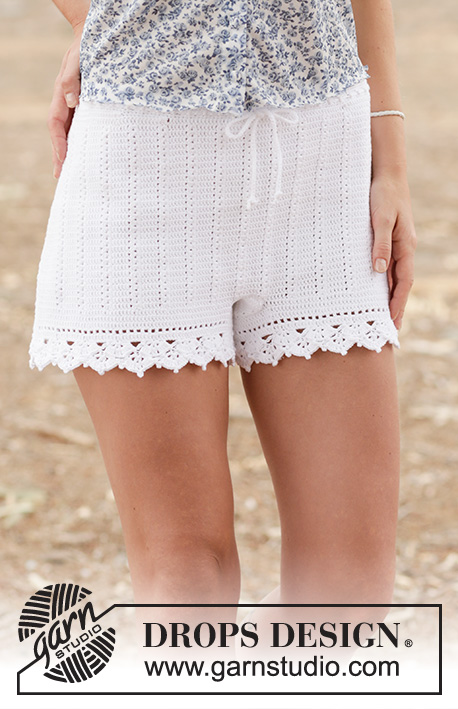
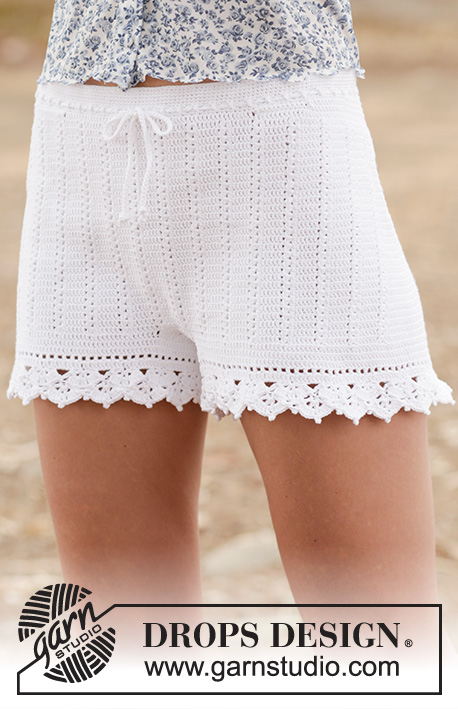
Crochet DROPS shorts with double crochet and lace pattern in ”Safran”. Size: S - XXL.
DROPS 162-19 |
||||||||||||||||||||||||||||
|
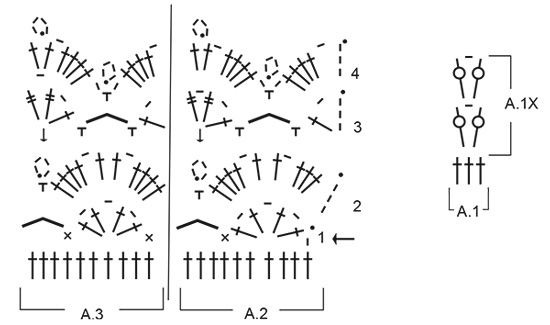
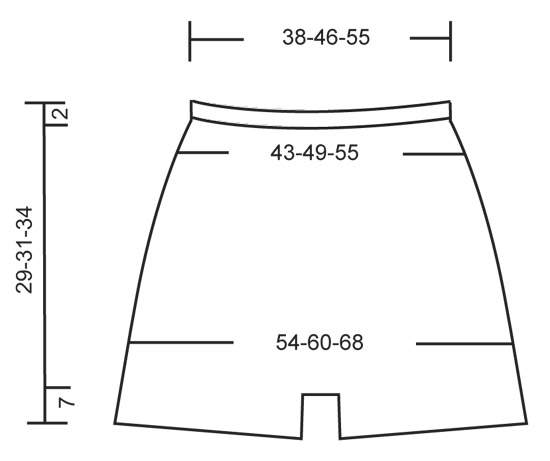
CROCHET INFO: Replace first sc at beg of every sc round with 1 ch. Finish round with 1 sl st in 1st ch at beg of round. Replace first dc at beg of every dc round with 3 ch. Finish round with 1 sl st in 3rd ch at beg of round. PATTERN: See diagrams A.1 to A.3. INCREASE TIP 1: Inc 2 dc mid back as follows: Work until 2 dc remain before marker mid back, work 2 dc in first dc, 1 dc in each of the next 2 dc (marker is between these) and 2 dc in next dc (= 2 dc inc). Inc 4 dc mid back as follows: Work until 4 dc remain before marker mid back, work 2 dc in first dc, 1 dc in next dc, 2 dc in next dc, 1 dc each of the next 2 dc (marker is between these) and 2 dc in next dc, 1 dc in next dc, 2 dc in next dc (= 4 dc inc). INCREASE TIP 2: Work until 1 dc remains before marker in the side, work 2 dc in first dc, 1 dc in next dc (marker is in this dc) and 2 dc in next dc (= 2 dc inc). Repeat the same inc in the other side = 4 sts inc on round. ---------------------------------------------------------- SHORTS: The piece is worked top down. Work 224-274-326 ch on hook size 2.5 mm / C with Safran and form a ring with 1 sl st in first ch. Insert 1 marker at beg of round = mid back. Work first round as follows: ch 1, * skip ch 1, 1 sc in each of the next 7 ch *, repeat from *-* until 0-2-6 ch remain, work 1 sc in each of these ch = 196-240-286 sc. READ CROCHET TIP! Continue working 1 sc in every sc until piece measures 2 cm / ¾". REMEMBER THE CROCHET GAUGE! Now work an eyelet row as follows: ch 4, skip 1 sc, * 1 dc in next sc, ch 1, skip 1 sc *, repeat from *-* the entire round, finish with 1 sl st in 3rd ch from beg of round. On next round work 1 sc in every dc and every ch. Then work the shorts higher in the back as follows: Work 11-12-13 sc past the marker mid back, turn and work 1 sl st in first st, then 1 sc in each of the next 21-23-25 sc, turn and work 1 sl st in first st, then 1 sc in each of the next 32-35-38 sts (sl sts are also worked). Continue like this by working 11-12-13 sts more on every turn until a total of 154-192-208 sts have been worked. Turn again and work until marker mid back. Continue to work 1 round with sc while AT THE SAME TIME inc 28-16-2 sc evenly = 224-256-288 sc. Then work pattern (and insert markers) as follows from mid back: 3 dc, A.1 (= 3 dc), * 5 dc, A.1*, repeat from *-* until 2 dc remain, 2 dc, AT THE SAME TIME insert a marker in each side as follows: Insert a marker in the 3rd dc after 7th-8th-9th repetition A.1, and insert a marker in 3rd dc after 21th-24th-27th repetition with A.1 (i.e. 1 marker in each side). When A.1 has been worked 1 time vertically, continue pattern A.1X - AT THE SAME TIME inc mid back and in the sides as follows: SIDES: Inc on each side of dc with marker, in each side as follows - READ INCREASE TIP 2. Repeat inc every 4th round 7-7-8 times in total = 28-28-32 dc inc. MID BACK: AT THE SAME TIME when piece measures 15-17-19 cm / 6"-6¾"-7½" (measured mid front), inc mid back as follows – Read INCREASE TIP-1. Repeat inc with 2 dc mid back every round 10 times in total, and repeat inc with 4 dc every round 2-2-3 times = 28-28-32 dc inc. There are now 280-312-352 dc on round. Now piece measures approx. 22-24-27 cm / 8¾"-9½"-10½" mid front and 27-29-32 cm / 10½"-11½"-12½" mid back. Now divide for legs as follows: Work 1 sl st in each of the first 5-6-6 dc on round, turn and work 1 dc in each of the first 10-12-12 dc (i.e. 5-6-6 sts on each side of marker mid back). These 10-12-12 dc = gusset. Work dc back and forth over these dc. When piece measures 4-5-6 cm / 1½"-2"-2½", dec 1 dc in each side, repeat dec when piece measures 8-9-10 cm / 3"-3½"-4" = 6-8-8 dc. Continue with 1 dc in every dc until gusset measures 11-12-13 cm / 4½"-4¾"-5", cut the yarn. Fasten gusset edge to edge to the middle 6-8-8 sts towards mid front. Then work the legs. LEG: Work 1 dc in each of the 132-146-166 dc around one leg (i.e. work 1 dc in every dc in A.1X and 1 dc in ch-space = 3 dc), in addition work 28-31-34 dc along the gusset = 160-177-200 dc. Work 2 rounds with dc AT THE SAME TIME on last round inc 0-3-0 dc evenly by working 2 dc in 1 dc = 160-180-200 dc. Continue to work as follows: ROUND 1: 3 ch (= 1 dc), * ch 1, skip 1 dc, 1 dc in next dc * , repeat from *-* until 1 dc remains, ch 1, skip 1 dc, 1 sl st in 3rd ch at beg of round. ROUND 2: 3 ch (= 1 dc), * 1 dc in ch-space, 1 dc in next dc *, repeat from *-* the entire round until 1 ch-space remains, 1 dc in ch-space, finish with 1 sl st in 3rd ch on round. ROUND 3: Now work pattern as follows: Work pattern according to diagram A.2 over the first 10 dc, continue with A.3 the entire round. Finish every round with 1 sl st at beg of round. REMEMBER CROCHET INFO! Continue like this until pattern A.2-A.3 have been worked vertically. Fasten off. Work the other leg the same way. TIES: Work 130-140-150 cm / 51"-55"-60" with LOOSE ch, turn and work 1 sl st in every ch. Thread the tie in the row with eyelet holes at the top of shorts – start mid front. |
||||||||||||||||||||||||||||
Diagram explanations |
||||||||||||||||||||||||||||
|
||||||||||||||||||||||||||||
 |
||||||||||||||||||||||||||||
 |
||||||||||||||||||||||||||||
Have you finished this pattern?Tag your pictures with #dropspattern #ellymayshorts or submit them to the #dropsfan gallery. Do you need help with this pattern?You'll find 13 tutorial videos, a Comments/Questions area and more by visiting the pattern on garnstudio.com. © 1982-2026 DROPS Design A/S. We reserve all rights. This document, including all its sub-sections, has copyrights. Read more about what you can do with our patterns at the bottom of each pattern on our site. |
||||||||||||||||||||||||||||


With over 40 years in knitting and crochet design, DROPS Design offers one of the most extensive collections of free patterns on the internet - translated to 17 languages. As of today we count 324 catalogs and 12291 patterns - 12281 of which are translated into English (US/in).
We work hard to bring you the best knitting and crochet have to offer, inspiration and advice as well as great quality yarns at incredible prices! Would you like to use our patterns for other than personal use? You can read what you are allowed to do in the Copyright text at the bottom of all our patterns. Happy crafting!
Post a comment to pattern DROPS 162-19
We would love to hear what you have to say about this pattern!
If you want to leave a question, please make sure you select the correct category in the form below, to speed up the answering process. Required fields are marked *.