
Looking for a yarn?


Comments / Questions (187)
![]() Marine wrote:
Marine wrote:
Bonjour, Je suis au niveau de l'augmentation 1. J'ai bien compris tous els combien de mailles il fallait augmenter cependant, j'ai deux questions : Avec quelle maille doit-on faire tout le tour, en Bride ? Combien de tour d'augmentation faisons nous, un seul tour ? Merci par avance
23.06.2025 - 15:40DROPS Design answered:
Bonjour Marine, les tours commencent au milieu dos, vous allez donc augmenter 1 ou 2 brides de chaque côté du milieu dos: 1 ou 2 brides au début du rang + 1 ou 2 brides à la fin du rang. Vous aurez 2 brides entre les augmentations quand vous augmentez 1 bride et vous aurez: 1 augm, 1 bride, 1 augm, 1 bride, fin du tour/début du tour, 1 bride, 1 augm, 1 bride, 1 augm quand vous augmentez 4 brides au milieu dos. Bon crochet!
23.06.2025 - 16:25
![]() Marine wrote:
Marine wrote:
Bonjour, Je suis sur la partie short au desbur de la rehausse et je n’arrive pas à comprendre quand il fait tourner. Tourner pour repartir dans l’autre sens ? Merci par avance !
16.06.2025 - 22:05DROPS Design answered:
Bonjour Marine, la rehausse se compose de rangs raccourcis, on va donc crocheter alternativement sur l'endroit et sur l'envers plus de mailles à la fin de chaque rang, en commençant au milieu dos sur l'endroit, le dernier rang sera sur l'envers jusqu'au milieu dos, ainsi, vous pourrez ensuite reprendre à crocheter en rond. Suivez attentivement le nombre de mailles indiqué pour votre taille. Bon crochet!
17.06.2025 - 09:23
![]() Maria Bljahhina wrote:
Maria Bljahhina wrote:
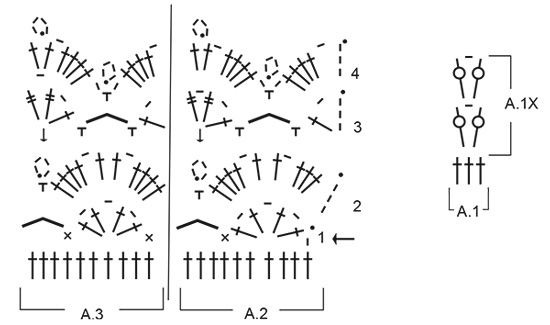
Tere, Heegeldan hetkel neid lühikesi pükse ning olen kohas, kus peab heegeldama A.1 skeemi üks kord. Skeemi järgi näeb muster välja nagu V kujulised mummud aga kui vaadata pilti siis seal pole mumme ning muster näeb teist moodi välja. Kas ma olen millesti valesti aru saanud? Ette tänades! Vastust ootamas Maria
22.05.2025 - 21:26DROPS Design answered:
Tere Maria Bljahhina! Skeem A.1 on pildil ülevalt alla triibud (tagurpidi V, st 2 sammast kokku + ahelsilmus + 2 sammast kokku). Skeemi korratakse iga 5 samba järel. Head heegeldamist!
31.05.2025 - 18:59
![]() Rikke Martine Staldkarl Larsen wrote:
Rikke Martine Staldkarl Larsen wrote:
Hej! Jeg er kommet til det punkt hvor jeg skal hækle mønster A1 og sætte mærker i siderne, men hvordan? Symbolet (et kors) beskriver jeg skal hækle st om lm-bue, men der er jo ingen lm-bue da jeg har hæklet en runde med fm inden jeg skal starte med A1. På forhånd tak, Mvh Rikke
10.05.2025 - 15:56DROPS Design answered:
Hei Rikke. I diagramforklaringen (til korset) står det: st om lm-bue (1.omg= st i st) MEN det som står i parentes burde ha står st i fm, ikke bare st. Så da hekler du staver i fastmaskene. mvh DROPS Design
19.05.2025 - 11:58
![]() Denise wrote:
Denise wrote:
Guten Tag, Ich bin leider total verwirrt. Wie funktioniert die Zunahme? Soll das Muster an diesen Stellen pausieren? Oder läuft das Muster durch und ist dann in jeder Reihe versetzt? So sieht das auf dem Bild leider nicht aus. Wäre toll, wenn man die Rückseite der Hose auch auf einem Bild sehen könnte. Danke und Grüße.
09.04.2025 - 09:37DROPS Design answered:
Liebe Denise, die Zunahmen-1 entstehen beidseiting von den 4 Maschen in der Mitte vom Rückenteil, so nehmen Sie am Anfang der Runde nach den 2 ersten Maschen und am Ende der Runde vor den 2 letzten Maschen - Zunahmetipp sollte korrigiert werden. viel Spaß beim Häkeln!
09.04.2025 - 16:00
![]() Marie wrote:
Marie wrote:
Bonjour, pour faire la couture du gousset, il faut coudre les 6 brides du dos sur les 6 brides du devant : sur le devant du short nous avons 5 brides entre le diagramme A1x (2 brides écoulées ensemble, 1 ml, 2 brides écoulées ensemble.) Où crocheter la 6eme bride du dos par rapport au devant car 'ous avons 5 brides ? Merci.
06.04.2025 - 17:48DROPS Design answered:
Bonjour Marie, posez le short à plat en centrant bien les 10 brides du début du gousset au milieu dos et cousez-les au milieu du devant en les centrant bien. Bon crochet!
07.04.2025 - 09:14
![]() Marie wrote:
Marie wrote:
Tolle Hose. Ich habe eine Frage, ich verstehe die erste Zunahme nicht: 1 Rd mit fM häkeln und GLEICHZEITIG 28-16-2 fM gleichmäßig verteilt zunehmen (= 224-256-288 fM) Wie mache ich das und wie komme ich dazu in einer Runde 70 Maschen zuzunehmen? Danke für eine Erklärung :)
11.03.2025 - 21:24DROPS Design answered:
Liebe Marie, bei dieser Runde sollen Sie regelmäßig verteilt zunehmen - dh jeweils 28-16-2 Mal 2 fM anstatt nur 1 fm in die nächste Masche häklen; hier lesen Sie, wie man regelmäßig verteilt zunimmt. Viel Spaß beim Häkeln!
12.03.2025 - 10:08
![]() Cattaneo wrote:
Cattaneo wrote:
Bonjour, concernant l'augmentation 1 "Milieu dos" ,, augmentation de 4 brides, je ne comprends pas où les faire par rapport au marqueur. J'en suis au dernier rg d augmentation de 2 brides et j'ai 3 MLS en l'air (début tour=marqueur), 10 brides puis 2 brides ensemble et à la fin de ce tour 2 brides ensemble et 10 brides. Pour les 2 derniers rgs d'augmentation de 4 brides (il faut augmenter 2x4 brides ? Et où précisément ?
25.02.2025 - 22:26DROPS Design answered:
Bonjour Mme Cattaneo, augmentez 2 brides ainsi: 1 bride au début du tour dans la 2ème bride du tour et 1 bride à la fin du tour dans l'avant-dernière bride avant la fin du tour. Augmentez 4 brides ainsi: 1 bride dans la 2ème et 1 bride dans la 4ème maille du tour + 1 bride dans la 4ème maille avant la fin du tour + 1 bride dans l'avant-dernière maille du tour., Bon crochet!
26.02.2025 - 08:26
![]() Jenny wrote:
Jenny wrote:
Placing markers at repeat 7/8/9 of the A.1 row and again at 21/24/27 makes no sense to me. Shouldn’t they be directly across from one another to the increase is evenly distributed in the hip area?
03.10.2024 - 01:36DROPS Design answered:
Dear Jenny, the markers should be inserted in the middle stitch of the 5 dc (US-English) in each side, ie the first marker should be after the 7th, 8th or 9th repeat of A.1 (see size) and the 2nd marker after the 21st, 24th or 27th repeat of A.1 = both sides of piece. Happy crocheting!
03.10.2024 - 09:52
![]() Signe Lundgren wrote:
Signe Lundgren wrote:
Virka drops design modeller e-231 shorts Virka högre bak. Hur gör man detta? Visa på yootube eller förklara hur jag skall höra detta på svenska. Hälsningar Signe Lundgren Hälsningar
07.09.2024 - 12:33DROPS Design answered:
Hei Signe. Vær snill og skriv mer spesifikk hva du trenger hjelp til på høyre bakside / hvor i oppskriften? Så skal vi hjelpe så godt vi kan. Skriv også hvilken str. du hekler. Har du sett på de 2 hjelpevideoen til denne shortsen? Klikk på Videor til høyre for bildet / eller under bildet. Om du må ha forklaring på svensk, kan du også ta kontakt med butikken du kjøpte garnet hos. De er behjelpelig med spørsmål på oppskrifter:) mvh DROPS Design
09.09.2024 - 11:17
|
||||||||||||||||||||||||||||
Elly May#ellymayshorts |
||||||||||||||||||||||||||||
 |
 |
|||||||||||||||||||||||||||
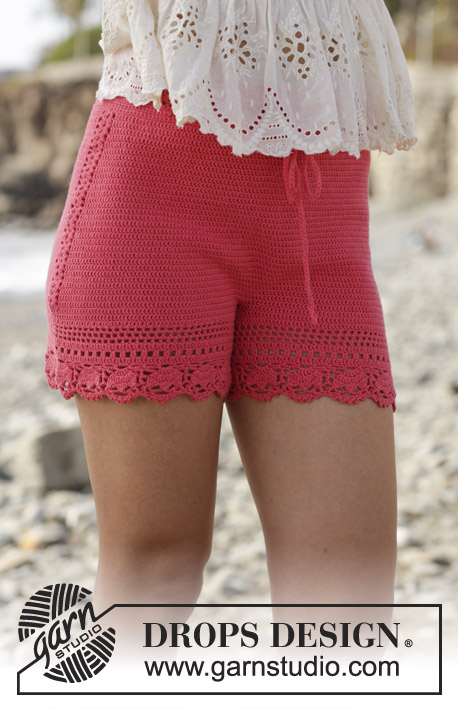
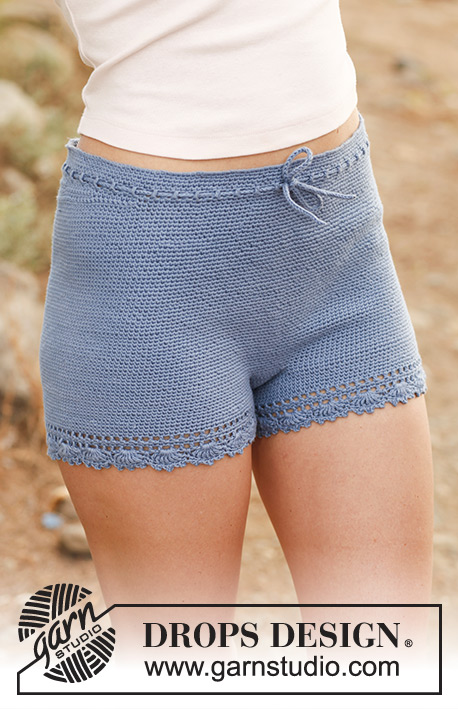
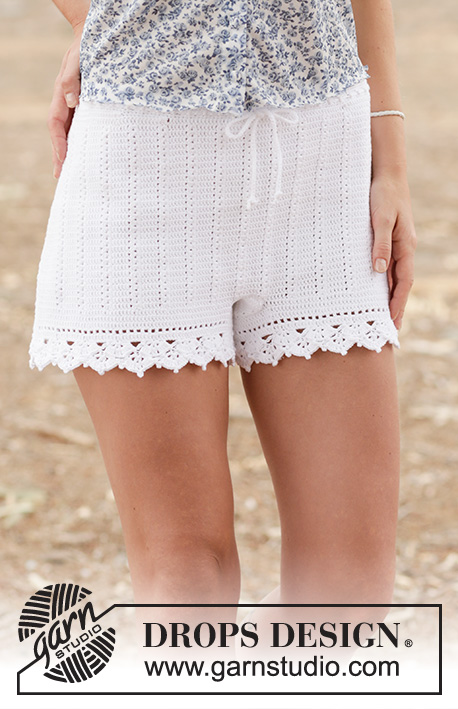
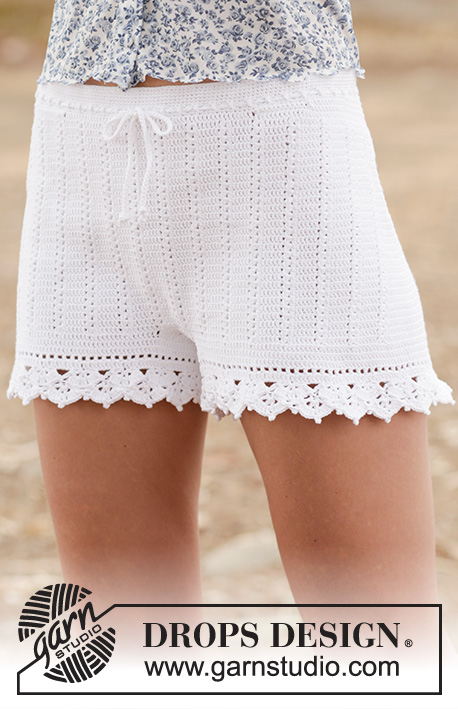
Crochet DROPS shorts with double crochet and lace pattern in ”Safran”. Size: S - XXL.
DROPS 162-19 |
||||||||||||||||||||||||||||
|
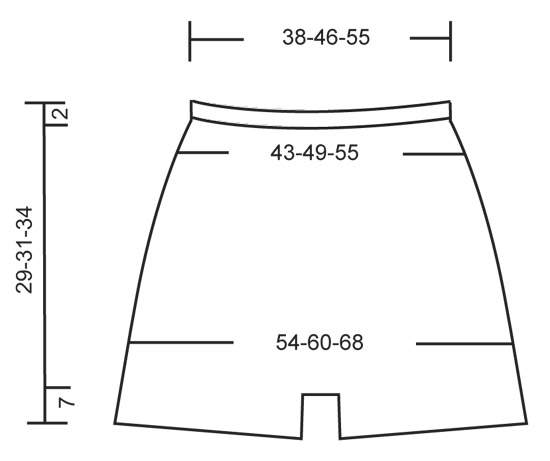
CROCHET INFO: Replace first sc at beg of every sc round with 1 ch. Finish round with 1 sl st in 1st ch at beg of round. Replace first dc at beg of every dc round with 3 ch. Finish round with 1 sl st in 3rd ch at beg of round. PATTERN: See diagrams A.1 to A.3. INCREASE TIP 1: Inc 2 dc mid back as follows: Work until 2 dc remain before marker mid back, work 2 dc in first dc, 1 dc in each of the next 2 dc (marker is between these) and 2 dc in next dc (= 2 dc inc). Inc 4 dc mid back as follows: Work until 4 dc remain before marker mid back, work 2 dc in first dc, 1 dc in next dc, 2 dc in next dc, 1 dc each of the next 2 dc (marker is between these) and 2 dc in next dc, 1 dc in next dc, 2 dc in next dc (= 4 dc inc). INCREASE TIP 2: Work until 1 dc remains before marker in the side, work 2 dc in first dc, 1 dc in next dc (marker is in this dc) and 2 dc in next dc (= 2 dc inc). Repeat the same inc in the other side = 4 sts inc on round. ---------------------------------------------------------- SHORTS: The piece is worked top down. Work 224-274-326 ch on hook size 2.5 mm / C with Safran and form a ring with 1 sl st in first ch. Insert 1 marker at beg of round = mid back. Work first round as follows: ch 1, * skip ch 1, 1 sc in each of the next 7 ch *, repeat from *-* until 0-2-6 ch remain, work 1 sc in each of these ch = 196-240-286 sc. READ CROCHET TIP! Continue working 1 sc in every sc until piece measures 2 cm / ¾". REMEMBER THE CROCHET GAUGE! Now work an eyelet row as follows: ch 4, skip 1 sc, * 1 dc in next sc, ch 1, skip 1 sc *, repeat from *-* the entire round, finish with 1 sl st in 3rd ch from beg of round. On next round work 1 sc in every dc and every ch. Then work the shorts higher in the back as follows: Work 11-12-13 sc past the marker mid back, turn and work 1 sl st in first st, then 1 sc in each of the next 21-23-25 sc, turn and work 1 sl st in first st, then 1 sc in each of the next 32-35-38 sts (sl sts are also worked). Continue like this by working 11-12-13 sts more on every turn until a total of 154-192-208 sts have been worked. Turn again and work until marker mid back. Continue to work 1 round with sc while AT THE SAME TIME inc 28-16-2 sc evenly = 224-256-288 sc. Then work pattern (and insert markers) as follows from mid back: 3 dc, A.1 (= 3 dc), * 5 dc, A.1*, repeat from *-* until 2 dc remain, 2 dc, AT THE SAME TIME insert a marker in each side as follows: Insert a marker in the 3rd dc after 7th-8th-9th repetition A.1, and insert a marker in 3rd dc after 21th-24th-27th repetition with A.1 (i.e. 1 marker in each side). When A.1 has been worked 1 time vertically, continue pattern A.1X - AT THE SAME TIME inc mid back and in the sides as follows: SIDES: Inc on each side of dc with marker, in each side as follows - READ INCREASE TIP 2. Repeat inc every 4th round 7-7-8 times in total = 28-28-32 dc inc. MID BACK: AT THE SAME TIME when piece measures 15-17-19 cm / 6"-6¾"-7½" (measured mid front), inc mid back as follows – Read INCREASE TIP-1. Repeat inc with 2 dc mid back every round 10 times in total, and repeat inc with 4 dc every round 2-2-3 times = 28-28-32 dc inc. There are now 280-312-352 dc on round. Now piece measures approx. 22-24-27 cm / 8¾"-9½"-10½" mid front and 27-29-32 cm / 10½"-11½"-12½" mid back. Now divide for legs as follows: Work 1 sl st in each of the first 5-6-6 dc on round, turn and work 1 dc in each of the first 10-12-12 dc (i.e. 5-6-6 sts on each side of marker mid back). These 10-12-12 dc = gusset. Work dc back and forth over these dc. When piece measures 4-5-6 cm / 1½"-2"-2½", dec 1 dc in each side, repeat dec when piece measures 8-9-10 cm / 3"-3½"-4" = 6-8-8 dc. Continue with 1 dc in every dc until gusset measures 11-12-13 cm / 4½"-4¾"-5", cut the yarn. Fasten gusset edge to edge to the middle 6-8-8 sts towards mid front. Then work the legs. LEG: Work 1 dc in each of the 132-146-166 dc around one leg (i.e. work 1 dc in every dc in A.1X and 1 dc in ch-space = 3 dc), in addition work 28-31-34 dc along the gusset = 160-177-200 dc. Work 2 rounds with dc AT THE SAME TIME on last round inc 0-3-0 dc evenly by working 2 dc in 1 dc = 160-180-200 dc. Continue to work as follows: ROUND 1: 3 ch (= 1 dc), * ch 1, skip 1 dc, 1 dc in next dc * , repeat from *-* until 1 dc remains, ch 1, skip 1 dc, 1 sl st in 3rd ch at beg of round. ROUND 2: 3 ch (= 1 dc), * 1 dc in ch-space, 1 dc in next dc *, repeat from *-* the entire round until 1 ch-space remains, 1 dc in ch-space, finish with 1 sl st in 3rd ch on round. ROUND 3: Now work pattern as follows: Work pattern according to diagram A.2 over the first 10 dc, continue with A.3 the entire round. Finish every round with 1 sl st at beg of round. REMEMBER CROCHET INFO! Continue like this until pattern A.2-A.3 have been worked vertically. Fasten off. Work the other leg the same way. TIES: Work 130-140-150 cm / 51"-55"-60" with LOOSE ch, turn and work 1 sl st in every ch. Thread the tie in the row with eyelet holes at the top of shorts – start mid front. |
||||||||||||||||||||||||||||
Diagram explanations |
||||||||||||||||||||||||||||
|
||||||||||||||||||||||||||||
|
||||||||||||||||||||||||||||
|
||||||||||||||||||||||||||||
Have you finished this pattern?Tag your pictures with #dropspattern #ellymayshorts or submit them to the #dropsfan gallery. Do you need help with this pattern?You'll find 13 tutorial videos, a Comments/Questions area and more by visiting the pattern on garnstudio.com. © 1982-2025 DROPS Design A/S. We reserve all rights. This document, including all its sub-sections, has copyrights. Read more about what you can do with our patterns at the bottom of each pattern on our site. |
||||||||||||||||||||||||||||


With over 40 years in knitting and crochet design, DROPS Design offers one of the most extensive collections of free patterns on the internet - translated to 17 languages. As of today we count 314 catalogs and 11821 patterns - 11811 of which are translated into English (US/in).
We work hard to bring you the best knitting and crochet have to offer, inspiration and advice as well as great quality yarns at incredible prices! Would you like to use our patterns for other than personal use? You can read what you are allowed to do in the Copyright text at the bottom of all our patterns. Happy crafting!
Post a comment to pattern DROPS 162-19
We would love to hear what you have to say about this pattern!
If you want to leave a question, please make sure you select the correct category in the form below, to speed up the answering process. Required fields are marked *.