
Popular categories
Looking for a yarn?


Comments / Questions (97)
![]() Nina wrote:
Nina wrote:
Ik wil maat L breien, maar als ik de meerderingen bij elkaar optel van mouw en voor/achterpand kom ik niet op een totaal van 310 steken (ik kom maar tot 304). zie onderstaand stukje. Ook wil ik graag weten waar de meerderingen in het voor en achterpand geplaatste zijn. Bij voorbaat dank, Nina
02.06.2015 - 22:57DROPS Design answered:
Hoi Nina. Je bent misschien een keer meerderen vergeten. Je meerdert voor maat L op de panden (= 4 st per keer): 18 keer in elke nld en 9 keer om de nld, en op de mouwen (= 4 st per keer): 6 keer om de nld en 6 keer in elke 4e nld = 156 st + 154 die je had = 310. Je meerdert voor de raglan aan elke kant van A.2, A.2 is de overgang tussen pand + mouw. Lees ook onder RAGLAN aan het begin van het patroon.
04.06.2015 - 13:51
![]() Teresa Mas Pinto wrote:
Teresa Mas Pinto wrote:
Gracias por la respuesta. Creo que este detalle no queda claro en las instrucciones.
15.05.2015 - 15:39
![]() Teresa Mas Pinto wrote:
Teresa Mas Pinto wrote:
Estoy tejiendo el canesú. Cuando dice que el aumento en las mangas : 1 Pt cada segunda vuelta un total de 2-4-6.....y después cada 4a vta un total de 6 vcs, interpreto que el aumento ha de ser dos puntos. Si no es así no consigo el total de 262-286-310...etc.
13.05.2015 - 21:57DROPS Design answered:
Hola Teresa, en el canesú, en la vta en la que aumentamos solamente en delantero y espalda aumentamos un total de 4 pts en la vta. En la vta en la q aumentamos en delantero, espalda y mangas, aumentamos un total de 8 pts en la vta
15.05.2015 - 08:59
![]() Lene Rask Rasmussen wrote:
Lene Rask Rasmussen wrote:
Jeg kan ikke finde ud af hvor udtagningerne skal være på denne fine bluse? På for- og bagstykket, er det da før sidste maske inden og første maske efter ærme? Og hvor på ærmet? På forhånd tak
10.05.2015 - 22:03DROPS Design answered:
Hej Lene. Naar du tager ud til raglan, saa tager du ud baade för og efter A.2. A.2 markerer overgang mellem forstykke, aermer og bagstykke. Se under RAGLAN överst i mönstret. God fornöjelse.
11.05.2015 - 13:16
![]() Viviane wrote:
Viviane wrote:
Merci pour votre réponse qui a répondu à ma question.
23.04.2015 - 17:18
![]() Viviane wrote:
Viviane wrote:
Comment la manche de ce modèle après les augmentations peut-elle faire 17 cms de haut alors que pour la taille s que je fais, les augmentations se terminent sur le 29ème tour, (l'échantillon est de 28 tours pour 10 cms).
16.04.2015 - 19:10DROPS Design answered:
Bonjour Viviane, les mesures du schéma sont prises ouvrage fini, à plat, les 7 cm en haut correspondent à la largeur des manches en double - et les 10 cm correspondent bien à la hauteur du raglan. Bon tricot!
17.04.2015 - 08:54
![]() Ann-Karin Rosenlind wrote:
Ann-Karin Rosenlind wrote:
Blir lite förbryllad.Undrar var markeringarna ska sitta i Arbetet.Tack för alla era underbara mönster.
28.03.2015 - 05:25DROPS Design answered:
Hej Ann-Karin. Du har ingen markeringer til raglan (du öker her paa hver side af A.2). Markeringene kommer senere i siden naar du har sat maskerne til erme paa en traad og gaar igang med bolen.
22.04.2015 - 16:15
![]() Siri Haugen wrote:
Siri Haugen wrote:
Mønsteret over erme går over 39 m. Hvor skal man øke på ermene uten at det går utover mønsteret?
18.02.2015 - 19:52DROPS Design answered:
Hei Siri. Du öker med 1 kast, saa du strikker mönstret som beskrevet og strikker dette vrid i naeste omgang saa der ikke kommer hul. Du strikker ikke de nye masker med i A.2 - det forbliver som det er. Du strikker de nye masker videre i glatstrik.
19.02.2015 - 16:13Marilú Galindo wrote:
Para los aumentos de la espalda/frente también se debe poner un marca puntos? A partir de qué vuelta se inician?
10.02.2015 - 09:09DROPS Design answered:
Hola Marilú. ¿Puedes concretar a que aumentos te refieres? Si es a los aum en los lados - lo tienes muy bien explicado en el patrón - los aum se trabajan a cada lado de los MP (marcapuntos) de los lados que insertamos dentro de los pts nuevos montados bajo la manga después de separar las mangas y el cuerpo.
15.02.2015 - 23:08Patricia Tan wrote:
The placement of markers is not included in the instructions.
09.02.2015 - 12:38DROPS Design answered:
Dear Mrs Tan, markers are placed when slipping sts for sleeve onto a st holder, you cast on 6-10 new sts (see size) and insert 1 marker in the middle of these new sts each side. Happy knitting!
09.02.2015 - 16:07
|
||||||||||||||||||||||
Esther#esthertop |
||||||||||||||||||||||
 |
 |
|||||||||||||||||||||
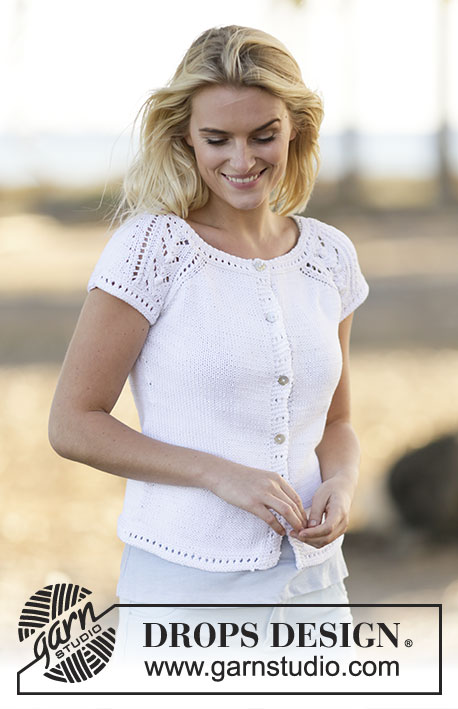
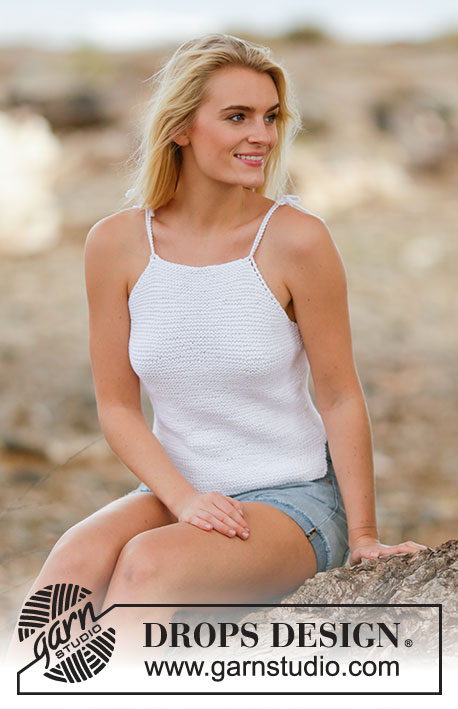
Knitted DROPS top with raglan and lace pattern, worked top down with short sleeves in ”Muskat”. Size: S - XXXL.
DROPS 159-33 |
||||||||||||||||||||||
|
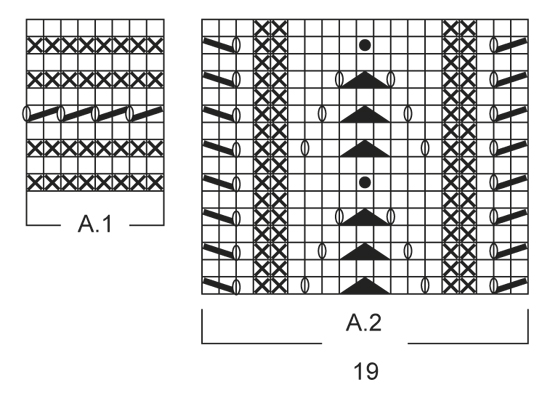
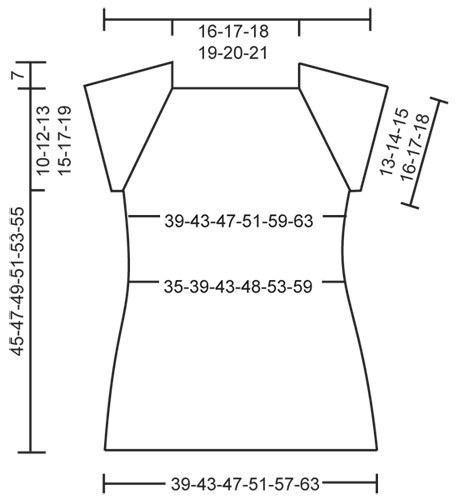
PATTERN: See diagrams A.1-A.2. RAGLAN: Inc for raglan on each side of A.2. Inc with a YO, work YO twisted on next round to avoid holes. The inc on body and sleeves are uneven as explained in pattern. INCREASE TIP: Beg 1 st before marker and inc as follows: 1 YO, K 2 (marker is between these 2 sts), 1 YO. On next round K YOs twisted to avoid holes. DECREASE TIP: Dec as follows before marker: K 2 tog. Dec as follows after marker: Slip 1 st as if to K, K 1, psso. ---------------------------------------------------------- TOP: Worked in the round on circular needle, top down. YOKE: READ ALL OF THE FOLLOWING SECTION BEFORE CONTINUING! Cast on 146-150-154-158-162-166 sts on circular needle size 3 mm / US 2.5 with Muskat. Work A.1. When A.1 has been worked, switch to circular needle size 4 mm / US 6. Work next round as follows from mid back: Work 17-18-19-20-21-22 sts in stockinette st (= back piece), work A.2 (= 19 sts), 1 st in stockinette st, A.2 (= 19 sts) (= 39 sts on sleeve), work 34-36-38-40-42-44 sts in stockinette st (= front piece), work A.2, 1 st in stockinette st and A.2 (= 39 sts on sleeve) and finish with 17-18-19-20-21-22 sts in stockinette st (= back piece). Continue pattern like this AT THE SAME TIME inc for RAGLAN beg on next round - see explanation above. Inc on front/back piece: 1 st every round a total of 14-16-18-20-26-30 times, then on every other round 7-8-9-10-9-9 times. Inc on sleeves: 1 st every other round a total of 2-4-6-8-10-12 times and then every 4th round a total of 6 times in all sizes. After all inc there are 262-286-310-334-366-394 sts on row, continue working until the piece measures approx. 17-19-20-22-24-26 cm = 6¾"-7½"-8"-8¾"-9½"-10¼" from shoulder and down. Work next round as follows: K 38-42-46-50-56-61 (= back piece), slip the next 55-59-63-67-71-75 sts on a stitch holder for sleeve, cast on 6-6-6-8-8-10 new sts, insert 1 marker in the middle of the new sts, K 76-84-92-100-112-122 (= front piece), slip the next 55-59-63-67-71-75 sts on 1 stitch holder for sleeve, cast on 6-6-6-8-8-10 new sts, insert 1 marker in the middle of the new sts and K the remaining 38-42-46-50-56-61 (= back piece) = 164-180-196-216-240-264 sts on row - NOW MEASURE PIECE FROM HERE. BODY: Continue in stockinette st. When piece measures 4 cm / 1½", dec 1 st on each side of markers in the side - READ DECREASE TIP (= 4 sts dec). Repeat dec every 4 cm / 1½" a total of 4 times = 148-164-180-200-224-248 sts. When piece measures 22 cm / 8¾" in all sizes, inc 1 st on each side of markers in the side - READ INCREASE TIP (= 4 sts inc). Repeat inc every 2 1/2 cm / ⅞" a total of 4 times = 164-180-196-216-240-264 sts. When piece measures 33-33-34-34-34-34 cm / 13"-13"-13½"-13½"-13½"-13½"-, switch to circular needle size 3 mm / US 2.5. Work pattern according to diagram A.1 and then loosely bind off. Top measures approx. 52-54-56-58-60-62 cm / 20½"-21¼"-22"-22¾"-23⅝"-24⅜" from shoulder and down. SLEEVE EDGE: Worked in the round on double pointed needles. Slip the 55-59-63-67-71-75 sts from stitch holder back on double pointed needles size 3 mm / US 2.5 and cast on 6-6-6-8-8-10 new sts under sleeve = 61-65-69-75-79-85 sts. Work pattern in the round according to diagram A.1 and then loosely bind off. Work the other sleeve edge the same way. ASSEMBLY: Sew tog under sleeves. |
||||||||||||||||||||||
Diagram explanations |
||||||||||||||||||||||
|
||||||||||||||||||||||
 |
||||||||||||||||||||||
 |
||||||||||||||||||||||
Have you finished this pattern?Tag your pictures with #dropspattern #esthertop or submit them to the #dropsfan gallery. Do you need help with this pattern?You'll find 24 tutorial videos, a Comments/Questions area and more by visiting the pattern on garnstudio.com. © 1982-2026 DROPS Design A/S. We reserve all rights. This document, including all its sub-sections, has copyrights. Read more about what you can do with our patterns at the bottom of each pattern on our site. |
||||||||||||||||||||||


With over 40 years in knitting and crochet design, DROPS Design offers one of the most extensive collections of free patterns on the internet - translated to 17 languages. As of today we count 325 catalogs and 12298 patterns - 12288 of which are translated into English (US/in).
We work hard to bring you the best knitting and crochet have to offer, inspiration and advice as well as great quality yarns at incredible prices! Would you like to use our patterns for other than personal use? You can read what you are allowed to do in the Copyright text at the bottom of all our patterns. Happy crafting!
Post a comment to pattern DROPS 159-33
We would love to hear what you have to say about this pattern!
If you want to leave a question, please make sure you select the correct category in the form below, to speed up the answering process. Required fields are marked *.