
Popular categories
Looking for a yarn?


Comments / Questions (97)
![]() Wehrlen Francoise wrote:
Wehrlen Francoise wrote:
J'aimerais savoir où se font les augmentations des manches : au début et à la fin de la manche ou entre les 2 motifs A2 de la manche ?
29.04.2019 - 12:00DROPS Design answered:
Bonjour Mme Wehrlen, les augmentations des manches au début de chaque manche, après A.2 (= A.2, 1 jeté), on tricote ensuite les mailles de la manche, puis on fait 1 jeté juste avant A.2, à la fin de la manche (le A.2 avant le devant/le dos). Bon tricot!
29.04.2019 - 14:07
![]() Catherine wrote:
Catherine wrote:
Merci pr votre réponse je vais dc tester avec 4 fois 2 jetés consécutifs pour le rang des 8 augmentations
29.04.2019 - 11:52DROPS Design answered:
Bonjour Catherine, vous ne devez pas avoir 4 jetés consécutifs, en augmentant tous les tours, vous aurez au 1er tour: 1 jeté, A.2, 1 jeté, manche, 1 jeté, A.2, 1 jeté (en augmentant 1 m avant et après A.2 - cf explications pour votre taille) - au tour suivant, vous tricotez le jeté du devant/dos, faites 1 jeté, tricotez A.2, manche, A.2, faites 1 jeté et tricotez le jeté du devant/dos. Bon tricot!
29.04.2019 - 14:05
![]() Catherine wrote:
Catherine wrote:
Bonjour, je commence ce top en taille M et je voulais savoir si je suis sur la bonne piste concernant les augmentations du raglan : 1 rang 4 augmentations avant et apres les deux A2 des manches puis rang suivant 8 augmentations (donc 2 jetés consécutifs avant et apres les deux A2 des manches). Est ce exact ?
27.04.2019 - 20:34DROPS Design answered:
Bonjour Catherine, on va augmenter différemment sur le dos/le devant et les manches: quand on augmente que pour le dos/le devant (= tous les tours): on fait 1 jeté avant A.2 après la 1ère moitié du dos, puis après le A.2 de la manche et avant le A.2 de la 2ème manche pour le devant, et enfin après le A.2 de la 2ème manche pour l'autre moitié du devant = 4 augm. Quand on augmente pour les manches sur le même rang, on va faire 1 jeté avant A.2 et après A.2 (= comme avant + après le A.2 du début de la manche et avant le A.2 de la fin de la manche) = 8 augmentations. Bon tricot!
29.04.2019 - 09:38
![]() CELINE wrote:
CELINE wrote:
Je crois qu'il y a une erreur mais comme je débute j'en suis pas sûre. L'échantillon indique 28rangs=10cm. A la fin paragraphe empiècement, il est noté à 286m l'ouvrage mesure 19cm. Pour obtenir 19cm, il faut faire 53 rangs minim. Hors, on fait A1(10rangs)+augmentation raglan (33rangs). J'arrive à 43 rangs avec 15cm. Pouvez-vous me confirmer l'erreur et me dire comment procéder ? Bien à vous, Céline
04.09.2018 - 16:58DROPS Design answered:
Bonjour Céline, l'ouvrage va mesurer 19 cm depuis l'épaule, pas depuis le rang de montage. Si votre échantillon est juste en largeur et en hauteur, et que vous conservez bien la bonne tension, votre ouvrage aura les bonnes dimensions. Bon tricot!
05.09.2018 - 07:56
![]() Valerie wrote:
Valerie wrote:
Bonjour, Décidément je ne comprend pas comment se font les augmentations... si on augmente avant et apres les A2 alors celà fait 8 endroits (vous ne dites pas au début ou placer les marqueurs), donc où se font les augmentations que vous appelez 'dos' et 'devant' ? un schéma aurait été le bienvenu. Merci par avance pour votre réponse.
03.06.2018 - 21:21DROPS Design answered:
Bonjour Valérie, pas besoin de marqueur ici car les augmentations du raglan se font avant ou après A.2, mais vous pouvez en ajouter pour délimiter les A.2 et mieux vous repérer. Les augmentations diffèrent sur le dos/le devant et les manches, vous pourrez - en fonction de la taille - augmenter soit uniquement 4 m (dos/devant ou manches) ou bien 8 m (dos/devant et manches). Les augmentations du dos/devant et des manches se font après A.2 au début du dos/ du devant/ des manches et à la fin du dos/du devant/des manches juste avant le A.2 suivant. Bon tricot!
04.06.2018 - 09:31
![]() Yannick wrote:
Yannick wrote:
Bonjour, j'essaie de tricoter avec MUSKAT le modèle Esther (qui est le prénom de ma petite fille !) mais je ne comprends pas comment faire et le raglan et les augmentations ? merci de votre réponse - cordialement
08.09.2017 - 11:10DROPS Design answered:
Bonjour Yannick, vous allez augmenter différemment sur le dos/le devant et sur les manches, les augmentations du raglan vont se faire avant/après A.2 sur la partie concernée. En fonction de la taille, vous augmenterez soit 4 m (dos et devant uniquement) soit 8 m (dos et devant + manches). Bon tricot!
08.09.2017 - 11:19
![]() Margareta Ernevad wrote:
Margareta Ernevad wrote:
Förstår inte ökningarna för raglan. Står att man ökar på var sida om A2. Det är ju två A2 per ärm. Tycker mönstret är luddigt skrivet. Förstår inte alls.
20.06.2017 - 01:11DROPS Design answered:
Det ska ökas 8 m för raglan åt gången, dvs. det ökas på varje sida om de 4 rapporterna med A.2 (både på fram-/bakst och ärmar).
20.06.2017 - 13:48Catharina wrote:
Ik heb alle meerderingen gedaan en heb nu het juiste aantal steken (262 voor S). Mijn werk meet maar 14 cm in plaats van 17. Wat moet ik doen? Kan ik gewoon het patroon doorbreien totdat ik de juiste lengte heb?
09.06.2017 - 16:04DROPS Design answered:
Hoi Catharina, Waarschijnlijk klopt je proeflapje dan niet in de hoogte (heb je dit gecontroleerd?) Om er 3 cm bij te krijgen moet je ongeveer 10 naalden extra breien, maar het is wel het beste om dan een stukje uit te halen en deze extra naalden tussen de naalden met meerderingen te verwerken, anders loopt de raglanlijn niet mooi. Reken uit hoeveel naalden je moet breien om op 17 cm te komen en verdeel over die naalden alle meerderingen. Eerst een aantal elke naald, dan om de naald en tot slot nog een aantal meerderingen elke 4 naalden. Succes!
13.06.2017 - 14:36Kay Reddy wrote:
Hi Thank you so much for your explanation. I would like to thank you for your awesome brilliant patterns and help to all queries with so much patience!!! I will be pulling out all my hair by now!! Keep up the good work!!
22.10.2016 - 10:56Kay wrote:
Hi after reading all the troubleshooting I think the confusion is in the terminilogy " inc for body 4 sts 16 times" should be inc for Raglan
20.10.2016 - 11:07DROPS Design answered:
Dear Kay, you are inc 1 st at the beg of front /back piece + 1 st at the end of front/back piece, so that each piece will be inc by 2 sts x 2 pieces for the body = 4 inc, but only 2 on each piece. It maybe just how you read it. Happy knitting!
20.10.2016 - 13:02
|
||||||||||||||||||||||
Esther#esthertop |
||||||||||||||||||||||
 |
 |
|||||||||||||||||||||
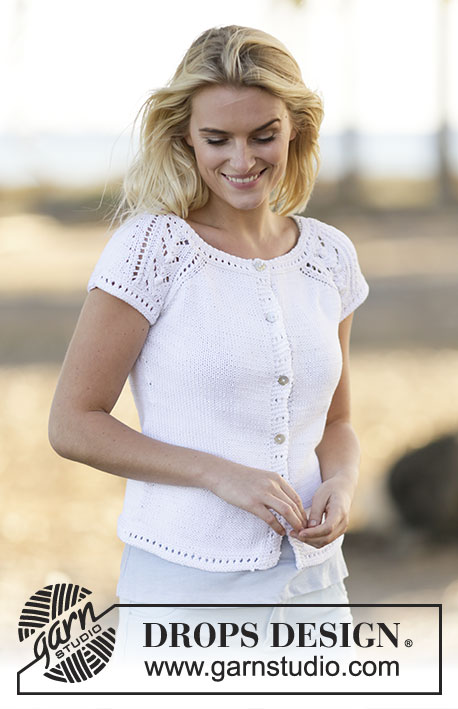
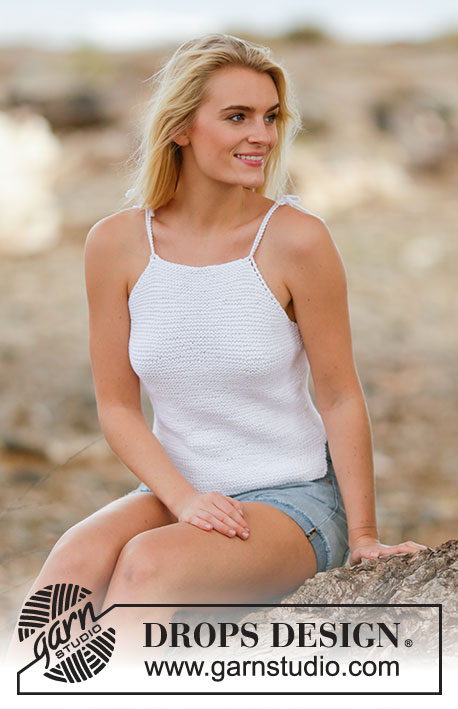
Knitted DROPS top with raglan and lace pattern, worked top down with short sleeves in ”Muskat”. Size: S - XXXL.
DROPS 159-33 |
||||||||||||||||||||||
|
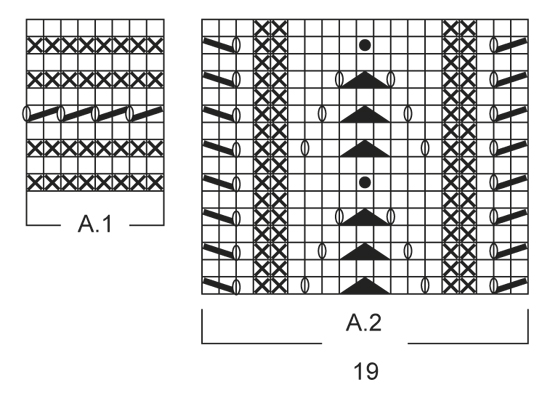
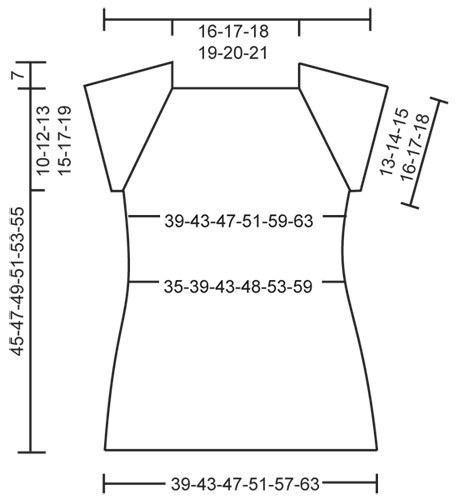
PATTERN: See diagrams A.1-A.2. RAGLAN: Inc for raglan on each side of A.2. Inc with a YO, work YO twisted on next round to avoid holes. The inc on body and sleeves are uneven as explained in pattern. INCREASE TIP: Beg 1 st before marker and inc as follows: 1 YO, K 2 (marker is between these 2 sts), 1 YO. On next round K YOs twisted to avoid holes. DECREASE TIP: Dec as follows before marker: K 2 tog. Dec as follows after marker: Slip 1 st as if to K, K 1, psso. ---------------------------------------------------------- TOP: Worked in the round on circular needle, top down. YOKE: READ ALL OF THE FOLLOWING SECTION BEFORE CONTINUING! Cast on 146-150-154-158-162-166 sts on circular needle size 3 mm / US 2.5 with Muskat. Work A.1. When A.1 has been worked, switch to circular needle size 4 mm / US 6. Work next round as follows from mid back: Work 17-18-19-20-21-22 sts in stockinette st (= back piece), work A.2 (= 19 sts), 1 st in stockinette st, A.2 (= 19 sts) (= 39 sts on sleeve), work 34-36-38-40-42-44 sts in stockinette st (= front piece), work A.2, 1 st in stockinette st and A.2 (= 39 sts on sleeve) and finish with 17-18-19-20-21-22 sts in stockinette st (= back piece). Continue pattern like this AT THE SAME TIME inc for RAGLAN beg on next round - see explanation above. Inc on front/back piece: 1 st every round a total of 14-16-18-20-26-30 times, then on every other round 7-8-9-10-9-9 times. Inc on sleeves: 1 st every other round a total of 2-4-6-8-10-12 times and then every 4th round a total of 6 times in all sizes. After all inc there are 262-286-310-334-366-394 sts on row, continue working until the piece measures approx. 17-19-20-22-24-26 cm = 6¾"-7½"-8"-8¾"-9½"-10¼" from shoulder and down. Work next round as follows: K 38-42-46-50-56-61 (= back piece), slip the next 55-59-63-67-71-75 sts on a stitch holder for sleeve, cast on 6-6-6-8-8-10 new sts, insert 1 marker in the middle of the new sts, K 76-84-92-100-112-122 (= front piece), slip the next 55-59-63-67-71-75 sts on 1 stitch holder for sleeve, cast on 6-6-6-8-8-10 new sts, insert 1 marker in the middle of the new sts and K the remaining 38-42-46-50-56-61 (= back piece) = 164-180-196-216-240-264 sts on row - NOW MEASURE PIECE FROM HERE. BODY: Continue in stockinette st. When piece measures 4 cm / 1½", dec 1 st on each side of markers in the side - READ DECREASE TIP (= 4 sts dec). Repeat dec every 4 cm / 1½" a total of 4 times = 148-164-180-200-224-248 sts. When piece measures 22 cm / 8¾" in all sizes, inc 1 st on each side of markers in the side - READ INCREASE TIP (= 4 sts inc). Repeat inc every 2 1/2 cm / ⅞" a total of 4 times = 164-180-196-216-240-264 sts. When piece measures 33-33-34-34-34-34 cm / 13"-13"-13½"-13½"-13½"-13½"-, switch to circular needle size 3 mm / US 2.5. Work pattern according to diagram A.1 and then loosely bind off. Top measures approx. 52-54-56-58-60-62 cm / 20½"-21¼"-22"-22¾"-23⅝"-24⅜" from shoulder and down. SLEEVE EDGE: Worked in the round on double pointed needles. Slip the 55-59-63-67-71-75 sts from stitch holder back on double pointed needles size 3 mm / US 2.5 and cast on 6-6-6-8-8-10 new sts under sleeve = 61-65-69-75-79-85 sts. Work pattern in the round according to diagram A.1 and then loosely bind off. Work the other sleeve edge the same way. ASSEMBLY: Sew tog under sleeves. |
||||||||||||||||||||||
Diagram explanations |
||||||||||||||||||||||
|
||||||||||||||||||||||
 |
||||||||||||||||||||||
 |
||||||||||||||||||||||
Have you finished this pattern?Tag your pictures with #dropspattern #esthertop or submit them to the #dropsfan gallery. Do you need help with this pattern?You'll find 23 tutorial videos, a Comments/Questions area and more by visiting the pattern on garnstudio.com. © 1982-2026 DROPS Design A/S. We reserve all rights. This document, including all its sub-sections, has copyrights. Read more about what you can do with our patterns at the bottom of each pattern on our site. |
||||||||||||||||||||||


With over 40 years in knitting and crochet design, DROPS Design offers one of the most extensive collections of free patterns on the internet - translated to 17 languages. As of today we count 324 catalogs and 12290 patterns - 12280 of which are translated into English (US/in).
We work hard to bring you the best knitting and crochet have to offer, inspiration and advice as well as great quality yarns at incredible prices! Would you like to use our patterns for other than personal use? You can read what you are allowed to do in the Copyright text at the bottom of all our patterns. Happy crafting!
Post a comment to pattern DROPS 159-33
We would love to hear what you have to say about this pattern!
If you want to leave a question, please make sure you select the correct category in the form below, to speed up the answering process. Required fields are marked *.