
Popular categories
Looking for a yarn?


Comments / Questions (94)
![]() Benedetta wrote:
Benedetta wrote:
Ho letto una risposta precedente ma ...continuo a non capire! Grazie
16.05.2016 - 10:26DROPS Design answered:
Buongiorno Benedetta. Deve lavorare a dir solo le m che ha lavorato a rov sul diritto del lavoro. P.es, quando imposta il motivo trova: 6 m per il bordo davanti a punto legaccio, 10-9-9-8-8 m rov (a seconda della taglia) ... Sul rovescio, lavorerà a dir le 10-9-9-8-8 m lavorate a rov. Le maglie del diag. le lavora come indicato nel diagramma. Buon lavoro!
16.05.2016 - 10:34
![]() Benedetta wrote:
Benedetta wrote:
Buongiorno, ho un dubbio: la spiegazione, all'inizio lavoro,dice d e a rov sul diritto del lavoro.ì lavorare le m a rov a dir sul rov del lavoro .Mi chiedo allora se sul rovescio le maglie sono da lavorare tutte a diritto.Grazie mille x l'aiuto
16.05.2016 - 10:21DROPS Design answered:
Buongiorno Benedetta. Deve lavorare a dir solo le m che ha lavorato a rov sul diritto del lavoro. P.es, quando imposta il motivo trova: 6 m per il bordo davanti a punto legaccio, 10-9-9-8-8 m rov (a seconda della taglia)... Sul rovescio, lavorerà a dir le 10-9-9-8-8 m lavorate a rov. Le maglie del diag. le lavora come indicato nel diagramma. Buon lavoro!
16.05.2016 - 10:33
![]() Karin Van Lemmeren wrote:
Karin Van Lemmeren wrote:
Nou sorry . maar er klopt niks van,de afkanting van de hals op de achterkant is bij 27 motiefjes in de hoogte en de schouder pas bij 31 motiefjes,is op de foto duidelijk te zien,kan nooit maar 1 cm verschil zijn,of jullie foto´s kloppen niet,snap er niks van,dit zien jullie zelf toch ook wel,graag een duidelijkere uitleg.groet,karin
12.05.2016 - 01:31DROPS Design answered:
Hoi Karin. De foto en het patroon komen overeen. Door het in elkaar naaien van de schouders en het breien van de halsrand, lijkt het wellicht alsof de motieven in het midden lager zijn. Misschien zijn de schoudernaden op de foto iets naar achteren geschoven, maar het model op de foto is gebreid volgens dit patroon.
12.05.2016 - 11:05
![]() Karin Van Lemmeren wrote:
Karin Van Lemmeren wrote:
Goedeavond,bij het achterpand moet ik bij maat S de hals afkanten op 65 cm en de schouder op 66 cm,maar als ik naar de foto kijk en de motiefjes tel, wordt de hals al veel eerder afgekant,er zit echt niet 1 cm tussen maar veel meer, is eerder hetzelfde als het voorpand,hoop op wat meer uitleg,bij voorbaat dank,karin
11.05.2016 - 00:32DROPS Design answered:
Hoi Karin. De hoogte op het achterpand is correct.
11.05.2016 - 16:59
![]() Mina wrote:
Mina wrote:
Buonasera, ho un problema: il buco in corrispondenza del gettato risulta troppo largo nonostante stia tenendo la mano molto stretta..come fare? Nel vostro video c'è scritto che realizzare un rovescio ritorto al posto di quello normale lo rende più piccolo ma ci sarebbero differenze estetiche?
04.05.2016 - 21:36DROPS Design answered:
Buonasera Mina, deve lavorare a rovescio ritorto i gettati che servono da aumento: lavorandoli a ritorto non si vedrà il buco, mentre per i gettati del motivo vengono lavorati a rovescio normale sul f successivo perché devono formare un buco. La differenza è che con il rovescio ritorto il buco non si vede, per cui non può essere utilizzato per il motivo traforato. Buon lavoro!
04.05.2016 - 22:43
![]() Mina wrote:
Mina wrote:
Buonasera, ho iniziato da poco questo progetto e già mi è sorto un dubbio: con "Lavorare ora il diagramma A.2 (= 7 m) sul diagramma A.1 fino alla fine del lavoro." Intendete di alternare A1 e A2 fino a fine lavoro o faccio solo A2 ?
03.05.2016 - 21:43DROPS Design answered:
Buonasera Mina. Deve lavorare il diagramma A.1 solo una volta. Terminato il diagramma A.1, prosegue con solo il diagramma A.2 fino alla fine del lavoro. Buon lavoro!
03.05.2016 - 23:29
![]() Eva wrote:
Eva wrote:
Buenas tardes. Estoy haciendo la chaqueta y me he quedado atascada en el delantero derecho. Empiezo teniendo 58 ptos, cuando disminuyo para las sisas tengo 44 ptos, pero luego dice que tengo que disminuir 2 pts 3 veces y 1 pt 2 veces, con lo que son 8 ptos de disminución, pero dice que termino con 21 ptos en total, y no sé como llegar a esos 21. Gracias.
04.04.2016 - 17:55DROPS Design answered:
Hola Eva. Has olvidado las disminuciones para el escote, es decir 58 -( 3x1 + 2x4 + 1x3 = 14 pts dism para la sisa) - ( deslizar 15 + 2x3 +1x2 = 23 pts para el escote) = 21 pt restantes para el hombro.
05.04.2016 - 08:41
![]() PROVOST wrote:
PROVOST wrote:
Bonjour, après l'ouverture des boutonnières les diminutions se font a quelle distances ou se font les une derrière les autres.
21.03.2016 - 20:26DROPS Design answered:
Bonjour Mme Provost, les diminutions des côtés (20-36 dim - cf taille) se font 5-4-3 fois au total tous les 3-4-5 cm. Bon tricot!
22.03.2016 - 08:22
![]() Sussie Tornbak wrote:
Sussie Tornbak wrote:
Hej igen, Med den forklaring jeg har fået kan jeg dermed konstatere at der er fejl i opskriften, for du beder mig strikke efter opskrift til XXXL, men med maskeopslag til XXL. Hvad med mål passer de? det er jo surt at investerer en masse tid i en opskrift der kan være for stor eller for lille. Og hvad med resten af trøjen, skal jeg også lave masker til XXL men i øvrigt strikke efter XXXL?
10.03.2016 - 18:22DROPS Design answered:
Hej Sussie, Nej det er XXL jeg har forklaret for dig (den næst største størrelse). Jeg synes du skal markere den størrelse du vil strikke efter. Husk også at når vi skriver "gentag fra *-* 14 gange til, så er det i alt 15 gange stykket mellem * skal strikkes.
11.03.2016 - 10:30
![]() Sussie Tornbak wrote:
Sussie Tornbak wrote:
Jeg kan ikke få str. XXL til at passe: jeg har 439 masker til XXL 6kant+8vr+(A.1=9+5vr)x 6 = 98m forstk, (5vr+A.1=9)x14 + 5vr = 201m rygstk, (5vr+A.1=9)x6 + 8vr+6kant = 98 forstk = ialt 397 m. - hvad med de resterende 42 m??
10.03.2016 - 09:33DROPS Design answered:
Hej Sussie, Nu skal jeg forklare hvordan du strikker XXL i 160-2! 6kant+8vr+(A.1=9+5vr)x 7 = 112m forstk, (5vr+A.1=9)x15 + 5vr = 215m rygstk, (5vr+A.1=9)x7 + 8vr+6kant = 112 forstk = ialt 439 m. God fornøjelse!
10.03.2016 - 10:01
|
||||||||||
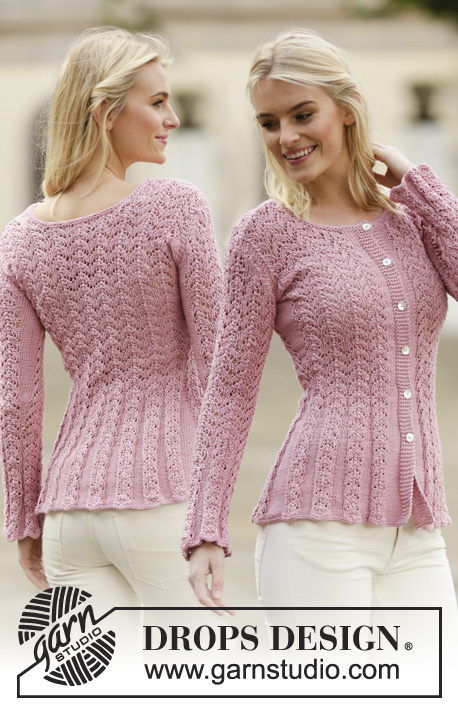
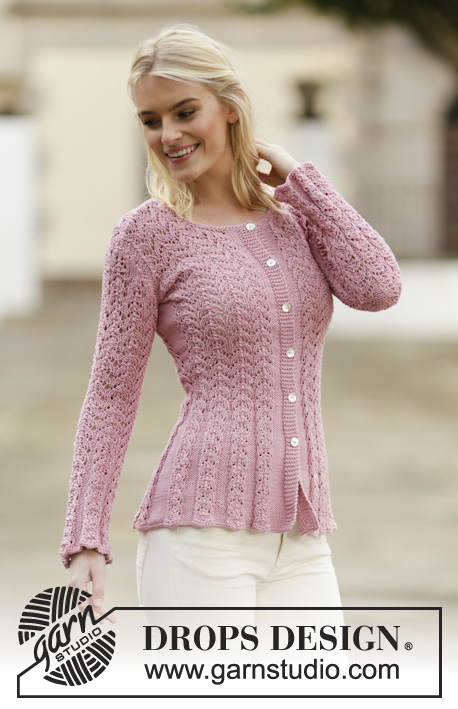
Love Is In The Air Cardigan#loveisintheaircardigan |
||||||||||
 |
 |
|||||||||
Knitted DROPS jacket with lace pattern in ”Muskat” or "Belle". Size: S - XXXL.
DROPS 160-2 |
||||||||||
|
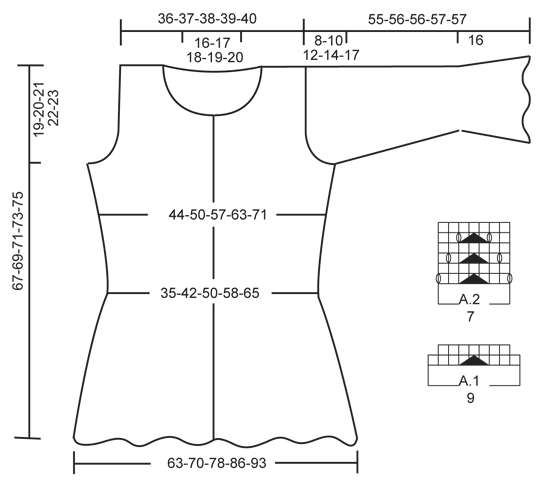
GARTER ST (worked in the round): * K 1 round and P 1 round *, repeat from *-*. 1 ridge = 2 rounds. GARTER ST (back and forth): K all rows. 1 ridge = K2 rows. PATTERN: See diagrams A.1 and A.2. The diagrams show all rows in pattern seen from RS. INCREASE TIP: Work until 1 st remains before marker, 1 YO, P 2 (marker is in the middle of these sts), 1 YO = 2 sts inc. On next row K YO twisted to avoid holes. BUTTONHOLES: Dec for buttonholes on right band from RS. 1 buttonhole = K tog 3rd and 4th st from mid front, then make 1 YO. Dec for buttonholes when piece measures: SIZE S: 15, 23, 31, 39, 47 and 55 cm / 6", 9", 12¼", 15¼", 18½", 21½". SIZE M/L: 15, 23, 31, 39, 48 and 57 cm / 6", 9", 12¼", 15¼", 19", 22½". SIZE XL: 16, 24, 32, 41, 50 and 59 cm / 6¼", 9½", 12½", 16", 19¾", 23¼". SIZE XXL: 16, 25, 34, 43, 52 and 61 cm / 6¼", 9¾", 13⅜", 17", 20½", 24". SIZE XXXL: 17, 27, 36, 45, 54 and 63 cm / 6¾", 10⅝", 14¼", 17¾", 21¼", 24¾". ---------------------------------------------------------- BODY: Worked back and forth on circular needle. Cast on 311-351-411-439-495 sts (includes 6 band sts in each side of piece) on circular needle size 3.5 mm / US 4 with Muskat or "Belle". Work 2 ridges in GARTER ST - see explanation above. Switch to circular needle size 4 mm / US 6. Then work as follows from RS: 6 band sts in garter st, P 10-9-9-8-8, * A.1 (= 9 sts), P 7-6-6-5-5 *, repeat from *-* 3-4-5-6-7 more times, insert 1 marker (= right front piece), * P 7-6-6-5-5, A.1 *, repeat from *-* 8-10-12-14-16 more times, P 7-6-6-5-5, insert 1 marker (= back piece), * P 7-6-6-5-5, A.1 *, repeat from *-* 3-4-5-6-7 more times, P 10-9-9-8-8, 6 band sts in garter st. Work band sts in garter st until finished measurements. Work P sts K from WS and P from RS. Move the markers upwards when working. When A.1 has been worked 1 time vertically, there are 277-309-361-381-429 sts on needle. Then work A.2 (= 7 sts) over A.1 until finished measurements. When piece measures 10 cm / 4", dec as follows: Work 6 band sts in garter st, P 2 tog, P 8-7-7-6-6, * A.2, P 2 tog, P 5-4-4-3-3 *, repeat from *-* 3-4-5-6-7 more times, marker, * P 2 tog, P 5-4-4-3-3, A.2 *, repeat from *-* 8-10-12-14-16 more times, P 2 tog, P 5-4-4-3-3, marker, * P 2 tog, P 5-4-4-3-3, A.2 *, repeat from *-* 3-4-5-6-7 more times, P 2 tog, P 8-7-7-6-6, 6 band sts in garter st = 257-285-333-349-393 sts (20-24-28-32-36 sts dec). Continue with P and pattern as before until piece measures 13-14-14-15-15 cm / 5"-5½"-5½"-6"-6". Then dec as follows: 6 band sts in garter st, P 7-6-6-5-5, P 2 tog, * A.2, P 4-3-3-2-2, P 2 tog *, repeat from *-* 3-4-5-6-7 more times, marker, * P 4-3-3-2-2, P 2 tog, A.2 *, repeat from *-* 8-10-12-14-16 more times, P 4-3-3-2-2, P 2 tog, marker, * P 4-3-3-2-2, P 2 tog, A.2 *, repeat from *-* 3-4-5-6-7 more times, P 7-6-6-5-5, P 2 tog, 6 band sts in garter st = 237-261-305-317-357 sts (20-24-28-32-36 sts dec). Dec for BUTTONHOLES on right band - see explanation above. Continue dec (i.e. dec alternately on each side of every P section) every 3-4-4-5-5 cm / 1"-1½"-1½"-2"-2" 4-3-3-2-2 more times = 157-189-221-253-285 sts. Work next row as follows: 6 band sts in garter st, P 4, * A.2, P 1 *, repeat from *-* 3-4-5-6-7 more times, marker, * P 1, A.2 *, repeat from *-* 8-10-12-14-16 more times, P 1, marker, * P 1, A.2 *, repeat from *-* 3-4-5-6-7 more times, P 4, 6 band sts in garter st. When piece measures 30 cm / 11¾", inc 1 st on each side of each marker (= 4 sts inc) - READ INCREASE TIP! Work inc sts P from RS and K from WS. Repeat inc every 1½-2-2½-3½-3½ cm / ½"-¾"-⅞"-1¼"-1¼" 9-7-6-5-5 more times = 197-221-249-277-309 sts. When piece measures 48-49-50-51-52 cm / "-19¼"-19¾"-20"-20½", divide the piece as follows: Slip the first and last 52-58-65-72-80 sts on a stitch holder for front piece, cut the yarn, then work only over the middle 93-105-119-133-149 sts (= back piece). BACK PIECE: = 93-105-119-133-149 sts. Now bind off for armholes at beg of every row in each side of piece as follows: bind off 4 sts 0-0-1-1-1 time, then 3 sts 1-1-1-1-2 times, 2 sts 2-4-4-6-7 times and 1 st 1-3-5-8-9 times = 77-77-79-79-83 sts. When piece measures 65-67-69-71-73 cm / 25½"-26½"-27"-28"-28¾", slip the middle 31-33-35-37-39 sts on a stitch holder for neck and finish each shoulder separately = 23-22-22-21-22 sts. On next row from neck, K the first 2 sts tog = 22-21-21-20-21 sts. Work sts in the side that do not fit A.2 in stockinette st. Continue to work A.2, P sts and in stockinette st as before. When piece measures 66-68-70-72-74 cm / 26"-26¾"-27½"-28½"-29", work 1 ridge in garter st over all sts, then bind off. Work the other shoulder the same way. RIGHT FRONT PIECE: = 52-58-65-72-80 sts. Now bind off for armhole at beg of every row from the side as on back piece = 44-44-45-45-47 sts. Continue to work in garter st, A.2 and P sts as before. When piece measures 57-59-61-63-65 cm / 22½"-23¼"-24"-24¾"-25½" dec for neck as follows: On next row from RS slip the 14-15-16-17-18 sts towards mid front on a stitch holder for neck (work them first), then bind off on every row from neck: 2 sts 3 times and 1 st 2 times = 22-21-21-20-21 sts remain on shoulder. Work sts in the side that do not fit A.2 in stockinette st. Continue to work A.2, P sts and in stockinette st as before. When piece measures 66-68-70-72-74 cm / 26"-26¾"-27½"-28½"-29", work 1 ridge in garter st over all sts, then bind off. LEFT FRONT PIECE: Work as right but reversed. SLEEVE: Worked in the round on double pointed needles. Cast on 96-105-105-112-112 sts on double pointed needles size 3.5 mm / US 4 with Muskat or "Belle". Work 2 ridges. Switch to double pointed needles size 4 mm / US 6. Insert 1 marker at the beg of the round. Then work as follows: * P 7-6-6-5-5, A.1 (= 9 sts) *, repeat from *-* the entire round (= 6-7-7-8-8 times in total). When A.1 has been worked 1 time vertically, there are 84-91-91-96-96 sts on needle. Work A.2 over A.1 and P as before. When piece measures 3 cm / 1", dec as follows: * P 2 tog, P 5-4-4-3-3, A.2 *, repeat from *-* the entire round (= 6-7-7-8-8 sts dec) = 78-84-84-88-88 sts. When piece measures 6-6-6-7-7 cm / 2½"-2½"-2½"-2 ¾"-2¾", dec as follows: * P 4-3-3-2-2, P 2 tog, A.2 *, repeat from *-* the entire round (= 6-7-7-8-8 sts dec) = 72-77-77-80-80 sts. Repeat dec (i.e. dec alternately on each side of every P section) every 2½-3-3-4-4 cm / ⅞"-1⅛"-1⅛"-1½"-1½" 4-3-3-2-2 more times = 48-56-56-64-64 sts. Work next round as follows: *P 1, A.2 *, repeat from *-* the entire round (= 6-7-7-8-8 times in total). Piece now measures approx. 16 cm / 6¼". When piece measures 18 cm / 7", inc on each side of marker - READ INCREASE TIP - (= 2 sts inc), repeat inc every 2½-3-2-2-1½ cm / ⅞"-1"-¾"-¾"-½" 11-9-12-11-14 more times = 72-76-82-88-94 sts. P the inc sts. Work A.2 and P until piece measures 47-46-44-43-40 cm / 18½"-18"-17¼"-17" (shorter measurements in the larger sizes because of longer sleeve cap and wider shoulders), bind off 6 sts mid under sleeve (= 3 sts on each side of marker) and work sleeve back and forth on circular needle until finished measurements. Bind off for sleeve cap at beg of every row in each side: bind off 2 sts 4 times and 1 st 1-4-7-10-14 times, then bind off 2 sts in each side until piece measures 54-55-55-56-56 cm / 21¼"-21½"-21½"-22"-22", then bind off 3 sts 1 time in each side. NOTE: Work sts in the side that do not fit A.2 in stockinette st. Bind off the remaining sts, piece measures approx. 55-56-56-57-57 cm / 21½"-22"-22"-22½"-22½". Make another sleeve. ASSEMBLY: Sew the shoulder seams. Sew in sleeves. Sew the buttons on to left front piece. NECK EDGE: Pick up 100-120 sts (includes sts on stitch holder for neck) on circular needle size 3.5 mm / US 4 with Muskat or "Belle". Work 2 ridges. Bind off. |
||||||||||
Diagram explanations |
||||||||||
|
||||||||||
 |
||||||||||
Have you finished this pattern?Tag your pictures with #dropspattern #loveisintheaircardigan or submit them to the #dropsfan gallery. Do you need help with this pattern?You'll find 26 tutorial videos, a Comments/Questions area and more by visiting the pattern on garnstudio.com. © 1982-2026 DROPS Design A/S. We reserve all rights. This document, including all its sub-sections, has copyrights. Read more about what you can do with our patterns at the bottom of each pattern on our site. |
||||||||||


With over 40 years in knitting and crochet design, DROPS Design offers one of the most extensive collections of free patterns on the internet - translated to 17 languages. As of today we count 324 catalogs and 12291 patterns - 12281 of which are translated into English (US/in).
We work hard to bring you the best knitting and crochet have to offer, inspiration and advice as well as great quality yarns at incredible prices! Would you like to use our patterns for other than personal use? You can read what you are allowed to do in the Copyright text at the bottom of all our patterns. Happy crafting!
Post a comment to pattern DROPS 160-2
We would love to hear what you have to say about this pattern!
If you want to leave a question, please make sure you select the correct category in the form below, to speed up the answering process. Required fields are marked *.