
Popular categories
Looking for a yarn?


Comments / Questions (41)
![]() Rannveig wrote:
Rannveig wrote:
Diagram M.8 ser ut til å være feil, det er flere rader glattstrikk mellom hullmønster-radene på bildet enn hva man får med å følge mønsteret.
06.12.2017 - 15:58
![]() Jessica wrote:
Jessica wrote:
Goedendag, Ik heb 87 steken opgezet en hoef 0 keer te minderen. Maar bij telpatroon a.2 en a.3 met daarachter a.4 kom ik niet op 87 steken. Ook niet als ik 1 kantsteek aftrek aan beide zijden. Kunt u mij uitleggen hoe ik verder moet? Groeten Jessica
04.07.2017 - 12:48DROPS Design answered:
Hoi Jessica. Je breit 1 kantsteek, 1 keer A.2 (7 steken), 12 keer A.3 (72 steken), 1 keer A.4 (6 steken) en nog een kantsteek. Dan kom je in totaal op 87 steken.
04.07.2017 - 15:17Wendy Gallant wrote:
In back piece upon completion of A7, you call A2A3A4. In the image provided it looks like instead of A2A3A4 it should be A6 in reverse. Is this correct?
24.01.2017 - 15:37Wendy Gallant answered:
Please disregard my last comment, I was looking at the pattern from bottom to top. The knitting sequence is from top to bottom. My apologies.
24.01.2017 - 16:55
![]() Julie wrote:
Julie wrote:
Bonjour. Si je souhaite remplacer le point fantaisie par un point jersey, la taille du bolero va-t-elle varier? Merci de votre réponse.
07.08.2016 - 11:21DROPS Design answered:
Bonjour Julie, pensez à bien vérifier votre échantillon et à bien conserver la même tension pour conserver les bonnes mesures. Bon tricot!
08.08.2016 - 09:48
![]() Suz wrote:
Suz wrote:
I forgot to mention that I am working on a circular needle. Sorry
14.07.2015 - 23:05
![]() Suz wrote:
Suz wrote:
Need a little help. After picking up stitches for the sleeve from the RS of the back piece, the start of the next row is on the WS. The A.8 diagram show all rows seen from RS. I'm confused. How do I work the next row when I starting from the WS of the piece?
14.07.2015 - 23:02DROPS Design answered:
Hello Suz! You can work 1 row from WS and then start A.8 from RS. Thank you!
28.07.2015 - 16:10
![]() Ella wrote:
Ella wrote:
Bij patroon 160-4 meet mijn achterwand vanaf de opzettend geen 42 cm (middelste maat). De breedte klopt wel. Ik heb alle patronen gebreid zoals voorgeschreven. Moet het wel 42 cm zijn?
30.06.2015 - 22:30DROPS Design answered:
Hoi Ella. Klopt je stekenverhouding wel in de hoogte? Of mis je wat van het patroon? Ik heb nagerekend en voor maat L/XL brei je ongeveer totaal 138 nld, dat is met de juiste stekenverhouding ongeveer 42-43 cm (en vanwege het motief zal het werk zich een beetje samentrekken), dus dan klopt het wel.
02.07.2015 - 12:30Sandra wrote:
Your sizing refers to S - XXL. What are bust sizes (chest sizes)? I cannot find any reference for this in patterns or FFAQ's. Thanks for your help! Lovely patterns!
19.05.2015 - 19:52DROPS Design answered:
Dear Sandra, you will find at the bottom of the pattern a measurement chart will all finished measurements for each size in cm taken flat from side to side. Compare these to a similar garment you have and like the shape to find out the matching size. Happy knitting!
20.05.2015 - 09:55
![]() Gabi wrote:
Gabi wrote:
Liebes Drops-Team, zunächst einmal vielen Dank für die vielen tollen - vor Allem - kostenlosten Anleitungen. Ich hätte da eine Frage zu dem Modell 160-4 - Ärmel Da ich nicht wirklich gerne zusammennähe, könnte ich nicht ab dort, wo der Markierer für den Beginn der Ärmelnaht gesetzt wird (10 cm ab Anschlag Ärmel) die weiteren Reihen auch rund stricken??? Über eine zeitnahe Antwort würde ich mich sehr freuen. liebe Grüße Gabi
15.05.2015 - 12:50DROPS Design answered:
Liebe Gabi, schön, dass Sie unsere Anleitungen mögen. Zu Ihrer Frage: Ja, das geht. Sie müssten dann vor dem Rundenschluss beidseitig die Rand-M abketten. Die Abnahmen, die Sie beim Stricken in R beidseitig arbeiten, machen Sie dann am Rd-Anfang und Rd-Ende. Und am Ende stricken Sie kraus re dann so: 1 Rd re, 1 Rd li im Wechsel. Sie können sich aber auch mal unsere Hilfsvideos zum Zusammennähen anschauen, vielleicht nimmt Ihnen das etwas die Abneigung, eins finden Sie z.B. oben im Kopf unter "Videos".
15.05.2015 - 23:48
![]() Anne Marie wrote:
Anne Marie wrote:
Tak for hjælpen.
20.04.2015 - 16:09
|
|||||||||||||||||||
Mette#metteshoulderpiece |
|||||||||||||||||||
 |
 |
||||||||||||||||||
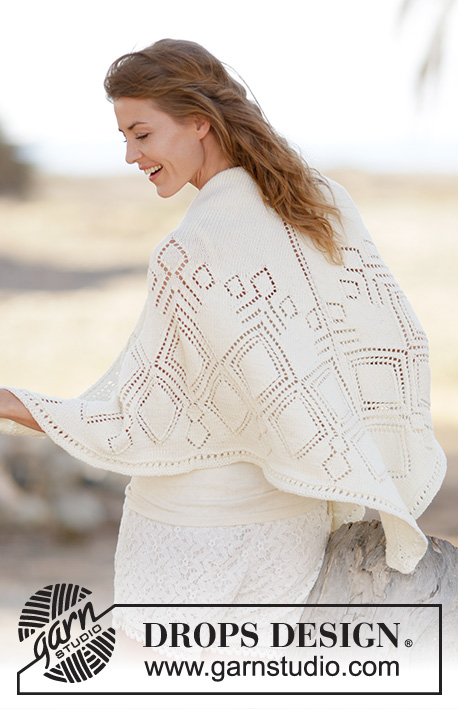
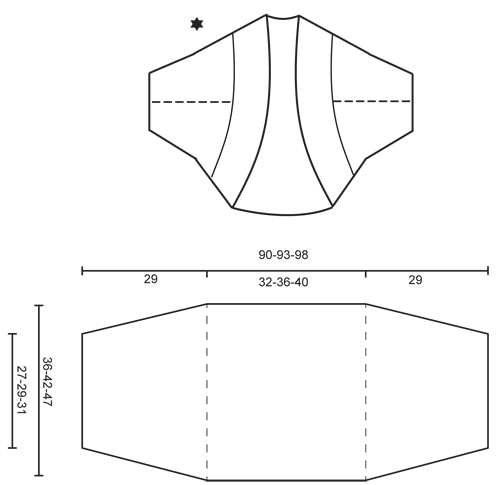
Knitted DROPS shoulder piece with lace pattern in ”BabyAlpaca Silk”. Size S-XXXL.
DROPS 160-4 |
|||||||||||||||||||
|
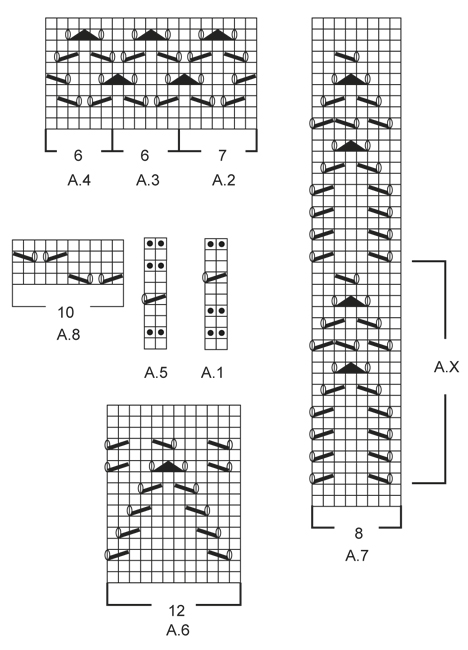
GARTER ST (back and forth): K all rows. 1 ridge = K2 rows. PATTERN: See diagrams A.1-A.8. The diagrams show all rows in pattern seen from RS. DECREASE TIP: Dec inside 1 edge st in garter st. All dec are done from RS! Dec as follows before 1 edge st and 2 sts: K 2 tog. Dec after 1 edge st as follows: Slip 1 st as if to K, K 1, psso. INCREASE TIP: Inc 1 st by making 1 YO, on next round P YO twisted (i.e. work in back loop of st instead front) to avoid holes. ---------------------------------------------------------- SHOULDER PIECE: Worked back and forth on circular needle. First work back piece. Then pick up sts on back piece for sleeves. BACK PIECE: Cast on 79-87-97 sts (includes 1 edge st in garter st in each side) on circular needle size 3 mm / US 2.5 with BabyAlpaca Silk. Work diagram A.1 over all sts inside 1 edge st in GARTER ST - see explanation above, in each side (on 7th row in A.1 K last st before edge st), repeat A.1 1-1-2 times in total vertically, AT THE SAME TIME on last row from RS in diagram inc 2-0-2 sts evenly = 81-87-99 sts. NOTE: Work edge sts in garter st until finished measurements. REMEMBER THE KNITTING GAUGE Now work inside edge sts in each side of piece as follows: A.2, A.3 11-12-14 times in width, A.4. When A.2-A.4 have been worked vertically, work A.5 (on 5th row K the last st before edge st). When A.5 has been vertically, work next row as follows: 3-0-0 sts in stockinette st, A.6 6-7-8 times in width, 4-1-1 sts in stockinette st. When A.6 has been worked vertically, continue with A.1 (on 7th row K last st before edge st), AT THE SAME TIME on last row from RS in diagram dec 2-0-0 sts evenly = 79-87-99 sts. Work next row from RS as follows: 2-2-0 sts in stockinette st, A.7 9-10-12 times in width, 3-3-1 sts in stockinette st. When A.X has been worked vertically, repeat A.X 0-1-1 more time before continuing until A.7 has been worked vertically. Now work 2 ridges AT THE SAME TIME on last row from RS adjust no of sts to 81-87-99 sts (includes 1 edge st in each side). Now work as follows: A.2, A.3 11-12-14 times in width, A.4. When A.2-A.4 have been worked vertically, continue with A.5 (on 5th row K the last st before edge st). Bind off when the entire A.5 has been worked 1-1-2 times vertically. Piece measures 36-42-47 cm / 14 1/4"-16½"-18½" from cast-on edge. SLEEVE: Pick up from RS 88-102-114 sts (includes 1 edge st in garter st in each side) inside 1 edge st in garter st in one side of back piece with BabyAlpaca Silk on circular needle size 3 mm / US 2.5. Work as follows: 1 edge st in garter st, K 3-0-1, A.8 until 4-1-2 sts remain, K 3-0-1, 1 edge st in garter st. Continue like this back and forth. When piece measures 4 cm / 1½'', beg dec in each side of piece - READ DECREASE TIP. Repeat dec approx. every 2-1½-1 cm / 3/4"-½"-1/4" 10-14-18 more times = 66-72-76 sts. NOTE: When there is not enough sts to work pattern, work sts in stockinette st. AT THE SAME TIME when piece measures 10 cm / 4'' from cast-on edge, insert a marker in each side (stop sleeve seam here from bottom of sleeve). When piece measures 27 cm / 10½'', inc 6-4-4 sts evenly on next row from RS = 72-76-80 sts. Switch to circular needle size 2.5 mm / US 1.5 and work in garter st for 2 cm / 3/4''. Loosely bind off. Pick up and work another sleeve the same way. ASSEMBLY: Sew underarm seam from bottom of edge in garter st and up to markers inside 1 edge st in garter st. EDGE: Now work an edge in rib in the round as follows: * Beg from RS at the seam under the sleeve (marker), pick up 135-145-155 sts with BabyAlpaca Silk on circular needle size 2.5 mm / US 1.5 along sleeve, over back piece and down along one side of the other sleeve until seam (marker) *, repeat from *-* over the opposite side of shoulder piece = 270-290-310 sts. Work rib K 2/P 3 over all sts. When piece measures 2 cm / 3/4'', inc 1 st in every section with P sts - READ INCREASE TIP! There are now 324-348-372 sts. Continue with K 2/P 4 until 4 cm / 1½'' have been worked from pick up edge. Now inc 1 st in every section with P sts the same way as before = 378-406-434 sts. Continue with K 2/P 5 for 2 cm / 3/4''. Rib measures 6 cm / 2 3/8''. Loosely bind off with K over K and P over P. |
|||||||||||||||||||
Diagram explanations |
|||||||||||||||||||
|
|||||||||||||||||||
 |
|||||||||||||||||||
 |
|||||||||||||||||||
Have you finished this pattern?Tag your pictures with #dropspattern #metteshoulderpiece or submit them to the #dropsfan gallery. Do you need help with this pattern?You'll find 20 tutorial videos, a Comments/Questions area and more by visiting the pattern on garnstudio.com. © 1982-2026 DROPS Design A/S. We reserve all rights. This document, including all its sub-sections, has copyrights. Read more about what you can do with our patterns at the bottom of each pattern on our site. |
|||||||||||||||||||


With over 40 years in knitting and crochet design, DROPS Design offers one of the most extensive collections of free patterns on the internet - translated to 17 languages. As of today we count 324 catalogs and 12245 patterns - 12235 of which are translated into English (US/in).
We work hard to bring you the best knitting and crochet have to offer, inspiration and advice as well as great quality yarns at incredible prices! Would you like to use our patterns for other than personal use? You can read what you are allowed to do in the Copyright text at the bottom of all our patterns. Happy crafting!
Post a comment to pattern DROPS 160-4
We would love to hear what you have to say about this pattern!
If you want to leave a question, please make sure you select the correct category in the form below, to speed up the answering process. Required fields are marked *.