
Popular categories
Looking for a yarn?


Comments / Questions (41)
![]() Ankie wrote:
Ankie wrote:
Perfect! This works! I guess I hadn't tried the right combination. Thank you.
25.06.2019 - 17:36
![]() Ankie wrote:
Ankie wrote:
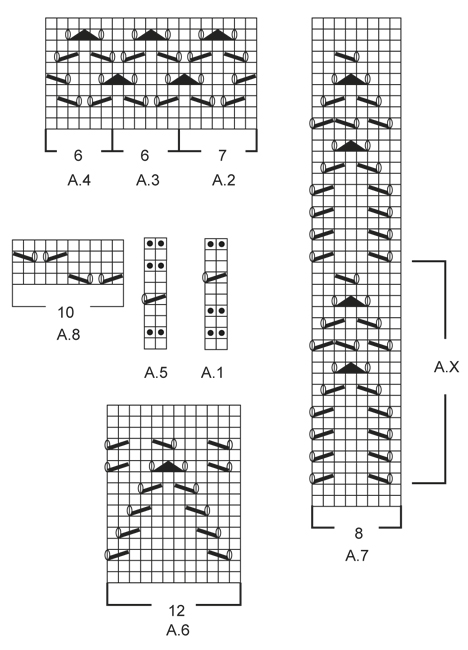
Hello Drops Design, I'm stuck at A.6. I managed to figure out the first row ( 3-0-0 sts in stockinette st, A.6 6-7-8 times in width, 4-1-1 in stockinette st, not including edge stitches) but do I continue with this pattern for the following rows? That is 1 edge stitch 3-0-0 Sts in stockinette st, A.6 6-7-8 times in width, 4-1-1 in ss stitch? I've tried several combinations and so far nothing works!
14.06.2019 - 19:33DROPS Design answered:
Dear Ankie, depending on your size you should have 81-87-99 sts, you will work: 1 edge st as before, 3-0-0 sts in stocking st, then repeat A.6 (= 12 sts) total of 6-7-8 times (= over the next 72-84-96 sts), and finish with 4-1-1 st in stsocking st and 1 edge st as before = 1 + 3-0-0 + 72-84-96 + 4-1-1 +1= 81-87-99 sts. Happy knitting!
17.06.2019 - 07:00
![]() Kathy wrote:
Kathy wrote:
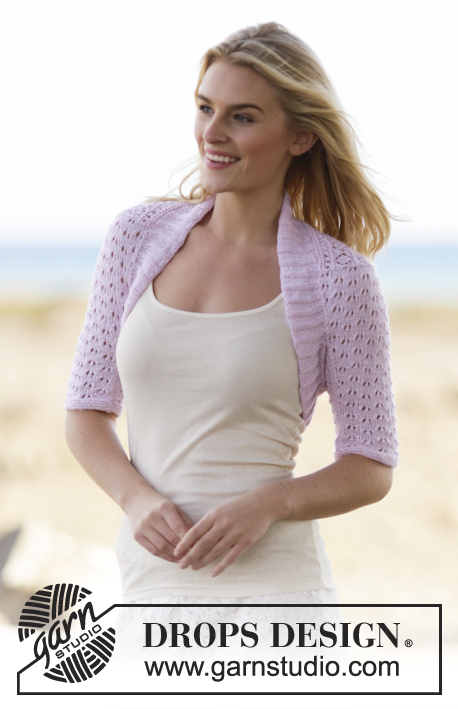
Hello, on the pattern instruction the pattern order is A1->A2-A3-A4->A5->A6->A7/AX however on the modell/picture the pattern order is A1->A2-A3-A4->A who knows->A1->again A who knows. Could you correct the instruction and giving the correct pattern?
23.04.2019 - 23:11DROPS Design answered:
Dear Cathy, the pattern is right, you are working back piece top down as explained (= see 4th picture), the first A.2-A.3-A.4 is just a bit hidden on the 2nd picture but you can see it on the first picture. Happy knitting!
29.04.2019 - 09:41
![]() Doris wrote:
Doris wrote:
Vielen Dank liebes Drops Team für die schnelle Rückmeldung und die Info. Dann hab ich was falsch gemacht 🤔😮 es ist eine schöne Jacke und ein tolles Muster. Von daher ....beginne ich gern noch mal von vorn. Vielen Dank für die schnelle Hilfe.
23.04.2019 - 21:06
![]() Doris wrote:
Doris wrote:
Hallo liebes Drops Team Versucht nachzustricken und festgestellt das das Strick Diagramm für das Rückenteil nicht mit dem abgebildetes Foto wo die Frau den Bolero trägt übereinstimmen. Model Nr. bs-077 Es ergibt ein völlig anderes Muster ?
23.04.2019 - 12:31DROPS Design answered:
Liebe Doris, die Diagramme stimmen die Foto und die Anleitung, die Diagramme werden von unten nach oben gelesen (hier lesen Sie mehr) und das 4. Foto zeigt das Muster von unten nach oben. Viel Spaß beim stricken!
23.04.2019 - 15:26
![]() Morena R. wrote:
Morena R. wrote:
Yes I did. To explain I'll make an example. Look at A6 diagram: the 4 small "holes" are on top of the diagram. In the pictures are at the bottom. Like the model wore the sweater up side down. Anyway I finished and wored it as it was. It looks fine!
09.09.2018 - 08:49
![]() Morena R. wrote:
Morena R. wrote:
Good morning, I have a doubt. I've completed the back side and I'm starting with the first sleeve. Looking at the picture (the foto of the model) my works doesn't match. It seams like the work has to be done top-bottom, but I've worked it bottom - top. I cannot find this information. Did I worked it wrong? Thanks
16.08.2018 - 09:00DROPS Design answered:
Hello, The pattern is worked bottom up. In what way does your work does not match the photo? Do you mean the lace pattern? Did you read the char from right to left on the even rows and from left to right on the odd rows? Hope we can help you out, Happy Knitting,
30.08.2018 - 11:43
![]() Heidi wrote:
Heidi wrote:
Tack för svar angående A.8. Det jag menar är om det ska vara flera varv(än ett) med slätstickning mellan A.8 sektionerna. Ser ut på tröjärmen att det är minst tre? Detta har även Rannvej påpekat den 6/12-2017.
28.03.2018 - 15:57DROPS Design answered:
Det ska endast vara 1 varv slätstickning mellan varje ny rapport med hålmönster. Det blir ju 3 varv mellan varje hålmönster som kommer direkt ovanför varandra, tror det är det som syns så väl på bilden.
03.04.2018 - 17:19
![]() Heidi wrote:
Heidi wrote:
Stickar diagram A.8 men hålen kommer mycket tätare än det ser ut på bilden på ärmen. Är det fel på diagrammet?
27.03.2018 - 19:51DROPS Design answered:
Hej, diagrammet är korrekt. Det ska vara 5 maskor mellan varje rapport med hål och minskningar.
28.03.2018 - 14:15
![]() Reichenstein wrote:
Reichenstein wrote:
Guten Tag, wenn ich den Bolero in xs stricken möchte, wieviele maschen muss ich denn anschlagen?Wie ist es mit den Ärmeln? kann ich die auch länger machen? Wie?
13.03.2018 - 18:06DROPS Design answered:
Liebe Frau Reichenstein, Leider können wir keine individuellen Umrechnungen vornehmen, wenden Sie sich mit diesem Wunsch bitte an den Laden, in dem Sie die Wolle kaufen. Vielen Dank für Ihr Verständnis.
14.03.2018 - 08:59
|
|||||||||||||||||||
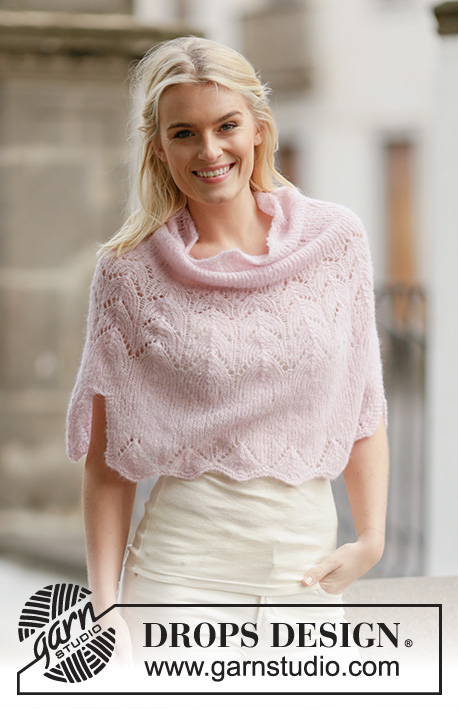
Mette#metteshoulderpiece |
|||||||||||||||||||
 |
 |
||||||||||||||||||
Knitted DROPS shoulder piece with lace pattern in ”BabyAlpaca Silk”. Size S-XXXL.
DROPS 160-4 |
|||||||||||||||||||
|
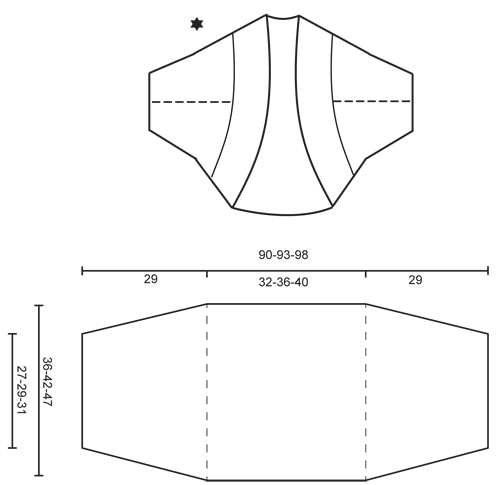
GARTER ST (back and forth): K all rows. 1 ridge = K2 rows. PATTERN: See diagrams A.1-A.8. The diagrams show all rows in pattern seen from RS. DECREASE TIP: Dec inside 1 edge st in garter st. All dec are done from RS! Dec as follows before 1 edge st and 2 sts: K 2 tog. Dec after 1 edge st as follows: Slip 1 st as if to K, K 1, psso. INCREASE TIP: Inc 1 st by making 1 YO, on next round P YO twisted (i.e. work in back loop of st instead front) to avoid holes. ---------------------------------------------------------- SHOULDER PIECE: Worked back and forth on circular needle. First work back piece. Then pick up sts on back piece for sleeves. BACK PIECE: Cast on 79-87-97 sts (includes 1 edge st in garter st in each side) on circular needle size 3 mm / US 2.5 with BabyAlpaca Silk. Work diagram A.1 over all sts inside 1 edge st in GARTER ST - see explanation above, in each side (on 7th row in A.1 K last st before edge st), repeat A.1 1-1-2 times in total vertically, AT THE SAME TIME on last row from RS in diagram inc 2-0-2 sts evenly = 81-87-99 sts. NOTE: Work edge sts in garter st until finished measurements. REMEMBER THE KNITTING GAUGE Now work inside edge sts in each side of piece as follows: A.2, A.3 11-12-14 times in width, A.4. When A.2-A.4 have been worked vertically, work A.5 (on 5th row K the last st before edge st). When A.5 has been vertically, work next row as follows: 3-0-0 sts in stockinette st, A.6 6-7-8 times in width, 4-1-1 sts in stockinette st. When A.6 has been worked vertically, continue with A.1 (on 7th row K last st before edge st), AT THE SAME TIME on last row from RS in diagram dec 2-0-0 sts evenly = 79-87-99 sts. Work next row from RS as follows: 2-2-0 sts in stockinette st, A.7 9-10-12 times in width, 3-3-1 sts in stockinette st. When A.X has been worked vertically, repeat A.X 0-1-1 more time before continuing until A.7 has been worked vertically. Now work 2 ridges AT THE SAME TIME on last row from RS adjust no of sts to 81-87-99 sts (includes 1 edge st in each side). Now work as follows: A.2, A.3 11-12-14 times in width, A.4. When A.2-A.4 have been worked vertically, continue with A.5 (on 5th row K the last st before edge st). Bind off when the entire A.5 has been worked 1-1-2 times vertically. Piece measures 36-42-47 cm / 14 1/4"-16½"-18½" from cast-on edge. SLEEVE: Pick up from RS 88-102-114 sts (includes 1 edge st in garter st in each side) inside 1 edge st in garter st in one side of back piece with BabyAlpaca Silk on circular needle size 3 mm / US 2.5. Work as follows: 1 edge st in garter st, K 3-0-1, A.8 until 4-1-2 sts remain, K 3-0-1, 1 edge st in garter st. Continue like this back and forth. When piece measures 4 cm / 1½'', beg dec in each side of piece - READ DECREASE TIP. Repeat dec approx. every 2-1½-1 cm / 3/4"-½"-1/4" 10-14-18 more times = 66-72-76 sts. NOTE: When there is not enough sts to work pattern, work sts in stockinette st. AT THE SAME TIME when piece measures 10 cm / 4'' from cast-on edge, insert a marker in each side (stop sleeve seam here from bottom of sleeve). When piece measures 27 cm / 10½'', inc 6-4-4 sts evenly on next row from RS = 72-76-80 sts. Switch to circular needle size 2.5 mm / US 1.5 and work in garter st for 2 cm / 3/4''. Loosely bind off. Pick up and work another sleeve the same way. ASSEMBLY: Sew underarm seam from bottom of edge in garter st and up to markers inside 1 edge st in garter st. EDGE: Now work an edge in rib in the round as follows: * Beg from RS at the seam under the sleeve (marker), pick up 135-145-155 sts with BabyAlpaca Silk on circular needle size 2.5 mm / US 1.5 along sleeve, over back piece and down along one side of the other sleeve until seam (marker) *, repeat from *-* over the opposite side of shoulder piece = 270-290-310 sts. Work rib K 2/P 3 over all sts. When piece measures 2 cm / 3/4'', inc 1 st in every section with P sts - READ INCREASE TIP! There are now 324-348-372 sts. Continue with K 2/P 4 until 4 cm / 1½'' have been worked from pick up edge. Now inc 1 st in every section with P sts the same way as before = 378-406-434 sts. Continue with K 2/P 5 for 2 cm / 3/4''. Rib measures 6 cm / 2 3/8''. Loosely bind off with K over K and P over P. |
|||||||||||||||||||
Diagram explanations |
|||||||||||||||||||
|
|||||||||||||||||||
 |
|||||||||||||||||||
 |
|||||||||||||||||||
Have you finished this pattern?Tag your pictures with #dropspattern #metteshoulderpiece or submit them to the #dropsfan gallery. Do you need help with this pattern?You'll find 20 tutorial videos, a Comments/Questions area and more by visiting the pattern on garnstudio.com. © 1982-2026 DROPS Design A/S. We reserve all rights. This document, including all its sub-sections, has copyrights. Read more about what you can do with our patterns at the bottom of each pattern on our site. |
|||||||||||||||||||


With over 40 years in knitting and crochet design, DROPS Design offers one of the most extensive collections of free patterns on the internet - translated to 17 languages. As of today we count 324 catalogs and 12245 patterns - 12235 of which are translated into English (US/in).
We work hard to bring you the best knitting and crochet have to offer, inspiration and advice as well as great quality yarns at incredible prices! Would you like to use our patterns for other than personal use? You can read what you are allowed to do in the Copyright text at the bottom of all our patterns. Happy crafting!
Post a comment to pattern DROPS 160-4
We would love to hear what you have to say about this pattern!
If you want to leave a question, please make sure you select the correct category in the form below, to speed up the answering process. Required fields are marked *.