
Popular categories
Looking for a yarn?


Comments / Questions (274)
![]() Madeline Aileo wrote:
Madeline Aileo wrote:
I have a question about row 39 in A.5. This should be a wrong side row and therefore shouldn't have any cables... but it does. Is that correct? I haven't started yet but I've been doing samples while I've been waiting for my yarn. Thanks k you. Madeline
20.01.2017 - 03:33DROPS Design answered:
Dear Mrs Aileo, diagram is worked in the round, so that all rounds will be worked from RS and any will be worked from WS. Happy knitting!
20.01.2017 - 09:20
![]() Brigitte wrote:
Brigitte wrote:
Hartelijk bedankt voor de goed uitleg vele groetjes Brigitte xx
28.10.2016 - 10:24
![]() Brigitte wrote:
Brigitte wrote:
Hallo het probleem is ik weet niet goed goe te beginnen en wanneer de meerdering moet gemaakt worden ik denk eerst een A2,en A1 dan meerden ik weet niet ik ben gestopt met de naald waar ik de markeerders geplaats heb maar weet niet hoe het verder moet , groetjes
21.10.2016 - 16:13DROPS Design answered:
Hoi Brigitte. Ik zou eerst gewoon breien zoals er staat en markeren waar de raglan komen. Je hebt 4 markeerders in het werk: A.1/A.2, markeerder, A.2/A.1. Je meerdert dus door 1 omslag te maken aan beide zijkanten van de raglan: 1 omslag, A.1/A.2, markeerder, A.2/A.1, 1 omslag. Herhaal over de hele nld en je hebt 8 st gemeerderd. Brei de nieuwe st op de mouw av, en de nieuwe st op de pand mee in het patroon zoals uitgelegd.
27.10.2016 - 15:51
![]() Brigitte wrote:
Brigitte wrote:
Hallo , mag ik jullie een vraag stellen a.u.b. ik moet beginnen met het breien van de raglan maat S maar ik begrijp het niet zo goed kunnen jullie me verder helpen ? hartelijk bedankt
21.10.2016 - 11:48DROPS Design answered:
Hoi Brigitte. Natuurlijk, ik kan proberen :) Wat is het probleem?
21.10.2016 - 15:00
![]() Lara wrote:
Lara wrote:
Under "yoke" in the instructions it says, "Continue to work an elevation in garter stitch back and forth.." What is an "elevation?" Thank you.
20.09.2016 - 22:10DROPS Design answered:
Dear Lara, you will now work some short rows back and forth so that there will be more rows in the back of piece than in the front of piece, this will shape a higher neckline on back piece. Happy knitting!
21.09.2016 - 09:14Debbie Waller wrote:
Hi, What are the bust measurements for S, M, L sizes please? Cheers, Deb
03.09.2016 - 06:33DROPS Design answered:
Dear Debbie, the chest measurements for S, M i L sizes are (44-48-52)x2. Read more here. Happy knitting!
03.09.2016 - 19:29
![]() Christina Olsson wrote:
Christina Olsson wrote:
Varför överensstämmer inte A3 med det man ser på bilden? Kablarna på bilden går över varann på en del ställen på mönstret men under på bilden!!?
16.08.2016 - 15:22
![]() Rainbow wrote:
Rainbow wrote:
S/M: P 6-3, * A.2 0-1 time in width....( what is 1or 2 time in width?) Please
12.08.2016 - 02:48DROPS Design answered:
Dear Rainbow, for size S you've to P6, then P7, work A.2, then P8 and so on; instead, for size M, you've to P3, work A.2, then P7, work A.2, then P9 and so on. Happy knitting!
13.08.2016 - 19:55
![]() Lize wrote:
Lize wrote:
Hei! Jeg er ikke sikker på om dette har blitt spurt før, men er det en feil i oppskriften? I diagrammet: Den linjen som går fra nederst høyre hjørne til øverst venstre hjørne; skal det ikke være 2 vr og så 2 r fra hjelpepinne? Jeg har sjekket det iforhold til en lignende oppskrift og der står det på dette viset. Hvis det er feil kanskje dere kan rette det opp? På forhand takk! Lize.
30.07.2016 - 21:15DROPS Design answered:
Hej Lize, diagrammerne stemmer så dem kan du følge. God fornøjelse!
21.11.2016 - 14:51
![]() Jonna Nielsen wrote:
Jonna Nielsen wrote:
Efter jeg har taget maskerne fra og slået de 12 nye op i siden kan jeg ikke få det til at passe med den inddeling der er i mønsteret enten mangler jeg masker eller så er der for mange .... det skal siges at maskeantallet har passet med opskriften lige indtil her, det er en str XL jeg strikker
26.07.2016 - 16:41DROPS Design answered:
Hej Jonna, det er svært at vide hvor det går galt, men du skal sørge for at mønsteret stemmer over hinanden som det har gjort tidligere. God fornøjelse!
29.03.2017 - 14:54
|
||||||||||||||||||||||||||||
Alana#alanasweater |
||||||||||||||||||||||||||||
 |
 |
|||||||||||||||||||||||||||
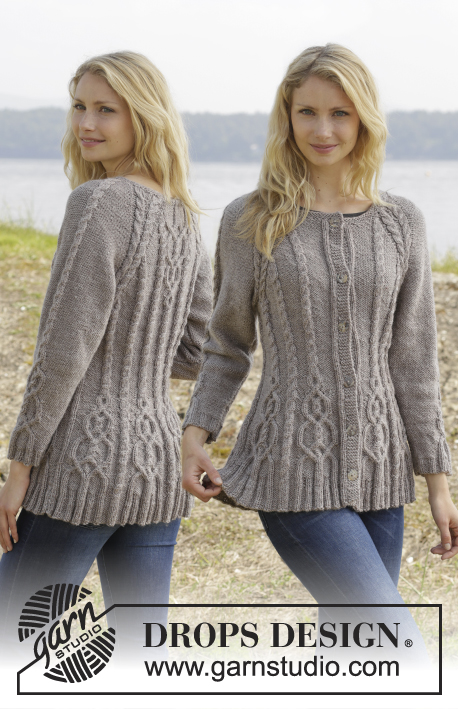
Knitted DROPS jumper with cables and raglan, worked top down in ”Karisma”. Size S-XXL
DROPS 156-19 |
||||||||||||||||||||||||||||
|
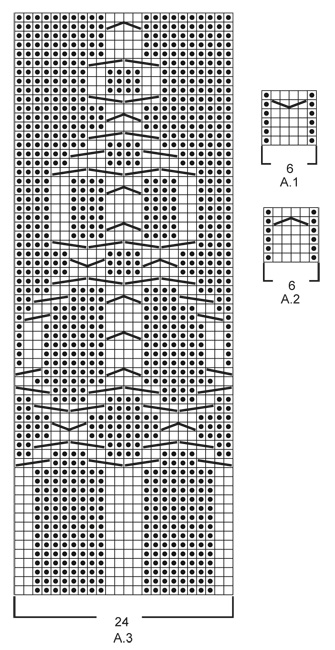
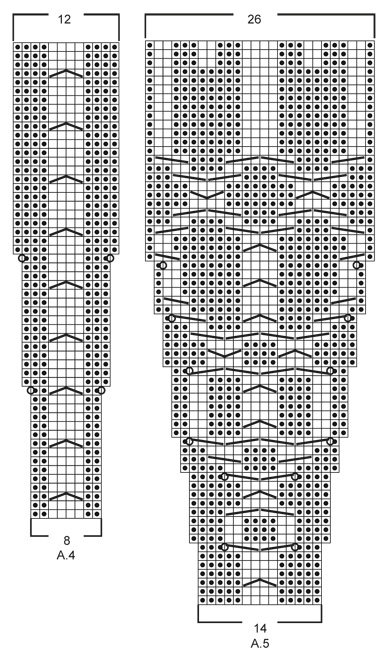
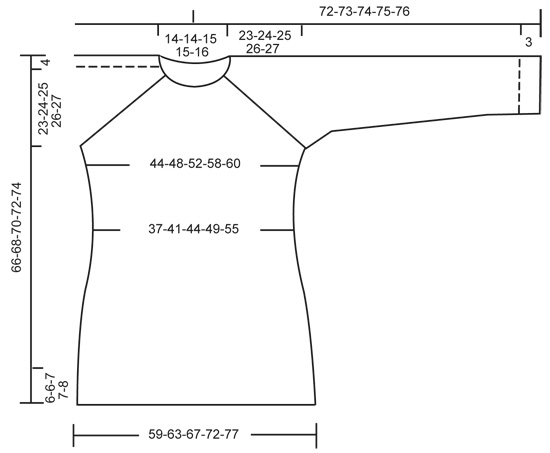
GARTER ST (in the round on circular needle): * K 1 round and P 1 round *, repeat from *-*. 1 ridge = 2 rounds. GARTER ST (back and forth on needle): K all rows. 1 ridge = K2 rows. PATTERN: See diagrams A.1 - A.5. The diagrams show all rows in pattern seen from RS. RAGLAN: Inc on each side of raglan sts (A.1/A.2, marker, A.2/A.1) by making 1 YO = 8 inc on round. On next round K the YOs twisted to avoid holes. Then P the new sts on sleeves, and on front and back piece work the new sts in pattern as explained below. DECREASE TIP (applies to sleeves): Dec on each side of marker as follows: Work until 3 sts remain before marker, P 2 tog, P 2, P 2 tog = 2 sts dec. INCREASE TIP: Inc 1 st by making a YO. On next round P YOs twisted, i.e. work in the back loop of st instead of front to avoid holes. P the new sts. ---------------------------------------------------------- JUMPER: Worked top down in the round on circular needle. Work sleeve in the round on circular needle/double pointed needles. YOKE: Cast on 92-92-97-97-101 sts on circular needle size 4 mm / US 6 with Karisma. Work 3 ridges in GARTER ST in the round on circular needle - see explanation above. Continue to work an elevation in GARTER ST back and forth -see explanation above, from mid back as follows (1st row = RS): Now work 5-5-7-7-9 sts, turn, work 10-10-14-14-18 sts, turn, work 15-15-19-19-23 sts, turn, work 20-20-24-24-28 sts, turn, work 25-25-29-29-33 sts, turn, work 30-30-34-34-38 sts, turn, work 35-35-39-39-43 sts, turn, work 40-40-43-43-48 sts, turn, work back to beg of round. Now K 1 round AT THE SAME TIME inc 24-24-23-23-27 sts evenly = 116-116-120-120-128 sts. P 18-18-19-19-21, insert 1st marker here (= this is now beg of round), A.2, P 2, A.2, P 2, A.1, insert 2nd marker here, A.2, P 0-0-1-1-3, A.3, P 0-0-1-1-3, A.1, insert 3rd marker here, A.2, P 2, A.2, P 2, A.1, insert 4th marker here, A.2, P 0-0-1-1-3, A.3, P 0-0-1-1-3, A.1. READ THE NEXT 2 SECTIONS BEFORE CONTINUING! REMEMBER THE GAUGE! On next round beg inc for RAGLAN – see explanation above, AT THE SAME TIME work pattern as follows: RAGLAN: Repeat inc every round 0-2-10-20-20 times in total. Then inc every other round 23-32-30-26-27 times and every 3rd round 6-0-0-0-0 times = 348-388-440-488-504 sts. PATTERN: Work pattern on body as follows (P the inc sts on sleeves): Work the first 6 sts inc in A.2, then P next 8-9-7-8-8 inc sts, work the next 6 inc sts in A.2, P the next 8-9-7-8-8 inc sts. NOTE: (Size M-L-XL-XXL): When A.3 has been worked 1 time vertically, continue with A.2 over cable and P the remaining sts from A.3 until start of body. S/M: Then inc as before on sleeve and inc inside A.1/A.2 (i.e. between A.1 and A.2, towards marker for raglan) on front and back piece 1-4 more times. P the new sts. L/XL/XXL: Continue with A.2 over the next 6 inc sts, P the next 7-8-8 inc sts, then inc as before on sleeve and inc inside A.1/A.2 (i.e. between A.1 and A.2, towards marker for raglan) on front and back piece 1-4-5 more times. P the last 1-4-5 inc sts. Piece now measures 27-28-29-30-31 cm / 10½"-11"-11½"-11¾"-12¼" from shoulder. Now work as follows: Slip the first 80-90-102-114-116 sts on a stitch holder for sleeve, cast on 12 new sts under sleeve, insert a blue marker in the middle of these new sts, work the next 94-104-118-130-136 sts (= front piece), slip the next 80-90-102-114-116 sts on a stitch holder for sleeve, cast on 12 new sts under sleeve, insert a blue marker in the middle of these new sts, work the remaining 94-104-118-130-136 sts on round (= back piece). NOW MEASURE THE PIECE FROM HERE. BODY: There are now 212-232-260-284-296 sts for body. Then continue pattern as follows: S/M: P 6-3, * A.2 0-1 time in width, P 7-7, A.2, P 8-9, insert a marker, A.2, P 8-9, insert a marker, A.2, P 9-9, A.2, P 9-9, A.2, insert a marker, P 8-9, A.2, insert a marker, P 8-9, A.1*, P 7-7, repeat from *-* 1 more time, P 1-4 L/XL/XXL: P 3-3-0, * A.2 1-1-2 times in width, P 4-6-5, A.2, P 7-8-8, insert a marker, A.2, P 7-8-8, insert a marker, A.2, P 7-8-8, insert a marker, A.2, P 10-11-12, A.2, P 10-11-12, A.2, insert a marker, P 7-8-8, A.2, insert a marker, P 7-8-8, A.2, insert a marker, P 7-8-8, A.1 *, P 4-6-5, repeat from *-* 1 more time, P 1-3-5. READ THE NEXT 2 SECTIONS BEFORE CONTINUING! Now dec and inc at the same time as follows: DECREASE: Dec differently as follows - READ DECREASE TIP: Dec 1 st on each side of the middle cable on front and back piece. Repeat dec every 2-2-1½-1½-1½ cm / ½"-½"-½"-¾"-¾" 3-3-4-4-6 more times. AT THE SAME TIME dec 1 st towards cable in every section with P sts with marker in (= 8-8-12-12-12 markers). Repeat dec every 3-2½-5-4-4 cm / 1⅛"-⅞"-2"-1½"-1½" 2-3-1-2-2 more times. INCREASE (towards the sides): When piece measures 3 cm / 1", inc along the cable towards the sleeve (i.e. cable from raglan) in P section towards the sides – READ INCREASE TIP! Inc 4 sts on round. Repeat inc every 1½-1½-2½-1½-1 cm / ½"-½"-⅞"-½"-⅜" 3-4-2-4-10 more times. When all dec and inc are done, 188-204-228-248-276 sts remain. When piece measures 11-12-12-13-14 cm / 4½"-4¾"-4¾"-5"-5½", work pattern as follows: P 6-3-6-6-0, A.2 0-1-1-1-2 times in width, P 7-8-6-11-15, A.4 0-0-1-1-1 time in width, * A.5, A.4 *, repeat from *-* 2-2-3-3-3 more times in width, A.5 1-1-0-0-0 times in width, P 7-8-6-11-15, A.2 0-1-1-1-2 times in width, P 7-8-6-11-15, A.4 0-0-1-1-1 time in width, * A.5, A.4 *, repeat from *-* 2-2-3-3-3 more times in width, A.5 1-1-0-0-0 times in width, P 1-5-0-5-15. NOTE: Adjust the first cable in A.4 and A.5 to get a nice transition between diagrams. Continue with pattern and inc according to diagram. When A.4 and A.5 have been worked vertically and piece measures approx. 33-34-34-35-35 cm / 13"-13½"-13½"-13¾"-13¾", there are 308-324-364-384-412 sts on round. Insert a marker here. NOW MEASURE THE PIECE FROM HERE. Now work rib as follows: S/M: * Work K over K and P over P until 7-11 sts remain before the blue marker in the side, P 2, K 2, P 3-4 *, repeat from *-* 1 more time and continue with K over K and P over P the rest of round. L/XL/XXL: * Work K over K and P over P until 8-14-21 sts remain before the blue marker in the side, K 2-2-2, P 3-4-3, K 0-2-2, P 0-3-3, K 0-0-2, P 0-0-3 *, repeat from *-* 1 more time and continue with K over K and P over P the rest of round. When rib has been worked for 2 cm / ¾" from marker, inc by making 1 YO before first P st in every P section - remember INCREASE TIP. When rib has been worked for 5-5-6-6-6 cm / 2"-2"-2½"-2½"-2½", bind off with K over K and P over P. SLEEVES: Slip the 80-90-102-114-116 sts from stitch holder back on circular needle. K 1 row over all sts and cast on 12 new sts at the end of row = 92-102-114-126-128 sts. Insert a marker in the middle of the new sts (i.e. 6 sts on each side of marker). NOW MEASURE THE PIECE FROM HERE. Then work sleeve in the round on circular needle/double pointed needles. Continue the middle cable on sleeve as before but work P over cables in raglan. On 2nd round beg dec on each side of marker - READ DECREASE TIP. Repeat dec in every other round 6 more times = 78-88-100-112-114 sts. Then dec 1 st on each side of marker every 2-1½-1-1-1 cm / ¾"-½"-⅜"-⅜"-⅜" 13-17-22-27-27 times = 52-54-56-58-60 sts. AT THE SAME TIME when piece measures 15 cm / 6", work A.5 over cable in the middle of sleeve - adjust the first cable in A.5 to get a nice transition between diagrams. NOTE: Do not inc in A.5 on sleeve, i.e. do not work YOs in diagram. When A.5 is finished and sleeve measures 37 cm / 14½", work rib as follows from marker at beg of round: P 0-0-1-2-3, K 1-2-2-2-2, P 3, K 2, P 3, K 2, P 2, continue rib as on last row in A.5 (= 26 sts), P 2, K 2, P 3, K 2, P 3, K 1-2-2-2-2, P 0-0-1-2-3. Continue like this for 3 cm / 1", bind off with K over K and P over P. ASSEMBLY: Sew the holes under the sleeves. |
||||||||||||||||||||||||||||
Diagram explanations |
||||||||||||||||||||||||||||
|
||||||||||||||||||||||||||||
 |
||||||||||||||||||||||||||||
 |
||||||||||||||||||||||||||||
 |
||||||||||||||||||||||||||||
Have you finished this pattern?Tag your pictures with #dropspattern #alanasweater or submit them to the #dropsfan gallery. Do you need help with this pattern?You'll find 23 tutorial videos, a Comments/Questions area and more by visiting the pattern on garnstudio.com. © 1982-2026 DROPS Design A/S. We reserve all rights. This document, including all its sub-sections, has copyrights. Read more about what you can do with our patterns at the bottom of each pattern on our site. |
||||||||||||||||||||||||||||


With over 40 years in knitting and crochet design, DROPS Design offers one of the most extensive collections of free patterns on the internet - translated to 17 languages. As of today we count 324 catalogs and 12290 patterns - 12280 of which are translated into English (US/in).
We work hard to bring you the best knitting and crochet have to offer, inspiration and advice as well as great quality yarns at incredible prices! Would you like to use our patterns for other than personal use? You can read what you are allowed to do in the Copyright text at the bottom of all our patterns. Happy crafting!
Post a comment to pattern DROPS 156-19
We would love to hear what you have to say about this pattern!
If you want to leave a question, please make sure you select the correct category in the form below, to speed up the answering process. Required fields are marked *.