
Popular categories
Looking for a yarn?


Comments / Questions (63)
Rainbowis wrote:
How can I read the diagram? and how i recognize the size as L above it M and so on?
19.02.2015 - 14:18DROPS Design answered:
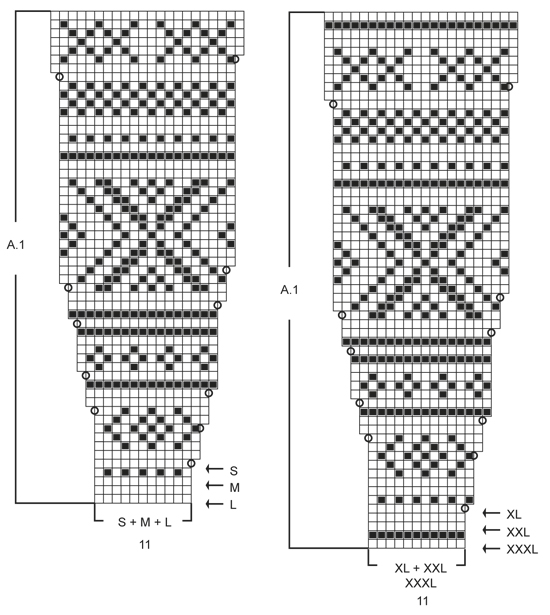
Dear Mrs Rainbowis, start at the arrow for your size, ie L start in first row in A.1 and start with 3rd row in diagram in size M. Read all rounds from the right towards the left (from RS here) starting at the right corner on the very bottom. (read more about diagrams here). Happy knitting!
19.02.2015 - 14:36Rainbowis wrote:
Ok. So how the instructionsis stating to use 80 cm circular needle taking into consideration that I'm making medium size?.
19.02.2015 - 09:41DROPS Design answered:
Dear Mrs Rainbowis, see answer below. Happy knitting!
19.02.2015 - 10:27Rainbowis wrote:
Hi, how to increase EVENLY in rounds? Regards,
16.02.2015 - 12:41DROPS Design answered:
Dear Mrs Rainbowis, divide your number of sts by the number of inc to work. The number you get should be rounded to full or half number, if you get for example 10, work 10 sts, make 1 inc, work 10 more sts, make 1 inc and so on, you should then get correct number of inc/sts. Happy knitting!
16.02.2015 - 13:52Rainbowis wrote:
Ok. So how the instructionsis stating to use 80 cm circular needle taking into consideration that I'm making medium size?.
10.02.2015 - 08:25DROPS Design answered:
Dear Mrs Rainbowis, you start yoke with the smaller (40 cm) circular needle and then when there are too much sts because of inc you can switch to longer (80 cm) circular needle. Happy knitting!
10.02.2015 - 08:49Rainbowis wrote:
1 ridge =2 rounds, is that means 4 ridges = 8 rounds?
08.02.2015 - 14:47Rainbowis wrote:
Does the Garter St differs from the Stcoking St?
08.02.2015 - 14:45DROPS Design answered:
Dear Mrs Rainbowis, when you work in round, you K all the rounds to work stocking st and to get garter st, work 2 rounds (K1 round, P1 round). Happy knitting!
08.02.2015 - 19:22
![]() Ines wrote:
Ines wrote:
Gracias x la respuesta pero ... Con esta elevación de puntos tal y la explicáis, no quedaría mas elevado un lado que otro? Gracias
03.01.2015 - 17:24DROPS Design answered:
Hola Ines. La elevación se trabaja a ambos lados del centro de la espalda. Se comienza en el centro de la espalda, por ejemplo para la talla S se trabajan 9 pts a un lado a partir del centro de la espalda, se giran y trabajan los 9 pts de vta (hasta el centro de la espalda) y sigen trabajando otros 9 pts a otro lado del centro de la espalda (= 18 pts) etc...se termina en el mismo sitio donde se empezó por eso no queda más elevado un lado que otro.
08.01.2015 - 00:24
![]() Ines wrote:
Ines wrote:
Gracias por la respuesta pero al levantar esos puntos tal y como lo explicais no quedaría mas elevado un lado del cuello que otro al hacer vueltas cortas en un lado y en el otro no? Podríais aclaro ello ? Gracias
03.01.2015 - 17:21
![]() Ines wrote:
Ines wrote:
Podríais publicar videos con las técnicas del top donw especialmente en los jerseys de cuello alto? Gracias
31.12.2014 - 17:46DROPS Design answered:
Hola Ines. Cada patrón tiene su apartado de vídeos correspondiente para realizar la labor junto a las pestañas de materiales y lanas alternativas. Puedes ver los vídeos nuevos en el apartado "Videos Tutoriales"
07.01.2015 - 23:32
![]() Ines wrote:
Ines wrote:
No acabo de comprender las vueltas cortas cuando en las instrucciones decís que "levantar puntos" desde el centro de la espalda. ¿Se hacen solo en uno de los lados? (ilógico) Entoces, cual es la referencia para levantar correctamente los puntos que se suponen es para hacer la forma del cuello de la espalda? Gracias
31.12.2014 - 17:43DROPS Design answered:
Hola Inés. No hay que "levantar puntos", simplemente tejer desde el centro 7 pts hacia un lado y girar, 14 hacia el otro lado y girar, etc...Se le llama elevación porque queda más alto en esa parte que el resto del cuello.
01.01.2015 - 11:56
|
||||||||||
Elinor Dashwood#elinordashwoodsweater |
||||||||||
|
|
||||||||||
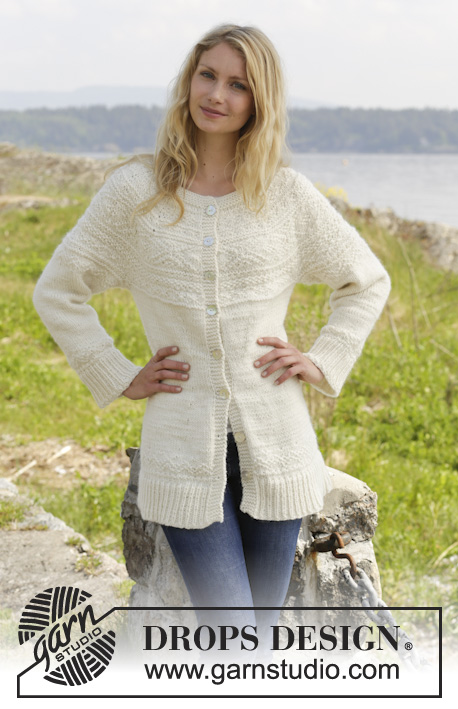
Knitted DROPS jumper with round yoke and textured pattern, worked top down in "Alaska", worked top down. Size: S - XXXL.
DROPS 157-5 |
||||||||||
|
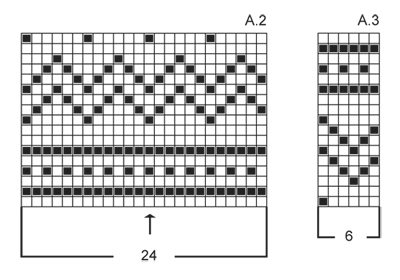
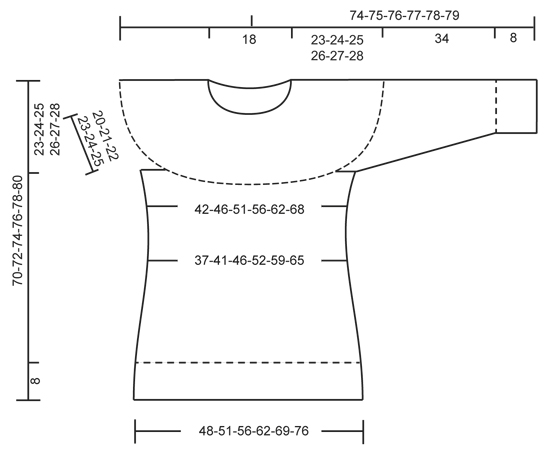
GARTER ST (in the round on circular needle): * K 1 round and P 1 round *, repeat from *-*. 1 ridge = 2 rounds. PATTERN: See diagrams A.1 to A.3. The diagrams show all rows in pattern seen from RS. INCREASE TIP 1 (applies to yoke): Inc 1 st by making 1 YO, on next round work YO twisted (i.e. work in the back loop of st instead front) to avoid holes. INCREASE TIP 2: Work until 1 st remains before marker, 1 YO, K 2 (marker is between these), 1 YO. On next round work YO twisted (i.e. work in the back loop of YO instead of front) to avoid holes. DECREASE TIP (applies to waist + sleeve): Dec as follows after marker: Slip 1 st as if to K, K 1, psso. Dec as follows 2 sts before marker: K 2 tog. ---------------------------------------------------------- JUMPER: Worked in the round, top down. YOKE: Cast on 69-76-80-84-87-91 sts on circular needle size 4 mm / US 6 with Alaska. Work 4 ridges in GARTER ST - see explanation above. Insert a marker at beg of round = mid back. Now switch to circular needle size 5 mm / US 8. Work in stockinette st AT THE SAME TIME inc 41-45-52-59-67-85 sts evenly – READ INCREASE TIP 1! There are now 110-121-132-143-154-176 sts on round. Then work an elevation back and forth in the neck from mid back as follows: K 9-10-11-12-13-14, turn piece and P 18-20-22-24-26-28. Turn piece, K 27-29-31-33-35-37, turn piece and P 36-38-40-42-44-46. Turn piece and K 45-47-49-51-53-55, turn piece and P 54-56-58-60-62-64. Turn piece and K over all sts until marker. On next round, work and inc according to pattern A.1 – choose diagram for correct size. REMEMBER THE GAUGE! When entire diagram A.1 has been worked 1 time vertically, there are 220-242-264-286-308-352 sts on needle. On next round work 1st row in A.2, AT THE SAME TIME inc 8-8-8-10-16-0 sts evenly = 228-250-272-296-324-352 sts. Work next round as follows: 2nd row in A.2 over the first 31-35-39-43-48-53 sts, slip the next 51-55-57-61-65-69 sts on a stitch holder for sleeve, cast on 8 new sts (= under sleeve), continue with A.2 over the next 64-70-80-88-98-108 sts (= front piece), slip the next 51-55-57-61-65-69 sts on a stitch holder for sleeve, cast on 8 new sts under sleeve, A.2 over the next 31-35-39-43-48-53 sts. There are now 142-156-174-190-210-230 sts for body. BODY: Continue in stockinette st. When piece measures 4 cm / 1½" from new sts under sleeve, insert 4 markers in piece as follows: 17-20-23-25-28-31 sts in stockinette st, insert a marker, 36-38-40-44-48-52 sts in stockinette st, insert a marker, 36-40-48-52-58-64 sts in stockinette st, insert a marker, 36-38-40-44-48-52 sts in stockinette st, insert a marker, 17-20-23-25-28-31 sts in stockinette st. Now beg dec - READ DECREASE TIP. Dec 1 st before 1st and 3rd marker and 1 st after 2nd and 4th marker (NOTE! 1st marker is 1st marker on row from RS!). Repeat dec every 1-1-1½-2-3½-3½ cm / ⅜"-⅜"-½"-¾"-1¼"-1¼" 4-4-4-3-2-2 times in total = 126-140-158-178-202-222 sts. Now insert a marker in the middle of the 36-38-40-42-48-52 sts in each side (i.e. between 1st and 2nd marker and between 3rd and 4th marker) = 5th and 6th marker. When piece measures 14-15-16-17-18-19 cm / 5½"-6"-6¼"-6¾"-7"-7½" from the new sts under sleeve, beg inc – remember INCREASE TIP 1! Inc before 1st and 3rd marker and after 2nd and 4th marker. Repeat inc every 3 cm / 1" 4 more times, AT THE SAME TIME on 2nd, 3rd and 4th inc, inc 1 st on each side of 5th and 6th marker (= sides) – READ INCREASE TIP 2! When all inc are done there are 158-172-190-210-234-254 sts on needle. When piece measures 31-32-33-34-35-36 cm / 12¼"-12½"-13"-13⅜"-13¾"-14¼" from new sts under sleeve, inc 4-2-2-0-0-4 sts evenly = 162-174-192-210-234-258 sts. Then work A.3 over all sts. When A.3 has been worked vertically, inc 42-45-51-66-78-90 sts evenly = 204-219-243-276-312-348 sts. Work 1 round in stockinette st. Then switch to circular needle size 4 mm / US 6 and work rib as follows: * K 1, P 2 *, repeat from *-*. Continue like this until rib measures 8 cm / 3⅛". Bind off with K over K and P over P. SLEEVE: Worked in the round on double pointed needles. Slip the 51-55-57-61-65-69 sts from stitch holder back on double pointed needles size 5 mm / US 8. Work 2nd row in A.2, cast on 8 new sts under sleeve at the end of row = 59-63-65-69-73-77 sts. Insert a marker in the middle of the 8 new sts (i.e. 4 sts on each side of marker). Then work in the round. Continue with pattern according to diagram A.2 – NOTE: Adjust pattern according to the middle, arrow in diagram marks middle st on top of sleeve, AT THE SAME TIME when piece measures 4 cm / 1½" from marker, beg dec – READ DECREASE TIP! Repeat dec every 2-1½-1½-1½-1½-1 cm / ¾"-½"-½"-½"-½"-⅜" 8-10-11-10-12-14 more times = 41-41-41-47-47-47 sts remain. When piece measures 34 cm / 13½" in all sizes, inc 1 st = 42-42-42-48-48-48 sts. Then work pattern according to diagram A.3. When A.3 has been worked 1 time vertically, inc 3 sts evenly = 45-45-45-51-51-51 sts. Now switch to double pointed needles size 4 mm / US 6 and work rib (K 1/P 2). Bind off with K over K and P over P when rib measures 8 cm / 3⅛". ASSEMBLY: Sew the holes under the sleeves. |
||||||||||
Diagram explanations |
||||||||||
|
||||||||||
 |
||||||||||
 |
||||||||||
 |
||||||||||
Have you finished this pattern?Tag your pictures with #dropspattern #elinordashwoodsweater or submit them to the #dropsfan gallery. Do you need help with this pattern?You'll find 24 tutorial videos, a Comments/Questions area and more by visiting the pattern on garnstudio.com. © 1982-2026 DROPS Design A/S. We reserve all rights. This document, including all its sub-sections, has copyrights. Read more about what you can do with our patterns at the bottom of each pattern on our site. |
||||||||||


With over 40 years in knitting and crochet design, DROPS Design offers one of the most extensive collections of free patterns on the internet - translated to 17 languages. As of today we count 324 catalogs and 12290 patterns - 12280 of which are translated into English (US/in).
We work hard to bring you the best knitting and crochet have to offer, inspiration and advice as well as great quality yarns at incredible prices! Would you like to use our patterns for other than personal use? You can read what you are allowed to do in the Copyright text at the bottom of all our patterns. Happy crafting!
Post a comment to pattern DROPS 157-5
We would love to hear what you have to say about this pattern!
If you want to leave a question, please make sure you select the correct category in the form below, to speed up the answering process. Required fields are marked *.