
Popular categories
Looking for a yarn?


Comments / Questions (63)
![]() Grit Meinig wrote:
Grit Meinig wrote:
Hallo, wenn ich beim Ärmel nach 34 cm mit A3 beginne, wird der Ärmel insgesamt ca. 9 cm länger als im Schnitt angegeben. Wo ist mein Denkfehler? Liebe Grüße Grit
11.12.2025 - 15:06
![]() Solveig-Therese wrote:
Solveig-Therese wrote:
Hei Det står at det skal strikkes 31 til 36 cm fra under ermet til A3 skal strikkes. Blir ikke genseren mye kortere enn på bildet? På målskjemaet står det at bolen er 70 til 80 cm + vrangbord
29.09.2025 - 09:04DROPS Design answered:
Hei Solveig-Therese, Målene du ser på (70 til 80 cm) er fra skulderen og helt ned. Bolen måler 47 til 52 cm fra ermehullene og ned. Hilsen Drops team.
30.09.2025 - 06:56
![]() Martina Ovisi wrote:
Martina Ovisi wrote:
Das Modell wird angezeigt, wenn man nach "mehrfarbig" sucht. es ist aber einfarbig.
29.11.2022 - 16:10DROPS Design answered:
Liebe Frau Ovisi, danke für den Hinweis! Viel Spaß beim stricken!
30.11.2022 - 08:58
![]() Carmen-Gabriela wrote:
Carmen-Gabriela wrote:
Zunächst vielen Dank für die schnelle Antwort. Falls die Taillierung NUR an den Seiten erfolgt, stimmt es mit 4 M Abnahme in der Runde. Aber ich dachte es sollen Taillenabnahmen unter der Brust und unter den Schulterblättern sein (das sieht man auf dem Foto nicht so gut). Also: Werden Zu- sowie Abnahmen immer an den Seiten gemacht und Mitte VT/RT bleibt glatt? Bis bald + schönes Wochenende:)
15.10.2021 - 17:37DROPS Design answered:
Liebe Carmen-Gabriela, die Abnahmen werden nicht auf den Seiten gestrickt sonder bei dem Vorder- bzw Rückenteil, dh ab bei den neuen Markierungen, die nach 4 cm eingesetzt werden. Die Zunahmen werden später auch bei diesen Markierungen + bei den Seiten (= 5. + 6. Markierungen) gestrickt. Viel Spaß beim stricken!
18.10.2021 - 08:20
![]() Carmen-Gabriela wrote:
Carmen-Gabriela wrote:
Hallo;) Frage zu den Abnahmen Rumpfteil "S": Ich habe es so verstanden, dass 8 M in der Runde abgenommen werden? (Dann wären es 4x8 =32 und 142-32 wären 110 M) Aber 142 M Passe minus 126 M Ergebnis nach Abnahmen = 16 abgenommene Maschen; d.h. 4 x nach je 1 cm 4 M / aber vor und nach 4 Markierern wären es 8 M (also 2 x 8 M?? =16 M abnehmen). Wie nehme ich 4 x 4 Maschen ab? Vielen Dank für Eure Info:)
14.10.2021 - 18:02DROPS Design answered:
Liebe Carmen-Gabriela, es wird beim Rumpfteil nur je 4 Maschen abgenmomen: 1 M vor der 1. und 3. Markierung + 1 M nach der 2. und 4. Markierung x 4 = 16 M ; es waren 142 M - 16= 126 M; kann es helfen?
15.10.2021 - 07:41
![]() Mira wrote:
Mira wrote:
Hej! En jättefin tröja! Jag tänkte sticka den i stl S och 60cm. Hur många nystan går det åt då? Passar mönstret bäst till slätt garn som Alaska eller skulle Alpaca 2tr också fungera?
24.10.2019 - 10:30DROPS Design answered:
Hej Mira, Ja den bliver också fin i 2 trådar DROPS Alpaca. Testa gärna vår konverterare! Du kanske behöver 1 nystan mindre om du stickar den 10 cm kortare :)
24.10.2019 - 15:12
![]() Pascale wrote:
Pascale wrote:
Jeg er nå kommet til ermene (størrelse M). I oppskriften står det at etter 34 cm, så skal jeg øke til 42 masker og strikke A3, og etter det 8 cm vrangbord. Men på tegningen står det 34 cm på ermet og 8 cm vrangbord: altså ermet før A3+A3 er da 34 cm. Hos meg måler A3 7 cm. Må jeg da starte med A3 etter 27 cm i ermet, eller etter 34?
20.10.2018 - 11:41
![]() Claudia wrote:
Claudia wrote:
Hallo, Ab wo zählt man Maschen für die Markierer im Rumpfteil. Ab den neuen Maschen oder ab den Markierer am Rücken?
12.09.2017 - 18:28DROPS Design answered:
Liebe Claudia, der Markierer ist an der hintere Mitte wie zuvor. Viel Spaß beim stricken!
13.09.2017 - 08:30
![]() Tetyana Zhabchenko wrote:
Tetyana Zhabchenko wrote:
Salve.Non riesco capire come fare primi 4 giri al'inizio.Spiegate.
19.01.2017 - 01:37DROPS Design answered:
Buongiorno Tetyana. Deve avviare le maglie, unirle in tondo e lavorare un giro diritto, uno rovescio, uno diritto e uno rovescio. Buon lavoro!
19.01.2017 - 06:44
![]() Iris wrote:
Iris wrote:
Merci beaucoup pour votre aide si efficace et précise :)
13.10.2016 - 00:15
|
||||||||||
Elinor Dashwood#elinordashwoodsweater |
||||||||||
|
|
||||||||||
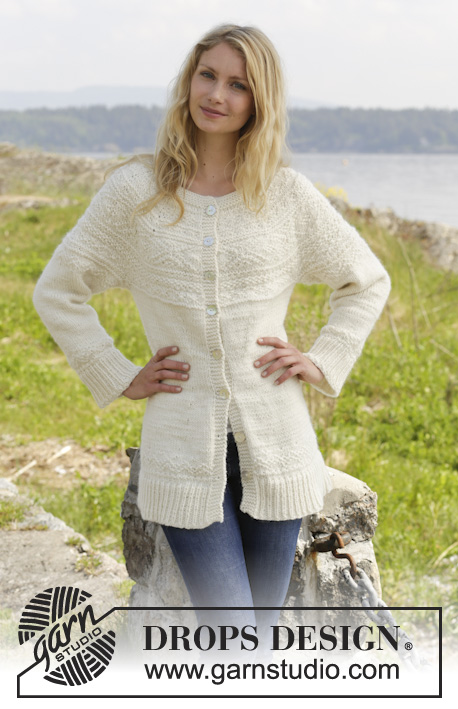
Knitted DROPS jumper with round yoke and textured pattern, worked top down in "Alaska", worked top down. Size: S - XXXL.
DROPS 157-5 |
||||||||||
|
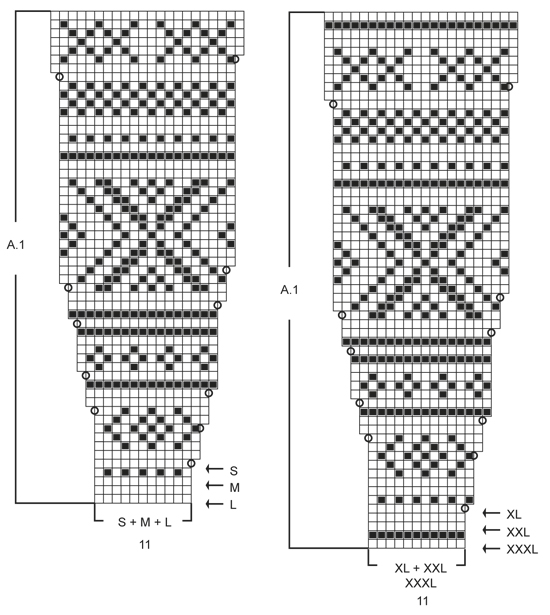
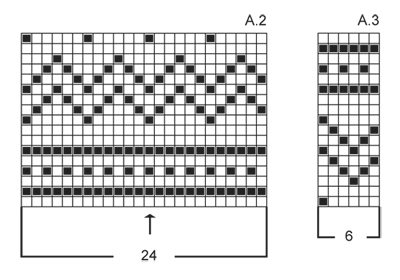
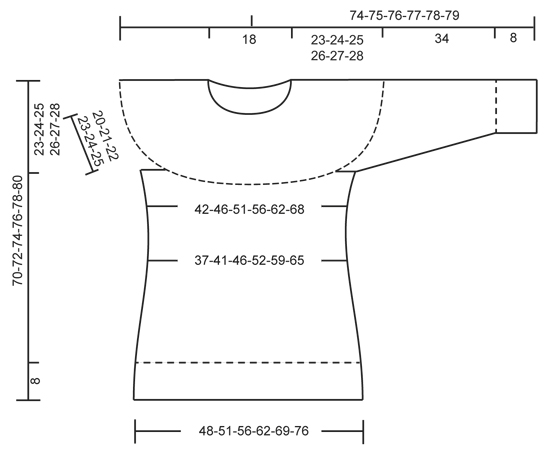
GARTER ST (in the round on circular needle): * K 1 round and P 1 round *, repeat from *-*. 1 ridge = 2 rounds. PATTERN: See diagrams A.1 to A.3. The diagrams show all rows in pattern seen from RS. INCREASE TIP 1 (applies to yoke): Inc 1 st by making 1 YO, on next round work YO twisted (i.e. work in the back loop of st instead front) to avoid holes. INCREASE TIP 2: Work until 1 st remains before marker, 1 YO, K 2 (marker is between these), 1 YO. On next round work YO twisted (i.e. work in the back loop of YO instead of front) to avoid holes. DECREASE TIP (applies to waist + sleeve): Dec as follows after marker: Slip 1 st as if to K, K 1, psso. Dec as follows 2 sts before marker: K 2 tog. ---------------------------------------------------------- JUMPER: Worked in the round, top down. YOKE: Cast on 69-76-80-84-87-91 sts on circular needle size 4 mm / US 6 with Alaska. Work 4 ridges in GARTER ST - see explanation above. Insert a marker at beg of round = mid back. Now switch to circular needle size 5 mm / US 8. Work in stockinette st AT THE SAME TIME inc 41-45-52-59-67-85 sts evenly – READ INCREASE TIP 1! There are now 110-121-132-143-154-176 sts on round. Then work an elevation back and forth in the neck from mid back as follows: K 9-10-11-12-13-14, turn piece and P 18-20-22-24-26-28. Turn piece, K 27-29-31-33-35-37, turn piece and P 36-38-40-42-44-46. Turn piece and K 45-47-49-51-53-55, turn piece and P 54-56-58-60-62-64. Turn piece and K over all sts until marker. On next round, work and inc according to pattern A.1 – choose diagram for correct size. REMEMBER THE GAUGE! When entire diagram A.1 has been worked 1 time vertically, there are 220-242-264-286-308-352 sts on needle. On next round work 1st row in A.2, AT THE SAME TIME inc 8-8-8-10-16-0 sts evenly = 228-250-272-296-324-352 sts. Work next round as follows: 2nd row in A.2 over the first 31-35-39-43-48-53 sts, slip the next 51-55-57-61-65-69 sts on a stitch holder for sleeve, cast on 8 new sts (= under sleeve), continue with A.2 over the next 64-70-80-88-98-108 sts (= front piece), slip the next 51-55-57-61-65-69 sts on a stitch holder for sleeve, cast on 8 new sts under sleeve, A.2 over the next 31-35-39-43-48-53 sts. There are now 142-156-174-190-210-230 sts for body. BODY: Continue in stockinette st. When piece measures 4 cm / 1½" from new sts under sleeve, insert 4 markers in piece as follows: 17-20-23-25-28-31 sts in stockinette st, insert a marker, 36-38-40-44-48-52 sts in stockinette st, insert a marker, 36-40-48-52-58-64 sts in stockinette st, insert a marker, 36-38-40-44-48-52 sts in stockinette st, insert a marker, 17-20-23-25-28-31 sts in stockinette st. Now beg dec - READ DECREASE TIP. Dec 1 st before 1st and 3rd marker and 1 st after 2nd and 4th marker (NOTE! 1st marker is 1st marker on row from RS!). Repeat dec every 1-1-1½-2-3½-3½ cm / ⅜"-⅜"-½"-¾"-1¼"-1¼" 4-4-4-3-2-2 times in total = 126-140-158-178-202-222 sts. Now insert a marker in the middle of the 36-38-40-42-48-52 sts in each side (i.e. between 1st and 2nd marker and between 3rd and 4th marker) = 5th and 6th marker. When piece measures 14-15-16-17-18-19 cm / 5½"-6"-6¼"-6¾"-7"-7½" from the new sts under sleeve, beg inc – remember INCREASE TIP 1! Inc before 1st and 3rd marker and after 2nd and 4th marker. Repeat inc every 3 cm / 1" 4 more times, AT THE SAME TIME on 2nd, 3rd and 4th inc, inc 1 st on each side of 5th and 6th marker (= sides) – READ INCREASE TIP 2! When all inc are done there are 158-172-190-210-234-254 sts on needle. When piece measures 31-32-33-34-35-36 cm / 12¼"-12½"-13"-13⅜"-13¾"-14¼" from new sts under sleeve, inc 4-2-2-0-0-4 sts evenly = 162-174-192-210-234-258 sts. Then work A.3 over all sts. When A.3 has been worked vertically, inc 42-45-51-66-78-90 sts evenly = 204-219-243-276-312-348 sts. Work 1 round in stockinette st. Then switch to circular needle size 4 mm / US 6 and work rib as follows: * K 1, P 2 *, repeat from *-*. Continue like this until rib measures 8 cm / 3⅛". Bind off with K over K and P over P. SLEEVE: Worked in the round on double pointed needles. Slip the 51-55-57-61-65-69 sts from stitch holder back on double pointed needles size 5 mm / US 8. Work 2nd row in A.2, cast on 8 new sts under sleeve at the end of row = 59-63-65-69-73-77 sts. Insert a marker in the middle of the 8 new sts (i.e. 4 sts on each side of marker). Then work in the round. Continue with pattern according to diagram A.2 – NOTE: Adjust pattern according to the middle, arrow in diagram marks middle st on top of sleeve, AT THE SAME TIME when piece measures 4 cm / 1½" from marker, beg dec – READ DECREASE TIP! Repeat dec every 2-1½-1½-1½-1½-1 cm / ¾"-½"-½"-½"-½"-⅜" 8-10-11-10-12-14 more times = 41-41-41-47-47-47 sts remain. When piece measures 34 cm / 13½" in all sizes, inc 1 st = 42-42-42-48-48-48 sts. Then work pattern according to diagram A.3. When A.3 has been worked 1 time vertically, inc 3 sts evenly = 45-45-45-51-51-51 sts. Now switch to double pointed needles size 4 mm / US 6 and work rib (K 1/P 2). Bind off with K over K and P over P when rib measures 8 cm / 3⅛". ASSEMBLY: Sew the holes under the sleeves. |
||||||||||
Diagram explanations |
||||||||||
|
||||||||||
 |
||||||||||
 |
||||||||||
 |
||||||||||
Have you finished this pattern?Tag your pictures with #dropspattern #elinordashwoodsweater or submit them to the #dropsfan gallery. Do you need help with this pattern?You'll find 24 tutorial videos, a Comments/Questions area and more by visiting the pattern on garnstudio.com. © 1982-2026 DROPS Design A/S. We reserve all rights. This document, including all its sub-sections, has copyrights. Read more about what you can do with our patterns at the bottom of each pattern on our site. |
||||||||||


With over 40 years in knitting and crochet design, DROPS Design offers one of the most extensive collections of free patterns on the internet - translated to 17 languages. As of today we count 324 catalogs and 12290 patterns - 12280 of which are translated into English (US/in).
We work hard to bring you the best knitting and crochet have to offer, inspiration and advice as well as great quality yarns at incredible prices! Would you like to use our patterns for other than personal use? You can read what you are allowed to do in the Copyright text at the bottom of all our patterns. Happy crafting!
Post a comment to pattern DROPS 157-5
We would love to hear what you have to say about this pattern!
If you want to leave a question, please make sure you select the correct category in the form below, to speed up the answering process. Required fields are marked *.