
Popular categories
Looking for a yarn?


Comments / Questions (298)
Jayne wrote:
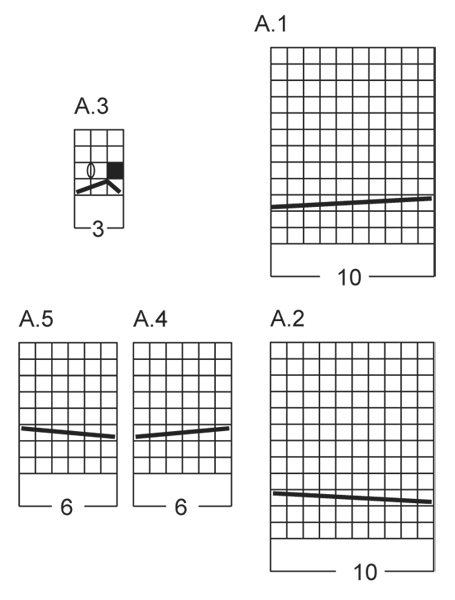
In the A3 you say to knit 3 pass the first stitch over which only leaves two stitches, in the pattern it says to slip stitch, knit two psso which still only leaves two stitches where do you get the 3 stitches from.
19.09.2016 - 01:17DROPS Design answered:
Dear Jayne, when working 1st row in A.3, slip 1 st, K next 2 sts and pass the slipped st over the 2 sts worked = 2 sts remain. On row 2, make 1 YO between these 2 sts = 3 sts again. Happy knitting!
19.09.2016 - 10:12Trine wrote:
Jeg slås virkelig med at læse denne opskrift, på trods af jeg vil mene jeg er habil strikker... Strikker str. L.. men er gået død i hvornår jeg skal lave indtagninger.. der er tre slags indtagninger, men jeg kan ikke greje på hvilke cm (målt nedefra) jeg skal gennemføre hvilke indtagninger. Håber I kan hjælpe - evt med maske-rest-antal pr indtagning??
13.09.2016 - 13:26DROPS Design answered:
Hej Trine. INDTAGNING 1: indtagning i hvert parti med 16 m vr paa pinden. Du tager ind som beskrevet fra 10 cm og gentager paa hver hver 4. cm i alt 8 gange. INDTAGNING 2: Indtagning 1 m ind efter 1.mærke og 1 m før 2.mærke paa pinden. Start fra 10 cm og gentages på hver 4,5 cm i alt 7 gange. INDTAGNING 3: Ved 16 cm tages der ind i mønster-2: Tag 1 m ind før A.3 og 1 m efter A.3 (= 16 m taget ind i alt per gang). Gentag 1 gang til efter 20 cm (dvs 16+20 = ved 36 cm).
13.09.2016 - 14:19
![]() Anita wrote:
Anita wrote:
Can some please explain pattern A.3 in English? Where does the YO happen?
06.08.2016 - 14:13DROPS Design answered:
Dear Anita, A.3 is worked over 3 sts, on 1st row, K3 then pass the 1st st over the 2 other so that this st is around the 2 worked sts (= 2 sts remain) - on row 2, P1, YO, P1 (= 3 sts). On row 3 and 4 worked these 3 sts in stocking st. Repeat these 4 rows. Happy knitting!
08.08.2016 - 10:24
![]() Anita wrote:
Anita wrote:
The problem with trying to use Google Translate is all the comments open in a separate window and translate is not an option. I tried to cut & paste, but that would take hours and hours. I'm disappointed because I just started making this sweater and I would like to see what others are saying about it. The directions are confusing me.
03.08.2016 - 18:11DROPS Design answered:
Dear Anita, you can always ask your question here, or for any further personnal assistance, contact your DROPS store even per mail or telephone so that they can assist you. Happy knitting!
04.08.2016 - 10:33
![]() Anita wrote:
Anita wrote:
How do I get all the comments to be in English?
02.08.2016 - 21:21DROPS Design answered:
Dear Anita, you can use any online translator to get an idea of the question and the answer into English. Happy knitting!
03.08.2016 - 09:31
![]() Sonia wrote:
Sonia wrote:
Bonjour, sur combien de rangs se font les torsades ? je n'arrive pas à trouver cette information merci
02.05.2016 - 20:11DROPS Design answered:
Bonjour Sonia, tout dépend de la torsade - les diagrammes se répètent en hauteur, ainsi dans A.1, on a 2 rangs avant la 1ère torsade, 1 rang avec la torsade et 9 rangs après la torsade, soit 11 entre chaque torsade. Bon tricot!
03.05.2016 - 08:51
![]() Kirsi Koivunen wrote:
Kirsi Koivunen wrote:
Tarvitsisin apua jatkoon. Teen neuletta koossa XL. Olen kohdassa, jossa työn pituus on 44 cm. Rivillä pitäisi tehdä 4 langankiertoa ja olen jumissa lähellä ensimmäistä merkkilankakohtaa, jossa minulla on edessä puikolla A.4:n jälkeen A.3, 1 n, A.3, 7 n (pitäisi olla 6 n) ja A.5. Minun pitäisi nyt saada ohjeen mukaan siihen päälle neulottua 6 n, A.3 mallikerta 1 kertaa, 6 n... Kaikki palmikot menevät sekaisin, jos yritän noudattaa tuota. Oletukseni on, että palmikot jatkuvat eheinä.
13.03.2016 - 11:00DROPS Design answered:
Olethan tehnyt kaikki tarvittavat kavennukset? Lisäksi on tärkeää, että neuletiheys on oikea, koska kavennukset tehdään cm:ien välein. Tarkista, että s-lukusi on kaikkien kavennusten jälkeen 293.
23.03.2016 - 16:22DALI wrote:
MUCHAS GRACIAS, ES LA PRIMERA VEZ QUE OBSERVE SUS MARAVILLOSOS TRABAJOS, IMPECABLES, ME GUSTA MUCHO TEJER, ESTOY FELIZ DE HABER ENCONTRADO SU PAGINA, DESEO HACER CADA MODELO QUE VEO. MUCHOS SALUDOS, Y NUEVAMENTE GRACIAS
06.03.2016 - 20:20
![]() Yousra Mawazini wrote:
Yousra Mawazini wrote:
Bonjour, je veux réaliser ce modèle en taille S. J'ai commencé selon les explications avec 306m, j'ai augmenté à 350 à la dernière de bordure. Quand j'ai commencé le 1er rang après bordure, j'ai réalisé que le compte des mailles n'est pas bon. Alors j'ai utilisé ma calculatrice et mon application Excel, les deux fois, j'arrive, selon les explications à 318m seulement. j'ai remarqué à plusieurs reprises `0-0-0-1-1-1 fois A.3`que j'ai interprété à ne rien faire pour la taille S.
06.03.2016 - 01:18DROPS Design answered:
Bonjour Mme Mawazini, en taille S, tricotez les 350 m ainsi: 8m au point mousse, A.2 (10m), POINT FANTAISIE 2 (17m: 7 m env, A.3 (3m), 7 m env), A.4 (6m), 14 m env, A.5 (6m), point fant. 2, A.4 (6m), marqueur1, 8 m env, A.5 (6m), point fant. 2 (17 m), A.4 (6m), 14 m env, A.5 (6m), point fant. 2 (17 m), A.1 (10 m), 14 m env, A.2 (10m), point fant. 2 (17 m), A.4 (6m), 14 m env, A.5 (6m), point fant. 2 (17m), A.4 (6m), 8 m env, marqueur 2, A.5 (6m), point fant. 2 (17 m), A.4 (6m), 14 m env, A.5 (6m), point fant. 2 (17m), A.1 (10m), 8 m point mousse. Bon tricot!
07.03.2016 - 09:58
![]() Yousra Mawazini wrote:
Yousra Mawazini wrote:
Je retire ma question concernant le liens des vidéos, je viens de le trouver. Désolée de vous avoir dérangé. Merci!
04.03.2016 - 01:06
|
|||||||||||||||||||||||||
Morning Glory#morningglorycardigan |
|||||||||||||||||||||||||
 |
 |
||||||||||||||||||||||||
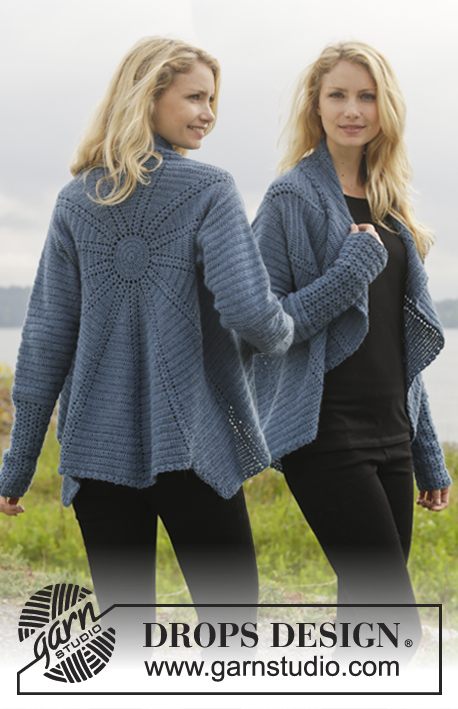
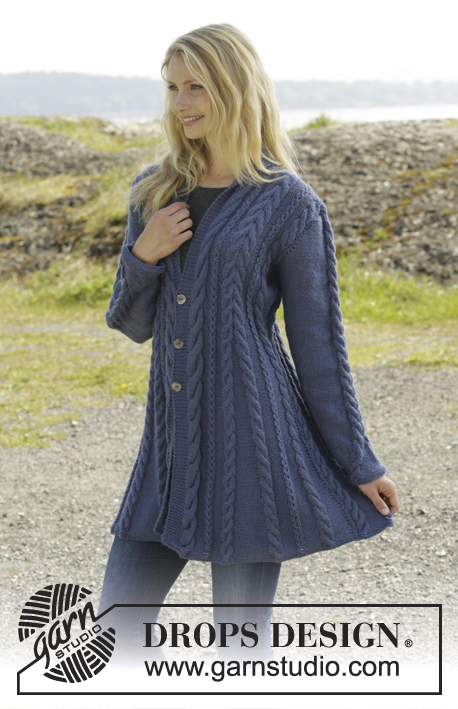
Knitted DROPS jacket with cables and shawl collar in ”Karisma”. Size: S - XXXL.
DROPS 158-1 |
|||||||||||||||||||||||||
|
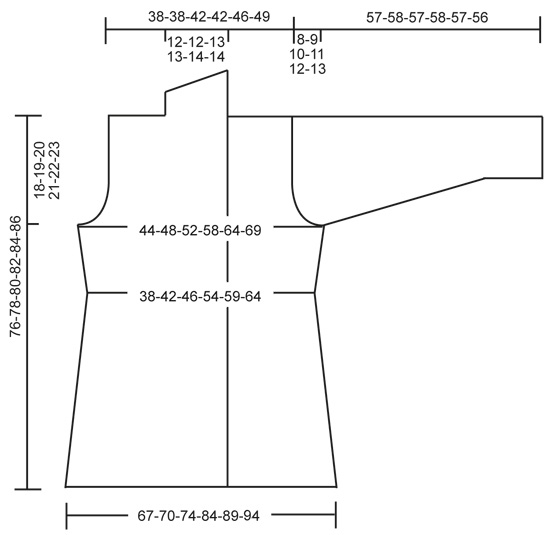
GARTER ST (back and forth on needle): K all rows. 1 ridge = K2 rows. GARTER ST (in the round on double pointed needles): * K 1 round and P 1 round *, repeat from *-*. 1 ridge = 2 rounds. DECREASE TIP: Dec 1 st before marker/A.3 as follows: Work until 2 sts remain before marker, P 2 tog. Dec 1 st after marker/A.3 as follows: P 2 tog. PATTERN 1: See diagrams A.1-A.5. The diagrams show all rows in pattern seen from RS. PATTERN 2: P 7-7-8-8-9-10, A.3, P 7-7-8-8-9-10. PATTERN 3: P 4-5-6-6-7-8, A.3, P 4-5-6-6-7-8. BUTTONHOLES: Dec for buttonholes on right band. 1 buttonhole = K tog second and third st from edge and make 1 YO. Dec for buttonholes when piece measures: SIZE S: 31, 39 and 47 cm / 12¼",15¼",18½" SIZE M: 31, 39 and 47 cm / 12¼",15¼",18½" SIZE L: 31, 39 and 47 cm / 12¼",15¼",18½" SIZE XL: 32, 40 and 48 cm / 12½",15¾",19" SIZE XXL: 32, 40 and 48 cm / 12½",15¾",19" SIZE XXL: 32, 40 and 48 cm / 12½",15¾",19" ---------------------------------------------------------- BODY: Worked back and forth on circular needle. Cast on 306-318-334-378-398-418 sts (includes 8 band sts in each side of piece) on circular needle size 3.5 mm / US 4 with Karisma. Work 2 ridges in GARTER ST - see explanation above AT THE SAME TIME on last row inc 44 sts evenly = 350-362-378-422-442-462 sts. Switch to circular needle size 4 mm / US 6. Then work from RS AT THE SAME TIME insert 2 markers and 0-0-0-4-4-4 strands in the piece as follows: Work 8 band sts in garter st, A.2, PATTERN 2 – see explanation above, A.4, P 14-16-16-16-16-16, A.5, pattern 2, A.4, P 0-0-0-8-9-10, insert 1 strand in size XL-XXL-XXXL, A.3 0-0-0-1-1-1 time, insert 1st marker, P 8-9-9-9-9-9, A.3 0-0-0-1-1-1 time, insert 1 strand in size XL-XXL-XXXL, P 0-0-0-8-9-10, A.5, pattern 2, A.4, P 14-16-16-16-16-16, A.5, pattern 2, A.1, P 14-16-16-16-16-16, A.2, pattern 2, A.4, P 14-16-16-16-16-16, A.5, pattern 2, A.4, P 0-0-0-8-9-10, insert 1 strand in size XL-XXL-XXXL, A.3 0-0-0-1-1-1 time, P 8-9-9-9-9-9, insert 2nd marker, A.3 0-0-0-1-1-1 time, insert 1 strand in size XL-XXL-XXXL, P 0-0-0-8-9-10, A.5, pattern 2, A.4, P 14-16-16-16-16-16, A.5, pattern 2, A.1, 8 band sts in garter st. Move the markers and strands upwards when working. Work band sts in garter st until finished measurements. Work K over K sts between cables from WS, i.e. P sts seen from RS. Continue pattern like this. Remember BUTTONHOLES - see explanation above. REMEMBER THE GAUGE! When piece measures 8-10-10-10-10-10 cm / 4", dec as follows: Dec in every section with 14-16-16-16-16-16 P sts by working as follows: P 2 tog, P 10-12-12-12-12-12, P 2 tog (= 10 sts dec in total). Repeat this dec every 5-4-4-4-4-4 cm / 2"-1½"-1½"-1½"-1½"-1½" 6-7-7-7-7-7 more times. NOTE: On last dec work the remaining 2 P tog. AT THE SAME TIME when piece measures 8-10-10-10-10-10 cm / 3"-4"-4"-4"-4"-4", dec as follows: Dec 1 st after 1st marker and 1 st before 2nd marker - see DECREASE TIP. Repeat this dec every 6-4½-4½-4½-4½-4½ cm / 2⅜"-1¾"-1¾"-1¾"-1¾"-1¾" 5-6-6-6-6-6 more times. AT THE SAME TIME when piece measures 16 cm / 6¼", dec as follows in pattern 2: Dec 1 st before A.3 and 1 st after A.3 (= 16 sts dec). Repeat this dec every 10-20-20-20-20-20 cm / 4"-8"-8"-8"-8" 2-1-1-1-1-1 more times. AT THE SAME TIME in size XL-XXL-XXXL dec as follows at every strand: Dec 1 st by working the 2 P sts closes to A.3 P tog (= 4 sts dec). Repeat this dec every 20 cm / 8" 1 more time. When all dec are done, there are 225-241-257-293-313-333 sts on needle. There are now 2 P st at markers in the sides and 1 P st between A.4 and A.5 and between A.1 and A.2 and 4-5-6-6-7-8 P sts on each side of A.3. When piece measures 44 cm / 17¼", adjust so that next row is from RS, inc as follows: 8 band sts in garter st, A.2, PATTERN 3 – see explanation above, A.4, P 1, A.5, pattern 3, A.4, P 0-0-0-6-7-8, A.3 0-0-0-1-1-1 time, 1 YO, P 2, 1 YO, A.3 0-0-0-1-1-1 time, P 0-0-0-6-7-8, A.5, pattern 3, A.4, P 1, A.5, pattern 3, A.1, P 1, A.2, pattern 3, A.4, P 1, A.5, pattern 3, A.4, P 0-0-0-6-7-8, A.3 0-0-0-1-1-1 time, 1 YO, P 2, 1 YO, A.3 0-0-0-1-1-1 time, P 0-0-0-6-7-8, A.5, pattern 3, A.4, P 1, A.5, pattern 3, A.1, 8 band sts in garter st (= 4 sts inc). K YOs twisted on next row to avoid holes. Repeat inc every 6th-6th-6th-12th-10th-12th row 5-5-5-3-4-4 more times = 249-265-281-309-333-353 sts. Work inc sts P from RS and K from WS. When piece measures 58-59-60-61-62-63 cm / 22¾"-23¼"-23⅝"-24"-24⅜"-24¾", divide the piece, finish front and back pieces separately as follows: Slip the first and last 66-70-74-81-87-92 sts on a stitch holder for front pieces, cut the yarn, then work only over the middle 117-125-133-147-159-169 sts (= back piece). BACK PIECE: Now bind off for armholes at beg of every row in each side as follows: bind off 3 sts 1 time, then 2 sts 1-1-1-3-4-4 times and 1 st 1-1-1-4-4-5 times = 105-113-121-121-129-137 sts. Then dec on next row from RS as follows: Dec 1 st before A.3 and 1 st after A.3 0-1-1-1-1-1 time = 105-105-113-113-121-129 sts. When piece measures 73-75-77-79-81-83 cm / 28¾"-29½"-30⅜"-31"-32"-32¾", dec 5 sts over A.1 and 5 sts over A.2 by working 2 and 2 sts K tog = 95-95-103-103-111-119 sts on needle. Then bind off the middle 25-25-27-27-29-31 sts for neck and finish each shoulder separately = 35-35-38-38-41-44 sts remain on each shoulder. When piece measures 75-77-79-81-83-85 cm / 29½"-30⅜"-31"-32"-32¾"-33½", dec 3 sts over every A.4 and A.5 (= 9 sts dec) = 26-26-29-29-32-35 sts remain on needle. Bind off. RIGHT FRONT PIECE: = 66-70-74-81-87-92 sts. Now bind off for armhole at beg of every row from the side as follows: bind off 3 sts 1 time, then 2 sts 1-1-1-3-4-4 times and 1 st 1-1-1-4-4-5 times = 60-64-68-68-72-76 sts. Then dec on next row from RS as follows: Dec 1 st before A.3 and 1 st after A.3 0-1-1-1-1-1 time = 60-60-64-64-68-72 sts on needle. When piece measures 75-77-79-81-83-85 cm / 29½"-30⅜"-31"-32"-32¾"-33½", dec 5 sts over A.2 by working 2 and 2 sts K tog and 3 sts over every A.4 and A.5 = 46-46-50-50-54-58 sts. Then bind off the first 26-26-29-29-32-35 sts for shoulder, work the rest of row = 20-20-21-21-22-23 sts. Then work shawl collar in garter st over the remaining sts, beg mid front (1st row = RS) as follows: * Work 2 rows back and forth over the first 12-12-13-13-14-15 sts, work 2 rows back and forth over all sts *, repeat from *-* until shawl collar measures 8-8-9-9-10-10 cm / 3⅛"-3⅛"-3½"-3½"-4"-4" at the shortest. Bind off. LEFT FRONT PIECE: Work as right front piece but reversed. Dec 5 sts over A.1 instead of A.2. Shawl collar beg from WS. SLEEVE: Worked in the round on double pointed needles. Cast on 48-50-52-54-54-56 sts on double pointed needles size 3.5 mm / US 4 with Karisma. Work 2 ridges in GARTER ST - see explanation above AT THE SAME TIME on last round inc 5 sts = 53-55-57-59-59-61 sts. Switch to double pointed needles size 4 mm / US 6. READ ALL OF THE FOLLOWING SECTION BEFORE CONTINUING! Work as follows: P 4-5-6-7-7-8, A.4, P 33, A.5, finish with P 4-5-6-7-7-8. Insert 1 marker at the beg of the round. On next round move A.4 and A.5 1 st towards the middle as follows: P 4-5-6-7-7-8, 1 YO, A.4, P 2 tog, P 29, P 2 tog, A.5, 1 YO, finish with P 4-5-6-7-7-8. P YO twisted on next round. Move A.4 and A.5 towards the middle 1 st every other round until 1 st remains between A.4 and A.5. Piece measures approx. 12 cm / 4¾". Continue to work P and A.4/A.5 with 1 P st between until finished measurements. AT THE SAME TIME when piece measures 10 cm / 4", inc 1 st on each side of marker. Repeat inc every 4-3½-2½-2½-2-1½ cm / 1½"-1¼"-⅞"-7/"-¾"-½" 9-10-12-13-16-17 more times = 73-77-83-87-93-97 sts. When piece measures 49-49-47-47-46-43 cm / 19¼"-19¼"-18½"-18½"-18"-17" (shorter measurements in the larger sizes because of longer sleeve cap and wider shoulders) bind off for sleeve cap at beg of every row in each side: bind off 4 sts 1 time, 2 sts 3 times and 1 st 6 times, then bind off 2 sts in each side until piece measures 56-57-56-57-56-55 cm/22"-22½"-22"-22½"-22"-21½", then bind off 3 sts 1 time in each side AT THE SAME TIME dec 2 sts over every cable. Bind off the remaining sts, piece measures approx. 57-58-57-58-57-56 cm / 22½"-22¾"-22½"-22¾"-22½"-22". Make another sleeve. ASSEMBLY: Sew the shoulder seams. Sew in sleeves. Sew the collar tog mid back and sew it to the neckline. Sew the buttons on to left band. SHAPING: Moisten piece and place it on a carpet or mattress - carefully stretch it out to measurements. Leave to dry. |
|||||||||||||||||||||||||
Diagram explanations |
|||||||||||||||||||||||||
|
|||||||||||||||||||||||||
 |
|||||||||||||||||||||||||
 |
|||||||||||||||||||||||||
Have you finished this pattern?Tag your pictures with #dropspattern #morningglorycardigan or submit them to the #dropsfan gallery. Do you need help with this pattern?You'll find 30 tutorial videos, a Comments/Questions area and more by visiting the pattern on garnstudio.com. © 1982-2026 DROPS Design A/S. We reserve all rights. This document, including all its sub-sections, has copyrights. Read more about what you can do with our patterns at the bottom of each pattern on our site. |
|||||||||||||||||||||||||


With over 40 years in knitting and crochet design, DROPS Design offers one of the most extensive collections of free patterns on the internet - translated to 17 languages. As of today we count 324 catalogs and 12245 patterns - 12235 of which are translated into English (US/in).
We work hard to bring you the best knitting and crochet have to offer, inspiration and advice as well as great quality yarns at incredible prices! Would you like to use our patterns for other than personal use? You can read what you are allowed to do in the Copyright text at the bottom of all our patterns. Happy crafting!
Post a comment to pattern DROPS 158-1
We would love to hear what you have to say about this pattern!
If you want to leave a question, please make sure you select the correct category in the form below, to speed up the answering process. Required fields are marked *.