
Popular categories
Looking for a yarn?


Comments / Questions (298)
Eliana wrote:
I'm making the XL size and am very happy with the it so far. However, I think I need I some advice about the diameter of the sleeves. I think that the final stitch count is 87 stitches which would be about 30cm at this tension. This is quite a bit smaller than my upper arm and smaller than the garment's arm hole. Have I miscalculated? Please advise!
29.01.2017 - 23:51DROPS Design answered:
Dear Eliana, make sure your tension still match even working in the round, you may have worked a bit tighter on dpn. You will find all measurements in cm for each size in measurement chart to help you if required. Happy knitting!
30.01.2017 - 12:06Anne-Christine Seigneur wrote:
Merci de votre réponse et oui, j'ai bien fait les diminutions de 2 mailles de chaque côté jusqu'à ce que la manche mesure 58 cm, mais comme vous dites de commencer ces diminutions à 49 cm, ça n'en fait pas beaucoup.....
13.12.2016 - 16:24
![]() Anne-Christine Seigneur wrote:
Anne-Christine Seigneur wrote:
Je viens de finir une manche, et le haut (l'arrondi) est beaucoup plus petit que l'emmanchure de la veste elle-même..... Il manque un bon 10 cm. Savez-vous pourquoi?
13.12.2016 - 15:39DROPS Design answered:
Bonjour Mme Seigneur, avez-vous bien rabattu 2 m de chaque côté jusqu'à ce que la manche mesure 57-58-57-58-57-56 cm - l'arrondi doit mesurer au total 8-8-10-12-11-13 cm et faire le tour de l'emmanchure. Bon tricot!
13.12.2016 - 16:02
![]() BEDEL SOPHIE wrote:
BEDEL SOPHIE wrote:
Bonjour, je suis arrivée aux augmentation, je fais la taille M. je ne comprends pas, il s'avère qu'il y aurait 25 mailles de plus, mais en relisant les explications, je ne voie pas ou les faire puisque concernant cette taille il est marqué 0. Or, arrivé à 59 cm on a bien 25 mailles de plus. Si, je ne tiens pas compte du 0, le dessein se retrouve complètement décalé. pourriez-vous m'éclairer car je suis bloquée. merci
20.10.2016 - 12:06DROPS Design answered:
Bonjour Mme Bedel, avant les augm, vous avez 241 m, vous tricotez ainsi: 8 m point mousse, A.2, point fantaisie 3 (= 13 m), A.4, 1 m env, A.5, point fantaisie 3, A.4, 1 jeté, 2 m env, 1 jeté, A.5, point fantaisie 3, A.4, 1 m env, A.5, point fantaisie 3, A.1, 1 m env, A.2, point fantaisie 3, A.4, 1 m env, A.5, point fantaisie 3, A.4, 1 jeté, 2 m env, 1 jeté, A.5, point fantaisie 3, A.4, 1 m env, A.5, point fantaisie 3, A.1, 8 m de bordure devant au point mousse, soit: 8+10+13+6+1+6+13+6 +1(augm)+2+1(augm) + 6+13+6+1+6+13+10+ 1+10+13+6+1+6+13+6 + 1(augm)+2+(1augm) + 6+13+6+1+6+13+10+8: 245 m. On augmente encore 5 fois ainsi soit 5 x 4 m en plus = 20 augm + 245 m = 265 m. Bon tricot!
20.10.2016 - 12:57Jayne wrote:
I am struggling with the sleeves. Does the yo P2 happen on every other round or just after the cable rows. Is it possible to explain the sleeves a bit better please.
04.10.2016 - 22:31DROPS Design answered:
Dear Jayne, if you mean the YO, P2 tog to moove A.4 and A.5, they have to be worked every other round until 1 st remain between both diagrams. Happy knitting!
05.10.2016 - 08:42Jayne wrote:
What stitch is the shawl collar done in.
03.10.2016 - 01:38DROPS Design answered:
Dear Jayne, collar sts are worked in garter st while working short rows. Happy knitting!
03.10.2016 - 10:42
![]() Anita wrote:
Anita wrote:
I'm up to the sleeves (finally). I did the first round : P6, A4, P33, A5, P6. I have the marker in place. Then the pattern says: "On the next round move A4 and A5 1 stitch towards the middle as follows (then it give those directions). Won't this make it extremely tight having just done a cable the row before? OR does this next cable happen when it's time to twist the cable again? Please help.
30.09.2016 - 04:57DROPS Design answered:
Dear Anita, the cable is done on row 3 in A.4 and A.5 and the first displacement is worked on row 2 (after garter st) on sleeve, so that 1st displacement will be worked on next row after yos and P2 tog. Follow diagram and displace cables every other round until P1 remains between both cables - it should work fine. Happy knitting!
30.09.2016 - 08:57Jayne wrote:
OK so I have 1 P between A1- A2 and 1 P between A4 - A5 and 5 P either side of A3. My question is I have two P stitches left at the markers between A4 - A5 is this correct on size M. As when you increase it says to yo P2 yo but if you only have 1 P stitch between A4 -A5 how can you yo P2 yo. Is this a mistake in the pattern. Should it read 2p stitches left after and before markers.
26.09.2016 - 17:45DROPS Design answered:
Dear Jayne, you are correct, there should be P2 at the markers on the side - pattern will be edited and correction added. Happy knitting!
27.09.2016 - 11:38Jayne wrote:
I should have said decreases in last question
26.09.2016 - 01:26
![]() Jayne wrote:
Jayne wrote:
I have a problem. I am doing size m. I have done all the increases correctly but I have ended up with an extra stitch by the markers and have 241stitches on needle. All the other stitches work out correctly.
26.09.2016 - 01:04DROPS Design answered:
Dear Jayne, check out all decreases and if you have now 1 P st between A.4 and A.5 and between A.1 and A.2 and 5 P sts on each side of A.3. It may be tricky to find out where you were wrong, you can ask for any further assistance from your DROPS store. Happy knitting!
26.09.2016 - 11:19
|
|||||||||||||||||||||||||
Morning Glory#morningglorycardigan |
|||||||||||||||||||||||||
 |
 |
||||||||||||||||||||||||
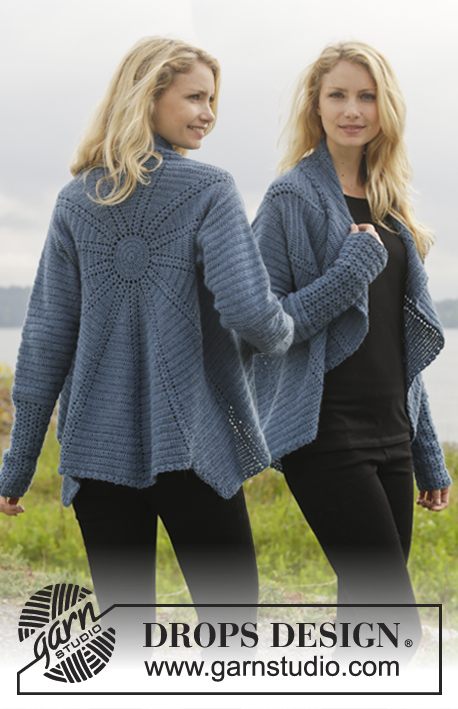
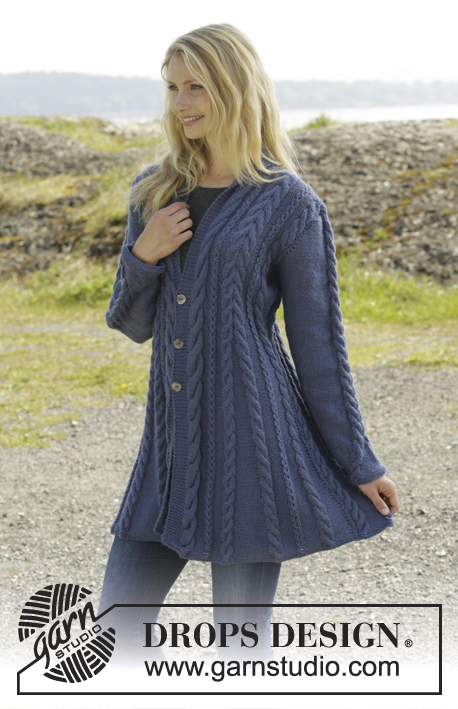
Knitted DROPS jacket with cables and shawl collar in ”Karisma”. Size: S - XXXL.
DROPS 158-1 |
|||||||||||||||||||||||||
|
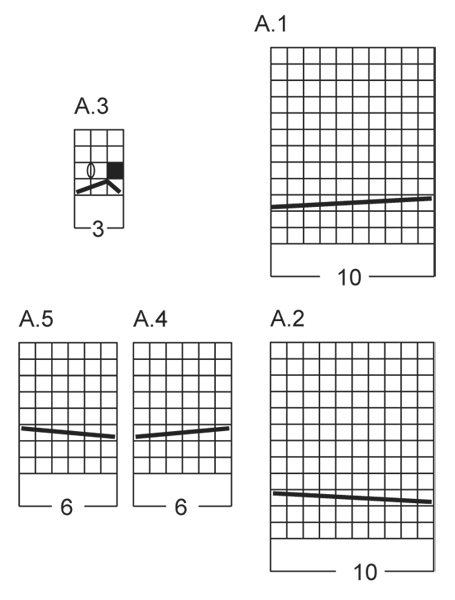
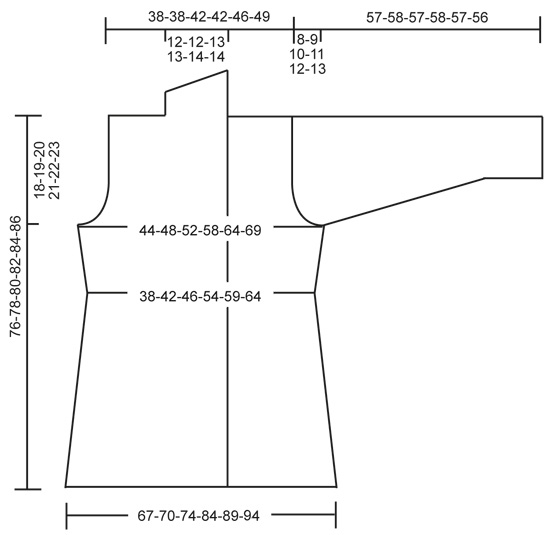
GARTER ST (back and forth on needle): K all rows. 1 ridge = K2 rows. GARTER ST (in the round on double pointed needles): * K 1 round and P 1 round *, repeat from *-*. 1 ridge = 2 rounds. DECREASE TIP: Dec 1 st before marker/A.3 as follows: Work until 2 sts remain before marker, P 2 tog. Dec 1 st after marker/A.3 as follows: P 2 tog. PATTERN 1: See diagrams A.1-A.5. The diagrams show all rows in pattern seen from RS. PATTERN 2: P 7-7-8-8-9-10, A.3, P 7-7-8-8-9-10. PATTERN 3: P 4-5-6-6-7-8, A.3, P 4-5-6-6-7-8. BUTTONHOLES: Dec for buttonholes on right band. 1 buttonhole = K tog second and third st from edge and make 1 YO. Dec for buttonholes when piece measures: SIZE S: 31, 39 and 47 cm / 12¼",15¼",18½" SIZE M: 31, 39 and 47 cm / 12¼",15¼",18½" SIZE L: 31, 39 and 47 cm / 12¼",15¼",18½" SIZE XL: 32, 40 and 48 cm / 12½",15¾",19" SIZE XXL: 32, 40 and 48 cm / 12½",15¾",19" SIZE XXL: 32, 40 and 48 cm / 12½",15¾",19" ---------------------------------------------------------- BODY: Worked back and forth on circular needle. Cast on 306-318-334-378-398-418 sts (includes 8 band sts in each side of piece) on circular needle size 3.5 mm / US 4 with Karisma. Work 2 ridges in GARTER ST - see explanation above AT THE SAME TIME on last row inc 44 sts evenly = 350-362-378-422-442-462 sts. Switch to circular needle size 4 mm / US 6. Then work from RS AT THE SAME TIME insert 2 markers and 0-0-0-4-4-4 strands in the piece as follows: Work 8 band sts in garter st, A.2, PATTERN 2 – see explanation above, A.4, P 14-16-16-16-16-16, A.5, pattern 2, A.4, P 0-0-0-8-9-10, insert 1 strand in size XL-XXL-XXXL, A.3 0-0-0-1-1-1 time, insert 1st marker, P 8-9-9-9-9-9, A.3 0-0-0-1-1-1 time, insert 1 strand in size XL-XXL-XXXL, P 0-0-0-8-9-10, A.5, pattern 2, A.4, P 14-16-16-16-16-16, A.5, pattern 2, A.1, P 14-16-16-16-16-16, A.2, pattern 2, A.4, P 14-16-16-16-16-16, A.5, pattern 2, A.4, P 0-0-0-8-9-10, insert 1 strand in size XL-XXL-XXXL, A.3 0-0-0-1-1-1 time, P 8-9-9-9-9-9, insert 2nd marker, A.3 0-0-0-1-1-1 time, insert 1 strand in size XL-XXL-XXXL, P 0-0-0-8-9-10, A.5, pattern 2, A.4, P 14-16-16-16-16-16, A.5, pattern 2, A.1, 8 band sts in garter st. Move the markers and strands upwards when working. Work band sts in garter st until finished measurements. Work K over K sts between cables from WS, i.e. P sts seen from RS. Continue pattern like this. Remember BUTTONHOLES - see explanation above. REMEMBER THE GAUGE! When piece measures 8-10-10-10-10-10 cm / 4", dec as follows: Dec in every section with 14-16-16-16-16-16 P sts by working as follows: P 2 tog, P 10-12-12-12-12-12, P 2 tog (= 10 sts dec in total). Repeat this dec every 5-4-4-4-4-4 cm / 2"-1½"-1½"-1½"-1½"-1½" 6-7-7-7-7-7 more times. NOTE: On last dec work the remaining 2 P tog. AT THE SAME TIME when piece measures 8-10-10-10-10-10 cm / 3"-4"-4"-4"-4"-4", dec as follows: Dec 1 st after 1st marker and 1 st before 2nd marker - see DECREASE TIP. Repeat this dec every 6-4½-4½-4½-4½-4½ cm / 2⅜"-1¾"-1¾"-1¾"-1¾"-1¾" 5-6-6-6-6-6 more times. AT THE SAME TIME when piece measures 16 cm / 6¼", dec as follows in pattern 2: Dec 1 st before A.3 and 1 st after A.3 (= 16 sts dec). Repeat this dec every 10-20-20-20-20-20 cm / 4"-8"-8"-8"-8" 2-1-1-1-1-1 more times. AT THE SAME TIME in size XL-XXL-XXXL dec as follows at every strand: Dec 1 st by working the 2 P sts closes to A.3 P tog (= 4 sts dec). Repeat this dec every 20 cm / 8" 1 more time. When all dec are done, there are 225-241-257-293-313-333 sts on needle. There are now 2 P st at markers in the sides and 1 P st between A.4 and A.5 and between A.1 and A.2 and 4-5-6-6-7-8 P sts on each side of A.3. When piece measures 44 cm / 17¼", adjust so that next row is from RS, inc as follows: 8 band sts in garter st, A.2, PATTERN 3 – see explanation above, A.4, P 1, A.5, pattern 3, A.4, P 0-0-0-6-7-8, A.3 0-0-0-1-1-1 time, 1 YO, P 2, 1 YO, A.3 0-0-0-1-1-1 time, P 0-0-0-6-7-8, A.5, pattern 3, A.4, P 1, A.5, pattern 3, A.1, P 1, A.2, pattern 3, A.4, P 1, A.5, pattern 3, A.4, P 0-0-0-6-7-8, A.3 0-0-0-1-1-1 time, 1 YO, P 2, 1 YO, A.3 0-0-0-1-1-1 time, P 0-0-0-6-7-8, A.5, pattern 3, A.4, P 1, A.5, pattern 3, A.1, 8 band sts in garter st (= 4 sts inc). K YOs twisted on next row to avoid holes. Repeat inc every 6th-6th-6th-12th-10th-12th row 5-5-5-3-4-4 more times = 249-265-281-309-333-353 sts. Work inc sts P from RS and K from WS. When piece measures 58-59-60-61-62-63 cm / 22¾"-23¼"-23⅝"-24"-24⅜"-24¾", divide the piece, finish front and back pieces separately as follows: Slip the first and last 66-70-74-81-87-92 sts on a stitch holder for front pieces, cut the yarn, then work only over the middle 117-125-133-147-159-169 sts (= back piece). BACK PIECE: Now bind off for armholes at beg of every row in each side as follows: bind off 3 sts 1 time, then 2 sts 1-1-1-3-4-4 times and 1 st 1-1-1-4-4-5 times = 105-113-121-121-129-137 sts. Then dec on next row from RS as follows: Dec 1 st before A.3 and 1 st after A.3 0-1-1-1-1-1 time = 105-105-113-113-121-129 sts. When piece measures 73-75-77-79-81-83 cm / 28¾"-29½"-30⅜"-31"-32"-32¾", dec 5 sts over A.1 and 5 sts over A.2 by working 2 and 2 sts K tog = 95-95-103-103-111-119 sts on needle. Then bind off the middle 25-25-27-27-29-31 sts for neck and finish each shoulder separately = 35-35-38-38-41-44 sts remain on each shoulder. When piece measures 75-77-79-81-83-85 cm / 29½"-30⅜"-31"-32"-32¾"-33½", dec 3 sts over every A.4 and A.5 (= 9 sts dec) = 26-26-29-29-32-35 sts remain on needle. Bind off. RIGHT FRONT PIECE: = 66-70-74-81-87-92 sts. Now bind off for armhole at beg of every row from the side as follows: bind off 3 sts 1 time, then 2 sts 1-1-1-3-4-4 times and 1 st 1-1-1-4-4-5 times = 60-64-68-68-72-76 sts. Then dec on next row from RS as follows: Dec 1 st before A.3 and 1 st after A.3 0-1-1-1-1-1 time = 60-60-64-64-68-72 sts on needle. When piece measures 75-77-79-81-83-85 cm / 29½"-30⅜"-31"-32"-32¾"-33½", dec 5 sts over A.2 by working 2 and 2 sts K tog and 3 sts over every A.4 and A.5 = 46-46-50-50-54-58 sts. Then bind off the first 26-26-29-29-32-35 sts for shoulder, work the rest of row = 20-20-21-21-22-23 sts. Then work shawl collar in garter st over the remaining sts, beg mid front (1st row = RS) as follows: * Work 2 rows back and forth over the first 12-12-13-13-14-15 sts, work 2 rows back and forth over all sts *, repeat from *-* until shawl collar measures 8-8-9-9-10-10 cm / 3⅛"-3⅛"-3½"-3½"-4"-4" at the shortest. Bind off. LEFT FRONT PIECE: Work as right front piece but reversed. Dec 5 sts over A.1 instead of A.2. Shawl collar beg from WS. SLEEVE: Worked in the round on double pointed needles. Cast on 48-50-52-54-54-56 sts on double pointed needles size 3.5 mm / US 4 with Karisma. Work 2 ridges in GARTER ST - see explanation above AT THE SAME TIME on last round inc 5 sts = 53-55-57-59-59-61 sts. Switch to double pointed needles size 4 mm / US 6. READ ALL OF THE FOLLOWING SECTION BEFORE CONTINUING! Work as follows: P 4-5-6-7-7-8, A.4, P 33, A.5, finish with P 4-5-6-7-7-8. Insert 1 marker at the beg of the round. On next round move A.4 and A.5 1 st towards the middle as follows: P 4-5-6-7-7-8, 1 YO, A.4, P 2 tog, P 29, P 2 tog, A.5, 1 YO, finish with P 4-5-6-7-7-8. P YO twisted on next round. Move A.4 and A.5 towards the middle 1 st every other round until 1 st remains between A.4 and A.5. Piece measures approx. 12 cm / 4¾". Continue to work P and A.4/A.5 with 1 P st between until finished measurements. AT THE SAME TIME when piece measures 10 cm / 4", inc 1 st on each side of marker. Repeat inc every 4-3½-2½-2½-2-1½ cm / 1½"-1¼"-⅞"-7/"-¾"-½" 9-10-12-13-16-17 more times = 73-77-83-87-93-97 sts. When piece measures 49-49-47-47-46-43 cm / 19¼"-19¼"-18½"-18½"-18"-17" (shorter measurements in the larger sizes because of longer sleeve cap and wider shoulders) bind off for sleeve cap at beg of every row in each side: bind off 4 sts 1 time, 2 sts 3 times and 1 st 6 times, then bind off 2 sts in each side until piece measures 56-57-56-57-56-55 cm/22"-22½"-22"-22½"-22"-21½", then bind off 3 sts 1 time in each side AT THE SAME TIME dec 2 sts over every cable. Bind off the remaining sts, piece measures approx. 57-58-57-58-57-56 cm / 22½"-22¾"-22½"-22¾"-22½"-22". Make another sleeve. ASSEMBLY: Sew the shoulder seams. Sew in sleeves. Sew the collar tog mid back and sew it to the neckline. Sew the buttons on to left band. SHAPING: Moisten piece and place it on a carpet or mattress - carefully stretch it out to measurements. Leave to dry. |
|||||||||||||||||||||||||
Diagram explanations |
|||||||||||||||||||||||||
|
|||||||||||||||||||||||||
 |
|||||||||||||||||||||||||
 |
|||||||||||||||||||||||||
Have you finished this pattern?Tag your pictures with #dropspattern #morningglorycardigan or submit them to the #dropsfan gallery. Do you need help with this pattern?You'll find 30 tutorial videos, a Comments/Questions area and more by visiting the pattern on garnstudio.com. © 1982-2026 DROPS Design A/S. We reserve all rights. This document, including all its sub-sections, has copyrights. Read more about what you can do with our patterns at the bottom of each pattern on our site. |
|||||||||||||||||||||||||


With over 40 years in knitting and crochet design, DROPS Design offers one of the most extensive collections of free patterns on the internet - translated to 17 languages. As of today we count 324 catalogs and 12245 patterns - 12235 of which are translated into English (US/in).
We work hard to bring you the best knitting and crochet have to offer, inspiration and advice as well as great quality yarns at incredible prices! Would you like to use our patterns for other than personal use? You can read what you are allowed to do in the Copyright text at the bottom of all our patterns. Happy crafting!
Post a comment to pattern DROPS 158-1
We would love to hear what you have to say about this pattern!
If you want to leave a question, please make sure you select the correct category in the form below, to speed up the answering process. Required fields are marked *.