
Popular categories
Looking for a yarn?


Comments / Questions (168)
![]() Katarzyna wrote:
Katarzyna wrote:
Tak juz wiem ,po przeczytaniu powtornym zorientowalam sie o co chodzi😁,czasami trzeba wiecej pomyslec,przepraszam za klopot
03.05.2020 - 21:18DROPS Design answered:
Bardzo się cieszę. A propos, czy już zagłosowałaś na nową kolekcję DROPS Jesień/Zima, zapraszamy serdecznie!
05.06.2020 - 17:22
![]() Kaska wrote:
Kaska wrote:
W opisie nie jest podane ile cm trzeba zrobic sciagacza francuskiego,jest podane jak zrobic ale ile go zrobic?
02.05.2020 - 17:48DROPS Design answered:
Witaj Kasiu! Trzeba wykonać 1 ściągacz francuski, czyli 2 rzędy (każdy na prawo). Pozdrawiamy!
03.05.2020 - 19:50
![]() Maria Leister wrote:
Maria Leister wrote:
Hei. Var ikke fornøyd med passformen. I str 38-40 skal tøffelen være 22 cm hel lengde selv om foten er 24. Hælsømmen havner da under hælen og tøffelen sitter stramt. Mye bedre å strikke den 24 cm som foten, da ble den veldig fin!
12.04.2020 - 20:45
![]() Ingmarie Nyberg wrote:
Ingmarie Nyberg wrote:
Hej! Är mitt i stickandet och har kommit till att arbetet är 22 cm och ska börja med slätstickning över A.a. Men jag förstår inte vad som menas med att sticka till färdigt mått. Hur långt är det? Hittar inga siffror på det. Med vänlig hälsning Ingmarie
23.02.2020 - 08:25DROPS Design answered:
Hei Ingmarie. Ferdig mål = 25 cm, det står i avsnittet rett over MONTERING. God Fornøyelse!
24.02.2020 - 11:35
![]() Ket wrote:
Ket wrote:
Hoi! Ik heb nog wol liggen waar ik misschien dit project mee kan maken. De aangeraden naalddikte daarvan is echter 3,5-4. Mijn maat is 39. Zou ik dit patroon een maat groter kunnen maken zodat dit misschien alsnog uitkomt?
18.02.2020 - 18:19DROPS Design answered:
Dag Ket,
Het beste is om even een proeflapje te maken om te kijken hoe de stekenverhouding van je garen is. Op basis daarvan zou je kunnen berekenen welke maat je kunt nemen.
20.02.2020 - 19:52
![]() Eliza Hermens wrote:
Eliza Hermens wrote:
Hoe weet je of je in A2 als bij de kabels staat 1 av/r welke steek je moet breien. Averecht of Recht? Zag deze vraag ook langs komen in de Engelse taal maar snap dan nog het antwoord niet. (heeft te maken met volgende naald of zo)?
16.02.2020 - 18:33DROPS Design answered:
Dag Eliza,
Je kijkt inderdaad naar de volgende steek. Er staat een rondje in het hokje of er staat niks in het hokje. Het rondje of een leeg hokje zijn uitgelegd bij de lijst met symbolen.
23.02.2020 - 17:09
![]() Ace wrote:
Ace wrote:
Hoi hoi! Ik zit te overwegen om binnenkort dit patroon te gaan breien. Ik vroeg me echter af, is het ook mogelijk om dit patroon met rondbreinaalden te maken in plaats van breinaalden zonder knop? Alvast bedankt!
04.02.2020 - 15:59DROPS Design answered:
Dag Ace,
Ja hoor, dat kan. Je zet dan gewoon alle steken op de rondbreinaald, in plaats van dat je ze verdeeld over naalden zonder knop.
04.02.2020 - 23:09
![]() Judith wrote:
Judith wrote:
I’m a bit confused regarding the instructions: “Now work in stocking stitch over sets I’m A.a, or start a bit earlier. (Am not certain what is meant by ‘start a bit earlier’ ie why/where?). Also, it continues.....”Continue A.1 and A.3 until “finished measurements”.........I can’t find which measurements are referred to. It says work A.a until piece measures 17-19-22 cm, so are the finished measurements in addition to this?
04.02.2020 - 12:51DROPS Design answered:
Dear Judith, you have to work A.a until piece measures 17-19-22 cm, and then work in stocking stitch over the stitches of A.a, but should you end A.a before the right measurement (= 17-19-22 cm), then work the stitches in stocking stitch (rather than start an new repeat in height that couldn't be finished). You continue working the cables on each side (= A.1 and A.3) to the end of the slipper, ie until all stitches will be decreased (= total length of slipper). Happy knitting!
04.02.2020 - 15:47
![]() Alisa Mai wrote:
Alisa Mai wrote:
Ich habe eine Frage bezüglich des Bündchens. Wieso soll ich nur 54 Maschen aufnehmen und dann 10 zunehmen, wenn ich in meinem Schaft doch insgesamt 68 habe. Dann macht es doch mehr Sinn, gleich daraus 64 aufzunehmen. Und wenn nicht, welche Maschen lasse ich dann aus? Das ist meine erste Strickanleitung und das verwirrt mich noch alles sehr. Danke schon im Voraus!
16.12.2019 - 22:29DROPS Design answered:
Liebe Frau Mai, wenn mann Maschen seitlich auffast, nimmt man ca 3 M auf 4 R, so daß Sie (bei der Maschenprobe) 54 M auffassen können, dann zur 64 M zunehmen. Viel Spaß beim stricken!
17.12.2019 - 09:41
![]() S Leishman wrote:
S Leishman wrote:
I have never made anything in the round before. I've made the socks and understand the directions up to this point: 'work the first 4 sts, round beg here = 41-41-43 sts. Now work piece in the round on double pointed needles... ' I have watched tutorial on how to cast onto the round but this isn't saying this. How do I get the stitches from the straight needles to the round needles and how many per needle?
17.11.2019 - 14:10DROPS Design answered:
Dear S, you simply divide the stitches between 4 double pointed needles, more or less evenly (that means that for the smaller sizes 3 needles will have 10 stitches eaach and the fourth will have 11), and use the 5th needle to knit in the round. I hope that helps. Happy Knitting!
17.11.2019 - 17:10
|
|||||||||||||||||||
Celtic Dancer#celticdancerslippers |
|||||||||||||||||||
 |
 |
||||||||||||||||||
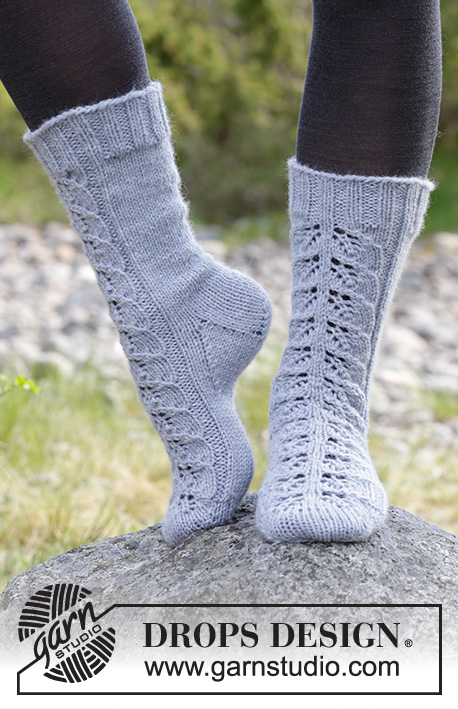
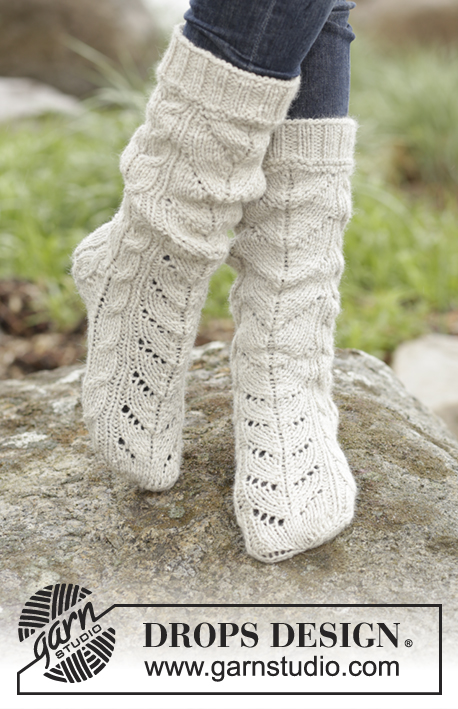
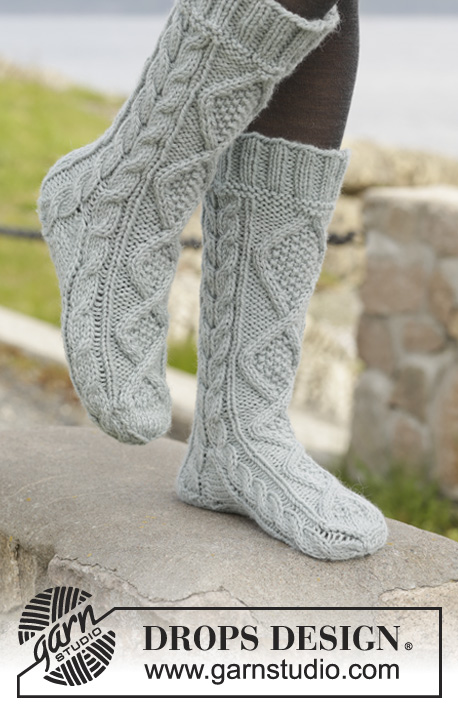
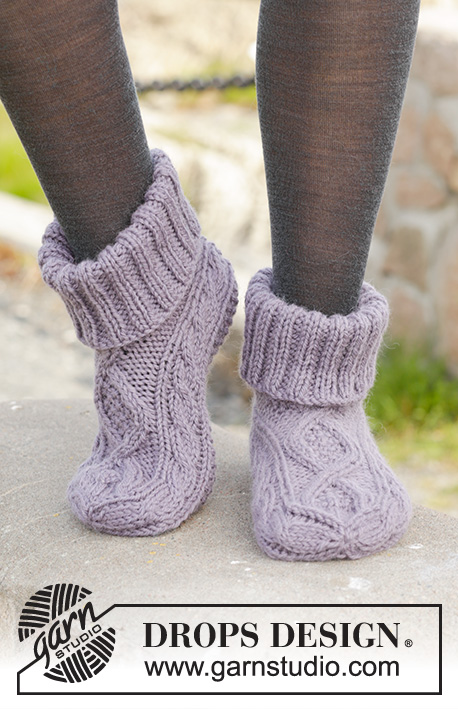
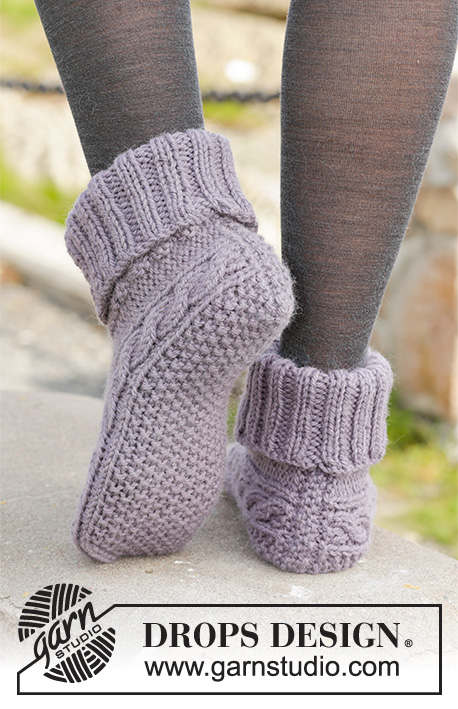
Knitted DROPS slippers with cables in "Nepal".
DROPS 156-55 |
|||||||||||||||||||
|
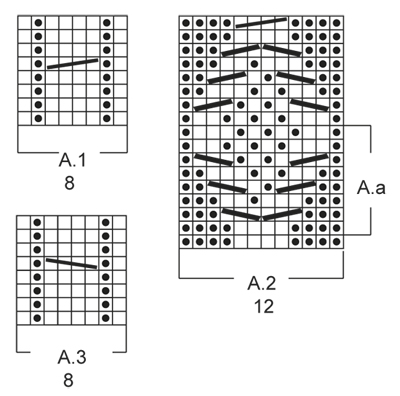
PATTERN: See diagrams A.1-A.3. The diagrams show the pattern seen from RS. DECREASE TIP: Dec 1 st before marker as follows: K 2 tog. Dec 1 st after marker as follows: K 2 twisted tog. GARTER ST (back and forth on needle): K all rows. 1 ridge = K2 rows. SEED ST: Row/round 1: * K 1, P 1 *, repeat from *-*. Row/round 2: K over P and P over K. Repeat 2nd row/round. MEASURING TIP: Measure in the middle of cable in A.1/A.3. ---------------------------------------------------------- SLIPPER: Worked back and forth from mid back. Cast on 33-33-35 sts on needle size 5 mm / US 8 with Nepal (let the yarn end be approx. 20 cm / 8"; used for assembly). Work 1 ridge in GARTER ST - see explanation above AT THE SAME TIME on last row inc 4 sts evenly = 37-37-39 sts. Then work as follows from RS: P 4, A.3 (= 8 sts), 13-13-15 sts SEED ST – see explanation above, A.1 (= 8 sts), finish with P 4. Continue the pattern like this, work P sts K from WS. Repeat A.1 and A.3 until finished measurements. REMEMBER THE GAUGE! When piece measures 10½-11½-13 cm / 4¼''-4½"-5" – see MEASURING TIP above, work as follows from RS: P 4, A.3, 13-13-15 sts seed st, A.1, P 4, cast on 4 new sts, work the first 4 sts, round beg here = 41-41-43 sts. Now work piece in the round on double pointed needles. Work pattern as before but now work A.2 (= 12 sts) over the 4 P sts in each side of piece and the 4 new sts. When A.2 has been worked 1 time vertically, work A.a until piece measures 17-19-22 cm / 6¾''-7½"-8¾". Now work in stockinette st over sts in A.a, or start stockinette st a bit earlier. Continue A.1 and A.3 until finished measurements. Now insert 4 markers in the piece as follows: Work A.3 but insert 1st marker between 1st and 2nd st and 2nd marker between 7th and 8th st in A.3, work seed st as before, work A.1 but insert 3rd marker between 1st and 2nd st and 4th marker between 7th and 8th st in A.1, K the remaining sts (= 14 sts on top of foot, 15-15-17 sts under foot and 6 sts in each side of piece). Now dec for toe on next round as follows: Dec 1 st after 2nd marker and 1 st before 3rd marker under foot 0-0-1 time in total – READ DECREASE TIP above, work the remaining sts = 14 sts on top of foot and 15 sts under foot (= 41 sts in total). On next round, dec as follows: Dec 1 st before 1st and 3rd marker and 1 st after 2nd and 4th marker (= 4 dec in total). Repeat dec every round 6 times in total AT THE SAME TIME on last dec work cable sts in A.1 and A.3 as follows: K 2 twisted tog, K 2 tog. After all dec there are 13 sts on needle. Piece measures approx. 20-22-25 cm / 8''-8¾"-9¾". Cut the yarn and pull it through the remaining sts, tighten tog and fasten. ASSEMBLY: Fold cast-on edge double (= mid back), use yarn end from beg to sew neatly tog mid back. EDGE: Work edge in the round on double pointed needles around the opening on slipper. Pick up 50-50-54 sts on double pointed needles size 4 mm / US 6 with Nepal. P 1 round. Then K 1 round while AT THE SAME TIME inc 10 sts evenly = 60-60-64 sts. Work rib = K 2/P 2 until piece measures approx. 12-13-14 cm / 4¾''-5"-5½". Bind off sts with K over K and P over P. Fold the edge double. Knit another slipper. |
|||||||||||||||||||
Diagram explanations |
|||||||||||||||||||
|
|||||||||||||||||||
 |
|||||||||||||||||||
Have you finished this pattern?Tag your pictures with #dropspattern #celticdancerslippers or submit them to the #dropsfan gallery. Do you need help with this pattern?You'll find 21 tutorial videos, a Comments/Questions area and more by visiting the pattern on garnstudio.com. © 1982-2026 DROPS Design A/S. We reserve all rights. This document, including all its sub-sections, has copyrights. Read more about what you can do with our patterns at the bottom of each pattern on our site. |
|||||||||||||||||||


With over 40 years in knitting and crochet design, DROPS Design offers one of the most extensive collections of free patterns on the internet - translated to 17 languages. As of today we count 324 catalogs and 12284 patterns - 12274 of which are translated into English (US/in).
We work hard to bring you the best knitting and crochet have to offer, inspiration and advice as well as great quality yarns at incredible prices! Would you like to use our patterns for other than personal use? You can read what you are allowed to do in the Copyright text at the bottom of all our patterns. Happy crafting!
Post a comment to pattern DROPS 156-55
We would love to hear what you have to say about this pattern!
If you want to leave a question, please make sure you select the correct category in the form below, to speed up the answering process. Required fields are marked *.