
Popular categories
Looking for a yarn?


Comments / Questions (38)
![]() Thelma wrote:
Thelma wrote:
One more question, so before the increase I have 72sc. Then after the increase row, should I have total 86dc or 94dc in the end of that row? Because you say I should do 1dc in every sc to the second marker, that is 8sc right? meaning i should do 8dc right? Then in the next 64sc do 86dc evenly throughout those 64sc to the end. Then it will be 94dc in the end(counting the 8dc between the markers with) , right? I dont know why, but how this is put up is so confusing haha
15.09.2019 - 18:27DROPS Design answered:
Dear Thelma, at the end of the first row, there will be 94 sts but you won't work anymore the first 8 stitches at the beg of the row (= between both markers) = you are now working over 86 sts only (from 2nd marker from RS to 1st marker from RS, then turn and work next row from WS from the first marker to the 2nd marker and so on). Happy crocheting!
16.09.2019 - 11:21
![]() Thelma wrote:
Thelma wrote:
One more question, so before the increase I have 72sc. Then after the increase row, should I have total 86dc or 94dc in the end of that row? Because you say I should do 1dc in every sc to the second marker, that is 8sc right? meaning i should do 8dc right? Then in the next 64sc do 86dc evenly throughout those 64sc to the end. Then it will be 94dc in the end(counting the 8dc between the markers with) , right? I dont know why, but how this is put up is so confusing haha
15.09.2019 - 17:35
![]() Thelma wrote:
Thelma wrote:
Hi again, also I dont understand when you say: (do not work over the 6-6-6-8 (8-8) sc between the 2 markers). Should i skip those 8sc between the marker and make my next dc in the sc after that or what does that mean? That would make a strange hole in the bonnet right? And also I find it confusing on how many rows i should be continuing on doing after the first part I dont understand what row you are talking about at what time. Is the ALL SIZES just one row of dc? And then the texture row
15.09.2019 - 16:59DROPS Design answered:
Dear Thelma, as said previously, you will crochet the first 8 sts on the row (= between markers) only on first row, then only crochet over the remaining 64 sts inc 22 sts = 86 sts. From RS you will crochet this row with dc, then turn and work textured rows = 1 row with sc from WS, 1 row with dc from RS, and repeat these 2 rows. Happy crocheting!
16.09.2019 - 11:19
![]() Thelma wrote:
Thelma wrote:
Hello, I find this pattern very confusing when you come to the ALL SIZES section. I dont understand where to increase? For the biggest size I now have 72 sc. Then you say for my size I should increase 22dc evenly. Then you say it should be 86dc at the end of that round? That doesnt add up. Do you mean I should increase evenly over the 64sc(72sc -8 sc between the markers) or do i increase evenly over the 8sc. Wouldnt that make a strange bump? Can you clarify this part for me
15.09.2019 - 16:45DROPS Design answered:
Dear Thelma, on this row, you first crochet the first 8 stitches (inserting one marqueur at the beg of round + 1 marker after these 8 sts = 64 sts remain; then work the next 64 sts increasing 22 sts evenly = 86 sts, and continue working back and forth over these 86 sts, ie you won't crochet the 8 sts from the beg of the row anymore. Happy crocheting!
16.09.2019 - 11:16
![]() Lorraine wrote:
Lorraine wrote:
Hi on the bonnet front part its say to start with DC on (ws) and carry on with the textured pattern ut the pattern is on the (ws) and the last school on on the (rs)have a done this wrong
23.04.2019 - 14:21DROPS Design answered:
Dear Lorraine, pattern has been edited to start this row from RS so that you can then continue in texture pattern. Happy crocheting!
07.05.2019 - 08:33
![]() Irene wrote:
Irene wrote:
Hej! Varför blir mössan lite ”toppig” i mitten där man startar? Känns som att det är för få stolpar eller gör jag ngt fel?
17.05.2018 - 10:02DROPS Design answered:
Hej Irene, det kan have noget med hæklefastheden at gøre. Hækler du i DROPS Baby Alpaca Silk og har du 22 st på 10 cm?
17.05.2018 - 14:38
![]() KellyAnn wrote:
KellyAnn wrote:
Im getting a point in the back is that normal?
07.02.2017 - 23:58DROPS Design answered:
Dear KellyAnn, you may have a small one but remember to check and keep correct tension while working. Happy crocheting!
08.02.2017 - 09:12
![]() Susanne wrote:
Susanne wrote:
Vil det så sige at jeg skal hækle feks 61 masker
07.03.2016 - 15:35DROPS Design answered:
Ja det stemmer :)
07.03.2016 - 16:02
![]() Susanne wrote:
Susanne wrote:
Jeg hækler i str 1/3 måneder og er kommet til hulkant til bindebånd, hvor man skal justere antallet så det er delbart med 5 +1, jeg forstår den ikke, hvordan skal jeg gøre det
07.03.2016 - 12:57DROPS Design answered:
Jo du kan tage 1 m ud ifølge udtagningstipset, så 5 går op i maskeantallet og så lægger du 1 til. God fornøjelse!
07.03.2016 - 15:10
![]() Hana Mikulandová wrote:
Hana Mikulandová wrote:
Není možnost foto postup? Ze začátku mám kolečko,ale nechápu jak mám pak dělat ten rup a líc... Děkuju
02.02.2016 - 10:06DROPS Design answered:
Seznam video-ukázek k tomuto návodu najdete v záložce vedle hlavní fotky modelu. Rubovou a lícovou řadu začnete háčkovat po dokončení kolečka, takto: označte si začátek kruhové řady a druhou značku vložte za 6. oko (od začátku kruhové řady). Práci otočíte a háčkujete od začátku kruhové řady (od 1. značky) rubovou řadu "zpátky" až ke 2. značce. Tam práci opět otočíte a háčkujete k 1. značce. Prostor mezi značkami (= 6 ok) zůstane bez háčkování - bude ležet vzadu na krku. Hodně zdaru! Hana
02.03.2016 - 11:10
|
||||||||||
Camille#camillebonnet |
||||||||||
|
|
||||||||||
Crochet baby bonnet with fan pattern in DROPS BabyAlpaca Silk. Size 0 - 4 years.
DROPS Baby 25-14 |
||||||||||
|
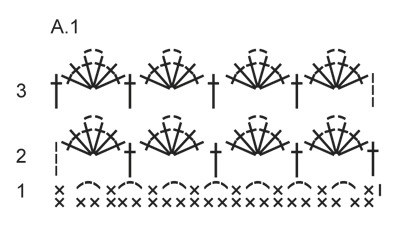
CROCHET INFO: Replace first sc at beg of every sc round/row with 1 ch. Finish round with 1 sl st in ch from beg of round. Finish row with 1 sc in 3rd ch from beg of previous row. Replace first dc at beg of every dc round/row with 3 ch. Finish round with 1 sl st in 3rd ch from beg of round. Finish row with 1 dc in ch from beg of previous row. TEXTURE ROWS: * 1 row sc from WS, 1 row dc from RS *, repeat from *-* (1 row sc + 1 row dc = 1 texture row). INCREASE TIP: Inc 1 sc/dc by working 2 sc/dc in same st. PATTERN: See diagram A.1. ---------------------------------------------------------- BONNET: Piece is first worked in the round, from mid back, then work back and forth over head. Ch 4 on hook size 3.5 mm/E with powder and form a ring with 1 sl st in first ch. ROUND 1: READ CROCHET INFO! Work 12 dc in ch-ring. ROUND 2: Work 1 sc in every dc = 12 sc. ROUND 3: Work 2 dc in every sc = 24 dc. ROUND 4: Work 1 sc in every dc = 24 sc. ROUND 5: * Work 1 dc in first sc, 2 dc in next sc *, repeat from *-* the entire round = 36 dc. ROUND 6: Work 1 sc in every dc = 36 sc. ROUND 7: * Work 1 dc in each of the first 2 sc, 2 dc in next sc *, repeat from *-* the entire round = 48 dc. ROUND 8: Work 1 sc in every dc = 48 sc. Stop here in size 0/1 + 1/3 months. ROUND 9: * Work 1 dc in each of the first 3 sc, 2 dc in next sc *, repeat from *-* the entire round = 60 dc. ROUND 10: Work 1 sc in every dc = 60 sc. Stop here in size 6/9 + 12/18 months. ROUND 11: * Work 1 dc in each of the first 4 sc, 2 dc in next sc *, repeat from *-* the entire round = 72 dc. ROUND 12: Work 1 sc in every dc = 72 sc. Stop here in size 2 + 3/4 years. ALL SIZES: Insert 1 marker at beg of round and 1 marker after 6-6-6-8 (8-8) sts (seen from RS). Beg from RS at marker at beg of round and work 1 dc in every sc until second marker AT THE SAME TIME inc 20-26-20-28 (20-22) dc evenly over these sts – READ INCREASE TIP = 62-68-74-80 (84-86) dc on row (do not work over the 6-6-6-8 (8-8) sc between the 2 markers). Then work TEXTURE ROWS back and forth – see explanation above, until piece measures approx. 8-9-10-11 (12-13) cm / 3"-3½"-4"-4½" (4¾"-5") from markers – finish after 1 row with sc from WS. Fasten off. EYELET HOLES FOR TIES: Work an edge at the bottom of hat with powder as follows: Begin from RS and work sc along one short side at the bottom of bonnet (work 1 sc in every sc-row and 2-3 sc in every dc-row), work 1 sc in each of the 6-6-6-8 (8-8) sc between the 2 markers on circle and work sc along the other short side (1 sc in every sc-row and 2-3 sc in every dc-row). Turn piece and work 1 row more with sc AT THE SAME TIME make sure number of sc’s are divisible by 5 + 1. Work next row as follows: ch 1, 1 sc in each of the first 2 sc, * skip 2 sc, ch 2, 1 sc in each of the next 3 sc *, repeat from *-* until 4 sts remain, skip 2 sc, ch 2 and work 1 sc in each of the last 2 sc. Work 2 rows back and forth with sc (1 sc in every sc and 2 sc in every ch-space). Fasten off. TIES: Cut 4 lengths off white yarn of 2.5 metres/2.75 yds each. Twine the strands tog until they resist, fold the string double so that it twines again. Make a knot at each end. Thread tie up and down through the eyelet holes on hat. FAN EDGE: Switch to off white and work 1 row sc from WS at the front of hat AT THE SAME TIME inc evenly to 64-70-76-82 (88-94) sc – READ INCREASE TIP. Then work FAN PATTERN according to diagram A.1, i.e. work as follows: ROW 1 (= RS): ch 1, 1 sc in first sc, * ch 3, skip 2 sts, 1 sc in next st *, repeat from *-* the entire row = 21-23-25-27 (29-31) ch-spaces, turn. ROW 2 (= WS): ch 3 (= 1 dc), 3 dc + 2 ch + 3 dc in first ch-space, * 1 dc in next ch-space, 3 dc + 2 ch + 3 dc in next ch-space *, repeat from *-* the entire row and finish with 1 dc in first sc from beg of previous row = 11-12-13-14 (15-16) dc-groups with 1 dc between every dc-group, turn piece. ROW 3 (= RS): ch 3 (= 1 dc), 3 dc + 2 ch + 3 dc in ch-space in first dc-group, * 1 dc in next dc, 3 dc + 2 ch + 3 dc in ch-space in the mid of next dc-group *, repeat from *-* the entire row and finish with 1 dc in 3rd ch from beg of previous row, fasten off. |
||||||||||
Diagram explanations |
||||||||||
|
||||||||||
 |
||||||||||
Have you finished this pattern?Tag your pictures with #dropspattern #camillebonnet or submit them to the #dropsfan gallery. Do you need help with this pattern?You'll find 11 tutorial videos, a Comments/Questions area and more by visiting the pattern on garnstudio.com. © 1982-2026 DROPS Design A/S. We reserve all rights. This document, including all its sub-sections, has copyrights. Read more about what you can do with our patterns at the bottom of each pattern on our site. |
||||||||||


With over 40 years in knitting and crochet design, DROPS Design offers one of the most extensive collections of free patterns on the internet - translated to 17 languages. As of today we count 324 catalogs and 12290 patterns - 12280 of which are translated into English (US/in).
We work hard to bring you the best knitting and crochet have to offer, inspiration and advice as well as great quality yarns at incredible prices! Would you like to use our patterns for other than personal use? You can read what you are allowed to do in the Copyright text at the bottom of all our patterns. Happy crafting!
Post a comment to pattern DROPS Baby 25-14
We would love to hear what you have to say about this pattern!
If you want to leave a question, please make sure you select the correct category in the form below, to speed up the answering process. Required fields are marked *.