
Popular categories
Looking for a yarn?


Comments / Questions (39)
![]() Frøydis Gustavsen wrote:
Frøydis Gustavsen wrote:
Hei Jeg holder på å strikke modell 155-27 og skal strikke bærestykke. Det er uklart hvordan fellingen skal skje, så jeg ber om en forklaring på dette. Spes gjelder det Det felles slik: 1m for hver 1, cm 10 x etc. Hvordan skal dette forstås?? Hvor skal det felles ? Har satt 8 Merketråder men de er det angitt hvordan fellingen skal vær. B er om svar snarest.
27.06.2018 - 15:12DROPS Design answered:
Hei Frøydis, Hvis du leser felletips-3 så forklarer det hvordan du skal felle til raglan ved hvert merke og du feller vekselvis før og etter merket annenhver gang. Da feller du 1 maske hver cm 9-10-10-11-11-12 ganger ved hvert merke, hver 4. pinne 7-5-6-4-2-0 ganger og deretter hver 2. pinne 1-6-7-11-17-21 ganger. Håper dette hjelper of god fornøyelse!
29.06.2018 - 06:33
![]() Valeria wrote:
Valeria wrote:
Hallo, ik heb nu gebreid tot dit punt in instructie “Brei 1 nld over het linkervoorpand aan de verkeerde kant. Keer het werk en brei als volgt over het linkervoorpand”. Moet ik nu andere naalden gebruiken en apart linkervoorpand breien. Daarna draad losknippen en achterland breien, draad los knippen en rechtervoorpand apart breien?
14.05.2018 - 16:41DROPS Design answered:
Hallo Valeria, Dat zou kunnen, maar het werkt prettiger om de steken die je niet breit gewoon op de naald te laten zitten, dus je hoeft er geen andere naald bij te pakken om het linker voorpand te breien. De steken van het acherpand en het rechter voorpand kun je dus gewoon op de naald latern terwijl je het linker voorpand breit.
14.05.2018 - 18:51
![]() Alessandra wrote:
Alessandra wrote:
Sto eseguendo appunto una taglia M e la mia perplessità riguarda appunto le maglie da avviare per le maniche nell'esecuzione dello sprone. 92 maglie sono tantissime!! Leggendo gli altri commenti mi è venuto il dubbio. È forse un errore? Buona serata 🌆
16.10.2016 - 18:00DROPS Design answered:
Buongiorno Alessandra. Il modello è pensato per avere un’apertura comoda intorno alle braccia. Se preferisce un’apertura più stretta è sufficiente che avvii un numero inferiore di maglie per le maniche. Buon lavoro!
17.10.2016 - 13:51
![]() Alessandra wrote:
Alessandra wrote:
Salve, Mi potreste gentilmente dire che taglia indossa la modella? Grazie mille 😊
16.10.2016 - 13:55DROPS Design answered:
Buongiorno Alessandra. Le nostre modelle indossano generalmente la taglia M. Buon lavoro!
16.10.2016 - 14:24Anna Valueva wrote:
Hello, I can't find any size guide on your website. My bust is 100 sm. Should I knit size XL?
12.04.2016 - 16:07DROPS Design answered:
Dear Mrs Valueva, you will find at the end of the pattern a measurement chart with all measurements in cm, taken flat from side to side. Compare these to a similar garment you have and like the shape to find out the matching size. Read more about sizing here. Happy knitting!
12.04.2016 - 16:26
![]() Lily wrote:
Lily wrote:
Ich habe die Jacke in der Größe S genau nach den Anleitungen gerade fertig gemacht und ich muss schreiben, dass die Strickanleitungen für die Passe falsch sind. Ich habe breite Schulter aber die Passe fällt einfach runter - ist zu groß. Ich würde sagen statt 86, 70 neue M über dem rechten Armausschnitt (und nicht locker, sondern fest) anschlagen.
09.10.2015 - 19:25
![]() Ritva Koskikallio wrote:
Ritva Koskikallio wrote:
Hei, minulle on epäselvää malli nro 155-27 ohjeessa kaarroke kavennukset. Koko M, kavenna 1cm välein 10x 1s ja sitten joka 4 krs 5 x 1s ja vielä joka 2krs 6 x 1s. Missä kyseiset kavennukset tehdään? Liittyykö merkkilangat jotenkin kavennuksiin ja vielä kuinka pitkään kutakin kavennusta tehdään? Paljon kiitoksia, olen iloinen jos saan vastauksia! Ritva
26.04.2015 - 11:39DROPS Design answered:
Raglankavennukset tehdään merkkilankojen molemmin puolin niin monta kertaa, kuin kyseisen koon kohdalla mainitaan. Kavennukset tehdään kavennusvinkki 3 selityksen mukaisesti: KAVENNUSVINKKI 3: Kaikki kavennukset tehdään työn oikealta puolelta! Kavenna vuorotellen ennen merkkilankoja ja merkkilankojen älkeen seuraavasti: Ennen merkkilankaa (aloita 2 s:n päässä merkkilangasta): Kavenna 1 s neulomalla 2 s oikein yhteen. Merkkilangan jälkeen: Neulo 2 s oikein yhteen.
11.05.2015 - 13:33
![]() Dominique Trujillo wrote:
Dominique Trujillo wrote:
Bonjour, serait-il possible d'avoir ce modèle mais avec des manches longues, j'aimerais bien le réaliser . Merci
08.02.2015 - 18:22DROPS Design answered:
Bonjour Mme Trujillo, vous pouvez vous inspirer d'un modèle basé sur la même tension, avec des manches longues - ou demander de l'aide à votre magasin DROPS. Bon tricot!
08.02.2015 - 19:33
![]() Kerry Hullett wrote:
Kerry Hullett wrote:
My finished item looks nothing like the photo despite having all the correct measurements as per the instructions. The neckline is saggy and the sleeves sick out in an unflattering way
12.05.2014 - 00:56DROPS Design answered:
Hi Kerry! Usually blocking helps in this case: Place the garment in lukewarm water until it is soaking wet. Carefully squeeze out the water - do not twist. Then roll it in a towel and squeeze to remove more water - the piece will now only be moist. Place the garment on a dry towel on garpet or mattress - carefully stretch it out to measurements and let it dry.
12.05.2014 - 11:16
![]() Beata wrote:
Beata wrote:
To jest moj faworyt kolekcji
28.04.2014 - 09:05
|
|
No One But Me#noonebutmecardigan |
|
|
|
|
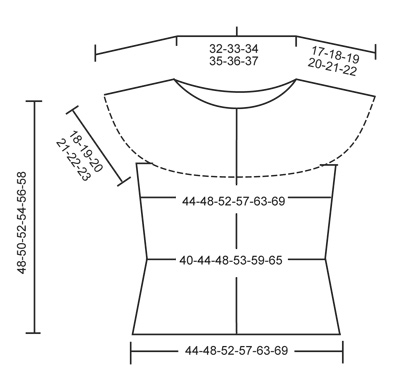
Knitted DROPS jacket with round yoke in ”Kid-Silk”. Size: S - XXXL.
DROPS 155-27 |
|
|
GARTER ST (back and forth on needle): K all rows. 1 ridge = K2 rows. DECREASE TIP 1: All dec are done from RS! Dec as follows 3 sts before marker: K 2 tog. Dec as follows 1 st after marker: Slip 1 st as if to K, K 1, psso. DECREASE TIP 2: All dec are done from RS! Dec as follows after 5 sts in garter st: Slip 1 st as if to K, K 1, psso = 1 st dec. Dec as follows 2 sts before 5 sts in garter st: K 2 tog = 1 st dec. DECREASE TIP 3: All dec are done from RS! Dec alternately before and after markers. Dec as follows before marker: Beg 2 sts before marker. Dec 1 st by K 2 sts tog. Dec as follows after marker: K 2 tog. INCREASE TIP: Inc 1 st by getting yarn between 2 sts from previous row - K this st twisted, i.e. work in back loop of st instead of front to avoid holes. BUTTONHOLES: Dec for buttonholes on right band. 1 buttonhole = K tog third and fourth st from edge and make 1 YO. Measure from beg of yoke and dec for buttonholes when piece measures: SIZE S: 2, 9 and 16 cm / ¾", 3½" and 6¼" SIZE M: 1, 9 and 17 cm / ⅜", 3½" and 6¾" SIZE L: 2, 10 and 18 cm / ¾", 4" and 7" SIZE XL: 1, 10 and 19 cm / ⅜", 4" and 7½" SIZE XXL: 2, 11 and 20 cm / ¾', 4⅜" and 8" SIZE XXXL: 1, 11 and 21 cm / ⅜", 4⅜" and 8¼" ---------------------------------------------------------- JACKET: Worked back and forth on circular needle. Cast on 218-238-256-276-304-332 sts on circular needle size 3 mm / US 2.5 with Kid-Silk. Work ridges in GARTER ST – see explanation above – back and forth until piece measures 3 cm / 1". Switch to circular needle size 3.5 mm / US 4 and continue with stockinette st with 12 band sts in garter st in each side of piece. REMEMBER THE GAUGE! Continue like this back and forth AT THE SAME TIME when piece measures 6 cm / 2½", insert 1 marker in each side of piece as follows: 12 band sts in garter st, 46-51-55-60-67-74 sts in stockinette st, insert a marker here, 102-112-122-132-146-160 sts in stockinette st, insert a marker here, 46-51-55-60-67-74 sts in stockinette st, 12 band sts in garter st. On next row from RS, dec 1 st on each side of both markers - READ DECREASE TIP 1. Repeat the same dec every cm / ½" 4 more times (= 5 times in total) = 198-218-236-256-284-312 sts. Then when piece measures 16-16-16-17-17-17 cm / 6¼"-6¼"-6¼"-6¾"-6¾"-6¾", inc 1 st on each side of marker in each side – see INCREASE TIP. Repeat the same inc approx. every 3-3½-3½-4-4-4 cm / 1⅛"-1¼"-1¼"-1½"-1½"-1½" 4 more times (= 5 times in total) = 218-238-256-276-304-332 sts. When piece measures 30-31-32-33-34-35 cm / 11¾"-12¼"-12½"-13"-13⅜"-13¾", work in garter st over 20 sts in each side (i.e. work in garter st over 10 sts on each side of markers in each side). When piece measures 31-32-33-34-35-36 cm / 12¼"-12½"-13"-13⅜"-13¾"-14¼", work as follows from RS: 12 band sts in garter st, * stockinette st until 10 sts remain before marker in the side, 5 sts in garter st, bind off 10 sts for armhole (i.e. 5 sts on each side of marker), 5 sts in garter st *, repeat from *-* 1 more time. Work the rest of row. There are now 92-102-112-122-136-150 sts on back piece and 53-58-62-67-74-81 sts (includes band sts) on each front piece. Work 1 row over left front piece from WS. Turn piece and work as follows over left front piece: 5 sts in garter st (towards armhole), dec 1 st – READ DECREASE TIP 2 - stockinette st and garter st over the 12 band sts as before. Continue like this until 4 sts have been dec in total inside the 5 sts in garter st towards armhole = 49-54-58-63-70-77 sts. Then work back piece the same way but with 5 sts in garter st and 4 dec towards armholes in each side = 84-94-104-114-128-142 sts. Work right front piece the same way as left front piece but reversed = 49-54-58-63-70-77 sts. YOKE: Work yoke in garter st. Switch to circular needle size 3 mm / US 2.5 and work as follows from RS: Work over all sts on right front piece, loosely cast on 86-92-96-100-106-110 new sts over right armhole, work over all sts on back piece, loosely cast on 86-92-96-100-106-110 new sts over left armhole and work the rest of row = 354-386-412-440-480-516 sts. On next row insert 8 markers in the piece as follows: 49-55-58-63-71-78 sts in garter st, insert a marker here, 26-27-28-29-31-32 sts in garter st, insert a marker here, 33-36-38-39-42-45 sts in garter st, insert a marker here, 26-27-28-29-31-32 sts in garter st, insert a marker here, 86-96-108-120-130-142 sts in garter st, insert a marker here, 26-27-28-29-31-32 sts in garter st, insert a marker here, 33-36-38-39-42-45 sts in garter st, insert a marker here, 26-27-28-29-31-32 sts in garter st, insert a marker here, 49-55-58-63-71-78 sts in garter st. Then on next row from RS beg dec – READ DECREASE TIP 3, AT THE SAME TIME dec for BUTTONHOLES on right band – see explanation above. Dec as follows: 1 st every 1 cm / ½" 9-10-10-11-11-12 times, then dec every 4th row 7-5-6-4-2-0 times and every other row 1-6-7-11-17-21 times. When all dec are done, 218-218-228-232-240-252 sts remain on needle. On next row from RS, dec 42-38-42-42-42-52 sts evenly on needle = 176-180-186-190-198-200 sts. Loosely bind off with K from WS when piece measures 48-50-52-54-56-58 cm / 19"-19¾"-20½"-21¼"-22"-22¾" in total. ASSEMBLY: Fasten off and sew buttons on to left front piece. |
|
 |
|
Have you finished this pattern?Tag your pictures with #dropspattern #noonebutmecardigan or submit them to the #dropsfan gallery. Do you need help with this pattern?You'll find 16 tutorial videos, a Comments/Questions area and more by visiting the pattern on garnstudio.com. © 1982-2026 DROPS Design A/S. We reserve all rights. This document, including all its sub-sections, has copyrights. Read more about what you can do with our patterns at the bottom of each pattern on our site. |


With over 40 years in knitting and crochet design, DROPS Design offers one of the most extensive collections of free patterns on the internet - translated to 17 languages. As of today we count 324 catalogs and 12290 patterns - 12280 of which are translated into English (US/in).
We work hard to bring you the best knitting and crochet have to offer, inspiration and advice as well as great quality yarns at incredible prices! Would you like to use our patterns for other than personal use? You can read what you are allowed to do in the Copyright text at the bottom of all our patterns. Happy crafting!
Post a comment to pattern DROPS 155-27
We would love to hear what you have to say about this pattern!
If you want to leave a question, please make sure you select the correct category in the form below, to speed up the answering process. Required fields are marked *.