
Popular categories
Looking for a yarn?


Comments / Questions (78)
Anna wrote:
How do i get After raglan inc 232 sts for size S started with only 72 sts, I finished 20 rounds and I have only 152 (8 sts inc in each 2nd and 3rd rnd)
14.08.2018 - 13:12DROPS Design answered:
Dear Anna, in size S you need to increase 8 sts a total of 20 times , there were 72 sts + 8 stsx20 = 72 + 160 = 232 sts. Happy knitting!
14.08.2018 - 16:23
![]() Marianna wrote:
Marianna wrote:
Buon giorno, non riesco a capire la parte del RAGLAN nella quale si dice di aumentare ogni 2 e 3 giri. Significa che si aumenta ai ferri 2°,3°,5°,6°,8°,9°,ecc oppure che si aumenta una volta ogni 2 giri e una volta ogni 3? Grazie
30.06.2018 - 15:58DROPS Design answered:
Buongiorno Marianna. Deve aumentare una volta dopo 2 giri e una volta dopo 3, in modo alternato. Buon lavoro!
06.07.2018 - 15:00
![]() Herma wrote:
Herma wrote:
Ik heb wat meer duidelijkheid nodig over het meerderen van de raglan. Ik begrijp nog wel dat ik voor en na de 3 steken die de overgang tussen voor-achterland en mouwen elke 2e naald 1 steek moet meerderen. Dit is 8 steken per naald. Maar ik moet ook nog eens elke 2e en 3e naald 22 steken, (per naald?( meerderen in totaal 14 keer. Geen idee hoe ik dit moet aanpakken. Help!😅. Jammer dat er geen voorbeeld video is van deze trui.
14.04.2018 - 14:21
![]() Gunn wrote:
Gunn wrote:
Siden første øking er på omg 2 å den starter med et kast , skal jeg ta 2 kast da ? får ikke antall masker til å stemme.
27.01.2018 - 15:05DROPS Design answered:
Hei Gun. Du gjør et kast i begynnelsen av diagram A.1 på 1. omgang, første økning til raglan gjøres på 2. omgang. Når det skal gjøres et kast og en økning til raglan på samme omgang, blir det 2 kast, bare husk at kastet til diagrammet skal strikkes «ta 1 m løst av p som om den skulle strikkes rett, 1 m rett, løft den løse m over», mens økningen til raglan skal «kastet strikkes vridd rett på neste p for å unngå hull». Usikker på hvorfor du ikke får maskeantallet til å stemme, husk å oppgi hvilken størrelse du strikker. Mvh Drops design
30.01.2018 - 10:15
![]() Gunn wrote:
Gunn wrote:
Hvorfor står det : det økes 8 m på hver omg med øking, uansett hva jeg gjør så får jeg bare 4 masker øking i omg 2. eller menes 8 m øking med at det er både i omg 2 og omg 3, får heller ikke maske tall til å stemme ,,, diagram a-1 er 2 masker i 4 omganger ,, forstår jeg rett at det skal økes kun i omg 2 og omg 3 og at omg 1 og 4 er uten øking ?
24.01.2018 - 22:45DROPS Design answered:
Hei Gunn. Du har 3 glattstrikkede masker 4 steder på genseren (2 foran og 2 bak). Når du skal øke skal det økes 1 maske FØR de 3 glattstrikkede maskene og 1 masker ETTER de 3 glattstrikkede masker = 2 økte masker. 2 økte masker x 4 steder = 8 økte masker per omgang. Det skal økes på hver 2.(andre) og 3. (tredje) omg (1. omg = ingen økninger. 2. omg = økninger. 3. og 4. omgang = ingen økninger. 5.omg (som er 3. omg etter siste økning, skal det økes). 6. omg = ingen økning. 7. omg (som er 2. omg etter siste økning, skal det økes). 8.-9. omg = ingen økninger. 10. omg (som er 3. omg etter siste økning, skal det økes) osv. God Fornøyelse!
26.01.2018 - 08:45
![]() Annie wrote:
Annie wrote:
Do I make all increases at the beginning of each sleeve or body section e.g. For Row 2 a yo before I knit all stitches? Then for Row 3 do I start with a yo, knit the yo through the back (from Row2) and then start pattern? Row 4 knit yo over through the back then knit all stitches. Then second time I do pattern sequence start the A1 pattern incorporating thr two new stitches? Thanks
04.07.2017 - 03:40DROPS Design answered:
Hi Annie, You increase for Raglan at each transition from body to sleeve so on each side of markers 3 and 4; and 5 and 6 sts in stocking stitch. These increased stitches are then worked into pattern A1. I hope this helps, Kind regards, Deirdre
04.07.2017 - 07:23Margaret wrote:
Hello, I am having trouble understanding the A.1 diagram for Pattern no w-529 or 154-2. It seems to have two numbers. I believe it's called Long Beach. Is there a video? Thanks so much, Margaret
15.01.2017 - 20:12DROPS Design answered:
Dear Margaret, work A.1 as follows in the round: round 1: (YO,slip1 ask if to K, K1, psso), repeat from (to) - round 2 (and all even numbered rounds: K) - round 3: (K2 tog, YO), repeat from (to). When working back and forth P all sts in row 2 and 4 from WS. Happy knitting!
16.01.2017 - 10:32
![]() Monique Rieder wrote:
Monique Rieder wrote:
Beste, Ik zie bij dit patroon nergens het kantpatroon, ook niet bij de filmpjes. Waar kan ik dat vinden? Bij een raglan moet je toch juist minderen, maar er staat meerderen? Alvast bedankt voor het antwoord, Met vriendelijke groet, Monique
15.10.2016 - 12:53DROPS Design answered:
Hoi Monique. Het telpatroon staat rechts onder de maattabel (hij is klein, maar hij is er). Je breit van boven naar beneden, daarom meerder je voor de raglan hier.
17.10.2016 - 16:31Penny wrote:
Good morning. I can't see where it says how many balls of yarn I need. Thanks. Penny
28.06.2016 - 03:20DROPS Design answered:
Dear Penny, you can see yarn quantity at the top of the pattern,near the picture. For example, for size S you need 450 g of DROPS Paris, i.e. 9 skeins. Happy knitting!!
28.06.2016 - 07:46Tiggy Burrows wrote:
I have finished the body and am now moving onto the sleeves, however it looks like there will be a large hole in the armpit on both sides between the 4 cast on for the body and the 3 cast on mid under sleeve. am i meant to pick up the 4 stitches cast on for body instead of cast on 3 at the start of sleeve? I have come so far i don't want to mess it up now!! thanks Tiggy
12.05.2016 - 13:27DROPS Design answered:
Dear Mrs Burrows, when working the sleeve, move all sts back on needle and cast on 3 sts for mid under sleeve. You can also pick up the 3 sts in the 4 sts cast on for under arm on body, or then sew the 3 sts to the 4 sts after sleeve have been worked. Happy knitting!
12.05.2016 - 17:54
|
|||||||||||||
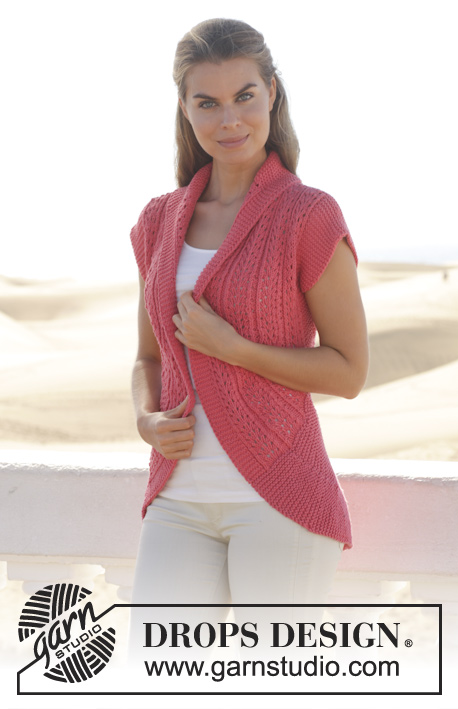
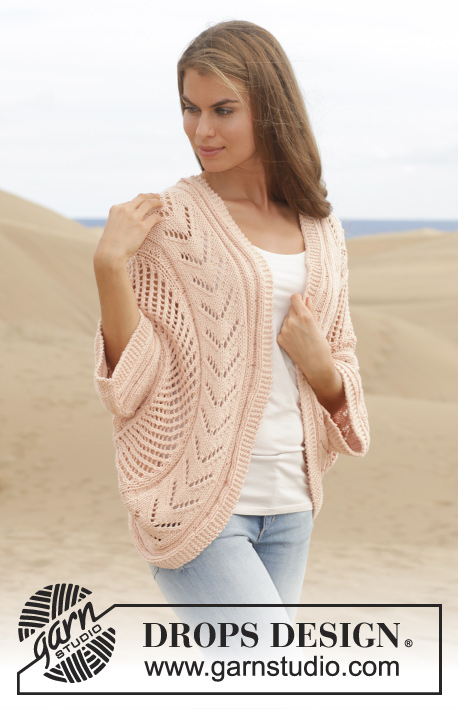
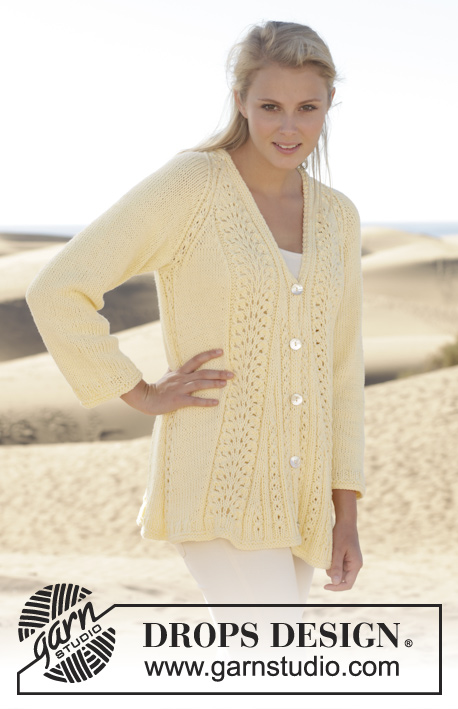
Long Beach#longbeachsweater |
|||||||||||||
|
|
|||||||||||||
Knitted DROPS jumper with lace pattern, worked top down in ”Paris”. Size: S - XXXL.
DROPS 154-2 |
|||||||||||||
|
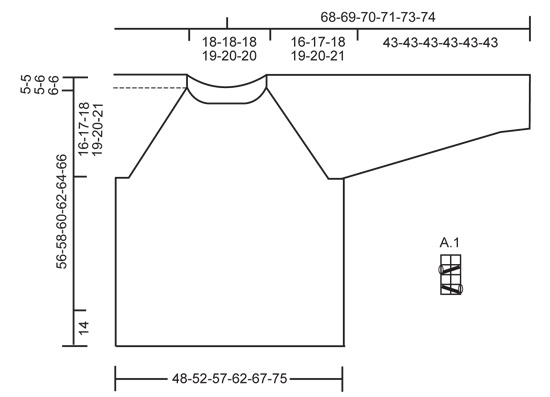
GARTER ST (in the round on circular needle/double pointed needles): * K 1 round and P 1 round *, repeat from *-*. 1 ridge = 2 rounds. GARTER ST (back and forth on needle): K all rows. PATTERN: See diagram A.1. The diagram shows all rows in pattern seen from RS. RAGLAN: Inc 8 sts on every round with inc. Inc on each side of the 3 sts in stockinette st which separate back piece, front piece and sleeves. Inc by making 1 YO, K YO twisted on next row to avoid holes. Work the inc sts in the pattern A.1: Inc every 2nd and 3rd round 20-20-22-20-22-14 times in total. Then work and inc differently on sleeves and front/back piece in the different sizes as follows: SIZE S: Work 3 more rounds without inc = 232 sts on needle. SIZE M: Inc every round on front/back piece 3 times and inc on 3rd round 1 time on sleeves. Work 2 rounds without inc = 248 sts on needle. SIZE L: Inc every round 4 times on front/back piece, no inc on sleeves = 264 sts on needle. SIZE XL: Inc every round 9 times on front/back piece and inc every 3rd round 3 times on sleeves = 288 sts on needle. SIZE XXL: Inc every round 9 times on front/back piece and inc every 3rd round 2 times on sleeves = 304 sts on needle. SIZE XXXL: Inc every round 23 times on front/back piece and inc every other round 11 times on sleeves = 332 sts on needle. DECREASE TIP: Dec on each side of 3 sts in stockinette st mid under sleeve. Dec as follows before sts: Work until 2 sts remain before the 3 sts, slip 1 st, K 1, psso. Dec as follows after sts: K 2 tog. ---------------------------------------------------------- JUMPER: The piece is worked top down. Cast on 84-84-84-92-96-96 sts on circular needle size 5.5 and work 2 ridges in the round. K 1 round and dec 12 sts evenly in all sizes = 72-72-72-80-84-84 sts. P 1 round - AT THE SAME TIME insert markers in the piece as follows: 1st marker at beg of round (= beg of back piece), 2nd marker after 18-18-18-18-20-20 sts (= end of back piece), 3rd marker after 3 sts, 4th marker after 12-12-12-16-16-16 sts (= left sleeve), 5th marker after 3 sts, 6th marker after 18-18-18-18-20-20 sts (= end of front piece), 7th marker after 3 sts, 8th marker after 12-12-12-16-16-16 sts (= right sleeve). Then work according to diagram A.1 over front piece, back piece and sleeves AT THE SAME TIME inc for RAGLAN - see explanation above on each side of the 3 sts in stockinette st that separate the sleeves, front and back piece. After raglan inc there are 232-248-264-288-304-332 sts on needle. On next round work A.1 over the 58-64-70-76-82-94 sts on back piece, bind off 3 sts, work A.1 over the 52-54-56-62-64-66 sts on right sleeve, slip sts from sleeve on a stitch holder. Bind off 3 sts, work A.1 over the 58-64-70-76-82-94 sts on front piece and bind off 3 sts, work A.1 over the 52-54-56-62-64-66 sts on left sleeve, slip sts from sleeve on a stitch holder and bind off 3 sts. Then work body and sleeves separately. BODY: Work next row as follows: A.1 over the next 58-64-70-76-82-94 sts (= back piece), cast on 4 new sts under right sleeve, A.1 over the next 58-64-70-76-82-94 sts (= front piece) and cast on 4 new sts under left sleeve = 124-136-148-160-172-196 sts. insert marker in the middle of the 4 new sts under each sleeve and move these when working. Put piece tog and work in the round according to A.1 over all sts until piece measures 41-43-45-47-49-51 cm / 16⅛"-17"-17¾"-18½"-19¼"-20". Work 2 ridges over 4 sts on each side of markers and A.1 over the other sts as before. (= 8 sts in each side in garter st). On next round divide the piece at the markers and work front and back piece separately until finished measurements with 4 sts in garter st in each side = 62-68-74-80-86-98 sts on needle. Work until piece measures 54-56-58-60-62-64 cm / 21¼"-22"-22¾"-23⅝"-24⅜"-25¼" and work 2 ridges. K 1 row while AT THE SAME TIME inc 10-10-12-14-14-14 sts evenly = 72-78-86-94-100-112 sts. K 1 row and loosely bind off. Piece measures approx. 56-58-60-62-64-66 cm / 22"-22¾"-23⅝"-24⅜"-25¼"-26". SLEEVE: Slip sts for sleeve back on needle = 52-54-56-62-64-66 sts, cast on 3 new sts and put piece tog and continue in the round on circular needle/double pointed needles = 55-57-59-65-67-69 sts. Work the 3 new sts under sleeve in stockinette st and work the other sts according to diagram A.1 as before. Insert a marker mid under sleeve, measure piece from here. When piece measures 2 cm / ¾", dec 1 st on each side of the 3 sts in stockinette st mid under sleeve - READ DECREASE TIP ABOVE, repeat dec every 2½-2-2-2-1½-1½ cm / ⅞"-¾"-¾"-¾"-½"-½" 15-16-16-18-19-19 more times (16-17-17-19-20-20 dec in total ) = 23-23-25-27-27-29 sts. Work until piece measures approx. 41 cm / 16" from marker, K 1 round, P 1 round, K 1 round and P 1 round. K 1 round while AT THE SAME TIME inc 4 sts evenly = 27-27-29-31-31-33 sts, P 1 round and loosely bind off. Piece measures approx. 43 cm / 17" (same length for all sizes because of wider body in the larger sizes). ASSEMBLY: Sew the openings under sleeves. |
|||||||||||||
Diagram explanations |
|||||||||||||
|
|||||||||||||
 |
|||||||||||||
Have you finished this pattern?Tag your pictures with #dropspattern #longbeachsweater or submit them to the #dropsfan gallery. Do you need help with this pattern?You'll find 21 tutorial videos, a Comments/Questions area and more by visiting the pattern on garnstudio.com. © 1982-2026 DROPS Design A/S. We reserve all rights. This document, including all its sub-sections, has copyrights. Read more about what you can do with our patterns at the bottom of each pattern on our site. |
|||||||||||||


With over 40 years in knitting and crochet design, DROPS Design offers one of the most extensive collections of free patterns on the internet - translated to 17 languages. As of today we count 324 catalogs and 12290 patterns - 12280 of which are translated into English (US/in).
We work hard to bring you the best knitting and crochet have to offer, inspiration and advice as well as great quality yarns at incredible prices! Would you like to use our patterns for other than personal use? You can read what you are allowed to do in the Copyright text at the bottom of all our patterns. Happy crafting!
Post a comment to pattern DROPS 154-2
We would love to hear what you have to say about this pattern!
If you want to leave a question, please make sure you select the correct category in the form below, to speed up the answering process. Required fields are marked *.