
Popular categories
Looking for a yarn?


Comments / Questions (77)
![]() Coutarel wrote:
Coutarel wrote:
J'en suis à 40 cm il faut rabattre sur l'envers ? pour les emmanchures
19.07.2014 - 09:39DROPS Design answered:
Bonjour Mme Coutarel, c'est exact, on rabat les mailles des emmanchures sur un rang sur l'envers. Bon tricot!
21.07.2014 - 09:10
![]() Coutarel wrote:
Coutarel wrote:
J'en suis à tricoter le diagramme A5. commencer par A5A puis A5B et ensuite faut il retricoter A5A ?
15.07.2014 - 12:44DROPS Design answered:
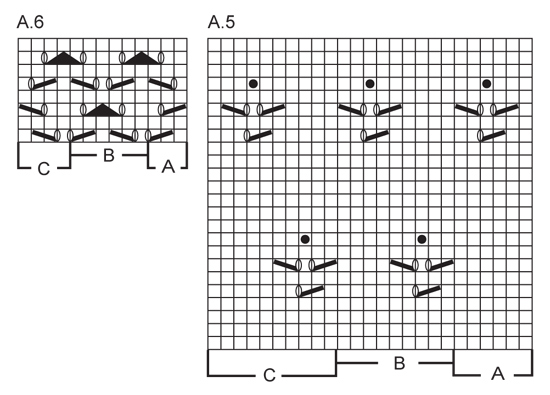
Bonjour Mme Coutarel, vous tricotez A.5 en commençant par A.5A sur les 6 premières m, vous répétez ensuite A.5B sur les mailles suivantes jusqu'à ce qu'il reste 15 m, et vous terminez par A.5C et 5 m de bordure devant. Bon tricot!
15.07.2014 - 13:12
![]() Stefanie wrote:
Stefanie wrote:
Hallo, habe die Wolle bekommen und gleich angefangen zu stricken. Kann man aber mit dem Muster A.1 nicht gleich von vorne anfangen? So hat man dann auf beiden Seiten die 3 "B" Maschen und nicht auf einer Seite 6 "B" Maschen? Gruß Stefanie
19.06.2014 - 08:47DROPS Design answered:
Liebe Stefanie, Sie fangen ja "vorne" an mit dem Muster (also mit A.1A), Sie lesen ja die erste R von rechts nach links. Am Ende der R müssen Sie noch 1 x A.1B stricken, damit das Muster symmetrisch wird. 6 "B"-Maschen haben Sie jedenfalls an keiner Stelle, Sie wiederholen ja nur A.1A über die R und stricken erst am Ende 1x A.1B.
20.06.2014 - 16:38
![]() Tina wrote:
Tina wrote:
Fertig! Ich habe sie in dieser Farbe gestrickt aber etwas länger. Passt gut, sieht gut aus und ist auf Grund der vielen Muster sehr appart! Vielen Dank wieder mal für die schöne Anleitung!
13.05.2014 - 10:11
![]() Lida Schoon wrote:
Lida Schoon wrote:
Is de teruggaande naald in de patronen ingetekend?
16.04.2014 - 12:09DROPS Design answered:
Hoi Lida. Ja: PATROON: Zie telpatronen A.1 tot en met A.6. De telpatronen laten het patroon aan de goede kant zien. Zowel de heengaande als de teruggaande naalden zijn weergegeven.
16.04.2014 - 12:44
![]() Stephanie wrote:
Stephanie wrote:
In the yoke section. As I continue the body sts and the sleeve sts with all the decreases, the pattern can't continue to establish as before. Could you explain this.
03.03.2014 - 00:22DROPS Design answered:
Dear Stephanie, the sts that cannot be included anymore in a full repeat can be worked in stocking st, if you want to work them into pattern, take care that you always have same number of dec/yo + the raglan dec. Happy knitting!
03.03.2014 - 10:31
![]() Anki Tilving wrote:
Anki Tilving wrote:
Jag har problem med början av mönstret på 152-1.A1 funkar inte, hur kan jag minska maskor och ändå ha lika många maskor kvar till nästa varv? Får inte det att funka,
27.02.2014 - 08:26DROPS Design answered:
I A.1 minskar du inte förrän på 15e varvet, och då ser du på 16e v i dagrammet så är de maskorna som är borta markerade med svart. I starten på diagrammet när du stickar ihop maskor så ökar du också med omslag, så maskantalet hålls konstant.
01.03.2014 - 00:46
![]() Alicia wrote:
Alicia wrote:
I really need assistance in understanding A.A1 pattern. On the 3rd row it shows that I would have to "slip 1 st as if to K, K2 tog, pesso - the way I interprets this step, it would only leave 1 stitch in the group of 3, which for the next 3 rows decrease, I would have not stitches to decrease? Please help! I love this pattern and would like to complete it without having to pull my hair!! thank you!
19.02.2014 - 00:29DROPS Design answered:
Dear Alicia, you are correct, on 3rd row in A.1, you dec 2 sts over 3 sts, but at the same time, make 1 yo each side, i.e. first 3 sts in A.1, row 3 are worked as follows: YO, sl 1 as if to K, K2 tog, psso, YO (= 3 sts again). Happy knitting!
19.02.2014 - 09:41
![]() Barbara wrote:
Barbara wrote:
Do I do the short rows over the band stitches on every row or just the one row
09.02.2014 - 01:31DROPS Design answered:
Dear Barbara, when piece measures 36-33 cm (see size), you work short rows over band sts only 1 time each side. Happy knitting!
10.02.2014 - 09:47
![]() Armirotto Josée wrote:
Armirotto Josée wrote:
Beste, Blijkbaar is er een verschil in beschrijving bij het maken van nopjes/bobbels de tekst bij het model is anders dan de tekst bij de video. Graag uw toelichting welke beschrijving te volgen is ? Josee
04.02.2014 - 09:51DROPS Design answered:
Hoi Jose. Je moet de beschrijving in het patroon volgen. De video geeft een voorbeeld/idee van hoe je een nopje kan breien, maar het aantal st/nld voor het nopje kan verschillen per patroon.
04.02.2014 - 13:47
|
|||||||||||||||||||||||||
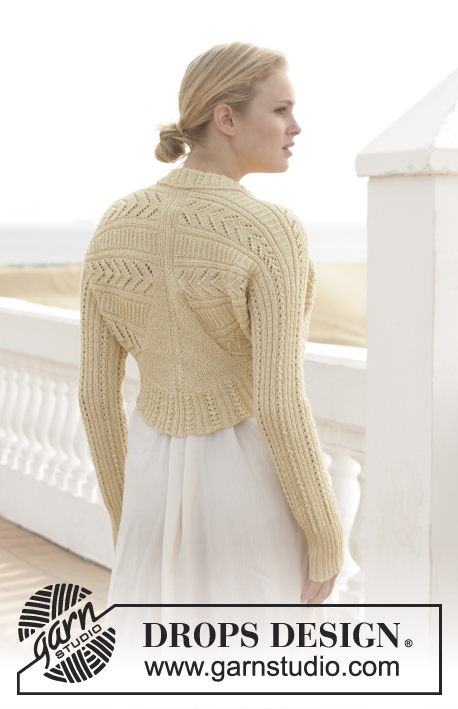
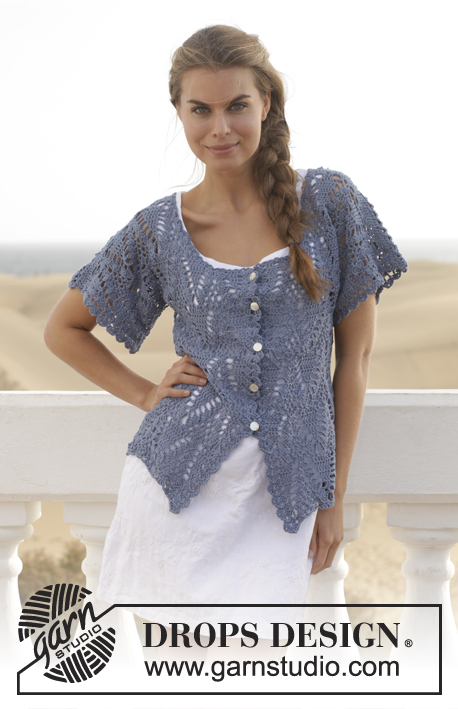
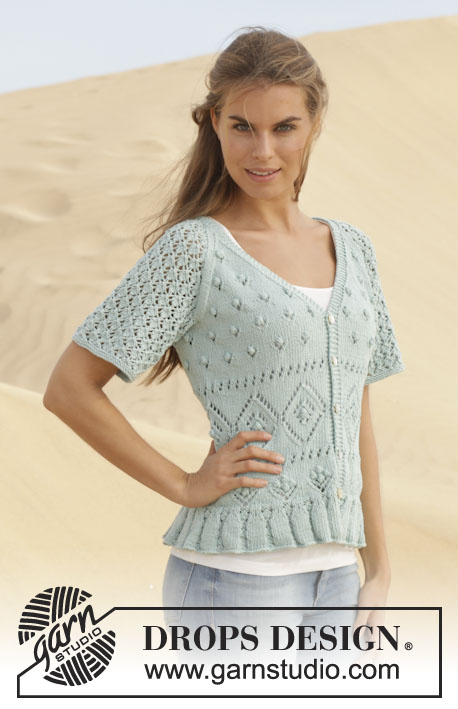
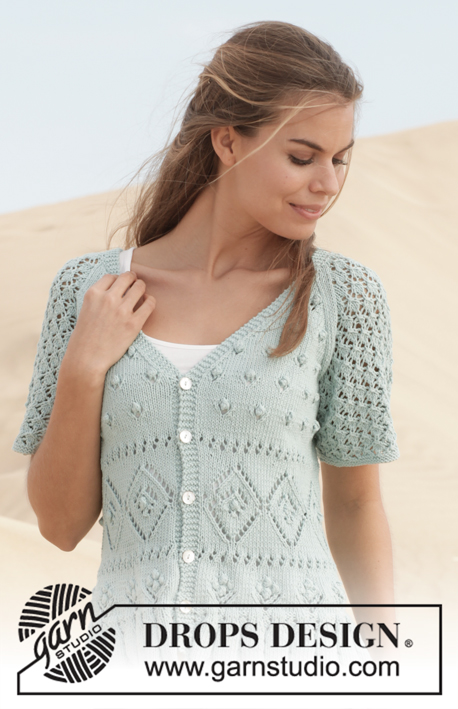
Ocean Breeze#oceanbreezecardigan |
|||||||||||||||||||||||||
 |
 |
||||||||||||||||||||||||
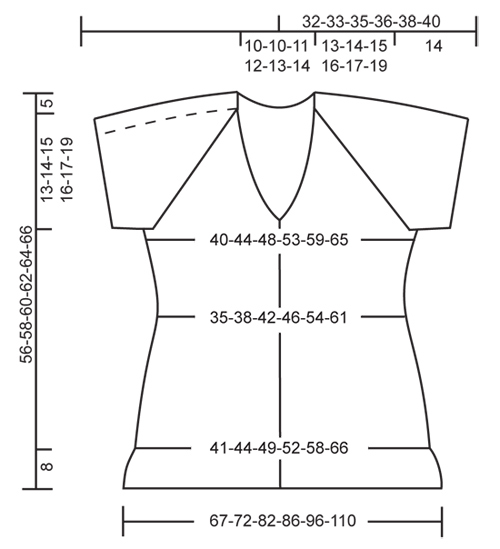
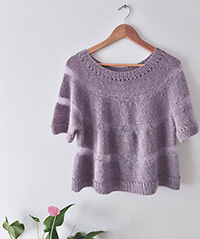
Knitted DROPS jacket with lace pattern and raglan in ”Cotton Light”. Size: S - XXXL.
DROPS 152-1 |
|||||||||||||||||||||||||
|
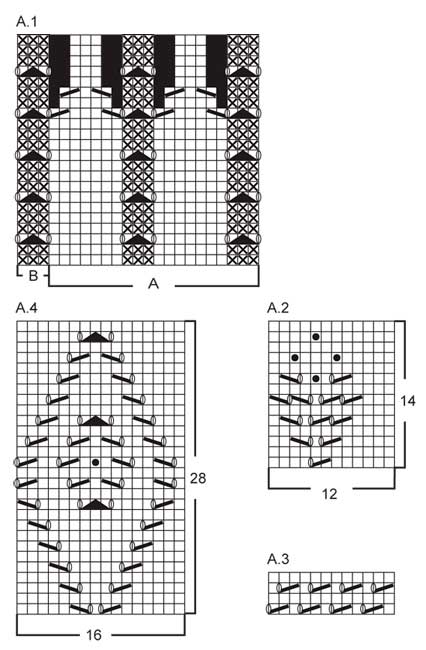
GARTER ST (back and forth on circular needle): K all rows. 1 ridge = K2 rows. GARTER ST (in the round on double pointed needles): * K 1 round and P 1 round *, repeat from *-*. 1 ridge = 2 rounds. PATTERN: See diagrams A.1 to A.6. The diagrams show all rows in pattern seen from RS. BUTTONHOLES: Dec for buttonholes on right band. 1 buttonhole = K tog second and third st from edge and make 1 YO. Dec for buttonholes when piece measures: SIZE S: 8, 15, 22, 29 and 35 cm / 3", 6", 8¾", 11½", 13¾" SIZE M: 8, 15, 22, 29 and 35 cm / 3", 6", 8¾", 11½", 13¾" SIZE L: 8, 15, 22, 29 and 35 cm / 3", 6", 8¾", 11½", 13¾" SIZE XL: 8, 15, 22, 29 and 35 cm / 3", 6", 8¾", 11½", 13¾" SIZE XXL: 8, 15, 22, 29 and 35 cm / 3", 6", 8¾", 11½", 13¾" SIZE XXXL: 8, 14, 20, 26 and 32 cm / 3", 5½", 8", 10¼", 12½" DECREASE TIP 1: All dec are done from RS! Dec 1 st by K 2 sts tog. DECREASE TIP 2: Dec inside 5 band sts in each side. All dec are done from RS! Dec as follows after 5 band sts: Slip 1 st as if to K, K 1, psso. Dec as follows before 5 band sts: K 2 tog. INCREASE TIP: Inc 1 st by making 1 YO. On next row work YO twisted to avoid holes. RAGLAN: Dec on each side of marker in each raglan line. All dec are done from RS! Beg 3 sts before marker and work as follows: K 2 tog, K 2 (marker is between these 2 sts), slip 1 st as if to K, K 1, psso (= 2 sts dec). ---------------------------------------------------------- BODY: Worked back and forth on circular needle from mid front. Cast on 293-313-353-373-413-473 sts (includes 5 band sts in each side towards mid front) on circular needle size 3.5 mm / US 4 with Cotton Light. P 1 row from WS. Work next row as follows from RS: 5 band sts in GARTER ST - see explanation above, work pattern according to diagram A.1A until 8 sts remain, work A.1B (= 3 sts) and finish with 5 band sts in GARTER ST. Continue pattern like this back and forth. When A.1 has been worked, there are 181-193-217-229-253-289 sts on needle and piece measures approx. 8 cm / 3" vertically, remember BUTTONHOLES on right band - see explanation above. Work next row as follows from RS: 5 band sts in garter st, work pattern according to diagram A.2 until 8 sts remain, work 3 sts in stockinette st and finish with 5 band sts in garter st. Continue pattern like this. REMEMBER THE GAUGE! When A.2 has been worked, piece measures approx. 13 cm / 5". Work 4 rows in stockinette st (1st row = RS and continue bands in garter st) while AT THE SAME TIME on 3rd row (= RS) dec 15-12-15-15-9-12 sts evenly - READ DECREASE TIP 1 (do not dec over bands) = 166-181-202-214-244-277 sts remain on needle. Then work A.3 1 time vertically with 5 band sts in garter st in each side. After A.3 work 4 rows in stockinette st while AT THE SAME TIME on 1st row (= RS) dec 11-10-15-11-9-10 sts evenly (do not dec over bands) = 155-171-187-203-235-267 sts remain on needle. Work next row as follows from RS: 5 band sts as before, work pattern according to diagram A.4 until 6 sts remain on row, work 1 st in stockinette st and finish with 5 band sts in garter st as before. When A.4 has been worked 1 time vertically, work 4 rows in stockinette st (1st row = RS and continue bands in garter st) while AT THE SAME TIME on 2nd row (= WS) inc 11-13-9-14-9-4 sts evenly - READ INCREASE TIP (do not inc over bands) = 166-184-196-217-244-271 sts remain on needle. Then work A.3 1 time vertically with 5 band sts in garter st in each side. After A.3 work 4 rows in stockinette st while AT THE SAME TIME on 2nd row (= WS) inc 13-13-10-16-7-7 sts evenly (do not inc over bands) = 179-197-206-233-251-278 sts remain on needle. The piece now measures approx. 31 cm / 12¼" vertically in all sizes. Work next row as follows from RS: 5 band sts as before, work pattern according to diagram A.5A (= 6 sts), work pattern according to diagram A.5B until 15 sts remain on row, work A.5C (= 10 sts) and finish with 5 band sts as before. Continue pattern like this back and forth. AT THE SAME TIME insert 1 marker 47-52-54-61-65-72 sts in from each side (= 85-93-98-111-121-134 sts between markers on back piece). When piece measures 36-36-36-36-36-33 cm / 14¼"-14¼"-14¼"-14¼"-14¼"-13" (adjust so that approx. 2 rows have been worked after last buttonhole on right band), work short rows over bands as follows (beg from RS): K 5 band sts, turn piece, tighten yarn and K, turn piece and work as before over all sts, turn piece, K 5 band sts, turn piece, tighten yarn and K. Then work back and forth over all sts as before, AT THE SAME TIME on 1st row from RS dec 1 st in each side towards mid front for V-neck – READ DECREASE TIP 2. Repeat dec every other row (i.e. every row from RS) 21-24-26-30-33-38 times in total – NOTE: Work sts that do not fit the pattern in stockinette st while decreasing. AT THE SAME TIME when piece measures approx. 38-39-40-41-42-42 cm / 15"-15¼"-15¾"-16⅛"-16½"-16½" – adjust so that next row is worked from WS, bind off for armholes in each side as follows: Work until 3 sts remain before first marker in the side, bind off the next 6 sts, work until 3 sts remain before marker in the other side, bind off the next 6 sts and work the rest of row. There are now 79-87-92-105-115-128 sts on back piece and approx. 41-45-46-51-53-57 sts on each front piece (depending on no of sts dec for V-neck). Put piece aside and work the sleeves (dec for V-neck are continued on yoke). SLEEVE: Worked in the round on double pointed needles. Cast on 71-77-79-85-87-93 sts on double pointed needles size 3 mm / US 2.5 with Cotton Light. Work 2 ridges in GARTER ST in the round - see explanation above. Switch to double pointed needles size 3.5 mm / US 4 and K 1 round while AT THE SAME TIME dec 10-10-12-12-14-14 sts evenly = 61-67-67-73-73-79 sts on needle. On next round work as follows: Work A.6A (= 3 sts), work pattern according to diagram A.6B until 4 sts remain on round and finish with A.6C (= 4 sts). Continue pattern in the round like this. When piece measures approx. 14 cm / 5½" in all sizes – finish after 5th round in A.6, bind off on next round the middle 6 sts under sleeve = 55-61-61-67-67-73 sts remain on row. Put piece aside and Make another sleeve. YOKE: Slip sleeves on to same circular needle as body where armholes were bind off (without working them first) = approx. 271-299-306-341-355-388 sts on needle. Insert 1 marker in all transitions between sleeves and body (= 4 markers). Continue back and forth as before with A.5 on body, A.6 on sleeves and neck dec in each side towards mid front as before – NOTE: Make sure to make the same no of YOs as dec sts in the pattern on body and sleeves so that the no of sts is correct. In addition on first row (= RS) dec for RAGLAN on each side of all markers – see explanation above (= 8 sts dec). Repeat dec for raglan on every row from RS 18-20-21-23-24-26 times in total. After all dec for raglan and neck, 91-99-96-111-115-128 sts remain on needle. AT THE SAME TIME after last row with dec for raglan work 1 row from WS as before. Work next row as follows from RS: Work 5 band sts as before, slip them on 1 stitch holder, work until 5 band sts remain on row, slip these 5 sts on 1 stitch holder = 81-89-86-101-105-118 sts on row. K 1 row from WS while AT THE SAME TIME dec 18-26-21-34-36-47 sts evenly = 63-63-65-67-69-71 sts remain on needle. Bind off with K from RS and cut the yarn. BAND + NECK EDGE: Slip the 5 band sts from stitch holder on right front piece back on needle size 3.5 mm / US 4. Continue in garter st back and forth over these 5 sts. Work until neck edge measures approx. 15-17 cm / 6"-6¾" from where sts were slipped back on needle (place neck edge towards neckline on garment mid back, lightly pull it and make sure that it fits the measurements), then bind off. Repeat along left front piece. Sew seam mid back inside bind-off edge (seam should be in towards WS on garment). Sew neck edge to neckline - sew in outer loops of edge sts to edge in garter st so that neck edge is placed nicely towards the neckline. Sew the opening under the sleeves. Sew on buttons. |
|||||||||||||||||||||||||
Diagram explanations |
|||||||||||||||||||||||||
|
|||||||||||||||||||||||||
 |
|||||||||||||||||||||||||
 |
|||||||||||||||||||||||||
 |
|||||||||||||||||||||||||
Have you finished this pattern?Tag your pictures with #dropspattern #oceanbreezecardigan or submit them to the #dropsfan gallery. Do you need help with this pattern?You'll find 27 tutorial videos, a Comments/Questions area and more by visiting the pattern on garnstudio.com. © 1982-2026 DROPS Design A/S. We reserve all rights. This document, including all its sub-sections, has copyrights. Read more about what you can do with our patterns at the bottom of each pattern on our site. |
|||||||||||||||||||||||||


With over 40 years in knitting and crochet design, DROPS Design offers one of the most extensive collections of free patterns on the internet - translated to 17 languages. As of today we count 324 catalogs and 12210 patterns - 12200 of which are translated into English (US/in).
We work hard to bring you the best knitting and crochet have to offer, inspiration and advice as well as great quality yarns at incredible prices! Would you like to use our patterns for other than personal use? You can read what you are allowed to do in the Copyright text at the bottom of all our patterns. Happy crafting!
Post a comment to pattern DROPS 152-1
We would love to hear what you have to say about this pattern!
If you want to leave a question, please make sure you select the correct category in the form below, to speed up the answering process. Required fields are marked *.