
Popular categories
Looking for a yarn?


Comments / Questions (21)
![]() Batin wrote:
Batin wrote:
Bonjour que veux dire ajuster après le 4eme rang du diagramme Merci
24.02.2026 - 20:05DROPS Design answered:
Bonjour Mme Batin, ajustez les 3 cm de hauteur de sorte que vous arrêtez après un rang 4 du diagramme, autrement, dit, tricotez un peu plus/un peu moins que ces 3 cm mais le dernier rang tricoté doit être le rang 4. Bon tricot!
25.02.2026 - 07:27
![]() Henny De Vries wrote:
Henny De Vries wrote:
Is het patroon beschreven met de teruggaande naalden?
06.03.2025 - 10:36
![]() Bakker wrote:
Bakker wrote:
Geachte M, In de patroonbeschrijving wordt geschreven dat het patroon netjes moet doorlopen in de boord. Jammer dat op de foto het niet te zien is wat daar mee bedoelt wordt . Vriendelijke groeten Mevrouw Bakker. Wel geweldig die gratis patronen.
30.10.2024 - 11:17
![]() Lesley O'Brien wrote:
Lesley O'Brien wrote:
Your pattern 74-6 says for the pocket lining cast on 32 sts & stocking stich for 26cm (This is rather a long pocket) . Then when knitting the fronts it says to place the pocket at around 20-21 cms. This can't be right, the pocket would hang down below the bottom of the cardigan.
26.06.2024 - 19:02DROPS Design answered:
Dear Mrs O'Brien, pockets will be folded double and will then be only 13 cm. Happy knitting!
27.06.2024 - 09:02
![]() Bourgeois wrote:
Bourgeois wrote:
Bonjour Lorsqu'on tricote le devant gauche, on lit les diagrammes de gauche à droite...il faut donc tricoter les torsades inversées aussi?
27.03.2023 - 22:08DROPS Design answered:
Bonjour Mme Bourgeois, il faut toujours bien lire les rangs avec les torsades sur l'endroit comme pour le devant droit, mais lisez-le de gauche à droite pour que les torsades soient tricotées en effet miroir sur le devant gauche. Bon tricot!
28.03.2023 - 10:10
![]() Anna Marie Fedel wrote:
Anna Marie Fedel wrote:
I'm so frustrated...After my third rip out and starting over...I finally got to the point where I understand the " pattern" I thought. I'm 2 almost 3 cm into the project and I still don't recognize a pattern....what am I doing wrong? And reading ahead....it says decrease 1 stich evenly on the first row...how can that happen? ....I love the cardigan...my gage on smaller needle is correct. But changing to the larger needle won't be. HELP. even as an experienced this is so confusing.
08.02.2022 - 15:16DROPS Design answered:
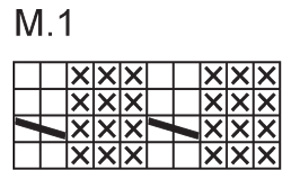
Dear Mrs Fedel, when working M.1 you should have rib (P3, K2) with a cable in the K2 on every 4th row. Whole pattern start with 1 edge stitch, K2 (= these should be worked as the K2 in M.1), then repeat M.1 and end with 1 edge stitch. From WS, knit the knit and purl the purl (rib looks K3/P2 from WS). Can this help?
08.02.2022 - 15:31
![]() Anna Marie Fedel wrote:
Anna Marie Fedel wrote:
In the DROPS 74-6 pattern. After I cast on 129 stitches to begin the back of the cardigan. Then I did the first row . When I came to the next row I am not sure how to start . Do I knit the ( edge ) stitch and then continue the pattern or start the " pattern " from the very beginning? I'm so confused. I can't read the comments because they are in a different language. Thanks
04.02.2022 - 14:37DROPS Design answered:
Dear Mrs Fedel, you are working wit 1 edge stitch on each side, from WS work: 1 edge stitch, repeat M.1 (reading from the left towards the right from WS), P2 and end with 1 edge st. Read more about diagrams here. Happy knitting!
04.02.2022 - 16:06
![]() Tiina Järvinen wrote:
Tiina Järvinen wrote:
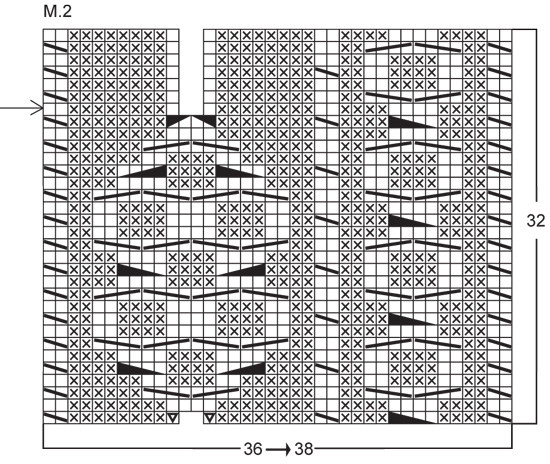
Ohjeeseen tehty korjaus riville 4 ja 5. Kuuluuko tulkita piirroksen merkkien selityksiä ylhäältä vai alhaalta laskettuna 4 ja 5.eli onko korjaus kuvaan jossa neljä ruutua jossa poikkiviiva kulmasta kulmaan vai kuvaan jossa neljä ruutuajotka puoliksi mustattu kulmasta kulmaan. Tiina
06.01.2020 - 14:19DROPS Design answered:
Hei, piirroksen kerrokset lasketaan alhaalta alkaen.
07.01.2020 - 18:40
![]() Désirée Tallemant wrote:
Désirée Tallemant wrote:
Bonjour, pourriez-vous me dire si le diagramme actuel tient compte des corrections? Pour ma part, je ne vois pas de différence entre les corrections et les lignes 4 et 5 du diagramme. Je vous remrcie.
28.11.2019 - 12:24DROPS Design answered:
Bonjour Mme Tallemant, tout à fait, si vous avez imprimé les explications après la date de la correction, les diagrammes sont justes. Bon tricot!
28.11.2019 - 14:00
![]() Germana wrote:
Germana wrote:
Grazieeeee ora ho capito
06.09.2017 - 19:43
|
|||||||||||||||||||||||||||||||
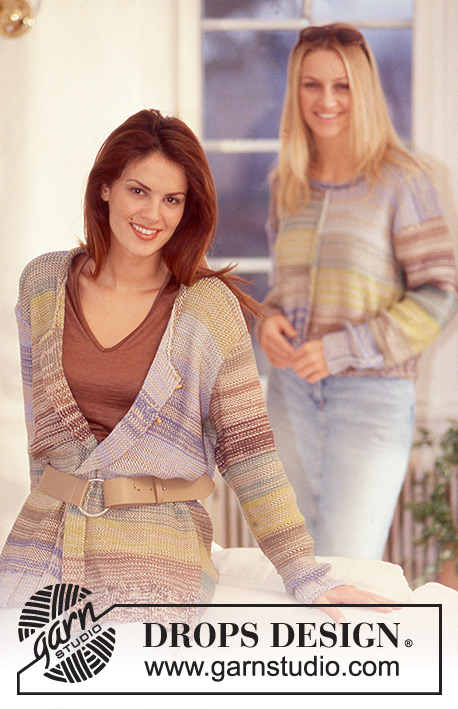
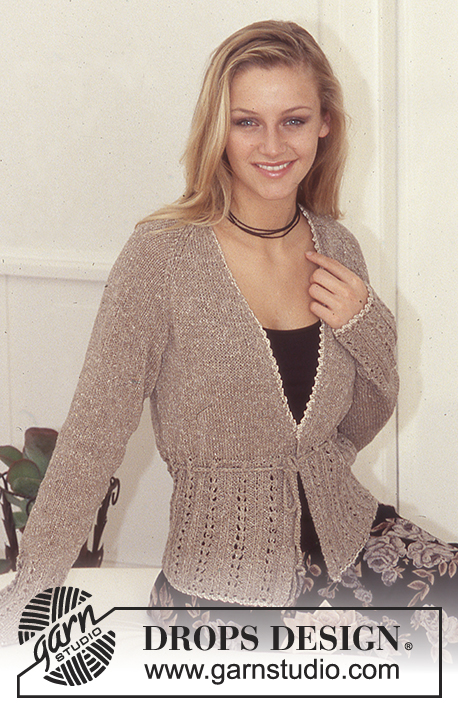
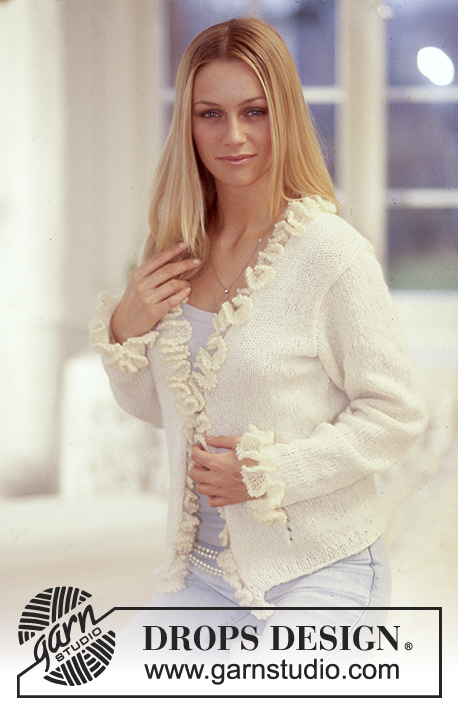
DROPS 74-6 |
|||||||||||||||||||||||||||||||
 |
 |
||||||||||||||||||||||||||||||
DROPS Cardigan in Alpaca
DROPS 74-6 |
|||||||||||||||||||||||||||||||
|
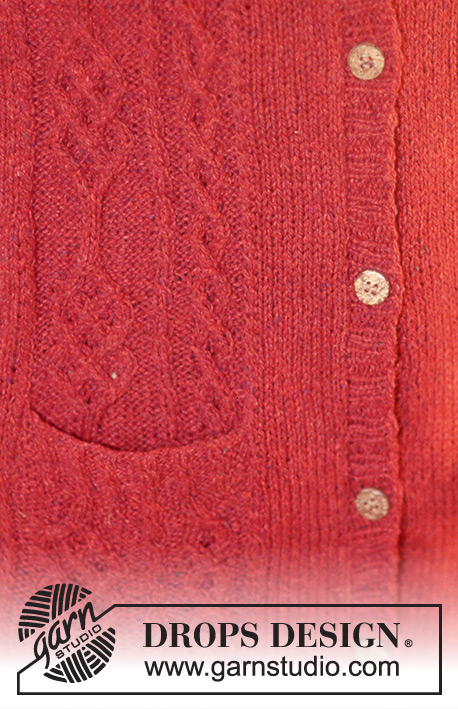
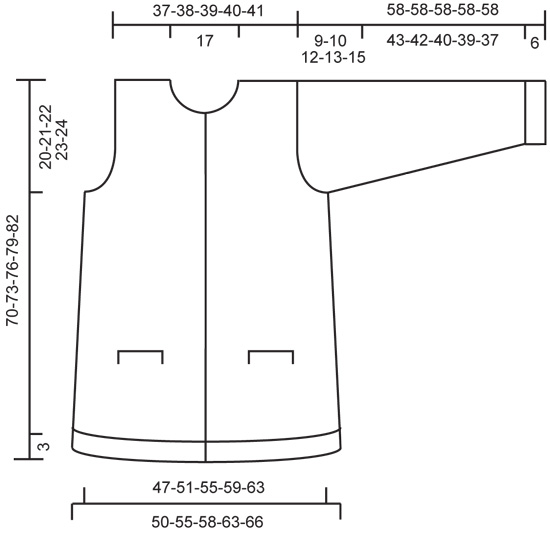
Gauge: 23 sts x 30 rows on larger needles in stockinette st = 10 x 10 cm. Pattern: See charts. The pattern is seen from the right side. Back: Cast on 119-129-139-149-159 sts on smaller needles. Establish the pattern on the first row as follows (right side row): K 1 (edge st), K 2 (for a small cable as in Pattern 1), Pattern 1 over 115-125-135-145-155 sts, K 1 (edge st). Knit in pattern as established until the piece measures approx. 3 cm (adjust to end after 4th row of pattern), then change to larger needles and stockinette st, decreasing 1-1-3-3-5 sts evenly distributed on the first row = 118-128-136-146-154 sts. When the piece measures 18 cm dec 1 st at each side every 6-7-7-8-8 cm a total of 4 times = 110-120-128-138-146 sts. When the piece measures 50-52-54-56-58 cm bind off for armhole at each side every other row: 4 sts 1 time, 3 sts 0-1-2-2-3 times, 2 sts 2-3-3-5-5 times and 1 st 4-3-3-4-4 times = 86-88-90-90-92 sts. When the piece measures 68-71-74-77-80 cm bind off the center 36 sts for the neck. Then dec 1 st at each neck edge every other row 2 times = 23-24-25-25-26 sts remain on each shoulder. Bind off when the piece measures 70-73-76-79-82 cm. Pocket lining: Cast on 32 sts on smaller needles and knit stockinette st for 26 cm, put sts on a st holder. Knit a second pocket lining. Right front: Cast on 72-77-82-87-92 sts on smaller needles. Establish pattern on the first row as follows beginning at center front edge (right side row): K 1 (edge st), Pattern 1 over 70-75-80-85-90 sts, K 1 (edge st). Knit Pattern 1 for approx. 3 cm (adjust to end after 4th row of pattern) – on the last row dec 1 st by P 2 tog the 19th and 20th sts (counted from center front edge) = 71-76-81-86-91 sts. Change to larger needles and continue as follows beginning from center front edge: K 1 (edge st), 10 sts stockinette st, Pattern 2 (36 sts which will inc to 38 sts in the pattern), 23-28-33-38-43 sts stockinette st and K 1 (edge st). Continue with pattern as established over all sts. When the piece measures 18 cm dec 1 st at side every 6-7-7-8-8 cm a total of 4 times = 67-72-77-82-87 sts. At the same time when the piece measures approx. 20-21 cm – adjust to end after 26 rows of Pattern 2 - see the arrow on the chart – put the 32 center sts of Pattern 2 onto a st holder for the pocket opening and put the 32 sts from one of the pocket linings onto the needles in their place. Continue pattern as established over all sts, continuing Pattern 2 on the pocket lining sts. Note: on the 25th row of the pattern (the row before the arrow), 2 sts are decreased – when you begin the pattern again, these sts are again increased on row 1. When the piece measures 50-52-54-56-58 cm bind off for armhole at the side every other row: 4 sts 1 time, 3 sts 0-1-2-2-3 times, 2 sts 2-3-3-5-5 times and 1 st 4-3-3-4-4 times. When the piece measures 60-62-65-67-70 cm bind off 12 sts at center front edge for neck. Then bind off at the neck edge every other row: 3 sts 1 time, 2 sts 2 times and 1 st 8 times = 28-29-31-31-33 sts (or 30-31-33-33-35 sts if you are in rows 1 through 25 of Pattern 2) remain every shoulder. When the piece measures 70-73-76-79-82 cm dec 5-5-6-6-7 (dec 2 sts more if you are in rows 1 through 25 of Pattern 2) evenly distributed on the row. On the next row bind off the remaining 23-24-25-25-26 sts. Left front: Cast on and knit the same as the right, reversing shaping so that the pattern will be the same at each side of center front – that is, read the charts for Patterns 1 and 2 from left to right (mirror image). Sleeve: Cast on 52-57-57-62-62 sts on smaller needles. Knit Pattern 1 for 6 cm. Change to larger needles and knit stockinette st to finished measurements. When the piece measures 8 cm inc 1 st at each side a total of 17-16-19-18-21 times: Size S: every 7 rows. Size M: alternately every 7th and 8th rows. Sizes L and XL: every 6 rows. Size XXL: every 5 rows = 86-89-95-98-104 sts. When sleeve measures 49-48-46-45-43 cm bind off for sleeve cap at each side every other row: 4 sts 1-1-1-1-1 time, 3 sts 1-1-1-0-0 time, 2 sts 4-4-3-3-2 times, 1 st 2-4-9-11-14 times, then 2 sts at each side until the piece measures 57 cm and then bind off 3 sts 1 time. Bind off the remaining sts, sleeve measures approx. 58 cm. Pocket edges: Put sts from st holder on smaller needles = 32 sts. On the first row, establish pattern as follows: K 3 (knit in garter st throughout), K 2 (for small cable), Pattern 1 over 25 sts (in the 7th st from start of pocket edge inc 1 st = 33 sts on needle), K 3 (knit in garter st throughout). Knit in pattern as established for 2.5 cm, bind off. Sew the edges to sweater from right side. Fold pocket lining double and sew to bottom of pocket edge, sew up sides. Assembly: Sew shoulder seams. Button band: Pick up approx. 142-166 sts (divisible by 4 +2 sts) along left button band on smaller needles. Knit rib as follows from right side: K 2 (knit in garter st throughout), * K 2, P 2 *, repeat from * - *, finish with K 2 and 2 sts in garter st. Knit in rib as established for 2 cm, bind off in pattern. Repeat along right button band, but after 1 cm make 7 buttonholes evenly distributed on the band. The bottom buttonhole should be approx. 10 cm from the lower edge and the top buttonhole should be approx. 8 cm from the top edge (you will make 1 buttonhole in the neckband as well). 1 buttonhole = bind off 2 sts and cast on 2 new sts on the next row. Neckband: Pick up approx. 111-131 sts (divisible by 5 + 6 sts) around the neck (including over button bands) on smaller needles. Knit as follows (seen from the right side): K 2 (knit in garter st throughout), K 2, then Pattern 1 to last 2 sts, K 2 (knit in garter st throughout). After 1 cm make 1 buttonhole over the others on button bands. Bind off when neckband measures 2.5 cm. Assembly: Sew in sleeves. Sew sleeve and side seams using edge sts as a seam allowance. Sew on buttons. |
|||||||||||||||||||||||||||||||
Diagram explanations |
|||||||||||||||||||||||||||||||
|
|||||||||||||||||||||||||||||||
 |
|||||||||||||||||||||||||||||||
 |
|||||||||||||||||||||||||||||||
 |
|||||||||||||||||||||||||||||||
Have you finished this pattern?Tag your pictures with #dropspattern or submit them to the #dropsfan gallery. Do you need help with this pattern?You'll find 21 tutorial videos, a Comments/Questions area and more by visiting the pattern on garnstudio.com. © 1982-2026 DROPS Design A/S. We reserve all rights. This document, including all its sub-sections, has copyrights. Read more about what you can do with our patterns at the bottom of each pattern on our site. |
|||||||||||||||||||||||||||||||


With over 40 years in knitting and crochet design, DROPS Design offers one of the most extensive collections of free patterns on the internet - translated to 17 languages. As of today we count 325 catalogs and 12298 patterns - 12288 of which are translated into English (US/in).
We work hard to bring you the best knitting and crochet have to offer, inspiration and advice as well as great quality yarns at incredible prices! Would you like to use our patterns for other than personal use? You can read what you are allowed to do in the Copyright text at the bottom of all our patterns. Happy crafting!
Post a comment to pattern DROPS 74-6
We would love to hear what you have to say about this pattern!
If you want to leave a question, please make sure you select the correct category in the form below, to speed up the answering process. Required fields are marked *.